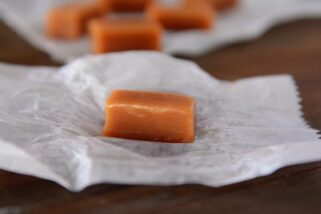
Perfect Vanilla {Bean} Caramels {Step-by-Step}
Just in time for holiday caramel making…get ready, because this recipe (with a step-by-step tutorial!) for soft and chewy vanilla bean caramels is the best and easiest caramel recipe ever!
If I had to admit the one post I’m most excited about this December, it would be these caramels. Not to minimize the awesomeness of all the other recipes that have and will be posted…but these caramels.
THESE CARAMELS!
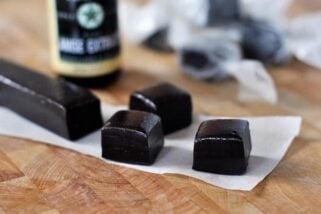
I thought I was finished needing new recipes for caramels. I have my mom’s old recipe. There’s this recipe for foolproof no-stir caramels. I can’t forget about black licorice caramels. Or cinnamon caramels. I even have a chocolate caramel.
I most definitely was not actively seeking out a new and improved caramel recipe when this one basically hit me in the face and forced me to try it.
The reason it appealed to my caramel sensitivities is that the method is totally different than any other caramel recipe I’ve ever made. It intrigued me enough that I figured it wouldn’t hurt to at least try it, right?
Instead of going small scale, I decided to make 600 of them for my BYU presentations last month.
To say I was elbow deep in caramels for a week straight would be an understatement. Thank you to all the willing souls who reside under my roof who wrapped caramels for days.
I figured I wouldn’t ever get that large of a test audience in one spot again. I wanted certain confirmation if these caramels were “blog worthy” or not.
So I asked the people who were in attendance (many of you!) to give me your feedback on these delightful vanilla bean caramels. And give me your feedback you did!
I’ve been inundated with close to a hundred emails asking when I’ll post the recipe. You’ve also let me know the caramels were amazing. And a few aggressive souls even suggested they may hunt me down if I don’t get the recipe up ASAP.
Rave reviews? I’ll say.
I’ve since made this recipe for vanilla bean caramels at least another 8-10 times. In fact, I’ve made it so many times, I feel as though I’ve navigated almost every issue that could come up when making these.
Judging by the hundreds of BYU attendees’ positive feedback, combined with all the friends and family I’ve shared with since then, you should fee very confident trying this recipe, too.
The good news? They are the most foolproof caramels I’ve ever made thanks to that cooking method I alluded to earlier.
Instead of boiling all the caramel ingredients together (like most recipes) and risk scorching (like cream and sweetened condensed milk are wont to do), the simple sugar syrup boils first.
Once it comes up to the right temperature (325 degrees), the cream and butter are added, which lowers the temperature of the caramels.
At this point, the mixture is stirred constantly for 10 or so minutes until it reaches the perfect caramel temperature. 245 degrees F in my world, but you can go for a firmer caramel at 248 if you want or go super soft and gooey at 238 to 240 or so.
Because I’ve made these vanilla bean caramels so many times, I’ve learned that you can even overshoot the 325 temperature by 20 degrees and they will still work out.
Says the girl who walked away from the boiling candy to help a child with homework only to discover a shocking temperature of 345 when she returned.
Cooking the sugar syrup to a higher temperature will still result in soft and chewy temperatures (as long as you don’t exceed that 245 degree temp in the last step).
But the higher the temp goes above 325, the more intense caramel flavor the candies will have…and they’ll also get increasingly darker.
I know candy thermometer and cooking temperatures can seem stressful, especially if you are new to (or scared of) making caramels, but I promise, this is the recipe you should try whether you are a beginner caramel maker or whether you can make them in your sleep and already think you have The Only Caramel Recipe You’ll Ever Need.
Not only is the cooking method for these caramels easier, in my opinion (and yes, I have tried the famed microwave caramels, and while good, they don’t hold a candle to the flavor of this legit cooked recipe), the caramels themselves are ridiculously delicious.
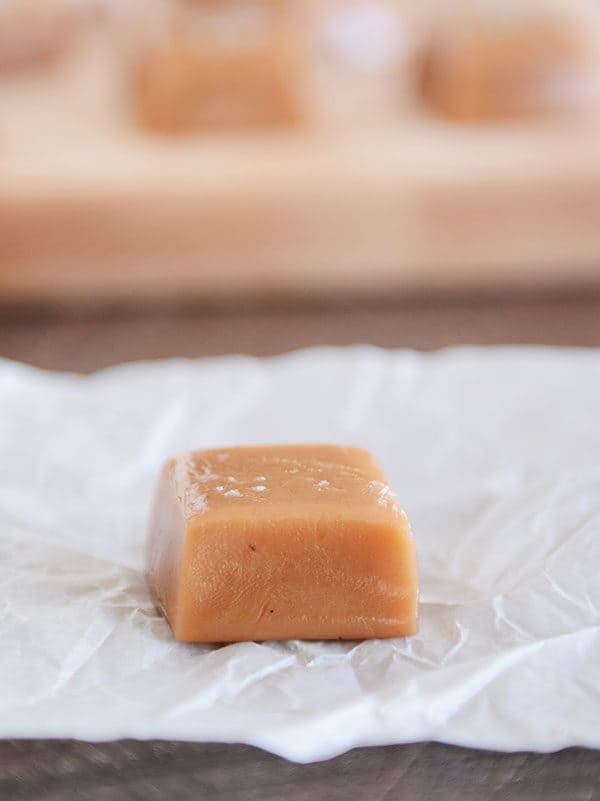
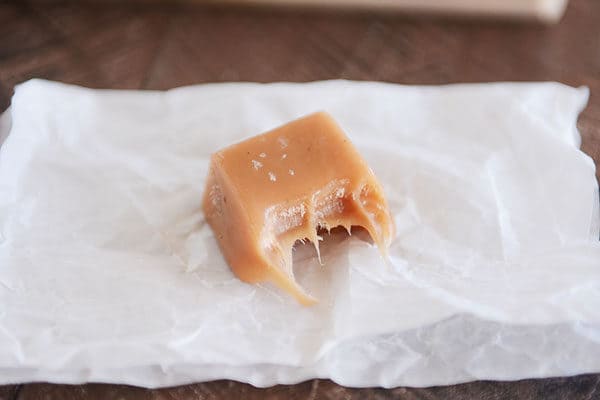
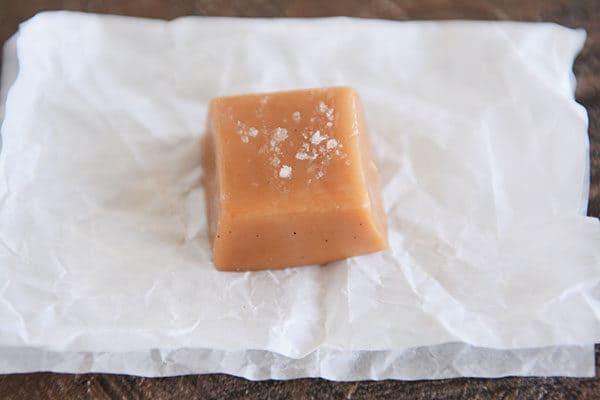
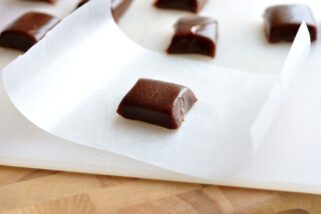
Perfectly chewy with a velvety, creamy and slightly buttery texture, these vanilla bean caramels are hands-down my favorite caramels ever.
I know in the land of hyperbole food blogging (of which I am as guilty as the next food blogger), it’s hard to know if a “new, best-ever” recipe is just that or if the excitement is being exaggerated.
I can assure you, these vanilla bean caramels are definitely best-ever in my book.
In order to dispel any concern or questions, I’ve included a step-by-step tutorial below the recipe.
And even though the recipe looks long, it’s only because I’ve tried to literally give every single detail I can in order to help you feel peace and comfort and joy as you make these.

Here are a few more caramel notes and answers to FAQ’s I get about caramel making:
What do you wrap your caramels with?
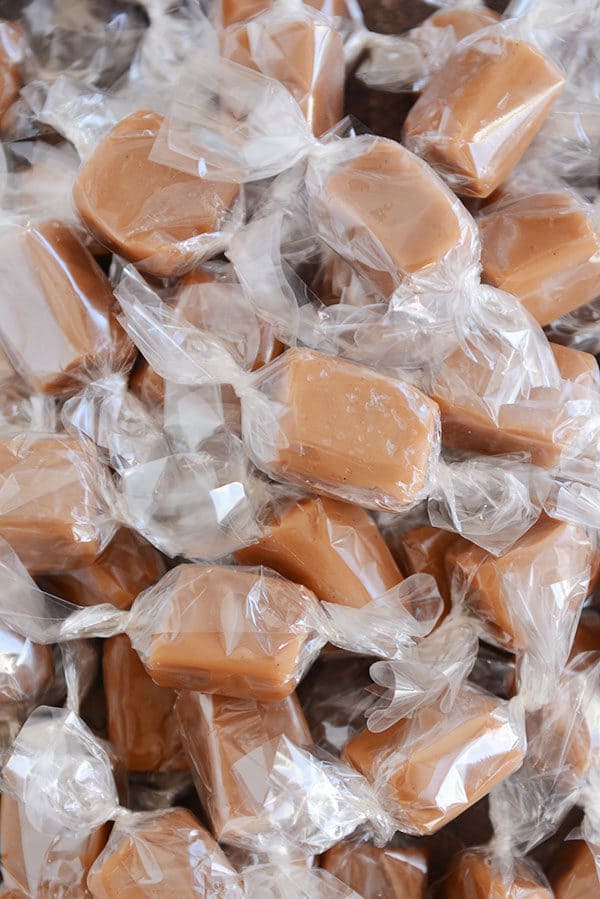
I used to use good ol’ wax paper, which is a great caramel wrapping tool. However, I have since discovered precut (PRECUT!!) cellophane wrappers, and I’ll never go back. My friend, Melissa, gave me some from Orson Gygi; they are available there (usually about $8 shipping) or on Amazon prime. With 1,000 in a package, I’d be calling your caramel bestie and offering to split a package of these babies.
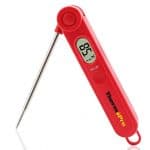
What candy thermometer do you use and love?
I’ve had this style of candy thermometer for years. I’ve owned a couple different ones since a child of mine who shall remain nameless dunked one in a sink full of water and another thermometer was used – by that same child, ahem – as a take-apart science project without my knowledge. It’s my all-time favorite candy thermometer.
I’ve had the worst luck with the long, thin (Taylor brand) or bulb candy thermometers (numbers wearing off, super inaccurate temps). I have a very accurate instant-read thermometer that I always pop into the caramels at the beginning along with the candy thermometer. I use it as a second line of defense to make sure the candy thermometer is reading correctly.
It usually is, but if it’s a degree or two off from the reading on the instant-read thermometer, I just do the math in my head and know to cook the caramels a few degrees lower or higher. I can explain this more if you have questions in the comments.
What kind of pot should I use?
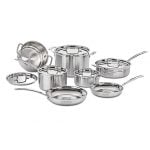
It’s really important when making candy (caramels, toffee, etc) that you use a heavy-bottomed pot. What do I mean by that? The bottom of the surface shouldn’t be thin. Ideally, it should have a thick metal lining on the bottom to insulate and not scorch the caramels.
I have a very, very old set of Farberware pans that I use (18/10 stainless steel), and they work great and are not expensive. Just make sure your pot is not super thin and wimpy.
What do you use to cut the caramels?
The very best tool for cutting caramels is a sturdy bench knife (a fantastic tool that can be used for a million other things, too). It’s the only thing I use to cut them. Works wonders. It’s fast and easy and won’t cut your little fingers off.
Do I really have to do the whole pastry brush dipped in water thing?
Yes, yes you do. Wiping down the sides of the pot in that first step where the sugar syrup boils is really important. Sugar granules on the sides of the pot can turn the entire batch into sugar, or cause it to crystallize or separate.
I’ve always resisted this step in other candy recipes, too, but it’s important here and not hard at all. This is the pastry brush I have (and I show you how to do the washing down action in the step-by-step tutorial below). But if you don’t have a pastry brush, you can use a wet cloth. Carefully drip the water onto the sides and wash the sugar off with the rag, rinsing and using clean water a couple times throughout the process. You only have to do it once in the recipe, so don’t let it deter you from making these.
What about vanilla beans? Is there an alternative?
Absolutely! While vanilla beans give a delicious flavor and offer those undeniably pretty speckles, you can also omit the vanilla beans and use pure vanilla extract. I’ve given all those details below in the recipe.
So there you go! I’ve included several other notes below in the recipe and in the step-by-step tutorial, so please MAKE SURE YOU READ THROUGH THE RECIPE before you make these vanilla bean caramels. It will help prevent any angst over mid-recipe surprises (the worst).
I really, really, really (a million reallys) hope you make these vanilla bean caramels. I want everyone to love them as much as I do!
Nothing says the holiday season quite like homemade caramels!
One Year Ago: Decadent Double Chocolate Mint Cookies
Two Years Ago: White Chocolate Pecan Brownies
Three Years Ago: Homemade Peppermint Patties
Perfect Vanilla {Bean} Caramels
Ingredients
- 1 to 2 vanilla beans (see note) , split and scraped
- 2 cups heavy cream
- 2 ½ cups (530 g) granulated sugar
- ½ cup light corn syrup
- ½ cup water
- 6 tablespoons (85 g) salted butter, cut into tablespoon-size pieces
- ¼ teaspoon coarse, kosher salt
- Fleur de sel or coarse sea salt for sprinkling, optional
Instructions
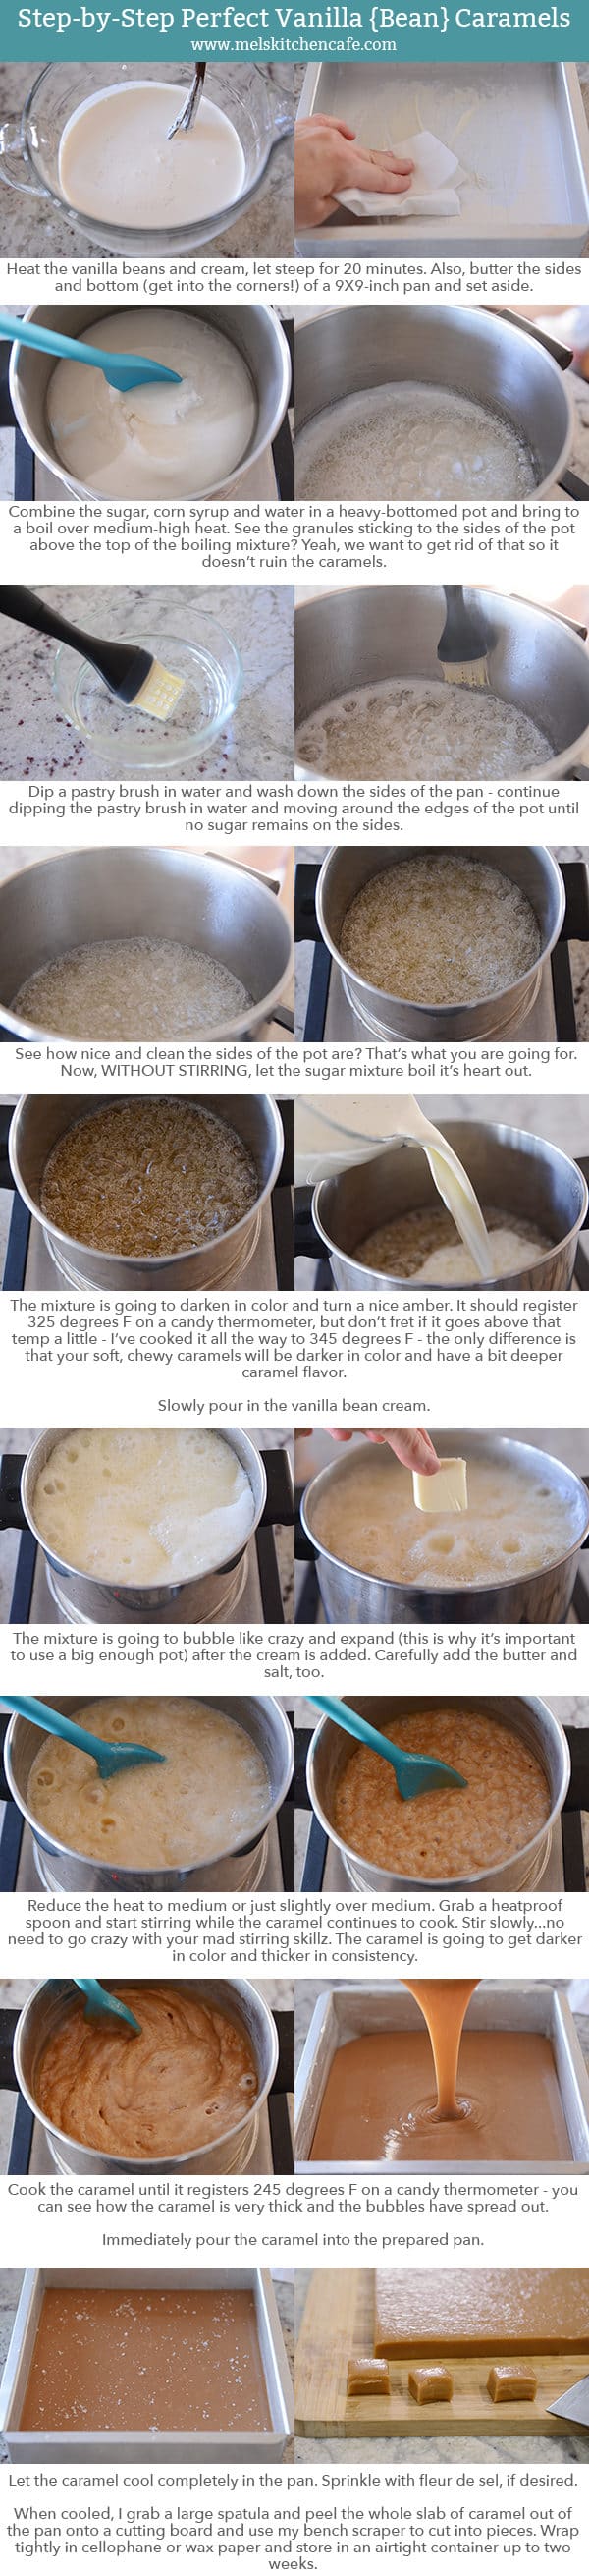
- Butter the bottoms and sides (get into the corners, too!) of a 9X9-inch square baking pan. Set aside.
- Place the vanilla bean and scraped seeds in a saucepan and pour in the heavy cream. Heat the mixture over medium heat until steaming. Remove from heat, cover and let sit (for at least 20 minutes) – go ahead and start making the caramels while the vanilla cream steeps.
- For the caramels, in a large, heavy-bottomed pot (at least 5- or 6-quarts), stir together the sugar, corn syrup, and water, taking care to not splash the mixture up the sides of the pot.
- Clip a candy thermometer onto the side of the pan.
- Bring the mixture to a boil over medium-high heat WITHOUT STIRRING or moving the pan. Right as it starts to boil, fill a cup with water and use a pastry brush to wash down the sides of the pan so there are no granules of sugar sticking to the sides of the pan (you probably won’t need to repeat this after the sides have been well-cleaned).
- The sugar mixture will bubble and start to darken. If you haven’t already, take the vanilla bean pod out of the cream mixture so it’s ready to go once you need it.
- Cook until the mixture registers 325 degrees F on the thermometer, about 25-30 minutes (for darker but still chewy caramels, continue cooking the sugar mixture – I’ve gone as high as 345 for super intense, dark caramels; beware the next step will cause much more steaming and bubbling the higher you cook this initial sugar mixture).
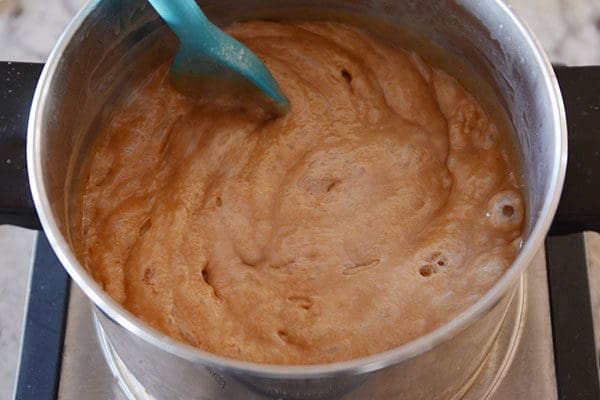
- Slowly and carefully pour the steeped vanilla cream mixture into the caramel – it will bubble and produce a lot of steam! Add the butter and salt. The mixture will have expanded during this step but will "fall" back to a lower level as the temperature lowers due to the added ingredients.
- Stir the caramel with a clean heatproof spoon or spatula (if it’s the one you used in the 3rd step, be sure to wash it to avoid introducing sugar granules to the caramel), avoiding scraping the edges of the pan, and continue to cook, stirring constantly and slowly, until the mixture reaches 245 degrees F, about 10-15 minutes (you can go as high as 248 degrees F for a firmer, but still chewy, caramel, and even take it off earlier for a softer caramel; 245 is perfect in my book).
- Immediately pour the caramel mixture into the prepared pan.
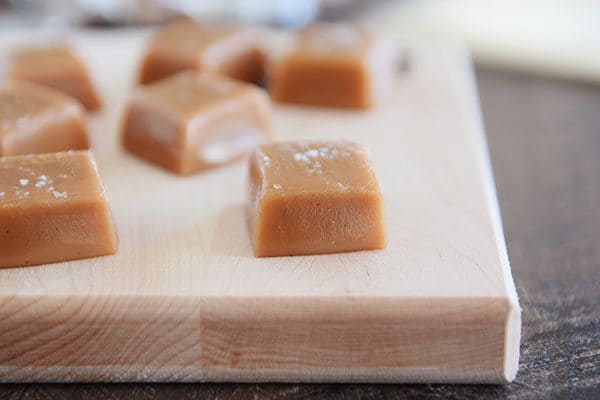
- Let the caramels cool completely. Sprinkle with fleur de sel, if desired. I use a large, metal spatula to peel the whole slab of caramel out of the pan and onto a cutting board.
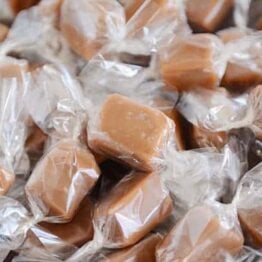
- Cut into squares using a sharp knife or bench scraper, wrap, and store in an airtight container for up to two weeks.
Notes
Recommended Products

Recipe Source: adapted from a recipe in Cuisine at Home December 2016 (increased and adapted a few ingredients for a richer caramel and added notes for using vanilla extract instead of vanilla beans)

Hi Mel, made these last night and it turned out so so so good! I prefer softer caramels so adjusted the temp a little. The flavor is amazing and so creamy. Everyone LOVED it! Thank you for sharing this recipe, it was super easy to follow.
Thanks for the report back, Sarah! Glad they turned out well for you!
Can I add cinnamon flavoring and red food coloring like your recipe for cinnamon caramels in this recipe? I have made this recipe several times and have the temperatures right for our liking so I don’t want to venture to a recipe I’m not as experienced with, but I want to try the cinnamon bear flavor….
Yes, these can definitely be made with cinnamon or other flavorings.
Can you use Vanilla Bean Paste in exchange for the Vanilla Extract if you go that route?
Yes
If you use paste, how much?
I just stumbled on your blog a few weeks back and made your pumpkin muffins – ahhh-mazing
Glad you liked the muffins, Pam! I use about 1 tablespoon vanilla bean paste.
I’m looking for a caramel recipe to use for homemade turtles candies or snickers bars. Would this recipe work? It looks delicious. Thanks!
Yes, it should work well in those types of recipes. A lot will depend on how firm/soft you cook the caramel, so just keep an eye on it so it works out for how you need it.
Is there any way to extend the shelf life of homemade caramels like these? Could they possibly be frozen or refrigerated, or would that compromise the quality?
Hi Liz – good question! I refrigerate homemade caramels all the time. You definitely don’t want to bite into one straight out of the fridge…but once they warm to room temperature, they are fantastic, and they stay fresh longer. Having said that, depending on the recipe, sometimes storing them in the fridge will cause a few butter “rings” or “drops” to form on the outside of the caramel over time.
If I’m going to use this for Carmel apples, can I make it ahead of time? What do you recommend?
Yes, absolutely. Cook it to a lower temp for caramel apples (around 238). It can be made ahead and warmed lightly before using.
So I thought I did everything right but I must have been tired because I cooked the caramel to 325 instead of 245 and they are a deep brown but taste burned and I’m like almost crying. Haha so sad. My candy thermometer says caramel is after the hard crack stage and I got the recipe and thermometer mixed up
Delicious taste. The temperature returned to 245 almost immediately after adding cream and butter. I wasn’t able to cook it for 10 minutes. Is it going to be gooey?
If the temperature reached 245 degrees, the caramels shouldn’t be too soft, but it is unusual that it would return to that high temperature so quickly. How did they turn out?
My caramel turned out as a semi-solid blob, albeit a tasty blob! Why didnt my caramel solidify?
Sounds like maybe the caramel didn’t get to quite the right temperature – did you use a candy thermometer?
Normally an avid mealtime cook and baker, so, didn’t expect a first time success story making my first candy. Followed recipe to the letter, except used my home made cannabis butter that a cancer sufferer uses to get to sleep.
Worked absolutely perfect the first time! She; (being a caramel connoisseur) says they beat out all commercially available and home made caramels she’s ever tried… including those sold as medicinal in the dispensaries.
Wish you could perfect one with honey, which we just harvested 5 gallons of….
Thank you Mel!
I live just below 8000’ in CO.
Made half a recipe today, using a 9×5 loaf pan & cooking to 14* Less in temperature.
Used ~1 tsp Van Bean Paste with the heated cream.
Got ~32 caramels cutting two diff sizes with bench cutter.
Recipe came out Great! Addictively Delicious
Many Thanks for the recipe & Everyone’s Comments
Hi, Mel, Perfect Vanilla Bean Caramels is a Great recipe, Easy and Tasty.
Today I tried another recipe** using the PVBC process of heating the Cream separately; heating Sugars and Syrups together to the temperatures used in PVBC recipe, adjusted for my altitude; adding cream, butter to heated sugars/syrups mixture; adding Van extract just before pouring in pan.
I made one-quarter recipe to try out technique and it came out just fine—Caramels are soft and have a nice maple flavor along with heat from the pepper flakes.
Thanks for a recipe that encouraged me to try something Else New
Re**https://www.sparklingcharm.com/homemade-spicy-maple-caramels/
I have pure vanilla bean paste. Can I use it in this recipe?
Yes, that should work – use about a tablespoon.
Great recipe. Cooked this morning. Came out very nice. May I suggest a pizza cutter cutting. Works very well. I was struggling with a chef knife continuously stuck to the blade. But the pizza cutting wheel rolled straight through. Didn’t stick at all.
I did use a bamboo skewer to periodically stir the sugar mixture. Mostly to distribute the pile of sugar in the bottom of the pan. Was afraid it would burn. Once it was boiling and cleared up I left it alone other than washing the sides a couple times.
For those that burned their mixture I would definitely turn the heat done a bit and keep a careful eye. Stovetops are just like microwaves varying wattage. A person in the comments below only took 6 minutes to reach 345. Where as mine took about 25 minutes.
Anyway thanks for the recipe. It was very delicious will be making it again
What size precut wrappers do you use? 4.25 x 4.25 or the 5 x 5 size?
Thanks!
I use the 5X5 size but the 4.25 size would work as well (especially if you cut your caramels a bit smaller).
Hi. I used this caramel recipe about 4 years for my caramel apples and it was wonderful! Unfortunately, I have just tried twice today to make this, I have my apples ready, and both times the sugar mixed burnt before it got anywhere close to 325. I have an induction stove now, could that be the problem?
Hi Terry – I don’t have an induction stovetop so I’m not familiar with them, but if the caramel worked out before and isn’t now, it’s likely the induction could be a factor.
Yup, you will have to “creep up” to 325°, I patiently waited nigh an hour while slowly bumping it up, then, when u hit about 315° or so, get ready…mine jumped to 330° in a flash from 315°, (using instant digital thermometer) but worked perfectly. These stovetops are very hard to pinpoint and regulate…. jot down dial adjustments and temps reached @ each adjustment. The second time was cut to 20 minutes.
Can you please explain what you mean when you say you only cook to 238 when doing caramel apples? Which time? I’ve tried making this 3 times without success, but I know it’s my errors as so many love it. Thanks!
I use 238 degrees F as the final temperature if I’m using it for caramel apples. Does that help?
If I wanted to add bourbon, at what point would you recommend adding? I saw another recipe that added 1/2 cup in the first sugar caramelization stage. Your thoughts?
Hi Stacie – I haven’t tried it so I can’t really recommend a good solution. Sorry I’m not more help! Sounds like the other recipe might be a good starting place!
I love this recipe. I love caramels. I have been making them for years–but haven’t ever totally stuck to one recipe. Recently though I have struggled with the caramels crystalizing, even when I use the pastry brush to get rid of the sugar on the side. This year when I made this recipe, I decided to mix the sugar, corn syrup and water in a separate bowl and mix them all together then pout the mixture into the middle of my heavy bottomed pot. Since there is no need to stir after that, I was able to just let it boil to the right temp. It worked like a charm.
Can we get it in grams too? Because cups isnt that accurate… Thanks 😉
Ok then….third try it ended up way dark. I changed to a smaller pot and the thermometer worked better. Fourth attempt I just eye balled it at least looks right.
Oh my gosh! This recipe is so hard! I’ve just tried to make two batches and both times the sugar has burned!! I’m going to try one more time and then I’ll just throw away the rest and try an easier method!!
I’m at sea level so I think you have to let it boil at a lower temp and the last time it boiled for 45 minutes and then still suddenly burned!
I’m so disappointed at the waste of ingredients!
It never did get past 275 on the thermometer !
I’m sorry this recipe has proved frustrating, Julianne! I hope moderating the temperature lower will help.
Do you think this caramel will be good to use to make turtle chocolates?
Yes, I bet it would! I’d undercook it by 2-4 degrees if using for cookies.
Since the directions said to boil the sugar mixture for 25-30 minutes, I thought it safe to set my timer for TEN minutes and leave the room to fold laundry. I thought I was being overly paranoid to check it that soon, but when I made my way out of the bedroom my house reeked of horrible burning. Sure enough, the pot had bubbled up with black tar, ruining my pot and stinking up my whole house and furniture. So for those reading this, don’t go by the time in the directions.
Update: I tried a new batch after the epic fail of the first batch, and the sugar mixture only took about six minutes to come to the right temp. Caramels turned out perfect! Best caramel of my life! Now I know for next time.
Best recipe, has become one of our most favorite Christmas traditions. High Quality pot makes a world of difference. Thanks Mel for teaching me how to be a homemaker. Eternally grateful!
Hi , I made your caramel recipe yesterday and they were tasty but far too gooey . So today I tried again and decreased the cream by one once as we are 2260 feet above sea level and they turned out really great! What do you suggest I do to add nuts ? Would I be able to switch this recipe up with rum flavoring instead of vanilla ? What about a caramel that has coffee bean or flavore? Very new to this and would like your expert opinion please
Yes, you can add nuts – it helps to warm the nuts before adding (stir them in once the caramel has reached temperature). And yes, I think you can sub in other flavorings. Should work great!
Mel,
I tested my candy thermometer (the same as yours) and water boils at 202. Therefore should I take 10 degrees off the 325 and 245? Thanks!!
I’ve wanted to try making caramels for a few years. I’ve decided this is the year with your tutorial! It’s hard to find vanilla beans around here. Is there a certain brand of vanilla extract you like to use when baking?
Hey Robyn, I’m actually posting an updated recipe for these caramels in the next couple of weeks with details about not having to use vanilla beans – I usually use the Costco brand of vanilla because it’s a little more cost effective with vanilla extract prices being so high.
Hi, Mel. Tryna get this recipe down before the holidays hit. I’ve made it twice with the caramel setting up harder than I want it to. I have a candy thermometer and I’m following your instructions verbatim. My question is, do I need to adjust the temperature of the caramel to suit my altitude? I’m in northern Utah at 4500 feet elevation. Is this why I’m having problems? Thanks.
The biggest culprit is probably the candy thermometer – and exact temperature. Water boils at lower temperatures at higher altitudes so the best way to figure out this issue with candy making is to calibrate your candy thermometer. I have an old post talking about how to do that here: https://www.melskitchencafe.com/calibrating-a-candy-thermometer-candy-thermometer-recommendations/ But basically you want to put your candy thermometer in a pot of boiling water for a couple minutes and then see what the temp is. Candy recipes are tested assuming water is boiling at 212 degrees. However if you live at higher elevation and/or your candy thermometer is off by a few degrees, your thermometer may show a boiling water temperature of, say, 205 degrees. That means that in the future, you’ll want to adjust caramel or candy recipes down 7 degrees (so if the recipe says to cook until 240 degrees, you’ll only cook until 233 degrees). Does that make sense?
Hi! Would this be your recommended recipe to dip apples in?
I’m a bit terrified of trying homemade Carmel but your recipes never fail me so I want to use one of yours for Carmel apples if possible?
Thanks so much!
Yes! It’s the one I use for caramel apples. 🙂
This recipe is amazing last christmas 1 made 4 vannilla batches in addition to cinnamon, chocolate, and anise batches soooooo good.
I was wondering if you think it would be possible to use apple cider in place of water to get a carmeled apple flavor? Or do you think it would just burn?
That’s a great question – I don’t know since I haven’t tried it. I think you’d be better off using a recipe written using apple cider (or maybe consult a few of those recipes and see how they differ).
My kids are always delighted when they smell these caramels cooking! They are a family favorite ♥️
Hi Mel! I’m a BIG fan of your blog – it’s my go to, and I thank you for so many fantastic recipes. I made these caramels 2 years ago, and then again this year. Had problems with burning them on both forays using different thermometers. The only one that has proved to be accurate is my all purpose digital Taylor thermometer, but it doesn’t clip to the pot and my hand does get hot! Regardless, I think I’ve finally mastered them. I have to tell you how profoundly people have reacted to these caramels, like nothing I’ve ever made before. I live right outside of Parkland, Florida, and one of my closest friends has children who attend Marjorie Stoneman Douglas, and the family is still going through a lot with PTSD. It’s heartbreaking. These caramels brought them so much joy, I am going to make them on a regular basis for them because what’s the purpose of baking if not to bring joy to people you love? I had to share this with you. Thought you’d like to know your caramels are healing wounded souls here in South Florida. Thanks for everything you do Mel! Your recipes bring so much of us a lot of joy. 🙂
Oh, wow, thanks for the comment! That’s so tender and sweet how something small like a homemade caramel can aid in healing. Thank you for sharing that! I totally agree: what purpose is there in baking if not to bring people joy? Sums it up perfectly. I’m happy you love this recipe because it is hands down my favorite caramel recipe!
OMG I did it! I was slightly terrified because this was my first foray into candy making, but it worked perfectly!
For anyone who is wondering I was brave enough (dumb enough) to try and substitute soy milk and vegan margarine. After adding the milk I had a carmel explosion all over my stove top…but since the damage was done I forged on and got a pan of dairy-free caramels out of the deal. After cleaning up I may be “brave” enough to try again and add the soy milk reeeeeeealy slowly. (ha ha) These caramels are a must-have a Christmas time.
I made these with coconut cream and they turned out really well, my dairy allergic boy was amazed–he’s never had anything like it before!
That’s awesome!
Hi Mel, love your recipe! Do you think that you could substitute brown sugar for the granulated sugar? I really like caramels made with brown sugar.
I’ve never tried that, Sadie – sorry I don’t know!
I live at 5500 ft altitude. Do I need to adjust the temperatures to cook it to for high altitude?
I’m not sure – have you tried googling how to make caramels at high elevation? I used to live at high elevation but it’s bene a long time and I don’t remember how or if I had to adjust things for candy making.
I live at 6000 ft above sea level, and I like to cook these caramels to 235 or 236 degrees. Have read that you take 2 degrees off of the candy temp for every 1000ft above sea level. Mel, what altitude is your kitchen? So I can fine tune my calculations
Also, I turn the heat off on my gas stove before I add the cream so I don’t have bubbling caramel lava overflow.
Hi Allison, I live at about 2,500 feet elevation.
I have a caramel recipe that I have used for years that uses a 1/2 vanilla bean split but it doesn’t say to scrape the beans I have always cutting half the split it down the center. It is added to the beginning and once you pour out mixture into pan you remove it. It’s been a hit with friends and family but should I be scrapping the beans out of the pod or continue as always since they taste great
Thanks
Mary
My son is dying to make caramel apples. Can I use this recipe and just dip the apples instead of pouring in a pan?
Yes, I’ve used this recipe for caramel apples many times! After the caramel is made, off the heat, let the caramel cool a bit or it will slide off the apples.
This was such a fun cooking adventure. Mine ended up being a lot darker but they’re still soft and delicious. I used vanilla bean paste because it’s what I had and it worked out great! Thanks for the yummy recipe Mel!
The past several years we have made your licorice caramels but last year we made both the licorice and vanilla bean caramels. I loved how easy the vanilla bean caramel recipe was to do…. yeah for not have to stir as much!!!!!
Will I screw up my licorice caramels if I use the vanilla bean caramel recipe and sub the anise extract for the vanilla beans? Or should I add the anise extract at the end? PS I leave out the black food coloring. Thank you for your time. Hope to hear from you soon!
I’m not sure if this was asked and answered in the comments (there are too many people who really, really like your recipe!!) but about how many caramels can you get out of one batch? I would love to do these for neighbor gifts, but I’m curious how many batches I would need to make!!
It really depends on how big you cut them (it makes a 9X9-inch pan). But I usually get right around 64 or so.
I have never owned a candy thermometer. My son wanted to make succers, so we were checking out your site and found caramels instead :o) (Fine with me!) Your link on Amazon shows both the digital and insta-read ones. Which one should I get?
Hey Rachel, that’s a great question. The instant-read thermometers are a bit more accurate but the downside is that you have to hold them (they usually don’t clip to the pan). I’ve had great success with the digital candy thermometer.
Delicious and amazing…BUT, they did not harden, it will make excellent caramel sauce, but what did I do wrong?
If they didn’t harden, it sounds like they weren’t cooked to a high enough temperature which might mean your candy thermometer is off and not registering the right temperature.
Delicious and amazing…BUT, it did not harden at all! what did I do wrong?
Hi Mel, have you ever tripled this recipe? I have been asked to make 300 of these for teacher appreciation day at school next week and wondering if this method will work. I have doubled the batch several times with no problems but wondering if the larger quantity with mess up the temperatures and how some of the caramel sets. Also, have you ever used a sheet pan instead of the 9 x 13 pan? Thanks for your help!
I’ve never tripled it, Jessica – mostly because it takes so much longer to cook. I’ve only every doubled. There is something to be said for not increasing candy recipes by quantity too much because of what you suggested. I’d probably stick with doubling. But yes, you can definitely pour them into a sheet pan.
Thank you!
I don’t know what I’m doing wrong. I’m following this recipe as exactly as I know how. After maybe 10 min of boiling in step 6, the part of the mixture that the thermometer is set in registered about 306. The other side of the pan, however, was very dark, smelled scorched, and registered 365. This is the second time I’ve tried this and it’s happened both times. This time I tried a different pan, and made sure it was centered over the flame. I don’t know if I should use a lower heat, or what! I consider myself pretty competent in the kitchen.
Hi Kari – can you describe the type of pan you are using? Does it have a nonstick coating or is it stainless? How thick is the bottom of the pot? Do you have a gas stove? I’d definitely try cutting the heat down a bit to see how that goes and then let me know…I can help you troubleshoot.
I tried making these today…mine did the same thing. Totally scorched the sugar mixture. It was a pan I normally make a different carmel recipe in. And it was over medium heat.♀️
I guess back to my old carmel recipe.
We just tried this recipe today for caramel apples and had the exact same experience as well—the syrup went from clear to dark brown in about 10 minutes. I was using a gas stove and heavy stainless steel 6-qt pot (which I also found to be way too big). We tried a second time (in a 3-quart pan) and a much lower temperature and it turned out better, though the syrup was at 325° before there was hardly any color change. The finished color was very light colored caramel. Should the syrup be cooked longer until it is golden, or go by the temperature?
Hi Penny, I prefer cooking until the syrup is golden. I added some more notes to this recipe (with a few adaptations) in this post: https://www.melskitchencafe.com/how-to-make-the-best-homemade-caramels-of-your-life/
But often, I’ll cook the syrup upwards of 345. As long as it is golden amber brown and not burned, it’s fine.
Made these today and they turned out great!! I’ve tried several different recipes in my day and this has been the best and most stress free yet!!! I have trust issues with thermometers so I’m a big fan of the ice water method along side the use of a thermometer. Thanks for a great recipe and tutorial! Merry Christmas!
I made these last year, they were delicious. The only problem I had was that the bitter sealed out of the carmels. They tasted fine, bit we had to eat around the butter. Can you help me figure out what o did wrong?