Perfect Flaky Homemade Pie Crust
Simple and no-fail, this perfect flaky homemade pie crust is the best pie crust recipe for beginners (and delicious enough for expert home bakers!).
Everyone needs a go-to pie crust recipe! And this one is one of my favorites.
It is super simple to make, very easy to work with, and produces a flaky, tender crust that is downright enviable in the world of pie making.
(If you’ve been around long enough to hear me wax poetic about this sour cream pie crust, don’t spend too much time questioning my loyalties. I love both of these recipes! Often, I’ll slightly prefer using the sour cream pie crust because the flavor is a bit better, in my opinion.)
I took one for the team and ripped up a baked pie crust so I could show you JUST how flaky this pie crust is. Look at those layers!
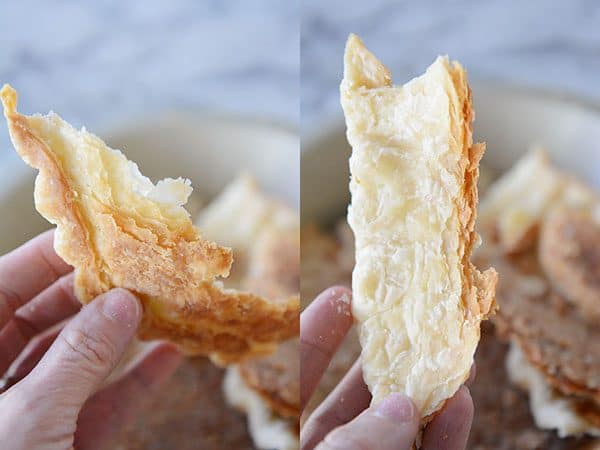
That right there is pretty much pie crust amazingness. And you can make it, too!
Even though many people make pie crust in the food processor (I do as well, at times), in this post, I’ll show you how to make the pie crust by hand. It’s SO easy!
{For an additional boost of help, here’s a video in the archives dedicated to that favorite sour cream pie crust recipe I mentioned.}
Ok, let’s get to it!
On a starting note, one of the best tips I can give you for pie crust success is using cold ingredients and keeping the pie dough cool all the way through the process of making it.
If your kitchen is blazing hot, it may not be the right time to make pie dough. If you are sweating, so will the pie dough. I’d say the ideal air temperature should be about 68-72 degrees F. If the fat (butter/shortening) gets too warm, it can spell disaster.
To prepare for today’s tutorial, you’ll want to throw ten tablespoons of butter in the freezer to hang out for 20-30 minutes.
Also, chill two tablespoons shortening in the refrigerator for several hours (or my cheater method: scoop the shortening onto a plate with a cookie scoop that’s been lightly greased with cooking spray and pop it in the freezer for 15-20 minutes).
For this pie crust, add 1 1/2 cups all-purpose flour to a medium-size bowl, followed by 2 tablespoons sugar and 1/4 teaspoon salt.
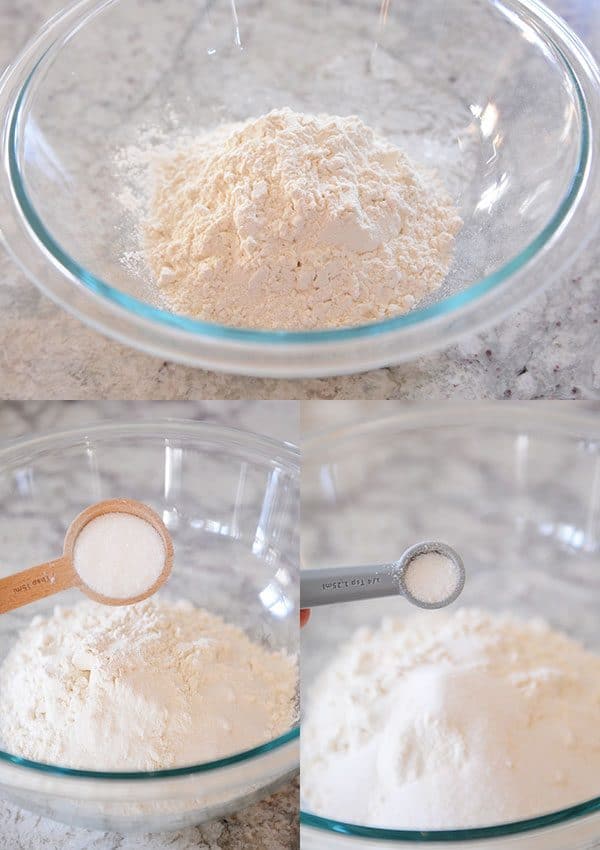
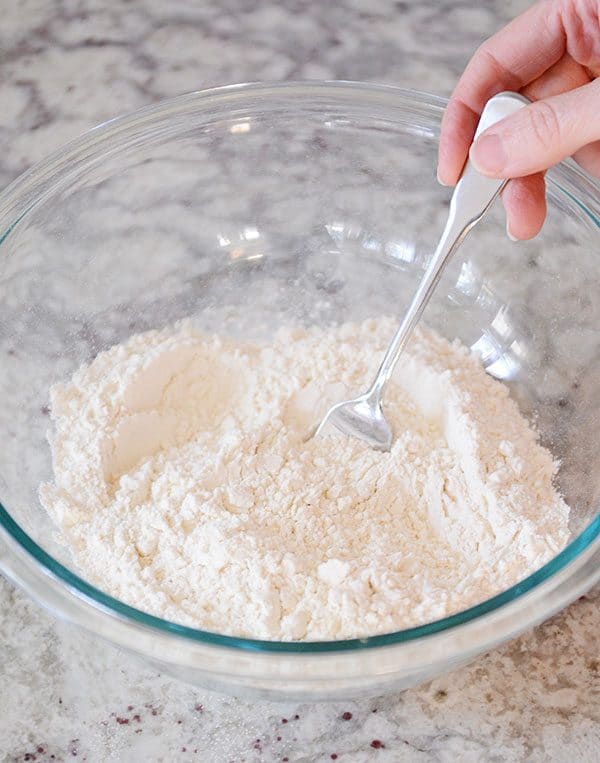
Give that mixture a quick stir with a fork.
Now, add the chilled shortening (two tablespoons).
If you are wondering who I am and how did I get here because I’m recommending you use shortening, stick with me for a second. I know this might be the only recipe on my site to ever call for shortening, but for those that are new to pie crust, shortening may quickly become your friend.
It isn’t as finicky to work with as butter is, and even a mere two tablespoons (in addition to the butter we’ll be using in a sec) lends a light flakiness to the crust that can be hard to achieve with 100% butter.
I am not a fan of pie crusts made with all shortening (butter-flavored shortening or not) because of the greasy aftertaste and lack of flavor, but this pie crust recipe hits the sweet spot of ultimate butter flavor and flakiness that is helped along by the shortening.
It is great for those wanting to conquer pie dough once and for all.
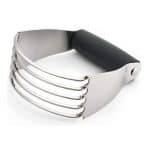
Now grab that pastry blender {aff. link} and start working the shortening into the dry ingredients.
TROUBLESHOOTING TIP: No pastry blender? No worries. You can work the shortening in with a fork or two butter knives.
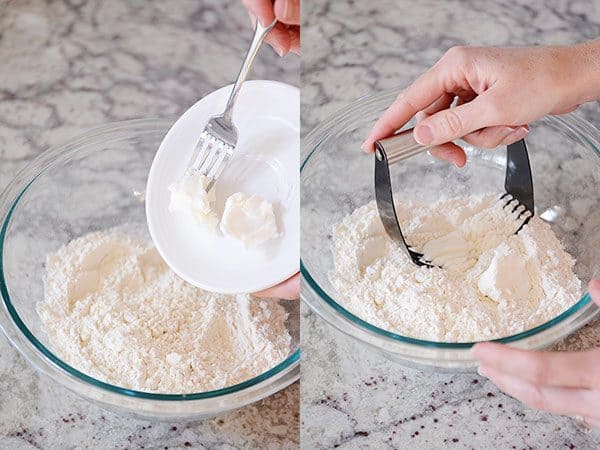
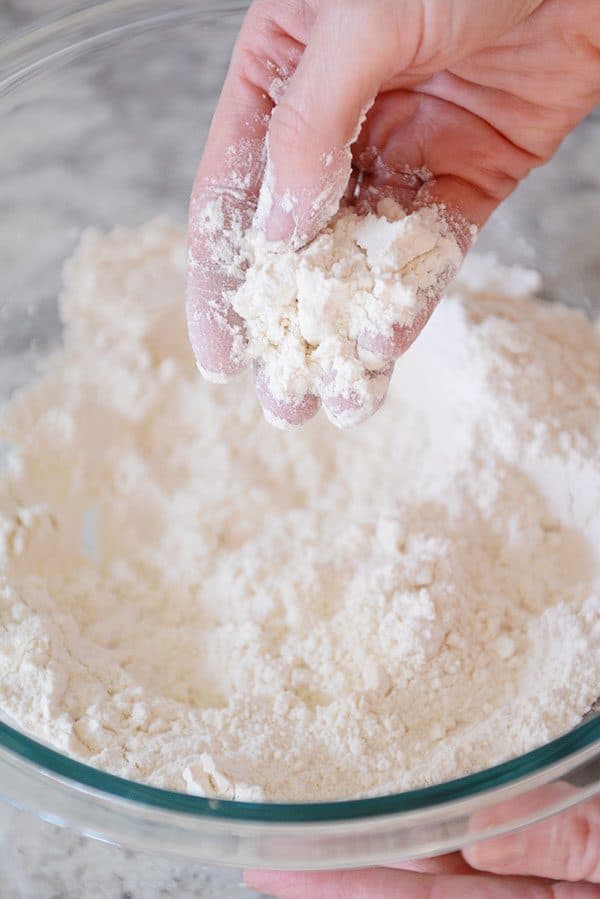
This step should only take a minute or two. The pieces of shortening should be about pea-size.
Don’t work them in too much. Those pieces of fat (same will go for the butter) melt during baking and release steam which creates little pockets of air in the pie crust…and all of that equals the crazy flakiness you are after.
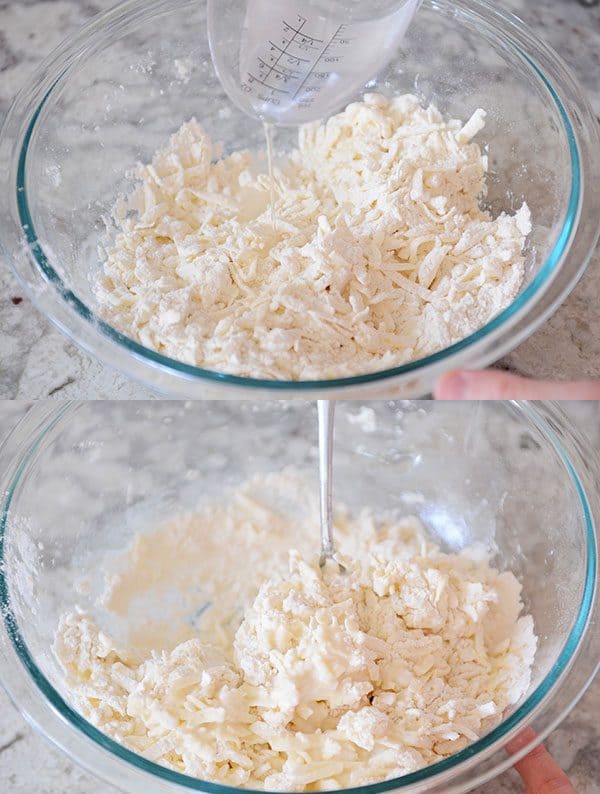
Now, using a box grater {aff. link} shred the frozen butter right into the bowl. This is much easier than cutting the butter into the flour mixture like we did above with the shortening (FYI: shortening doesn’t grate well on a mixer like the frozen butter does).
TROUBLESHOOTING TIP: If you don’t have a box grater, instead of freezing the butter, make sure it is well-chilled, then cut it into 1/4-inch pieces and add it to the dry ingredients and cut it in with a pastry blender or two forks or butter knives until the mixture is coarse and the butter is in pea-sized pieces.
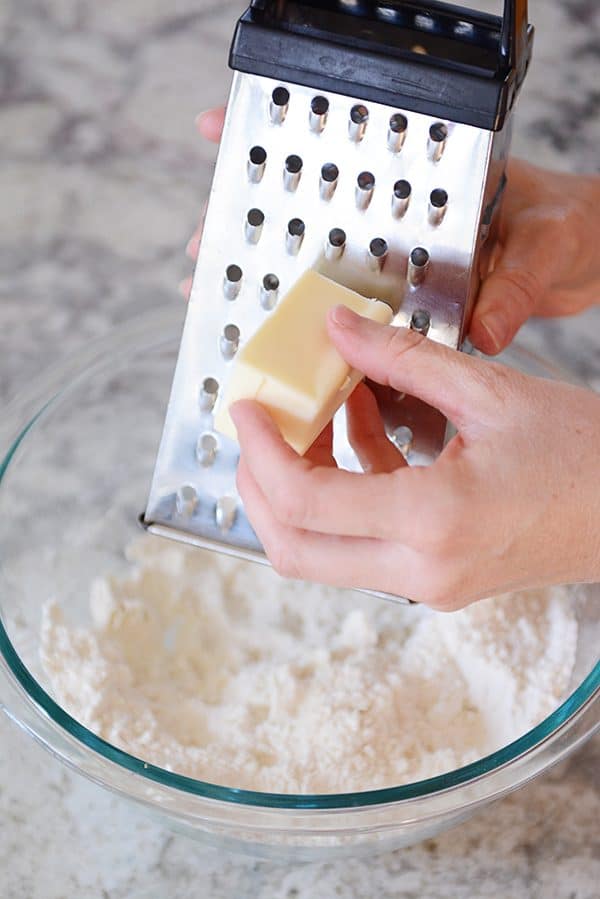
I usually grate half the butter in, give the mixture a toss, and then grate the other half. But you can do it all at once. It’s hard to mess up.
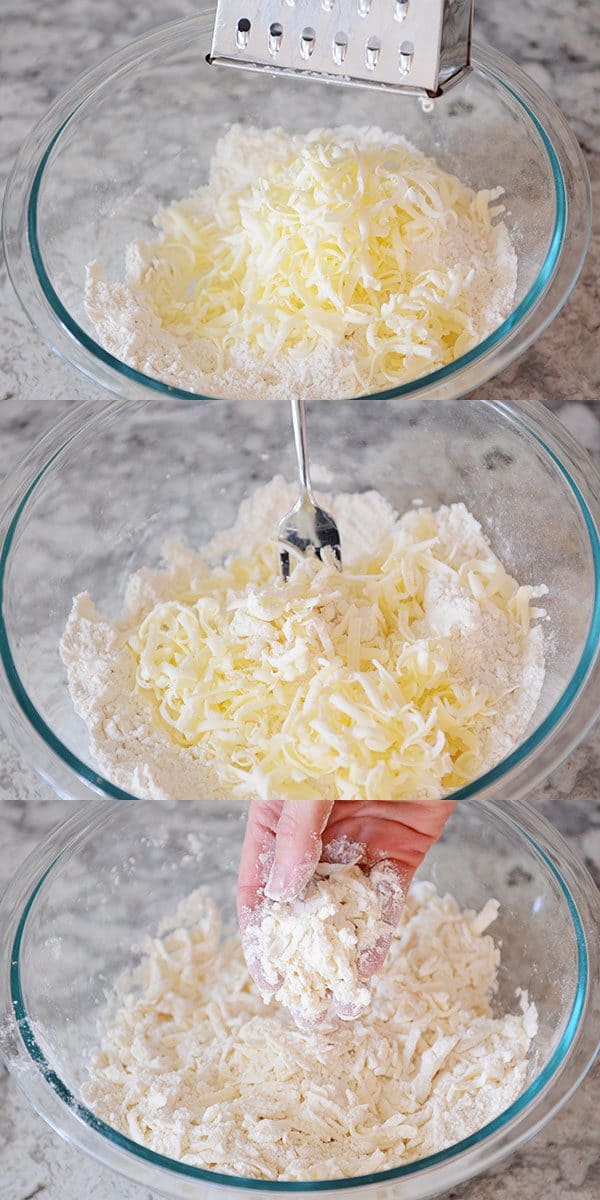
Once all the butter has been added, toss lightly with your hands or a fork until the butter strands are evenly coated with the dry ingredients.
Don’t overwork or overhandle the mixture to the point that the butter pieces start getting soft or melting from the heat of your hands!
Drizzle in the ice water, starting with the lesser amount (1/4 cup) and adding more (up to 1/3 cup TOTAL) only if the mixture is incredibly dry.
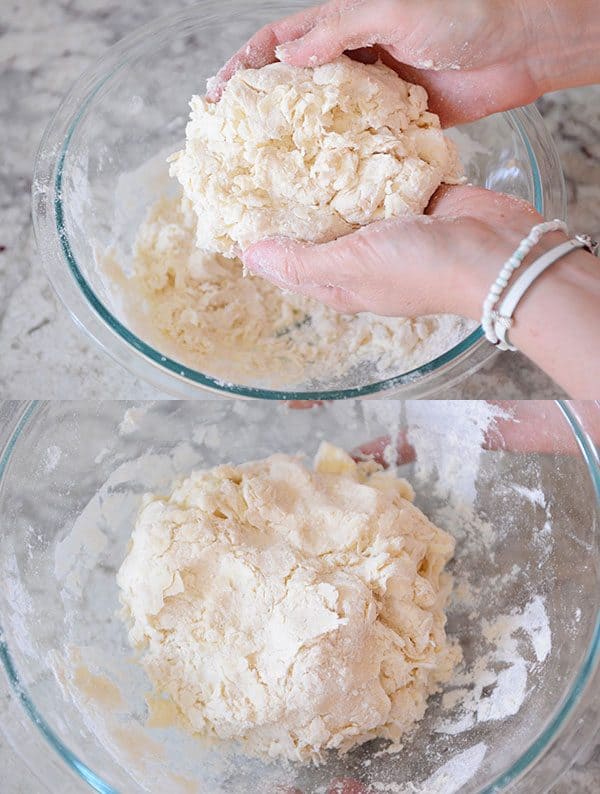
Use a fork to start moistening the ingredients. Eventually, I always end up abandoning the fork and gathering the mixture together with my hands.
When you can press a handful of the pie dough together and have it mostly stay together in a clump (even if there are dry patchy spots), you are golden. Stop mixing, and for the love, do not add any more liquid!
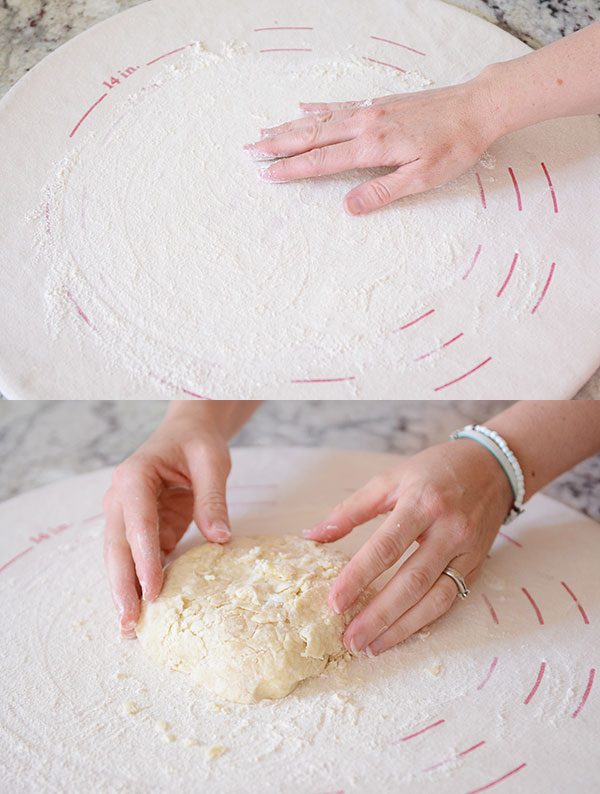
You can see below that the dough looks pretty shaggy. But it’s also coming together in a general mass. When it begins to clump together like this, I gather up all the excess mixture at the bottom of the bowl and press it into a lumpy ball.
If you are new to pie making, it might feel uncomfortable to not continue adding water until the dough resembles, say, sugar cookie dough. But I promise it’s ok if your pie dough looks like this! It’s better to have dry pie dough rather than overly wet pie dough.
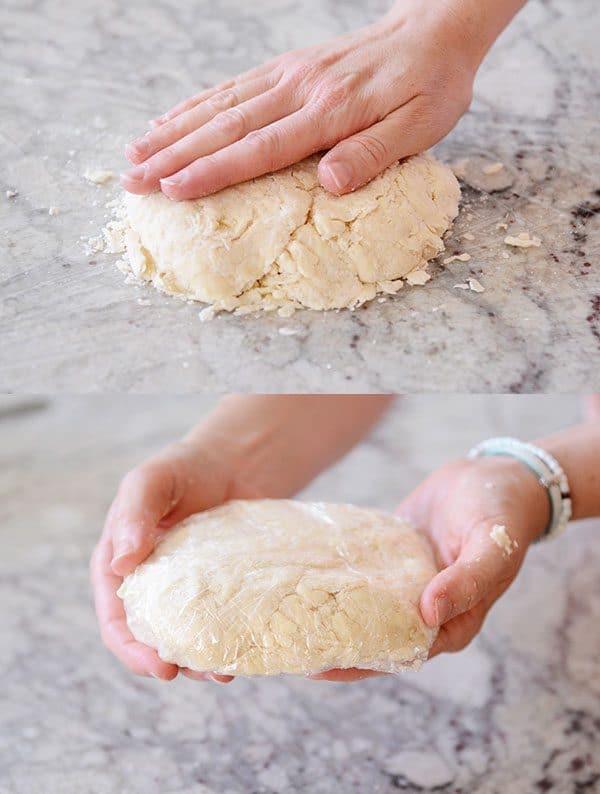
Gather the dough together and place on a long piece of plastic wrap.
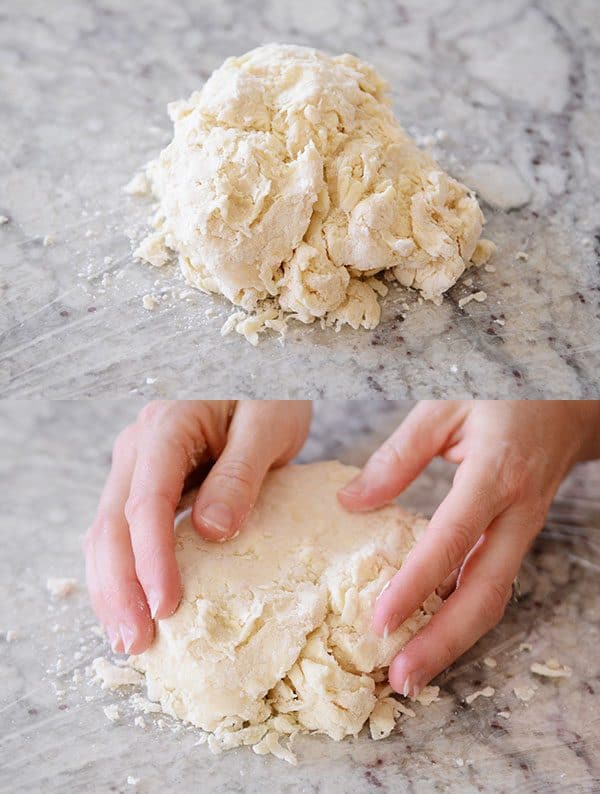
Mold it lightly into a thick disc.
Then, lift up the edges of the plastic wrap so the pie dough is covered completely. Refrigerate for at least an hour or up to several days (or freeze for a couple months).
TROUBLESHOOTING TIP: What happens if the dough falls completely apart when it is placed on the plastic wrap? If, at this point, you realize that you really did need to add more water, grab a spray bottle and lightly mist (very lightly!) the outside of the pie dough, patting excess dry ingredients back into a rough disc shape. While it rests in the fridge, the pie dough will absorb that extra liquid so it’s easier to roll out.
When the pie dough is ready to be rolled out, I always reach for my canvas board {aff. link}
Purchasing this $25 piece of pie making equipment several years ago completely changed the way I felt about making homemade pies AND how my pie crusts turned out. Even though I’m not one to recommend buying unnecessary equipment, I highly recommend a canvas-covered board like this.
TROUBLESHOOTING TIP: If you don’t have a board like this, never fear! In the video tutorial below, I’m not using the board to roll out the pie dough. Just a good old-fashioned lightly floured counter. The biggest tip when using a floured countertop is to make sure to lift and turn the dough often (and swipe flour underneath, as needed) so it doesn’t stick.
Using a rolling pin, press the center of the pie dough and give a quick roll.
Turn the dough a quarter turn, and again, starting in the middle, roll out a few times.
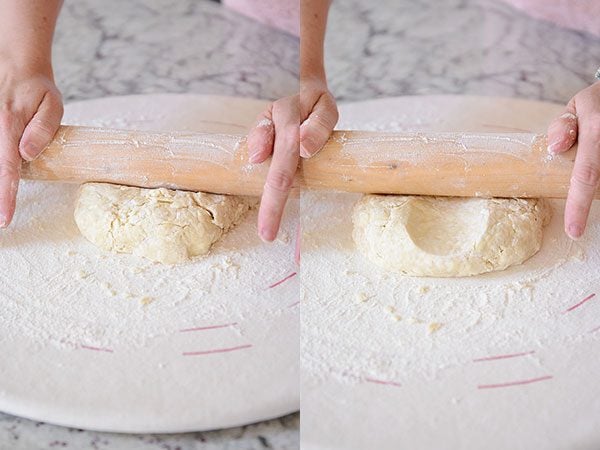
Continue this process of rolling from the middle and turning the pie dough until the pie dough is in a thin, even layer to the size you need it. I like to hold the pie plate I’m using upside down in the middle of the dough to make sure it’s rolled wide enough.
My general rule of thumb is to roll the pie dough 2-inches wider than the outside rim of the pie plate.
Try to get the pie dough rolled out in as few rolls as possible (basically, don’t roll it to death). This will help the ingredients stay cold so it bakes up nice and flaky.
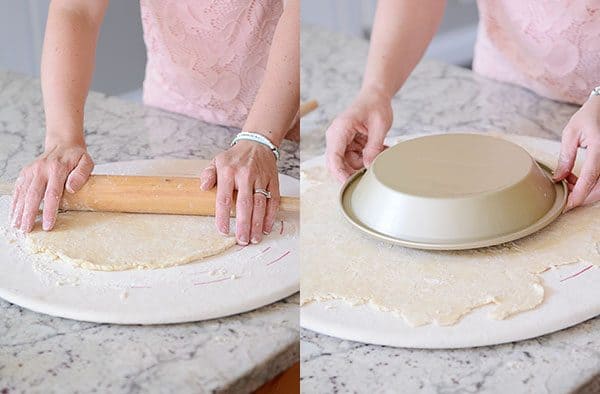
Lightly flour the rolling pin and starting at one edge, roll the dough up around the rolling pin.
If the dough feels too sticky to do this, before rolling it up, make sure there is a light sprinkle of flour on top of the dough and that you can easily lift all sides of the dough up from the canvas board (or counter).
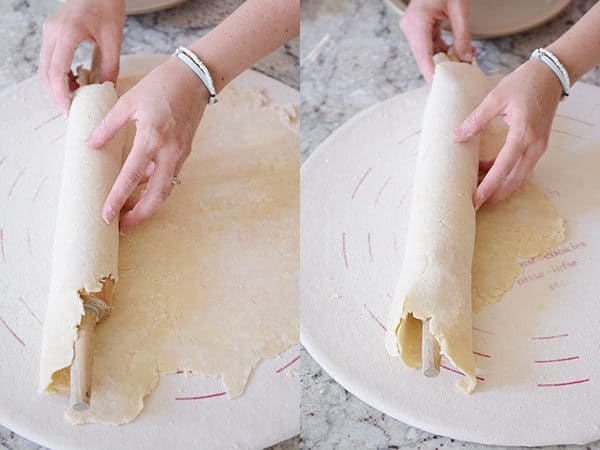
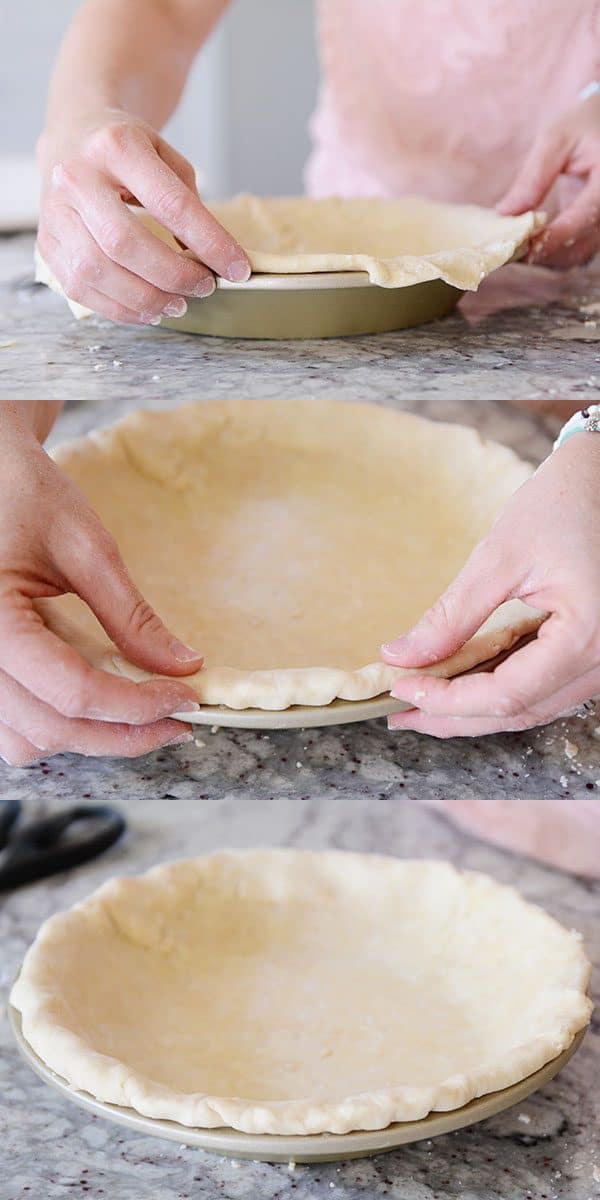
Now, unroll the pie dough over the pie plate, centering it as good as you can so you don’t have to stretch or move it too much once it is completely unrolled.
TROUBLESHOOTING TIP: What if the pie dough cracks or breaks while rolling or unrolling? If this happens, don’t stretch the pie dough to cover up the hole or tear. Instead, very, very lightly spray the area with cold water (just a drop, or less than) and take a small piece of dough from excess overhang and press it lightly to that area to cover the hole.
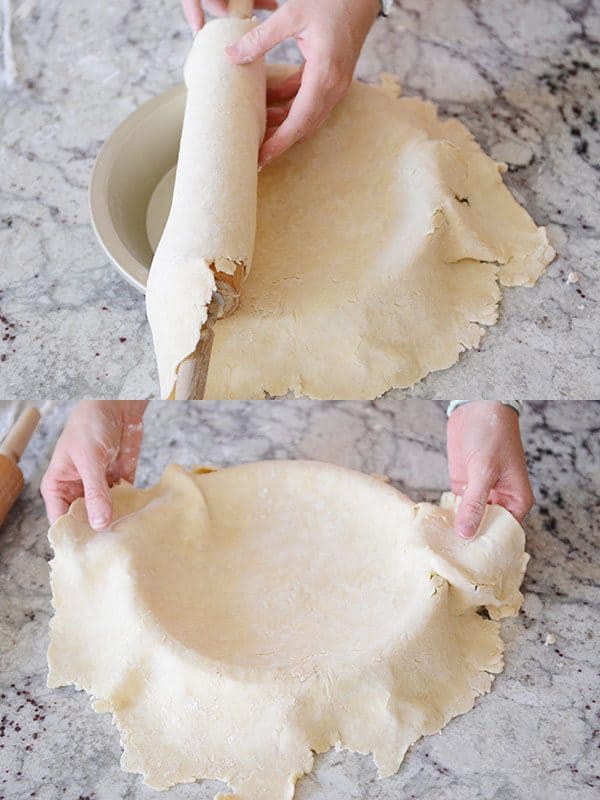
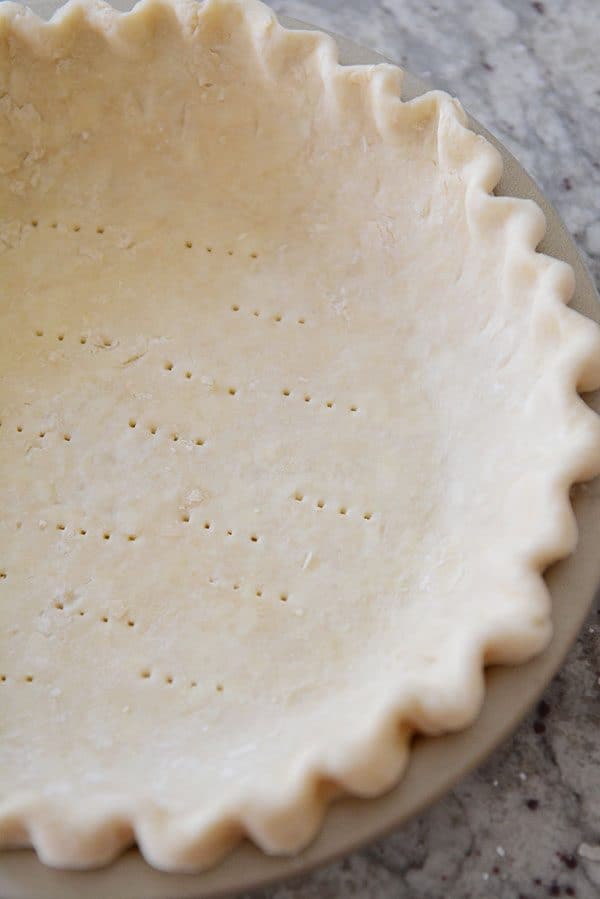
To get the pie dough perfectly nestled into the shape of the pie plate instead of pushing the dough down into the corners and molding it to the pie plates’ shape, lift up on the edge of the pie dough which will free up the slack of the pie dough, and using your other hand, move the dough down into the corner.
The key? No stretching or pulling. Just lifting and fitting. This is really important so that your pie crust DOES NOT SHRINK while baking.
Stretched out dough is going to want to shrink right back up while backing, and that will make you sad (and me, too).
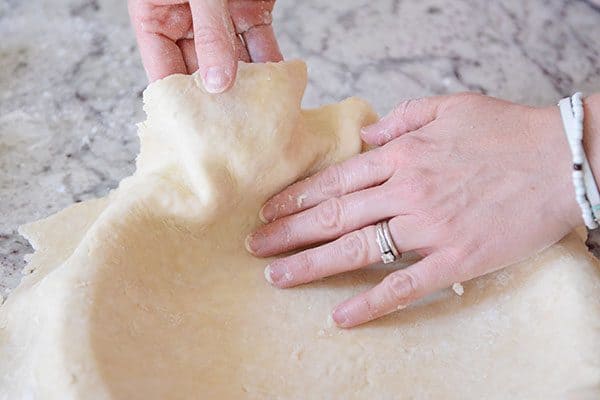
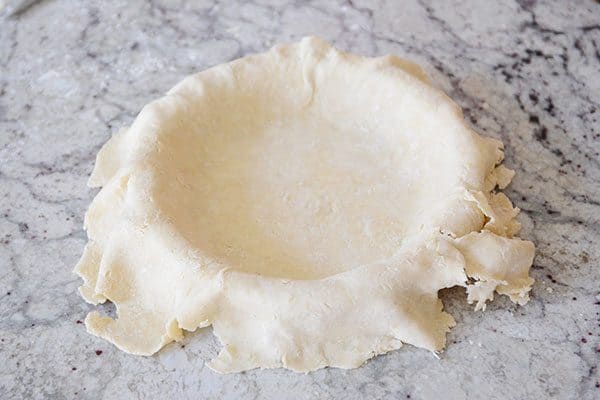
There we go. Perfectly lifted and fitted pie dough.
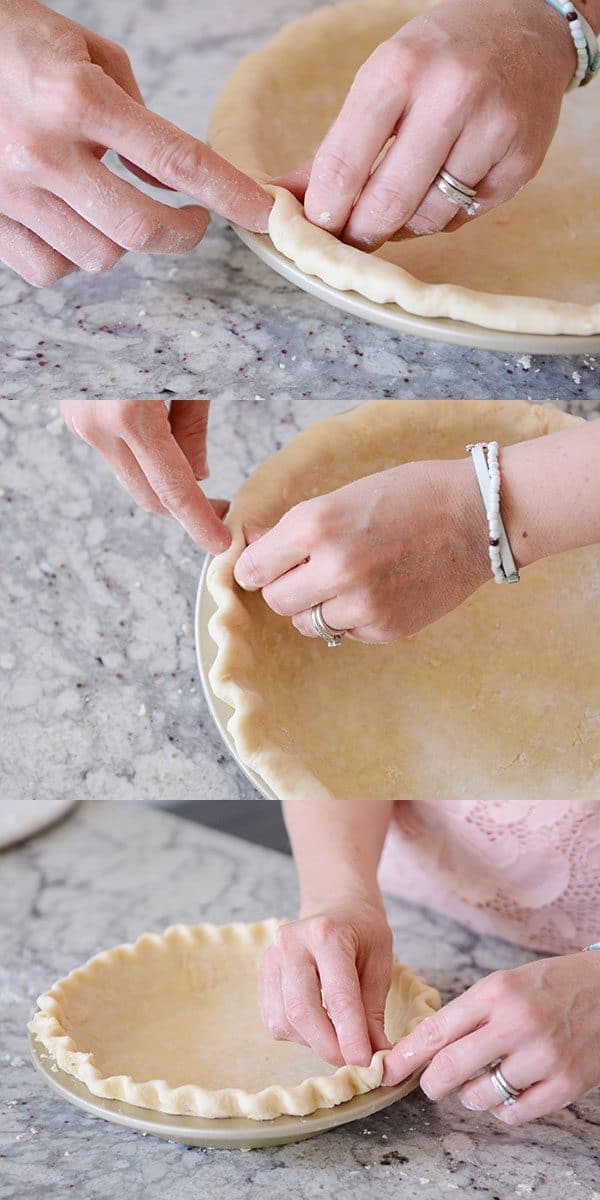
My favorite tool for trimming down the pie dough is kitchen scissors.
Snip the dough, leaving about 1/4-inch overhang (so, don’t trim it right up to the edge of the pie plate – you’ll see why in a second).
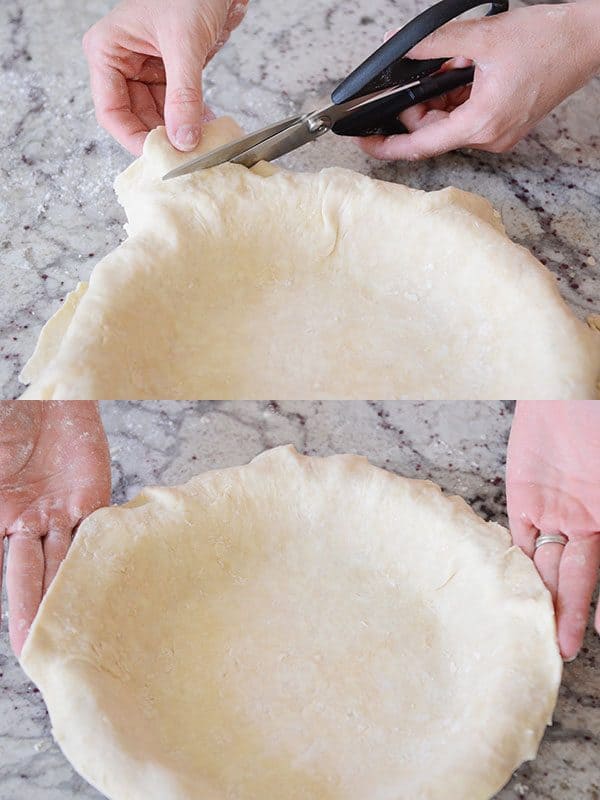
Take that 1/4-inch overhang and fold it underneath so it is flush with the edge of the pie plate.
Those edges are ready for crimping! Folding the pie edges under like that gives a thicker edge so the crimping is prettier AND it helps with the pie crust shrinking during baking.
Using the thumb and forefinger of one hand on the inside of the pie plate and the forefinger of the other hand on the outside edge, press together and crimp the edges for a classic pie crust look.
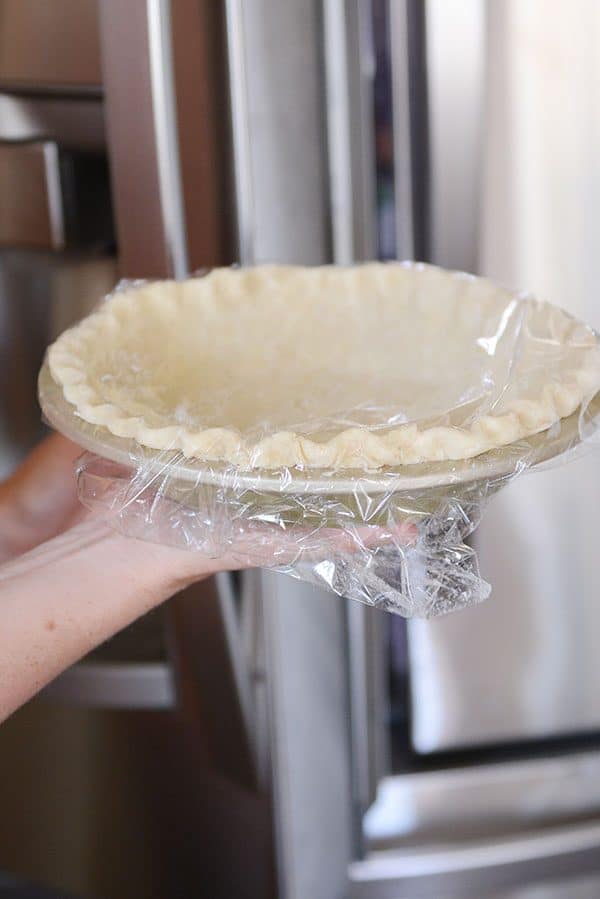
At this point, there are a lot of things you can do with an available pie crust!
But the safest thing to do right now is lightly cover it with plastic wrap and pop it in the fridge for about an hour. It’s a rare pie crust that doesn’t benefit from chilling time on the front or back end (it helps with that dreaded shrinking problem!).
This flaky homemade pie crust is one of my go-to pie crust recipes because it turns out perfect every time.

Perfect Flaky Pie Crust
Ingredients
- 1 ½ cups (213 g) all-purpose flour
- 2 tablespoons granulated sugar
- ¼ teaspoon salt
- 2 tablespoons shortening, frozen for 15-20 minutes or well-chilled
- 10 tablespoons (142 g) salted butter, frozen (see note)
- ¼ to ⅓ cup ice water
Instructions
- In a medium bowl, add the flour, sugar and salt. Whisk together with a fork to combine.
- Add the shortening to the bowl, and cut it into the dry ingredients using a pastry blender or fork or two butter knives until the shortening is in pea-sized pieces and the mixture is crumbly.
- Using a box grater (or other cheese grater with large holes), grate the frozen butter into the bowl. Lightly toss with a fork or your hands until the butter is evenly coated with the dry ingredients (don’t overmix with your hands, especially if the warmth from your fingers softens or melts the butter).
- Drizzle in 1/4 cup of the ice water. Use a fork to begin combining the dough. Abandon the fork, if needed, and use your hands to gather the pie dough into a mass. It will be dry and patchy – that’s ok. Grab a handful of dough and press. If it clumps together, don’t add more water. If it’s still dry and falling apart, drizzle in another 1-2 tablespoons and mix lightly and quickly until the dough gathers into a shaggy ball.
- Press the pie dough (gathering in any dry pieces that may scatter or fall out) into a thick disc-shape onto a piece of plastic wrap. Cover and refrigerate for at least an hour or up to several days (the pie dough can be frozen for several months).
- Roll out and use as needed or directed (in the recipe you are using).
Notes
Recommended Products

Recipe Source: adapted a little from Dorie Greenspan’s Good for Almost Everything recipe (reduced the shortening just a bit, use salted butter and less salt overall, adapted water amount slightly)


Can I put flat cookie sheet under my pie for drippings ( just in case)
Yes, you can definitely do that.
Hi Mel! I’m blind baking a pie crust in advance for a banana cream pie this year. I’m trying to make all of it a few days before so I don’t take up oven space and then I can just assemble it Thanksgiving day. Do you know how long your pie crust stays good? Should I keep it in the refrigerator or freezer?
Hi Miriam – the unbaked pie crust can be made up to a week in advance and kept in the fridge to roll out when needed (or frozen for several months). The baked pie crust should do ok for 1 to 2 days ahead of time (covered in the fridge) or it can be frozen for several months as well.
Your cookbook recipe and online recipe for pie crust are much different. One calls for 10 tablespoons of butter and cookbook calls for 4 tablespoons. Do both work? The sugar and salt varies too. Can you help me?
Hi Rhonda, the pie crust recipe in the cookbook is new and improved and yields the best pie crust between these two (less butter leaks out while baking).
My 18-year-old son just called from college in Colorado. His new testament professor is offering extra credit for students who bring a pie to class this week. Eli said he is using Mel’s kitchen café piecrust. He said he wanted it to be the best! He went straight to “MKC” just like his Mama. BTW, we live in Nampa—neighbors
What temp do I bake this crust at? And for how long? Thank you!
It depends on the recipe you are using – most recipes will indicate what temperature to bake the pie at. If you are blind baking this crust, here’s a quick tutorial with temperature/details: https://www.melskitchencafe.com/pie-making-boot-camp-week-3-all-about-blind-baking-chocolate-cream-pie/
Hi Mel,
Would this crust do OK if made the night before, placed in the pie tin, covered, and then filled and baked the next day, or would you recommend same day baking?
Yes, it would work great!
Can I use lard instead of shortening? Thank you.
Yes
Do you know if this works with a gluten free flour?
I haven’t tried it with gluten free flour, so I’m not sure. I’m sorry!
I recently tried your sour cream pie dough recipe, which was fine, but I definitely preferred this one after trying it tonight. I have a ways to go for my pies to look pretty, but the flavor and texture of the crust was great. Thank you!
Hi there! Quick question…what shortening do you recommend? I usually don’t use shortening so I’m not sure if crisco is best and if so, butter flavored or regular. Thanks!
I use plain Crisco (unflavored)
Do you recommend weighing or measuring the flour?
If weight measures are given, I always use them vs measuring in cups.
I am looking forward to making it this for a Christmas pumpkin pie. I’ve got my butter in the freezer and shortening chilling!
Can you double the recipe and make two pie crusts or do you recommend making one at a time? Thanks again!
Yes you can double the recipe just fine!
Really tasty, so flaky and really easy to roll and work with. Loved it! My only trouble was that I made beautiful fluted edges and they flattened out and disappeared during baking. Any advice on how to solve that problem?
Hi Julianne – do you think the crust was chilled enough before it went into the oven?
Can this particular recipe be used for hand pies?
Yep!
Do you ever have trouble with your oven smoking up from the butter? I’m not sure why this happened to me. Did I do something wrong? I’m just beginning to make another peach pie. Any advice?
Hi Janice, I haven’t had that happen with this pie crust – do you think the pie crust/butter was chilled long enough?
Also, I almost always place the pie on a baking sheet to catch any drips – that could help, too.