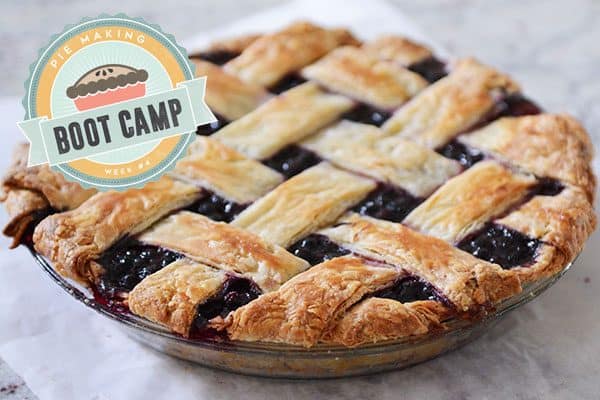
Pie Making Boot Camp Week #4: All About Double Crust Pies + FREE Printable to Sum it All Up!
Everything you need to know to make the most beautiful double crust pie of your life (easy lattice crust tutorial + cute printable!).
It’s Pie Boot Camp Week #4!
And the last week.
Yes, please. Hold back your emotions (haha).
I, for one, have loved this series.
Just to recap, here’s what we’ve talked about so far:
All About Pie Making Equipment Essentials
How to Make Pie Crust (Foolproof Recipe, Rolling Out, Crimping + Video Tutorial)
All About Blind Baking + How to Do It and Why (Bonus: Chocolate Ganache Cream Pie Recipe)
As a bonus for making it through all four weeks, I have a free, handy dandy, printable that you can use as a one-glance overview/cheat sheet of all the things we’ve talked about during Pie Boot Camp!
Here’s a color version you can keep on your computer or mobile device.
PDF Version with Links 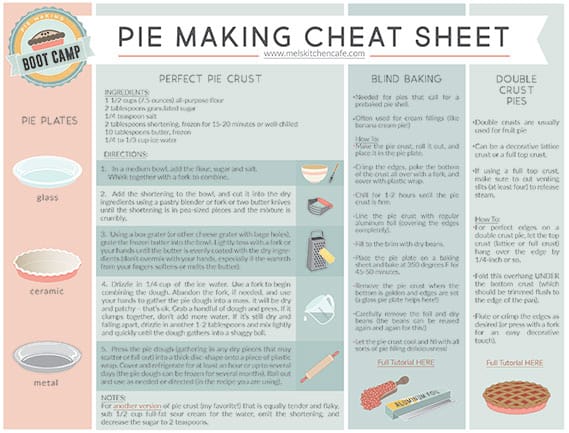
And a black and white version for printing!
Today, we’re diving into a quick tutorial on double crust pies. If you want to be a pie making rock star, conquering the double crust is a critical step.
And it’s not hard. So yay for that!
First up, make that pie crust! You can follow an earlier tutorial (week #2) if you want help with that.
Just remember that if the recipe makes enough pie dough for a 9-inch pie, you’ll want to double it to have enough crust for a double crust pie.
When it comes to separating the pie dough into two pieces, I generally do slightly more than half for the bottom and use the slightly smaller portion for the top.
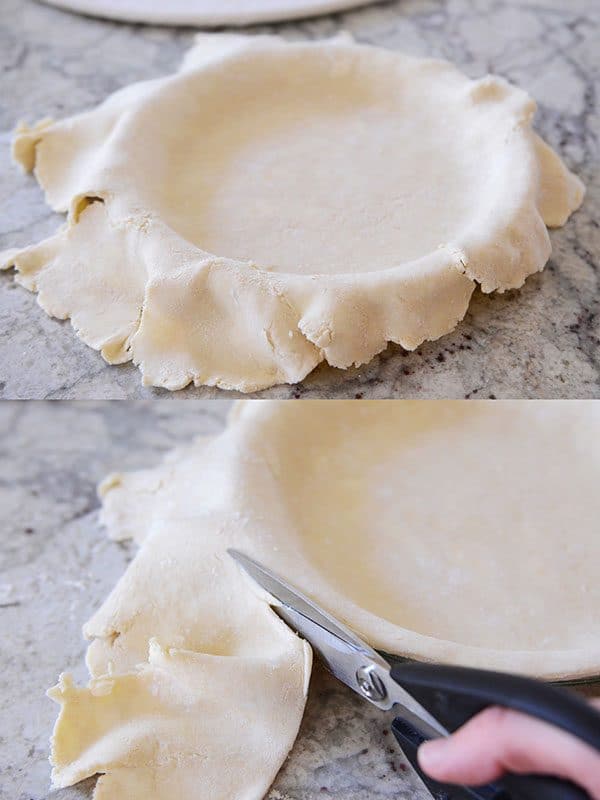
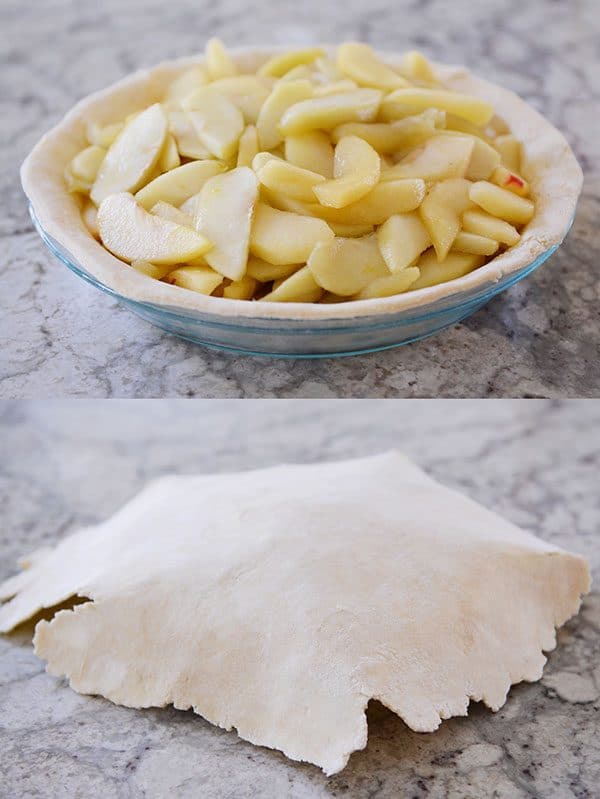
Gently place the pie dough into the pie plate after rolling (remember not to stretch or pull it – more details here).
Then, trim the edges so they are flush with the edge of the pie plate. I like to use my handy dandy kitchen scissors for this job.
I generally refrigerate the trimmed pie shell for an hour or so before filling, but really, a lot will depend on the recipe you are using.
Place the filling in the pie shell. In this case, I’m making my best-ever Blue Ribbon Apple Pie recipe (so good!).
Roll out the 2nd half of dough and gently drape it over the top. My top crust looks a little stiff because it was refrigerated for 15-20 minutes before using.
Not necessary unless the recipe calls for it! I chilled the top crust because my kitchen was sweltering hot and I didn’t want it sitting out in the heat for that amount of time.
Again, using my kitchen scissors, I trim the top crust leaving about 1/4- to 1/2-inch overhang.
This is important because you are going to fold that top crust underneath the bottom crust.
Just like pictured below!
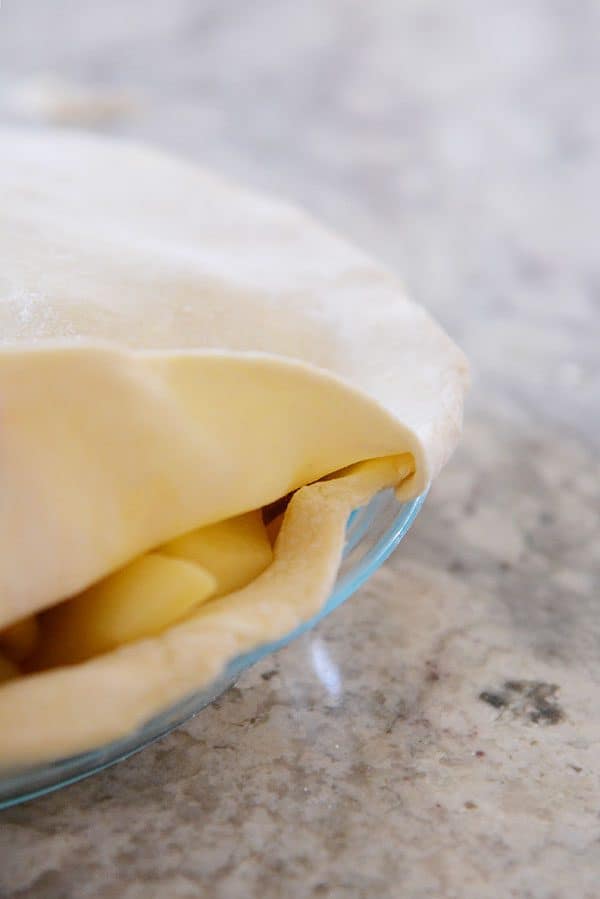
Doing so helps seal the pie into a cute little packet which allows all that delicious filling to stay IN the pie.
That’s exactly where we want it to stay.
There are other methods out there that have you do the opposite – leave the bottom crust with a longer edge and fold it over the top crust.
I’ve found that folding underneath, like pictured in this post, helps the pie crust seal better.
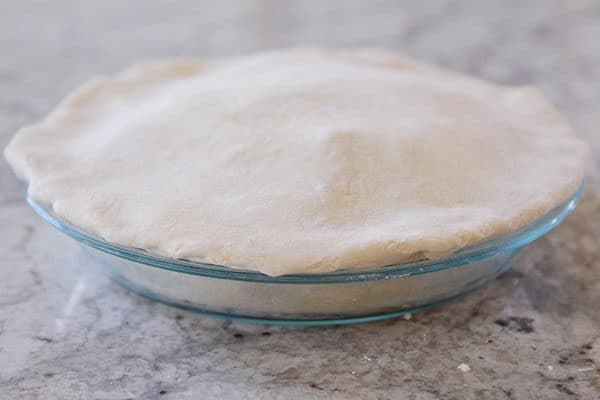
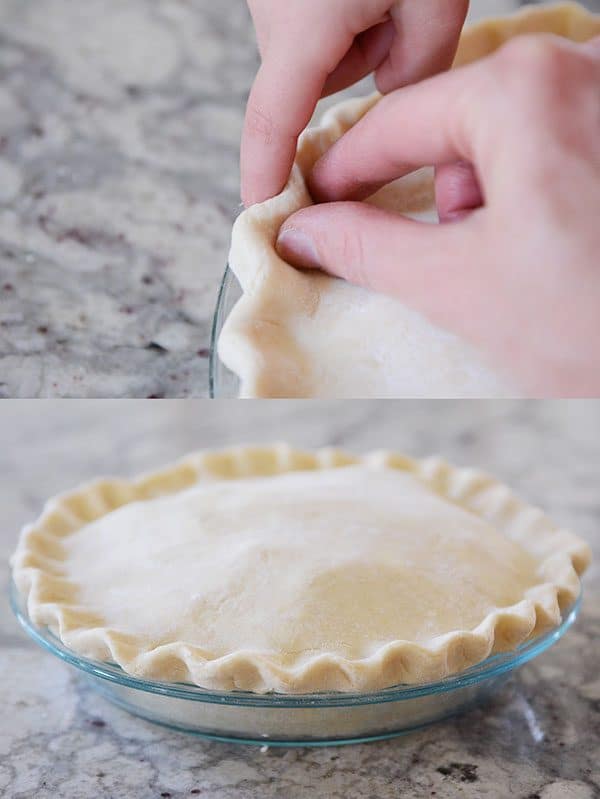
Just like a single crust pie, now’s the time to flute the edges! If you want an easier method, you can simply press the edges with the tines of the fork.
But if you want a classic, pretty, fluted edge look, follow the directions in this tutorial and crimp the edges (little fingers not necessary but extra helpful).
Pretty, pretty pie!
If using a full top crust like this (vs a lattice crust that is shown below), it’s important to allow a way for the steam to escape as the pie bakes.
Using a sharp paring knife (this is my favorite inexpensive paring knife), cut four gashes in the top of the pie 3-inches in length or so.
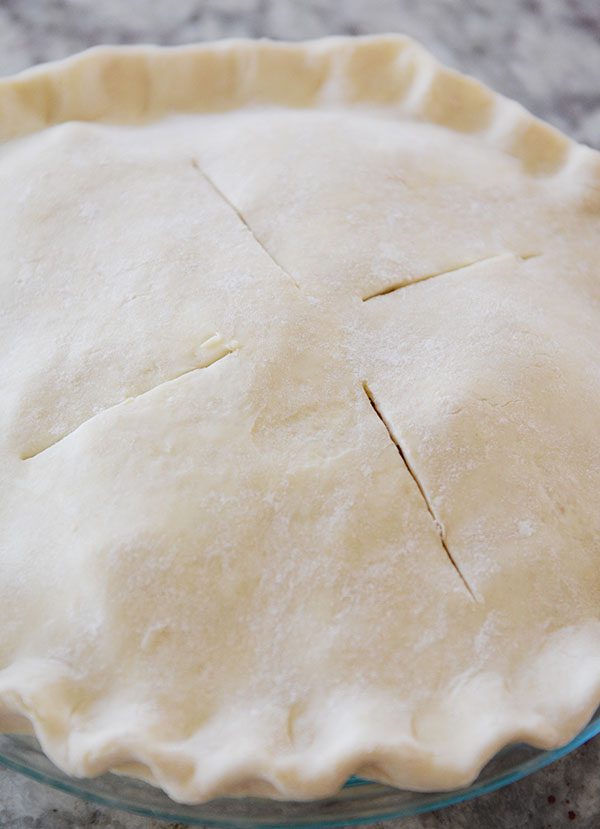
If the recipe calls for it, brush the top with water or a whisked egg white.
Honestly, I don’t always do this (even if the recipe calls for it – don’t judge).
It helps the top of the pie bake with a glossy, golden finish, but sometimes I’m just too lazy.
You can also sprinkle the top of the pie with coarse (or regular) sugar. Again, optional and up to you!
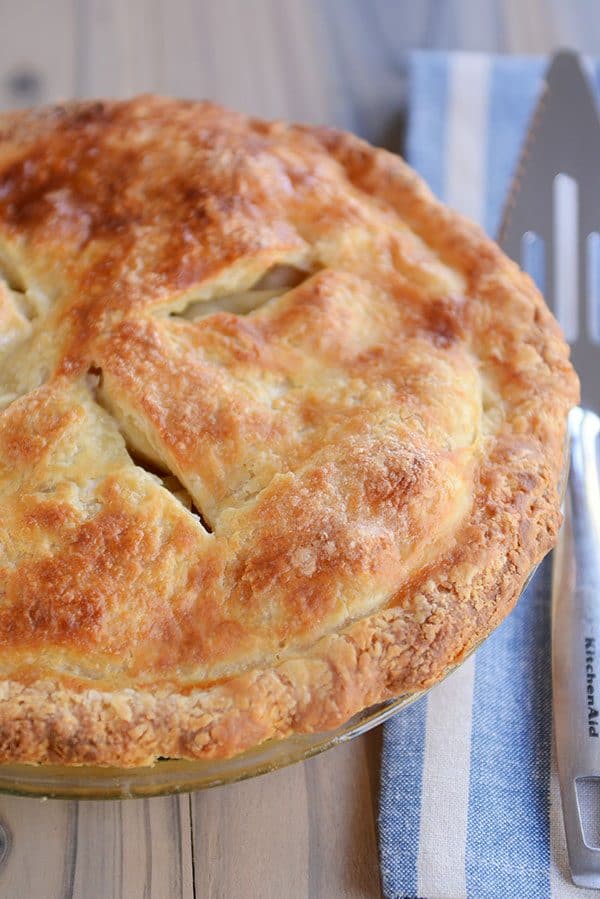
Place the pie on a foil-lined baking sheet and bake according to recipe instructions.

Look at that glorious baked pie. Doesn’t apple pie smell amazing?
You can see that the crust didn’t hold it’s fluted shape perfectly. That’s ok!
If there’s one thing I can’t emphasize enough with pie making, it is: let go of perfection!
It’s ok (and a little refreshing, honestly) when that pie doesn’t look picture perfect, I promise!
The crust on this pie is flaky, tender, and SO yummy!
Now let’s talk about another option other than draping a full crust on top of a pie!
You can google or search facebook for some VERY clever ideas on how to decorate the top of a pie.
In the interest of transparency and full disclosure, I barely have time to fix my hair every day let alone create an elaborate masterpiece for the top of my pies.
So I stick with the old-fashioned basics. Full top crust or a lattice crust.
This works for me and my unartistic brain!
But I urge you to get as creative as you like depending on your motivation and energy.
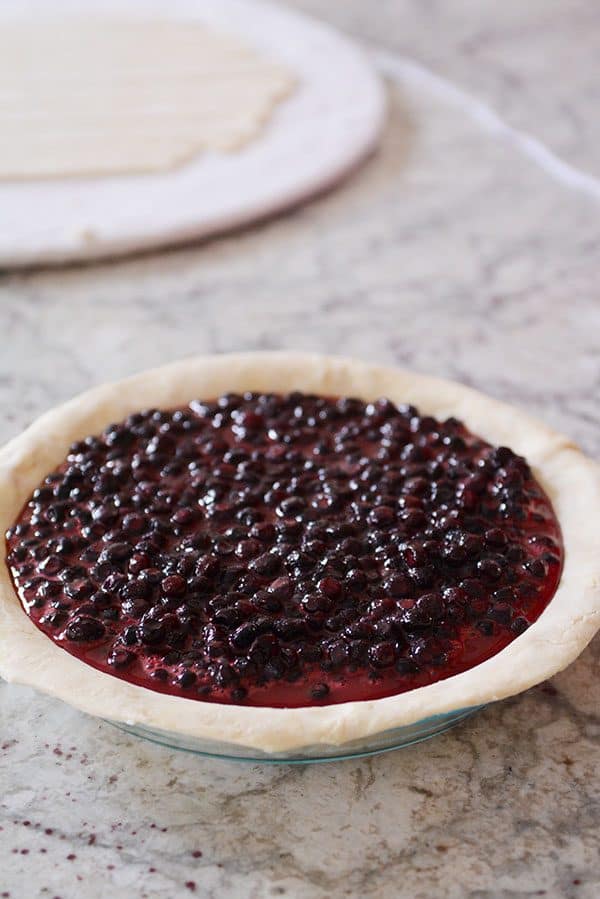
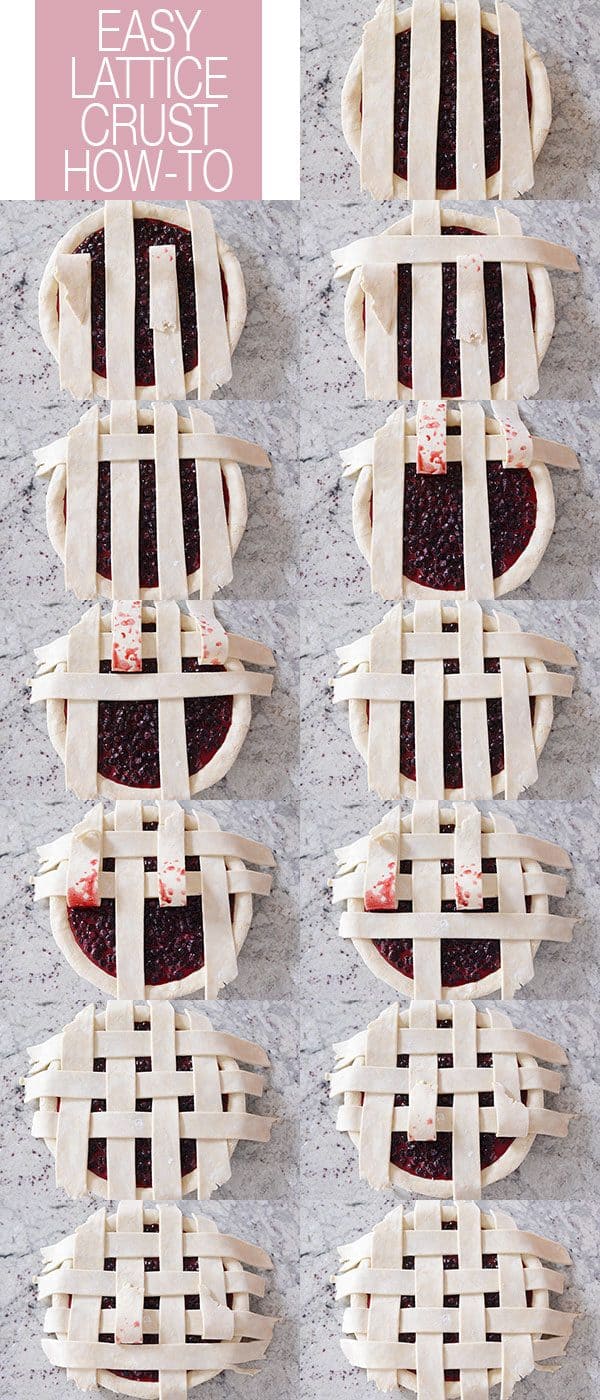
For a lattice crust, roll out the top crust and using a pizza wheel (or you can use a cute zigzag cutter), cut the crust into strips.
I find I like the strips fairly wide – about an inch or so. Any thinner and the strips can get wavy and distorted while baking.

Fill the bottom crust with your desired filling.
In this case: huckleberry pie! Oh my. It was as delicious as it looks.
Now. For a total lattice crust hack, you can simply lay strips on the bottom and then lay the perpendicular strips on top.
No weaving.
Sounds strange and a little blasphemous for pie makers all over the world, but it definitely works in a pinch, and I bet you most people wouldn’t notice.
Especially if they are being served a slice of delectable, homemade pie.
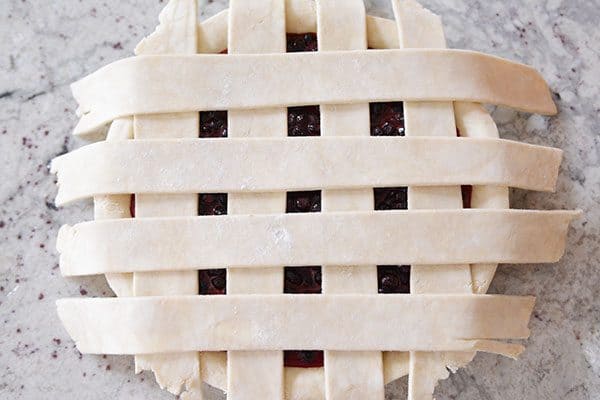
However, if you want to go the full lattice crust route, it’s not hard at all!
Below I have a quick picture tutorial showing the steps.
It’s a simple weaving procedure that involves lifting a set of pie crust strips at a time, placing a new perpendicular strip down, and repeating.
Take a look!
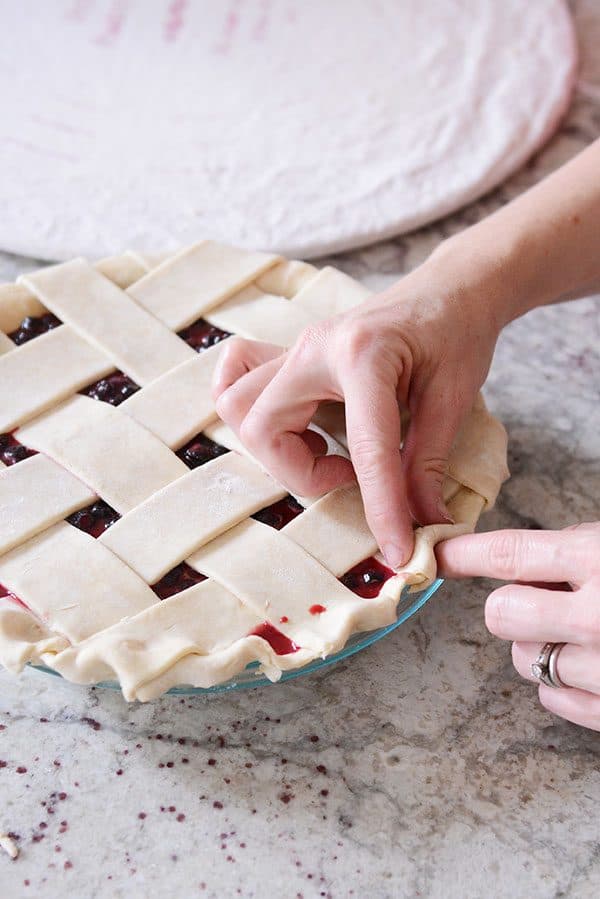
At the end of all that weaving (that honestly takes no time at all), you’re going to be left with some lattice crust overhang.
There are several methods on how to trim, tuck and crimp the edges. There’s really no right or wrong way.
But I’ve found that I like to trim those shaggy lattice strips to about 1/4- to 1/2-inch so they hang over the edge of the pie plate.
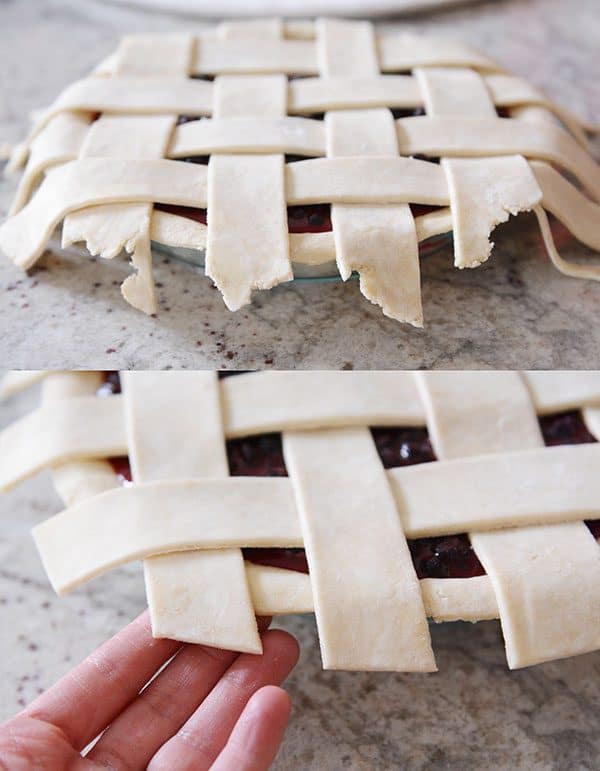
Then, similar to the full top crust, I gently tuck the strips under the bottom crust.
Like so.
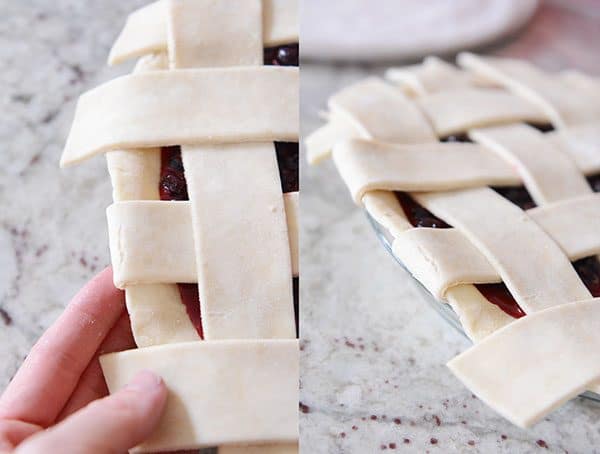
Do that all the way around so all the rogue pieces of lattice crust are safely tucked underneath.
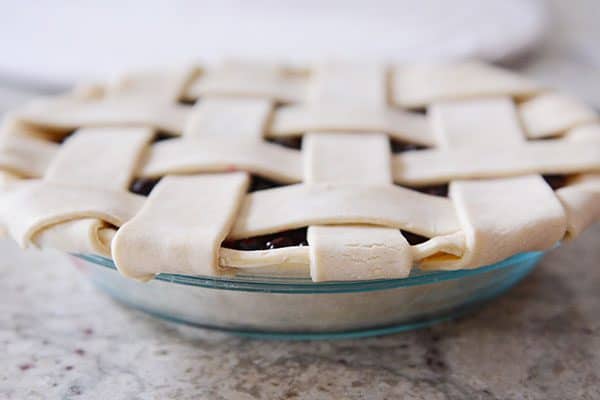
Then simply flute the edges like we’ve discussed a million times already.
The edges of the pie that have the lattice strips will be much thicker. Don’t stress it!
Just crimp like you would a single crust pie, and have faith that all will be well in the end (it will).
Place that pie on a foil-lined baking sheet.
This is especially important for lattice crust pies, particularly if the pie is filled to brimming with juicy fruit.
There will more than likely be some spillage through the openings as the filling bubbles and cooks.
Again, that’s ok! That baking sheet will catch all the mess which is FAR better than the bottom of the oven.
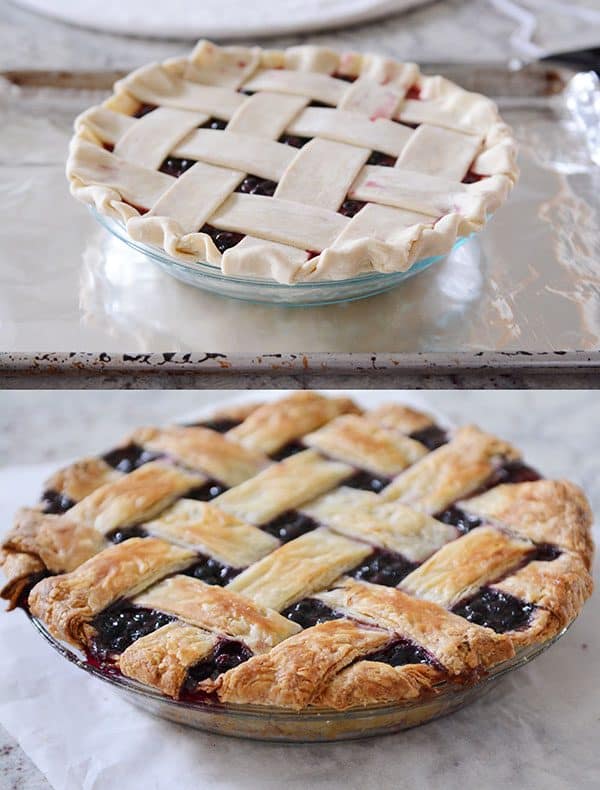
Remember that it’s ok for your pie to come out of the oven with fruit patches bubbling slightly over the crust or on top.
It’s all part of the pie making process!
And there you have it! A quick look at double crust pies!
As always, feel free to ask any questions or leave any comments below! I will answer them all!
Thanks for being along for the Pie Boot Camp ride! I’ve loved all of your comments and insights and input. You guys are awesome!
Hi! I’m going to attempt your apple cranberry pie this week and was wondering, when you split the dough for the double crust pie, do you weigh it or just eyeball it? Thank you!
I usually just eyeball it, but you can weigh it. I usually do just more than half for the bottom crust.
I have read, read and reread the boot camp articles. Pie crusts have always scared the heck out of me! But I did everything that you said and I was surprised that I could make it (almost) perfect. The water ratio was also a little unnerving. My husband loved it. Used your peaches and it was so good. Thank you so much for taking the time to write those camps. You are awesome!
Peach pie recipe not just peaches.
Thank you, Debbie! I’m so proud of you!
When making a lattice top, do you just trim the bottom crust, fold the lattice pieces under the bottom crust and then flute? Or did you tuck the bottom crust under after trimming and then tuck the lattice strips under and flute? I hope that makes sense. Thanks for all the hard work you put into this series!
Hi Abbey – there’s several ways you can do it – when I make a lattice top, I trim the bottom crust so there is 1/4-inch overhang. Then I trim the lattice pieces right to the edge of the pie plate, fold the bottom crust up and over the lattice pieces, pressing lightly, and then flute the edges. Does that help?
Greetings Mel~ I’ve just become a subscriber and have already enjoyed reading this pie boot camp series. One of my goals for 2020 is enhancing my pie baking, and you’re making it happen in sharing your knowledge and love the pictures/tutorials. I am a visual learner so truly taking it all in with these pictures! I also read with interest your not being able to make lefse. In reading this, I immediately looked this up as to what it is, and also wondered what a ‘ricer’ is. This has all been very exciting as I’ve learned so much tonight!! I’m thinking of giving the lefses a try……….do you have a recipe for this cause otherwise found on another site. I’ve come across your website because I wanted to make a cherry pie with plans for George Washington’s birthday and your site popped up. So glad I found you as it’s going to be a great year I see!! Thank you – Julie
Hi Julie! So glad you found your way here! I’m excited for you and all of your cooking goals. You are amazing! Good luck with the cherry pie! I misplaced my recipe for lefse…but I think it’s very similar to other popular recipes online. Good luck if you try it!
I tried to make my own piecrust once…I am embarrassed to say how long ago. It was a total disaster and I have been afraid ever since. I have made your rolls and pizza dough so many times. They are my go to breads. So when I saw your boot camp and read the step by step instructions I decided to jump in. And while my 1st go was far from perfect I am happy with the results. I will continue making my own pies..and my husband is thrilled :).
Can I use the leftover dough again?
Yes, you can use the leftover dough again! If you are rerolling it might not be as tender and flaky so keep an eye on that. Great job!
So I’ve made pies way too many times to not be able to figure this out.
Most recently (today), I made a crust using crisco (the recipe from the gals at obb). I spoon in the flour and level it with a knife. However, whenever I’m adding water, I always have to add a LOT more than the recipe says (this happens to me as well when I make your sour cream crust… sometimes I have to almost double the amount of sour cream). I worry about doing this and I worry about handling the dough too much. But most every single time, whenever I try to form it into a ball, it is extremely crumbly. I put it in some plastic wrap and try to smoosh it together without handling it too much and then put it in the fridge.
When I’m ready to use it, I try to give it one more good smoosh together so it’s not too crumbly.
When I roll it out, I use flour instead of cooking spray. But almost every single time, whenever I’m rolling, the edges are always crackly and crumbly. What am I doing wrong? It’s driving me crazy!! Should I just handle it more anyway? should I add more water even though I’m already adding much more than called for? Help!
Hey Jen, just a few questions – what’s the climate where you live (dry, cold, humid, etc) and what about elevation? Those factors can definitely make a difference. It sounds like you might be able to handle it just a bit more without having issues and that may help the dough to come together better. Also, what size are your butter pieces after mixing?
I’m in northern Utah… I try to get the butter pea size (or grated in with the sour cream crust). The dough is never chewy, or tough, it’s always very flaky once cooked, just very hard to handle (which is fine I guess, the fam never cares about how it looks so long as it tastes great!) I’m going to make another one next week. I’ll handle it a little more and see how it turns out!
I just finished reading through all of your pie boot camp posts and watching all your videos! Thanks for your help and all the time to make these posts! They are super helpful, and I felt much more confident now about my pie making abilities. Hopefully this will all pay off next week when I make my Thanksgiving pies by myself for this first time. Thanks again!
Thanks so much, Mikelle – and good luck!!
Hi Mel,
I really love , LOVE your blog. You put so much work into your posts and recipes.
Baking, and reading your blog posts, are a haven against the current political environment for me.
That’s why I became VERY upset, seeing an ad for my awful Congressman in this post. Are you the person who picks what ads will show up in your posts? If it’s your sponsoring company, please ask them not to accept political ads.
Hi Judy – thanks so much for your feedback! I will definitely report that ad, and I encourage my readers to report inappropriate ads as well (using the “report this ad” link under each ad). If you can let me know which congressman was in the ad, I will tell my ad company to manually seek it out and block it. I already have restrictions on ANY political ads posting, so this shouldn’t be happening. Thanks for letting me know!
Thank you so much, Mel. I didn’t know how to report it.
Tyhe Congressman was Steve Knight. Sponsored by the 45 Committee and the Muddle Class Family project.
Mel, you never let me down! I have been making my own crusts for years, thanks to ATK’s recipe in Baking Illustrated. However, I have always been foiled by lattice crust tops. I decided to make your sour cream recipe, and followed your pictures to a T. The cherry pie that just came out of the oven is picture-perfect! I only wish I could eat it 🙁 I’m taking it as a thank you gift, but it sure looks delicious. I made two other single crust pies, and finally got my edges to looked fluted and beautiful thanks to watching your pics and tips.
Way to go, Lynn! I’m so proud of you…your comment made my day!
Mel, my husband came home and said, “I hope this doesn’t insult you, but these pies look store-bought they’re so perfect.” 🙂 I’m hoping once the recipients take a few bites they’ll know they were homemade!
(Also, I made that white lasagna soup for the first time on Sunday, and all four of my kids love it. One pot, no fuss, great for busy days.)
Best compliment ever from your husband!!
Hi Mel!
I’d like to make some pies for a bake sale next weekend but I need to work on them this weekend. Do you have any tips for freezing and making pies ahead of time?
Thank you,
Desiree
Pies usually freeze really well! I’ve assembled and frozen fruit pies before and it works pretty well (I bake them from frozen – I find the crust is a little softer and slightly less flaky than if baking fresh, but it usually works great).
Oh how I LOVE your tutorials! This has been great, and I think I’ve learned several new things to help me take on pie baking more often. Thanks for all your great recipes too!
Thanks, Kristin! 🙂
Mel, thank you so much for this excellent “pie making boot camp”. I know it took a lot of time and effort but I have learned so much and truly appreciate you sharing your expertise.
Thanks, Julia – that means a lot to me!
That huckleberry pie looks so delicious! Do you pick/grow your own or is there a local place to sell? they’re probably seasonal, yes? Anyway, looks incredible and I’m really trying not to stress my first time hosting thanksgiving. Thanks for the help! 🙂
Hey Diana! I grew up picking huckleberries but they aren’t very plentiful in the midwest where we’ve lived for a long time. Now that we are back in Idaho, we’ve gone every summer (usually early August) up in the mountains near us but we have yet to find a stellar patch, and if you know anything about huckleberrying, people don’t give up the secrets to their picking spots! Super secret info. 🙂 We have yet to pick very many ourselves, but my friend goes up to Washington every year and picks gallons and gallons with her mom, so she gave me some she had in the freezer (a huckleberry pie was all my 12-year old requested for his birthday!). Usually in main huckleberry spots, you can find them at market stands, but they can be upwards of $40 a gallon!!
I’m sorry, but telling me that that is a huckleberry pie and then not sharing the recipe is pure torture!! ha ha Just telling me it is huckleberry is torture enough!! ha ha Huckleberries are my absolute FAVORITE and I keep trying to figure out how to get them in Utah without it costing me an arm and a leg. ha ha.
Thanks so much for this pie series!! I have struggled with perfecting a pie crust. The flavor is fine, but the rolling and baking I’m having issues with, so I can’t wait to try your tips from this series!!!
LOL! right?? I was searching for the recipe too, even though I know I have no chance of finding huckleberries right now 🙁
<3
Haha, good point, Nicole! My friend gave me several quart size bags of frozen huckleberries she had languishing in her freezer because all my 12-year old wanted for his birthday was a huckleberry pie! I haven’t made a huckleberry pie in ages. I made this one but I nixed the cinnamon and nutmeg, used my own pie crust, and used tapioca starch instead of quick-cooking tapioca. It was yummy!
I’ve learned so much and I bake a lot of pies! Can’t wait to try out your pie crust recipe. Both of these pies look so tender, flaky, and luscious. I bet they were delicious!
They were both really tasty, Karen! 🙂
I only make cream pies and pecan pies, I don’t love fruit pies, so I’ve never done a 2 crust pie. But my hubs prefers fruit pies, so I’m thinking I should be nice and make him one sometime, ha! Does it matter which way you top it? With the solid crust or the lattice crust? Or is that just personal preference?
Totally a personal preference! I suppose there are some fruit pie varieties that do better with a lattice vs a top crust, but I haven’t found a significant difference. I almost always do a lattice crust because I like being able to see the filling peek through.
Awesome! Thanks so much! I have loved this series! I grew up with shortening pie crust, with sprite for the liquid (better flavor than just water!) I haven’t ever had probs with my crusts. I tried your butter one last year and it fell in but tasted SO good! So I’m definitely giving your new recipe a try 🙂 hopefully meeting the 2 in the middle will work out for me! And super excited about your chocolate pie recipe! That’s my favorite kind! Another on your site has been my go to for a while now 🙂
Sprite for the liquid is such an interesting concept!