Step-by-Step Whole Wheat Quinoa Bread {My New Fave}
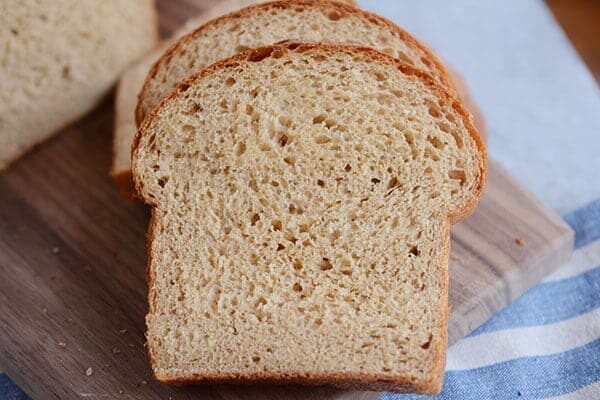
Healthy, hearty, and absolutely delicious, this whole wheat quinoa bread is light, fluffy and packs a protein punch. Pretty sure it’s my new favorite homemade bread!
I have been so excited to share this homemade bread recipe with you! It’s no secret I love making homemade bread. I’ve used this tried-and-true fabulous recipe (Darcy’s recipe in that post) to make my family’s everyday bread for years.
There’s just something about making bread that feels wholesome and good. It’s hard for me to explain.

I guess I’m just always amazed that such simple ingredients can come together to create fluffy domes of hearty goodness; it’s a mini miracle.
I wasn’t always good at making bread. And even now, sometimes my bread flops, but it is definitely one of the most satisfying things I make at home.
Having said that, can I take a minute to just throw this out there:
You don’t have to make homemade bread to be a a good mom, a decent human being, a rockstar in the kitchen, a role model to young children, or anything else that your guilt complex might want to fill in that blank.
THERE SHOULD BE NO GUILT OVER STOREBOUGHT BREAD, PEOPLE. And likewise, there shouldn’t be any guilt if you decide to make bread every day of your life in lieu of cleaning your bathrooms.
Sorry to get all lecture-y on you; I just feel strongly that we all need to stop the guilt.
Anyway, moving on.
A little while ago, I decided to branch out and try a new whole wheat bread recipe. With quinoa! I know. It sounds a little strange, but since we eat quinoa with dinner quite a bit, it wasn’t too much of a stretch to throw it into bread.
And oh, my goodness. This whole wheat quinoa bread is the best bread to ever come out of my kitchen.
So good, in fact, that this is the only sandwich bread I’ve been making for weeks. I’ve even converted several of my staunch bread making friends to this recipe, too. We are all in love!
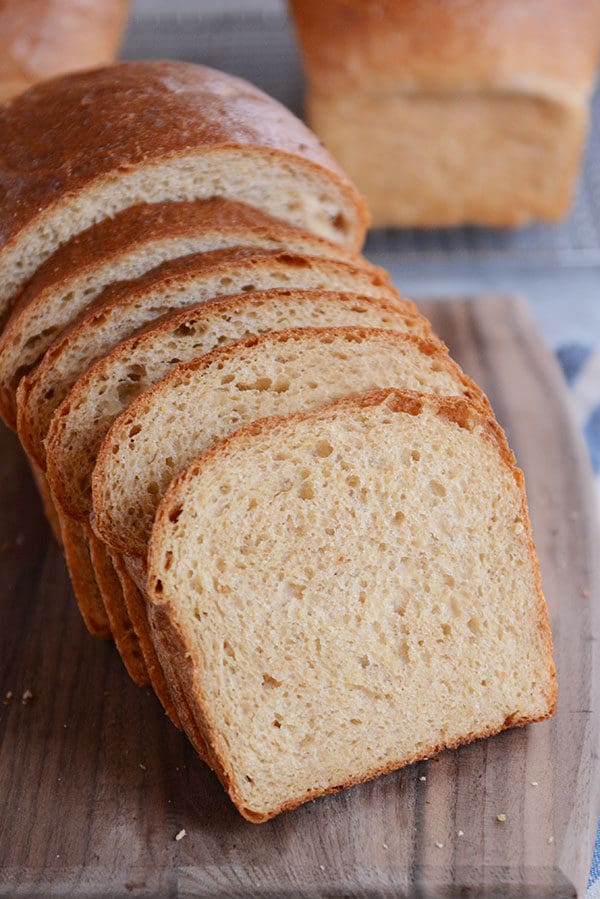
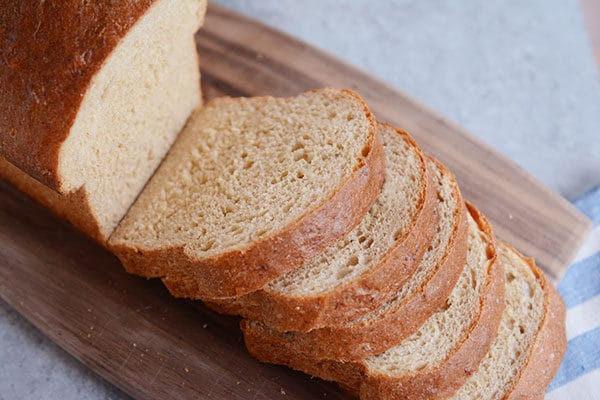
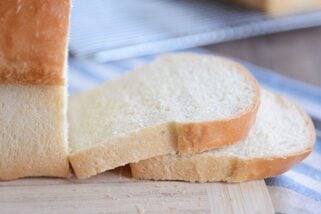
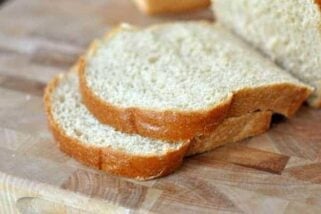
The quinoa lends a deliciously nutty flavor to the bread. It also makes the loaf extremely tender.
And if you are wondering, like I was, what happens to the quinoa in the bread dough, I think you’ll be pleasantly surprised. The loaf is intensely soft and fluffy without any hard bits of quinoa in the crumb.
The quinoa melds and absorbs in the bread dough as it mixes and bakes. There’s a hint of nutty flavor, but it’s not an in-your-face-quinoa punch as you eat it.
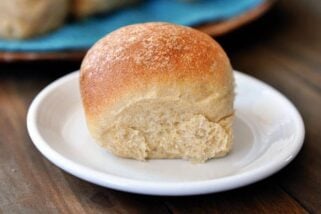
My kids are convinced this whole wheat quinoa bread makes the best toast in all the land. They’ll often eat through a whole loaf at breakfast (or for an after school snack, particularly if I let them slather it with nutella).
Because I want you to love this bread as much as we do, I’ve included a step-by-step tutorial below.
The recipe really is straightforward, but the method is a little unique, and the texture may be a bit different than other classic sandwich bread recipes.
Speaking of mixers, I know the world is divided when it comes to which stand mixer reigns supreme, but I make all of our bread in my beloved Bosch stand mixer. It is a powerhouse when it comes to bread.
I haven’t made this whole wheat quinoa bread in a KitchenAid mixer or by hand. Both could work, although keep an eye on your stand mixer if it has a weak motor.
I don’t want any stand mixers burning out (and people getting mad at me!).
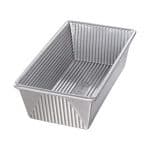
UPDATE: I’ve been getting a lot of questions about the bread pans I use. My favorite bread pans are the USA bread pans and the Chicago Metallic pans. I have a few of each and love both of them.
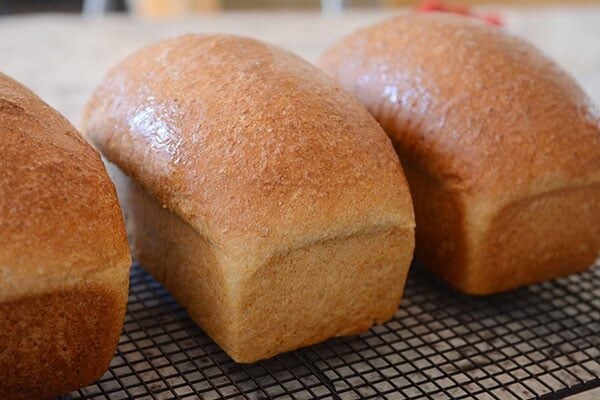
This whole wheat quinoa recipe is softest, fluffiest, best bread ever!
And if you are wanting to delve into the world of bread making but don’t know where to start or feel a little intimidated, here’s a step-by-step guide on my other go-to whole wheat bread recipe. And here is a tutorial on yeast (an oldie but a goodie of a post).
Please leave any questions in the comments below (or on specific recipe threads). I don’t have all the answers, but I can definitely try to help!
One Year Ago: Quick Blender Banana Chocolate Chip Muffins {Gluten-Free}
Two Years Ago: Foolproof No-Stir Homemade Caramels {With Step-by-Step Tutorial}
Three Years Ago: Simple Homemade Haunted Halloween Houses
Whole Wheat Quinoa Bread
Ingredients
- 1 cup uncooked white quinoa, rinsed
- 2 ¼ cups water
- 8 cups whole wheat flour, don't pack the flour in the measuring cup
- ⅓ cup vital wheat gluten, optional, see note
- 1 ½ tablespoons instant yeast
- 4 teaspoons salt
- 2 ¼ cups milk, lightly warmed (about 110 degrees F)
- ¾ cup room temperature water
- ½ cup honey
- ¼ cup oil, canola, vegetable, avocado
Instructions
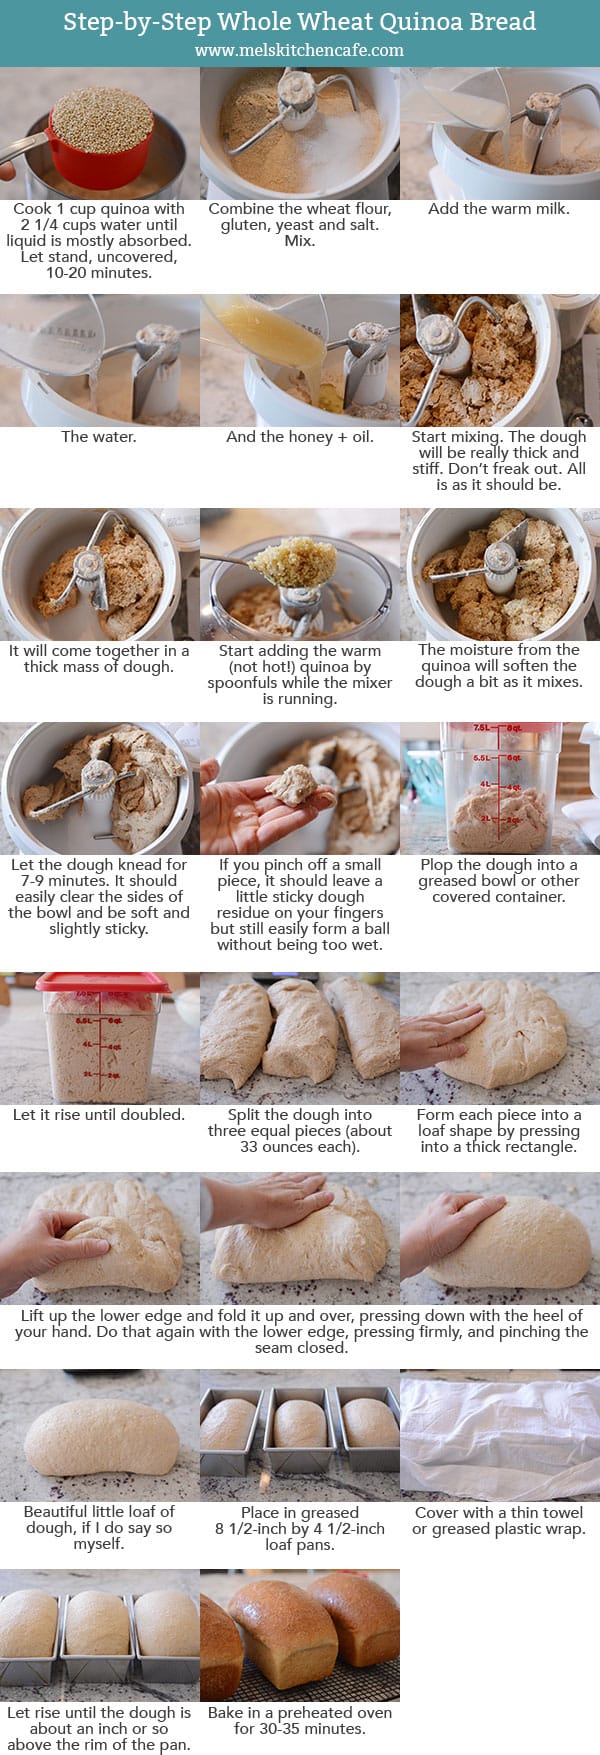
- Combine the quinoa and 2 1/4 cups water in a saucepan. Bring to a simmer. Cover and let cook for 10-12 minutes. Take the pan off the heat, remove the lid, stir the quinoa, and let it stand for 10-20 minutes.
- In a stand mixer, combine the wheat flour, gluten, yeast, and salt. Mix.
- Add the milk, 3/4 cup water, honey and oil. Continue mixing; the dough will start out looking very crumbly and come together in a stiff mass. That’s ok! It will soften as the quinoa is added.
- Spoon in the warm quinoa while the mixer is running. Gradually add all the quinoa and any excess water (there shouldn’t be much; most of it should have absorbed in the quinoa).
- Continue to mix until the dough comes together and forms a soft ball of dough that clears the sides and bottom of the bowl. If for some reason (and this can depend on elevation, humidity, temperature, etc), the dough is sticky and wet, gradually add 1/4 cup of flour at a time until it forms a ball of dough that clears the sides of the bowl – but avoid adding extra flour unless you really need to.
- Let the dough knead for 7-9 minutes.
- Place the dough in a greased bowl or container, cover, and let it rise until double.
- Lightly punch down the dough and portion into three equal loaves, about 32-35 ounces each. Form the dough into loaves by patting each piece into a thick rectangle and rolling it up, pressing with the heel of your hand to get rid of air bubbles and form a taut loaf.
- Place the loaves in greased 8 1/2-inch by 4 1/2-inch loaf pans. Let rise, covered, until 1-inch above the rim of the pan.
- Preheat the oven to 350 degrees and bake for 30-35 minutes. Remove the pans from the oven and gently turn the loaves out on to a cooling rack to cool completely. Brush the tops with butter while still warm, if desired.
Notes
Recommended Products

Recipe Source: whole wheat quinoa bread adapted from this recipe in America’s Test Kitchen Bread Illustrated (I swapped out all the white flour for whole wheat and added a few extra ingredients to help with tenderness, and I changed up a few other minor things with ingredients and method)

Hi Mel!
How do you warm up your milk to get it to 110 degrees? I microwave and it always gets too hot!
Thanks
Nadia
I usually microwave for 1 minute at 50% power. Stir, and then microwave for 10-12 second spurts until it’s warm enough.
This bread is AHHHHMAZING!! I made it last Wednesday and a week later it is still moist. I’m kind of a “bread snob” and will usually only eat it the day I make it but this is incredible as are the other recipes I’ve tried from your site!! Thank you so much for sharing! My friends and family all laugh at me because I tell them I will check with my “BFF” for a recipe…she won’t let me down!! And you always come through; I haven’t been disappointed yet!! And they haven’t either. I send them all to your site!
Thanks, Linda! Isn’t it amazing how soft this bread stays??
I’m trying this today! Question about the quinoa – I started cooking it about when I started making the bread. I ground my wheat, added the ingredients, etc. while the quinoa was cooking and cooling. It’s been way longer than 20 minutes (and I even stuck it in the fridge for about 10 minutes) and it’s still super hot – about 150 degrees. I’m worried about it killing the yeast, so I’m still letting it cool. About how long do you let yours cool? Do you start it way before you start the rest of the bread? It looks super yummy and I can’t wait to taste it!
I haven’t ever taken the exact temperature of the cooked quinoa but I usually start the bread after the quinoa has cooked – like, right when it starts cooling. Having said that, it’s pretty darn warm when I start adding it to the bread and it’s been fine. Next time I make this (probably tomorrow or the next day), I’ll grab a temperature reading and post an update.
Hey Amanda, I finally got around to getting a temperature on the quinoa I used. I’m making the bread as we speak and actually used the quinoa a bit warmer than I usually do – it was about 145 degrees and still steaming when I added it to the bread.
Finally I made a healthy bread that was not heavy like a brick!
Absolutely delicious! Now, I just need to figure out how to stop eating it.
Thanks!
Anyone use olive oil or coconut oil? Will any oil do?
I’m not sure if I did something wrong…my bread doesn’t look like yours. It’s lighter in color and looks a little denser. It is definitely baked and tastes good, but not great, so I was disappointed for the amount of time I spent working on it this afternoon. I used the King Arthur flour as you recommended. I just don’t know what went wrong.
Hi Sara – sorry your bread didn’t turn out! If it was dense, is there a possibility it needed to rise longer?
What type of mixer do you have? I’ve never made bread before but have thought about it and getting a mixer sounds like a good idea.
I use a Bosch Universal mixer for all my bread recipes. 🙂
I was so excited to try this recipe yesterday. My kids and husband don’t like quinoa but it’s so good for you and I was excited to have a way to sneak it in. But…my bread tastes like quinoa. Like that raw, almost dirt flavor you get when quinoa isn’t rinsed and/or cooked in chicken broth. My quinoa bag said its pre-rinsed so I didn’t rinse before cooking it. Could that be why? Any other ideas why this might have happened? The texture is great and I want to love this recipe, I really do!
Hey Natalie – I highly recommend always, always rinsing quinoa even if it says pre-rinsed. I’ve had that same thing happen with supposedly pre-rinsed quinoa and have learned it’s best to always rinse. That’s my guess of why your bread had an off taste…I can’t think of what else it would be other than brand (what kind did you use?) since it shouldn’t have an overpoweringly dirty quinoa taste when baked.
Have you ever used keifer instead of the milk? I have done keifer to use up and would love to try this bread recipe.
I haven’t used kefir in this bread recipe instead of milk but I think it’s definitely worth a try.
I tried it and I don’t know if it was because of the keifer or some other reason, but I had to add at least two more cups of flour (I live in Utah not very humid). The bread tastes good but it doesn’t look as fluffy as yours does.
Kneaded!!! Not needed.
P.S. My Kitchen Aid stand mixer did fine. It was maxed out and going over the attachment slightly, but it needed the dough for sufficient time and I just peeled away the dough that was up high.
Mel, thank you!! I made this today and LOVE it! I’m pumped!!! Put some in the freezer and we already downed one loaf. I made four smaller loaves instead of three.
I don’t have Instant yeast on hand. think I can figure out how to substitute active yeast? Do you have any tips?
I haven’t tried it but you could experiment by dissolving 1 1/2 to 2 tablespoons active dry yeast in maybe 1/2 cup water with a pinch of sugar and then sub it in the recipe (and decrease the liquid in the recipe just slightly or add a bit more flour).
Mel! This looked so amazing that when I saw the email first thing in the morning, I tossed my children’s homeschooling to the wind and spent all morning making it. (Clearly I’m an excellent mother with excellent priorities 🙂 Anyway, I made a couple small changes and it was still delicious: used coconut oil since that’s what I use in my other bread recipe, and non-dairy rice milk since that’s what we always have on hand. I also had to add a significant amount of extra flour while mixing (about a cup in both batches I made) and I live in Phoenix, so definitely no humidity. Maybe it depends on the wetness of the quinoa? Anyway, super yummy!
Side note: if you ever see jars of E.D. Smith’s Black Cherry Raspberry Blood Orange jam at your local Costco, buy 15 jars. It’s the best jam on the planet and SO good with this bread 🙂
Thanks for your notes on the recipe, Bonnie, and now I’m going to be on the lookout for that jam!
I recently bought the Bread Illustrated cookbook and liked the fan roll recipe I made from it. I’m very intrigued about the method it describes to use lava rocks to create a steam oven type of environment for making crusty bread. Good thing a kind older gentleman at Home Depot steered me away from the landscaping lava rocks I was about to buy to the ones for use with a gas grill.
Haha, that would definitely be something I would do. I’m loving that book, too. I made the fan rolls and loved them and am trying my hand at the croissants this week.
Hmmm croissants! Only you can motivate me to make them!
After eating a slice, my daughter said to only make this kind of bread now. Usually I make Darcy’s bread but now I think this is my new favorite. So tender and wonderful! I didn’t have the smaller size pans so used my 9.25×5.25 size pans and made two bigger loaves and one smaller loaf. Thanks for a delicious recipe!
That’s exactly how we feel; we love this bread! So happy you and your crew loved it, too.
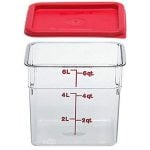
Looks like maybe the container is a Cambro brand? (Just by searching Amazon) Do you recommend a certain size Mel? Note that the lids are sold separate.
I have the 8-quart size and like it for larger quantities of dough. Eventually, I’d like to get the 4- or 6-quart one, too. The one I have is pretty big. It also makes a great storage container for other things (if making a lot of food or chopping up fruits/veggies for canning, etc).
Thank you very much for this recipe! I am going to forward it to my sister, as she is looking to change up a few things in her normal diet, and this might be a great bread for her. She loves quinoa as well, so I’m sure her and my mom will really like this. Thank you again.
What is the container you use to let the bread raise? I’d love to have one of those!!
Hi Liz, I got it at Standard Restaurant Supply but someone else in the comments found them on Amazon (the Cambro brand). I have the 8-quart size.
YUM! Can’t wait to try this. What kind of milk do you use or does it matter (skim, 1%, reconstituted powdered) …… Thanks for the great recipes!
I use 2% because it’s what I keep on hand – I think any kind would work although maybe not skim?
Bread tastes great! My only problem is a huge hole in one of the loaves (hopefully not all as I’ve only cut one) any idea on how to not get the big holes inside? I flattened out the loaf as mentioned with the rolling out. did I let it rise too long?? HELP!!
Hi Yvette, it’s probably not from rising but almost certainly from how it’s rolled up – any air pockets (even tiny ones) can result in large holes. Make sure to really press out the air with your hand while shaping or try using this shaping technique (it’s the video at the bottom of this post): http://www.melskitchencafe.com/whole-wheat-bread-step-by-step/
Quick question. Where did you get the container that you’re using to raise your dough in? Looks like something I need in my life!!
Thanks!
Hey Rachel – I picked it up at the Standard Restaurant Supply store near me. It’s awesome; I use it all the time for rising dough.
Oh boy do those loaves of bread look amazing. I make all of our bread here too. We’re partial to wheat bread but I’ve never added quinoa to bread. I can’t wait to try it! Your description and photos sold me. I don’t grind my own wheat but have everything on hand to give this a go-hopefully soon. 🙂
Hi Mel, I will be giving this recipe a go on the weekend, I have just enough quinoa for this wonderful bread. Thanks for the recipe and the step by step guide. Have a wonderful day.
Fi
Hey Mel, I would love to know if and where you buy your quinoa in bulk? I want to start feeding it to my family more but it seems expensive to buy in small amounts. By the way, this bread recipe looks so yummy! I cant wait to make it. And can I just say, you are my favorite =) I never really comment, but almost 100% of my recipes come from you and me and my sisters talk about you like you are an old friend…Thanks for all you do!!
I agree that quinoa can be expensive! I buy it at Costco when it’s there and also in #10 cans (for our food storage) at Thrive. I’m very choosy when and how I use it because of the cost (so you know this bread has to be good!). 🙂
Hi Mel,This looks great! I love the added nutritional benefit of the quinoa!!! I had a question about the vital wheat gluten. Why do some wheat bread recipes have it and some do not? The best luck I’ve had with wheat breads is a recipe without the vital wheat gluten. I don’t know if the gluten is what is throwing me off or not. Why do you need it? Thanks
Hey Erin – good question on the vital wheat gluten. I’m not sure why some bread recipes have it and others do not; I like to use it when I’m making breads or rolls with 100% wheat flour because I think it helps the bread to have a light and fluffy texture – it basically doesn’t take as much work to develop the natural gluten in the bread. Even if I use a little white flour, I’ll leave it out. It’s not 100% necessary, but if it’s left out, I’d encourage the bread to be kneaded a bit longer.
Hi Mel, what did you use to grease your bread pans? Your loaves look perfect and appear like they just fall out of the pan. Mine do not. Thanks for any advice you have!
Hi Erika – I just use nonstick cooking spray. A lot may have to do with the pan. I heart my bread pans big time (I use some from Chicago Metallic and a few others are USA bread pans).
I followed Mel’s advice and bought the Chicago Metallic pans and I just spray them with Pam and the bread DOES just *fall* out of the pan! So definitely buy them yourself, it’s amazing how amazing they are!
Do you have to use white quinoa? I have some red in my pantry. I have to try this, I love bread!
I’ve only ever used white quinoa, Renay, but you could definitely experiment!
I was already planning on making bread today and was happy to see this post. I just had a piece for lunch, and loved it!! I live in an area where there is high humidity, so I think I ended up adding almost a whole extra cup of flour, and I also lrft out the vital wheat gluten. It turned out awesome! Your website has made me into a baker, and I can’t thank you enough! I love all of your bread recipes and am excited to have one more to make for my family.
Good to know, Nicole! Humidity can definitely affect the dough so thanks for chiming in with your comments. I live in an extremely dry area which would make sense why I don’t need the extra flour
I’m making this right now and for any others living in humid areas, you may have to add quite a bit more flour to get it to clear the sides of the bowl. I didn’t measure exactly how much I ended up adding, but it was probably at least one cup. (I made the rest exactly as written, including weighing my flour at the beginning.) It looks and smells so good. I can’t wait to try it!
Thanks, Megan! It helps when others chime in with comments like this…I live in a very dry climate so it’s helpful for others to know if they live in a humid area, they may need more flour.
I needed to make bread today and was so excited to find a new bread recipe to try! It is rising now! As far as mixers go, for anyone looking into mixers, I went with the Ankarsrum mixer. https://www.amazon.com/dp/B00CA8YJ5M/ref=wl_it_dp_o_pd_S_ttl?_encoding=UTF8&colid=3UYW39N0T6GC5&coliid=I26RYX7JGAIYZE&psc=1
It is more pricy but I do love it!
I’ve never even heard of that mixer, Lachelle!
I can’t wait to try this!
Just a note for Kitchen Aid users, I learned the hard way that the Artisan mixer (which seems to be most common) is only designed to hold 9 cups of ingredients. I’ll be sure to decrease the recipe to make 2 loaves instead of 3!
It’s a hassle to get a Kitchen Aid mixer fixed, too! It’s insanely expensive to send it in to get repaired, so I kinda fast talked a Mennonite guy who owned a small engine repair shop to fix it! 🙂
Good note to make for other KitchenAid owners. Thanks, Becky!
I’ve repaired the stripped (plastic , UGH!) ) gear in my Artisan on my own before. The part can be bought for less than $10 and there’s lots of Youtube videos out there to help with step by step! 🙂
It’s messy (lots of engine grease) but worthwhile (money wise) to do it yourself.
Thanks for the tip on the number of cups of incredients— that could explain the disaster I had with this recipe written as is! 🙂
I can’t wait to try this! My family has been seriously missing my homemade bread since I took a teaching job this fall… Have to try this. Then I’ll share with my Home-Ec class. Thanks Mel!
What beautiful loaves of bread. I grind my own wheat also. I haven’t made bread in a good while. I need to try this.
This bread looks amazing! I’ve been looking for a new bread recipe to try for some homemade pear butter we’ve made, this might be the one!
Paige
http://thehappyflammily.com
This looks amazing! Since my teenage son could live on bread, this would be a nice healthy upgrade to our regular old bread. BTW…I just made your Classic Snickerdoodles and they are awesome! I only had 1/4 cup shortening (instead of 1/2 cup) so I added just another 1/4 cup butter and they turned out perfect! I’ve also been making your Creamy Garlic Alfredo Sauce – perfectly quick, foolproof, yum!! I love your recipes!!
This looks so good! Is there a way I could just make one loaf? I know there are rules about decreasing yeast. Thanks!!
Hi Jill – Liz, who just commented above you, is right in the process of making one loaf!
Wow, I had no idea there were rules about decreasing yeast … I just used 1/3 of all ingredients including yeast…it is only about 20 minutes but there is what I would say is normal rising for that time, i.e. it is rising. Any the warmest spot in my house is 64F.
I make a lot of yeast breads so use SAF Instant in bulk, kept in the refrigerator. I’ve never had a rise failure with it. It is vacuum packed and I make sure to get the freshest pack when I buy.
I’ll post back in reply to my upper comment later this afternoon after rise-bake-cool.
Mel,
This is pure genius. I’m definintely going to give this a shot. Thank you for sharing! What a great way to feel like I’m getting a healthy amount of protein in bread! I will report back. 🙂
Denise
Has anyone had any luck trying a nondairy milk in this recipe? If so, I’d love to hear about it!
Yes! I used rice milk and it turned out great!
Thank you, I’m excited to try this! I’ve been making the standard bread, but this looks intriguing. I’ve also never put milk in my sandwich bread…is it necessary because of the quinoa?
I don’t think it’s the quinoa that requires it – I think it’s there to help make a more tender loaf of bread.
What brand of bread pans are you using? I have been looking for some good “square corner” ones instead of pans with rounded corners. The same goes for a 15x10x1 jelly roll pan if you have any suggestions! Love your site!!
Hi Diane – I have this jelly roll pan and LOVE it:
https://www.amazon.com/OXO-Good-Grips-Non-Stick-Jelly/dp/B015CQZK4C/ref=sr_1_5?ie=UTF8&qid=1476890990&sr=8-5&keywords=jelly+roll+pan
I also have the Chicago Metallic 8 1/2-inch by 4 1/2-inch bread pans and they are great but a friend recently gave me some of the USA ones and they are my faves!
https://www.amazon.com/USA-Bakeware-Aluminized-Steel-Pound/dp/B0029JQEIC/ref=sr_1_1?s=kitchen&ie=UTF8&qid=1476891042&sr=1-1&keywords=usa+bread+pan
Thank you for the info!!
I always have cooked quinoa in the freezer, how much would you say i should use? I searched how much cooked quinoa a cup of dry yields and i found between 3-4 cups :s
Also, does the quinoa need to be warm? One more question, i noticed that this loaves weigh more than your whole wheat bread, why is that?
The texture and density of these loaves are a completely different animal than my go-top traditional whole wheat bread, so that is why they weigh more (probably thanks to the quinoa and overall structure/makeup of the dough). Yes, the quinoa needs to be a little warm and not dry at all. I haven’t ever measured the quinoa but I’m guessing it’s right around 3 1/2 to 4 cups. You might try making the quinoa for the recipe as written just once so you can get a better idea of how much to use and the texture of the quinoa – then it will be even easier to pull it out from the freezer and use it in the recipe.
Thanks Mel!
This bread recipe looks so good! Do you think it would adapt to a bread machine?
I honestly am not sure since I don’t use a bread machine – the only step I would be concerned about is adding in the quinoa at the end of mixing (since don’t you normally throw all the ingredients into the bread machine to start)?
Good news! I just tried it in a bread machine and it worked great. Just the dough cycle though — I always switch things over to bake in the oven myself. Anyway, I cut the recipe in half and added the quinoa towards the beginning (I let it get a start on mixing and then put it in before the blade struggled). Then I checked it a couple times during the mixing rounds to make sure that the flour was the right amount (always seems to vary). But it worked wonderfully. And you’re right, Mel — absolutely delicious bread!!
Thanks for the tips Angela! I am trying it today.
thanks for the bread machine tip!
I have wheat all ground ready to make bread, so I think I’ll try this today! Yay! My question is… I only have 9 inch loaf pans. How would you suggest baking in 9 inch pans? Should I only split it into 2 loaves or leave it at 3 smaller loaves? Thanks Mel!
Hi Aubri – it’s quite a hefty loaf, you might try baking three loaves in three 9X5-inch pans. They might be a little less tall but it might work. You could also make two bigger loaves and then use the last bit of dough to make a few rolls or something.
I just did three loaves in my 9×5 bread pans, and it turned out great!
Yay!
Hi! This looks amazing! Quick question: is the vital wheat gluten, well, vital??? I tend not to use it in my breads, but always add about a 1/3 cup of flax. And I want to make sure this bread won’t be a flop without it. Thank you!
I think the vital wheat gluten makes the bread much more fluffy and soft but you could definitely experiment leaving it out. 🙂
Wow really want to give this a try! I bake bread often but have never used vital wheat gluten. I tried making bagels once that called for it but left it out and they were just okay. Your recipe may be the push I need to try this ingredient out. Thanks for the detailed instructions!
I will definitely try this! Thanks.
I love to bake bread, but sandwich loaves have always been a problem for me in terms of slicing them into thin-enough pieces for sandwiches. If we want to just eat a hunk of bread, no problem, but for normal-sandwich-thickness slices: big problem. Do you ever have this issue?
I haven’t really had that problem, Nancy – what kind of bread knife do you have? I have a really inexpensive one (the Rada) brand from Amazon and it works amazingly well.
I used to have that problem as well, but am a huge fan of using an electric bread knife. Super, super thin slices (our preference) without any problem. I have a good bread knife as well, but it can’t compete. Several of my friends have converted to electric bread knives after asking how I could get my slices so thin.
Yes, an electric bread knife is the best for thin slicing. I got mine at Goodwill for a few dollars. Works great! Often see them at Goodwill.
Thank you, Susan and Alicia! I’ve heard about electric knives for this purpose before–I really will have to seek one out. I have a fancy Henckels bread knife, but I just can’t get thin-enough slices with it.
haha! I thought I was the only crazy person who uses an electric carving knife for cutting bread!!! 🙂
Looks great and I” definitely going to try it but I gotta ask – what if I don’t need 3 loaves of bread at a time? Can I freeze before baking? Or after baking? Or cut the recipe by thirds?
This bread freezes great after being baked and cooled!
I have 1/3 recipe rising right now – it is just me plus I only have 1 bread pan 🙂
Also, I don’t have a stand mixer so I modified the method a bit for hand mixing as well as my WheatMontana brand white whole wheat which seems to need more liquid in most recipes.
13 ounces would be about 1/3 of the flour, but I started with 10 ounces to make it easier to hand mix and then kneaded in about another 1.5 ounces at the end to get what I think is the correct feel. We will see – I’ll post back later today. My house is very cool and I usually need longer rise times…
Oooh, I’m excited to hear how it turns out, Liz! Happy to hear you made it by hand and survived! 🙂
http://beardogco.com/theroadhome/?p=17131 some quick photos of my process and results.
Great flavor and texture. I had some work interference and a bit long on the first rise, maybe a bit short on the 2nd and I might bake 5 minutes longer.
I made a little sandwich and a bit of toast from 1 slice for taste testing – good for both!
You are awesome, Liz! I think your bread is perfection!
Do you know how this can be adapted for a Cuisinart food processor?
I do love your recipes! Have you ever had clotted cream? I had it when I was in London. I’m thinking it would go well with this bread.
I love clotted cream, Laurie! Yum! I haven’t made this in a food processor so I’m not sure how it would work; good luck if you experiment!
I noticed in your other bread post that you grind your own wheat. Any recommendations for a good wheat flour for those of us who don’t grind our own wheat? Will using another type of flour change the taste or texture of the bread? I absolutely love your recipes! Thank you for sharing your talent with us!
Hi Jordan – great question. I love the King Arthur brand of whole wheat flour and I think it’s pretty widely available in stores – I’m sure there are other good brands but because I grind my own, I don’t have a lot of experience with storebought wheat flour. Using a different variety of wheat (I use white whole wheat), like red whole wheat, can change the texture and color and density of the bread, but it’s definitely not a deal breaker. The main thing to keep in mind is to not overflour the dough. If using storebought flour, it will be really compact in the bag, so it will be important to fluff it up really well before measuring. Let me know if you have any other questions!
I’m in the southeast (Atlanta Metro area) and the Krogers around me sell Kroger brand white whole wheat flour, for what it’s worth. I know Kroger affiliates are in Alaska and Arizona, where I have family, but I don’t know if they have the white whole wheat flour.