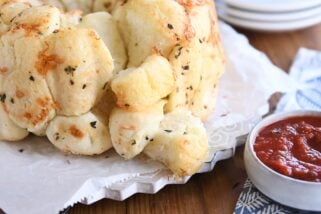
Buttery Pull Apart Bundt Bread
This buttery pull apart bundt bread is fabulous! So easy to make, it’ll wow everyone at the table and is sure to become a favorite. That golden buttery goodness can’t be beat!
This bread. It’s amazing. Talk about taking your every day dinner roll to the next level. Not only is it a showstopper in the looks department, but that crispy, buttery goodness is other-worldly delicious.
And I promise I’m not just saying this, but you guys, this bread is really easy to make. It definitely looks harder than it actually is, which will make you look like a total rock star. The dough is so easy to work with and comes together fast. Plus armed with yesterday’s baking with yeast tutorial, you’ve totally got this.
I got this recipe from a super awesome MKC reader, Madison G. (thanks, girl!) who not only shared her deep and abiding love for this easy pull apart bundt bread, but she also sent me step by step photos of her making the bread. Now if that’s not true dedication, I don’t know what is. (I’ve included her step by step photos at the end of this post!)
So Easy Your Kids Can Make It
We’ve made this bread so many times since Madison sent me the recipe. I think you can easily say we’re obsessed. Over the last few months, I’ve been delegating Sunday dinner assignments to the kids (and deliberately leaving myself out of the rotation so they can get some good hands on time executing a recipe start to finish, and also because, Sunday nap).
So, for instance, one kid will be in charge of main dish, another will tackle dessert, yet another will do a side dish, and since we usually have homemade bread of some sort on Sunday, I give at least one kid the assignment of homemade rolls. They each get to pick the recipe they want to make as long as they approve it through me first.
The kids have totally surprised me with their ability to conquer homemade bread. And this buttery pull apart bundt bread has been one of the most oft-chosen bread recipes to make on Sundays. My 12-, 13- and 15-year olds have each successfully made it all by themselves. I could cry with happiness.
Because this bread is meant to be a little rustic in appearance, it’s perfect for kids to make (and let’s be serious, for me to make, too).
This bread is not hard to make, but I still put together a little tutorial just because sometimes visual learning is the turning point between “maybe” and “dude, totally.”
As with most bread making, I use my Bosch to mix up this dough. It’s a small amount of dough, so I think a KitchenAid can handle it just fine, as well. The dough should be soft without being overly sticky. Add flour gradually until you get there (the exact amount of flour will depend on a lot of factors so don’t stress about how much you use as long as the dough forms a ball, clearing the edges of the bowl and is still soft).
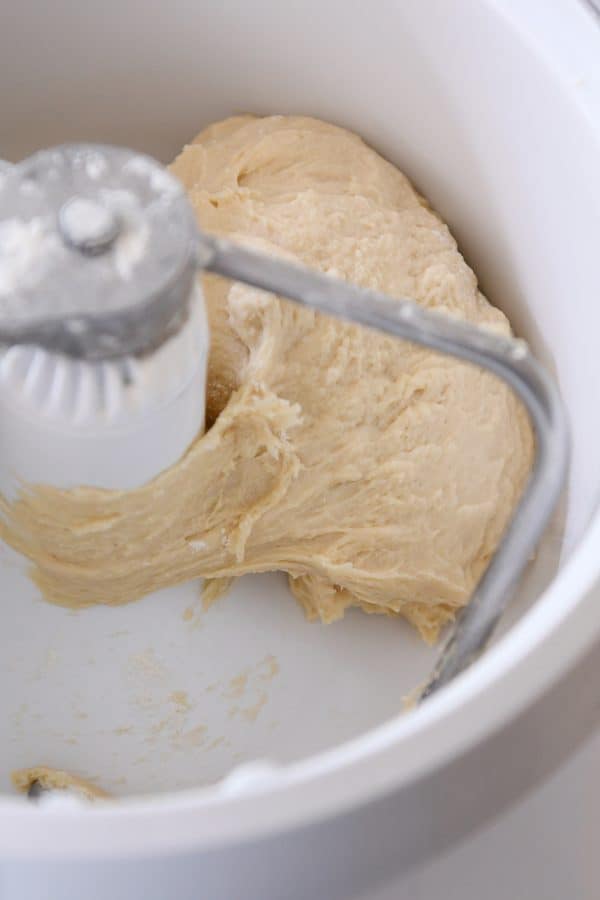
The dough will rest in the mixer for 10-15 minutes until slightly puffy. That’s right! No need to transfer it to another bowl to rise. Totally low maintenance.
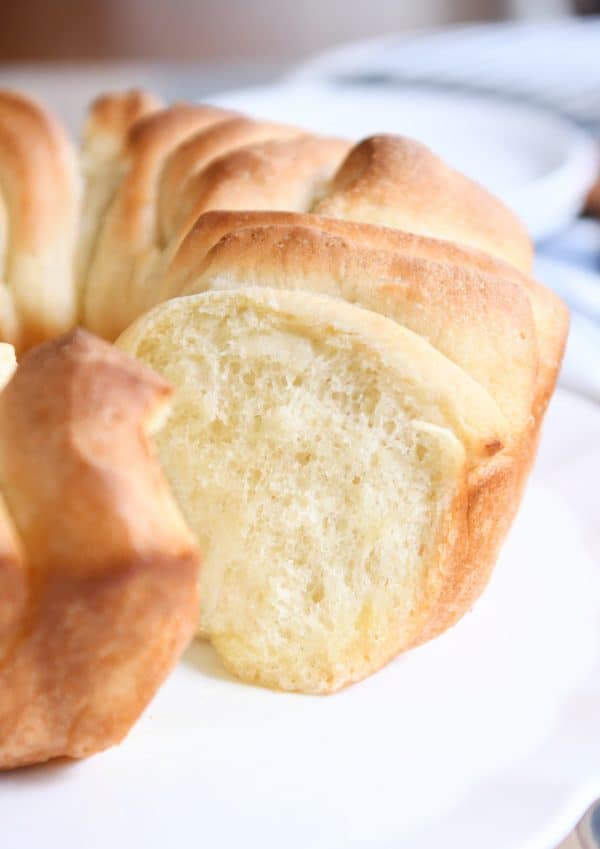
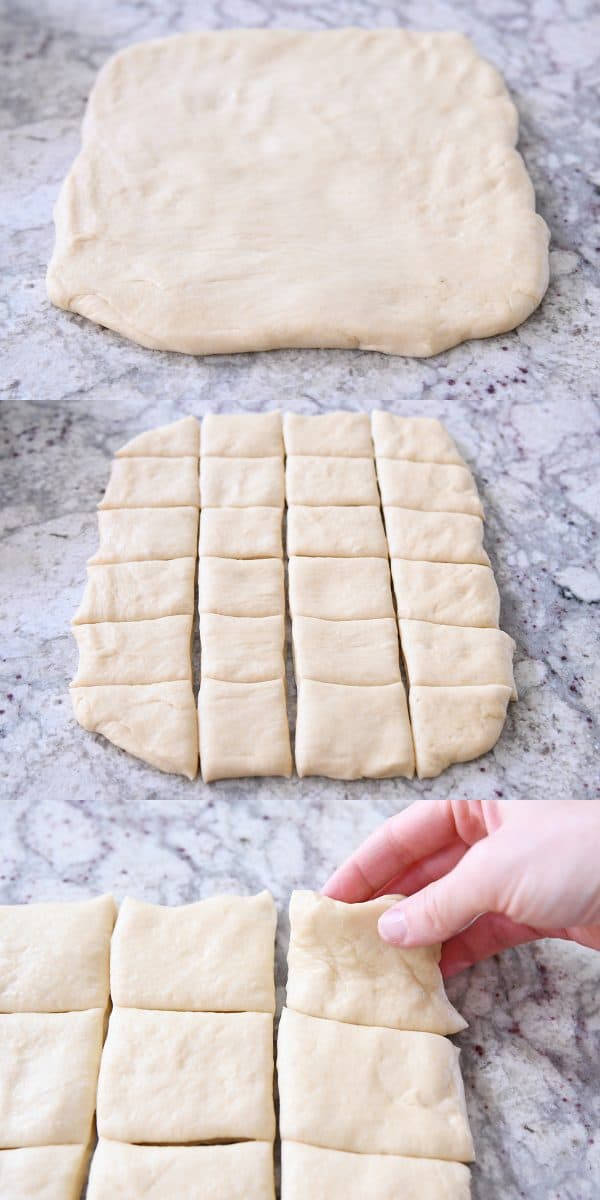
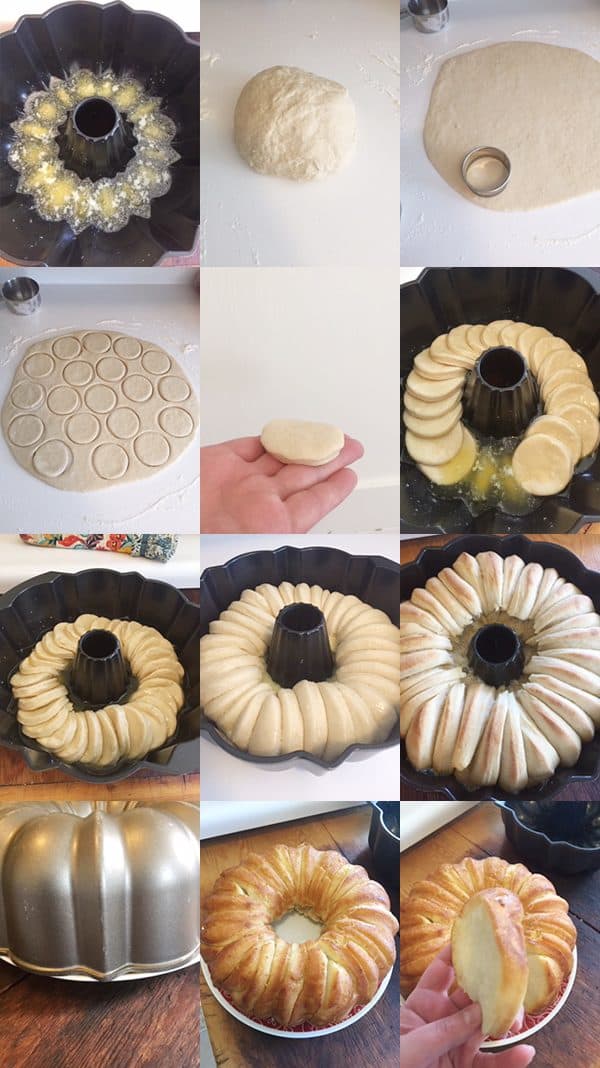
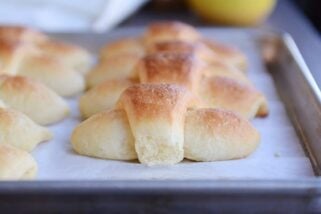
After it puffs a bit, you can press or roll it out on a lightly floured or greased countertop. Madison, who sent me the recipe, cuts out rounds with a biscuit cutter, but I’m kind of lazy, so I press the dough into a rectangle about 12X10 inches and then cut the rectangle into four strips the long way and six strips the short way which gives me 24 little squares. Following?
It’s not rocket science. Basically you want about 24-26 pieces of dough to layer into the bundt pan.
What if I don’t have a bundt pan?
Well, don’t you worry. This bread will convert really well to a couple loaf pans. You may not get quite the same wow factor as the bundt pan-effect, but hey, all that really matters is how it tastes. And I promise this bread tastes incredible no matter what it looks like.
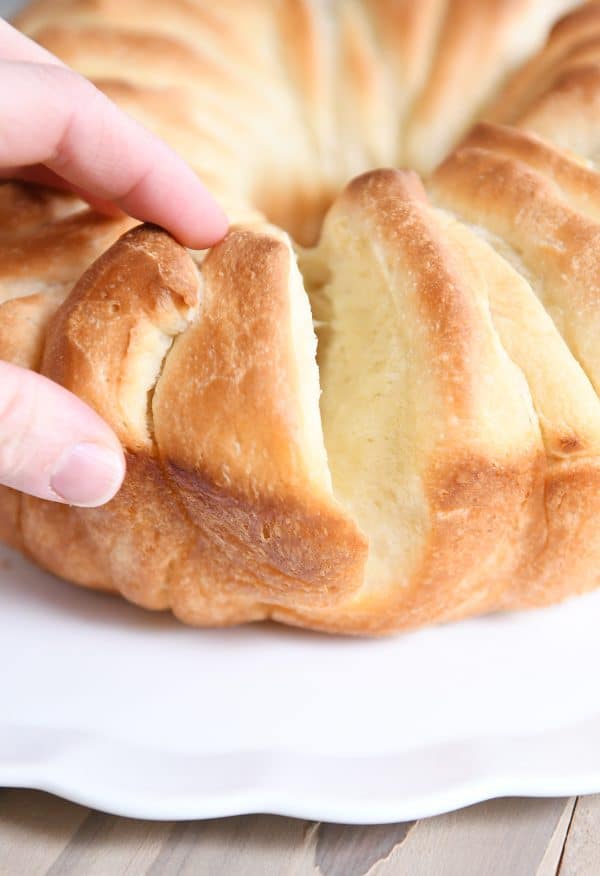
Pour 4 tablespoons melted butter evenly in the bottom of the bundt pan. Then, one by one, take a square (or circle if that’s how you chose to cut them) and dip into the butter and then lay the piece of dough down slightly on top of the one before it. Kind of like a trail of dominoes that’s been knocked down by an annoying sibling.
Please tell me that random visual makes sense to someone else other than me.
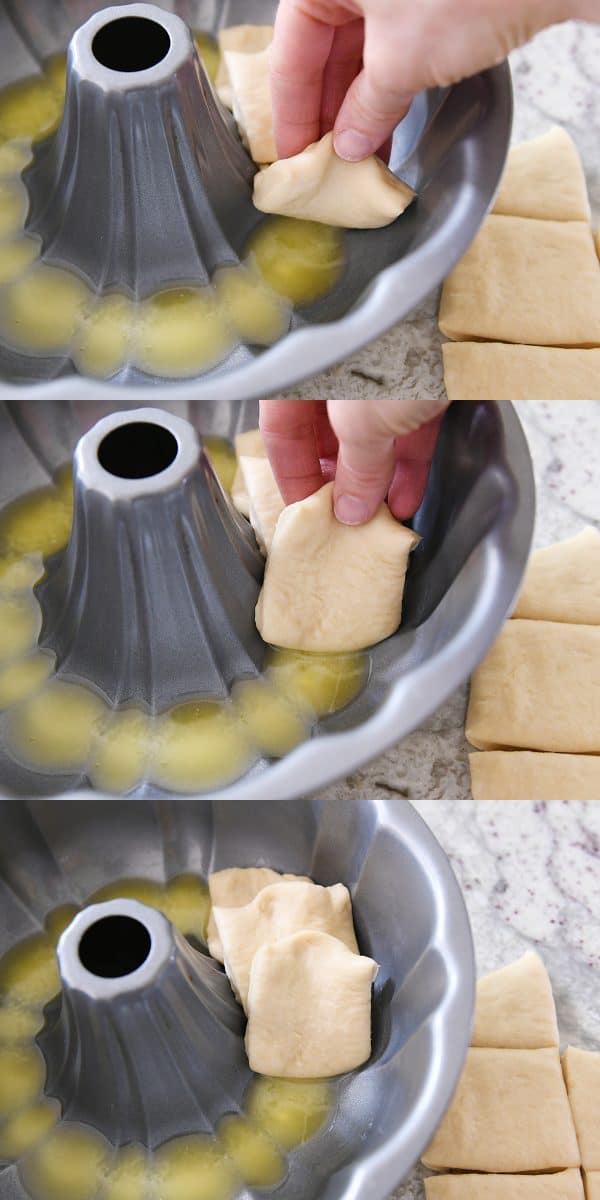
You’ll continue doing that until all the pieces of dough have been dipped in butter and laid to rest in a single layer around the bottom of the pan.
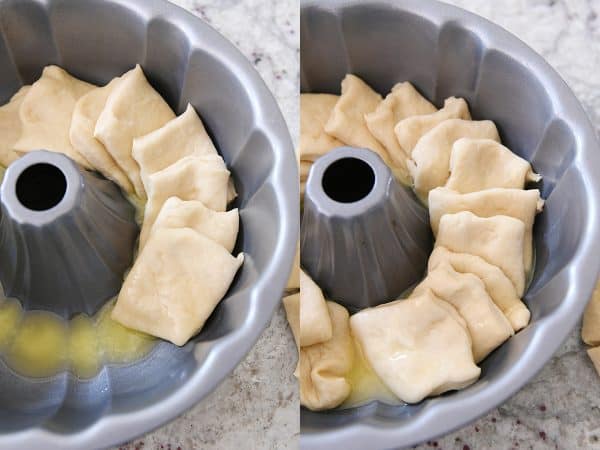
Toward the end with the last few pieces, you may need to reach in and adjust the dough squares a little bit to fit in the remaining pieces.
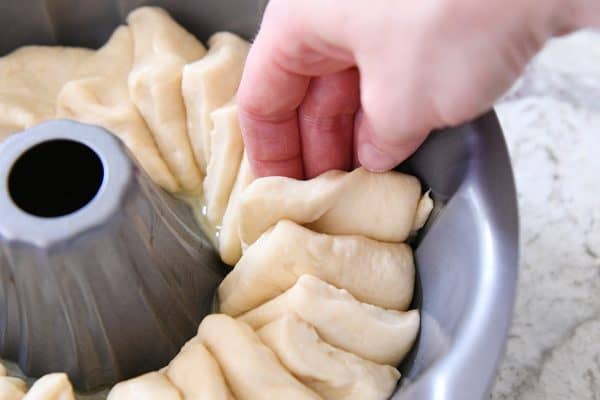
Cover the bundt pan and let the dough rise until noticeably puffy. Then, and don’t think twice about this, pour the remaining 4 tablespoons melted butter over and around the top of the bread and pop it in a 375 degree oven to bake for 20 minutes or so. You’re going for super golden. Super crispy. Super buttery.
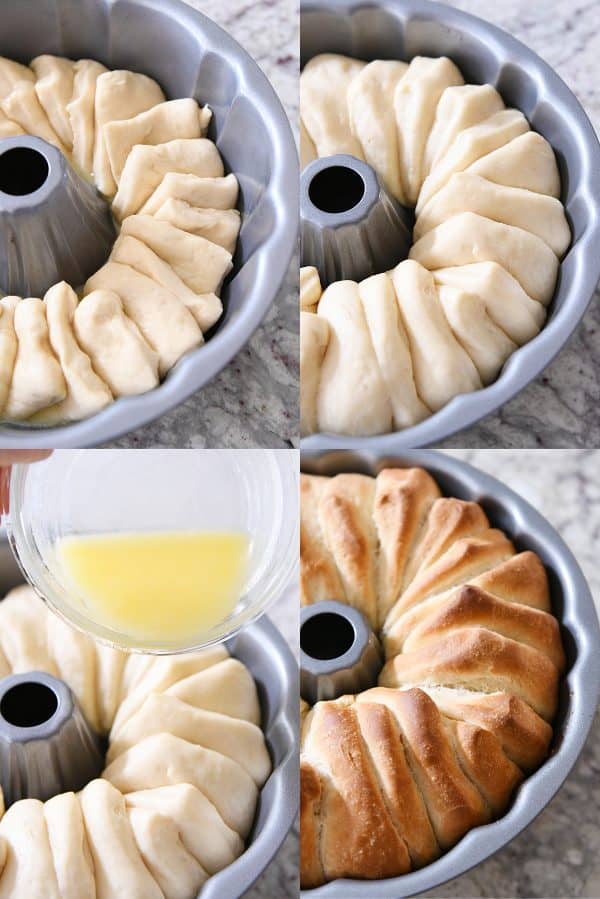
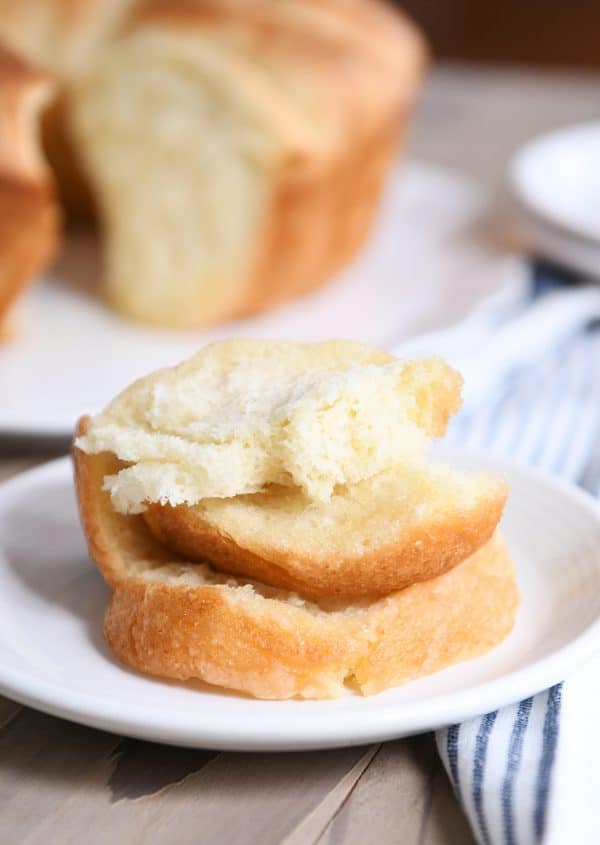
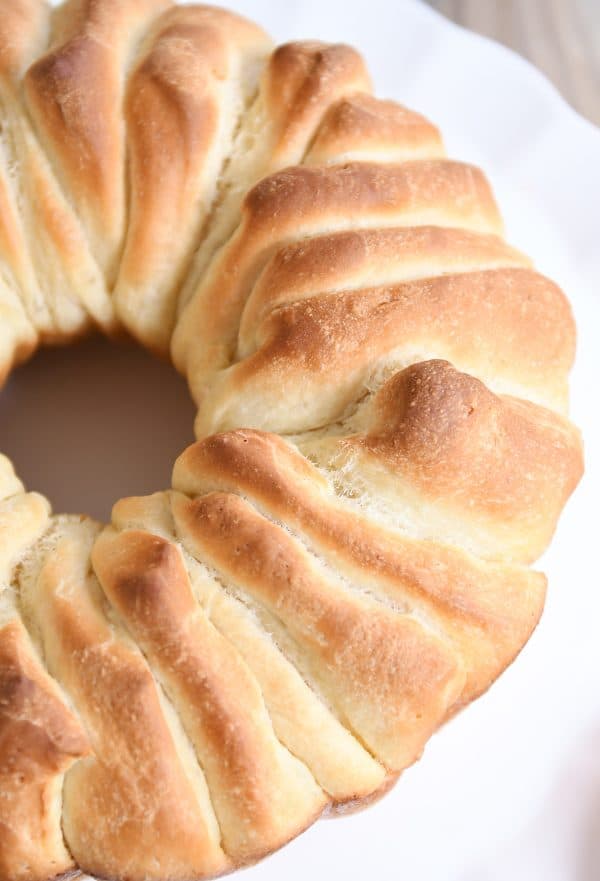
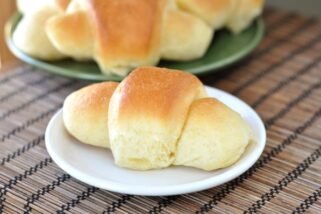
Once it comes out of the oven, let it rest for a couple minutes in the pan before turning it out onto a plate. The easiest way to do this is to turn a plate upside down over the top of the pan and then grabbing both the plate and the pan at the same time, do a quick flip so the baked bread pops out onto the plate.
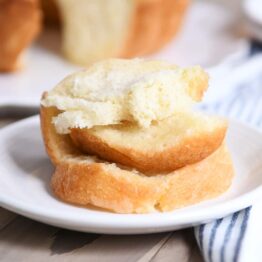
You can leave it bottom side up or flip the bread one more time (with your hands) so the craggy, golden edges are facing up. It doesn’t really matter either way. The golden pieces of bread pull apart easily, and it is delicious eaten plain as can be or spread with a little jam. It makes a fantastic side dish for everything from soup to pasta.
We haven’t done much experimenting yet because we love this buttery version so much, but I have a feeling this would adapt really well to a Parmesan or Asiago pull apart bread. And adding fresh or dried herbs would be a very, very good idea!
As an added layer of support, here are the step by step pictures Madison sent me when she emailed me the recipe. I threw them into a quick collage so you could see how it looks to cut the dough out into circle shapes. Also, Madison uses all the butter on the bottom of the pan (vs pouring half on top like we do).
Truly, this buttery pull apart bundt bread is special. Really, really special. It makes a fantastic “gift” for new neighbors or friends or to throw in with your next take-in meal.
Also, I think it would make a an awfully pretty centerpiece too. Thanksgiving, maybe? Although it’s doubtful anyone would be able to keep their hands off it as they sneakily try to snitch buttery piece after buttery piece. Yeah, after typing that out loud, I think this bread is meant to be freely enjoyed. Dig in!
FAQs for Buttery Pull Apart Bundt Bread
Yes!
Yes, you could make the dough with a bowl and wooden spoon. Just mix and knead the ingredients until a soft dough forms and knead by hand for 3-4 minutes.
I usually pop the leftovers in a ziploc bag and keep at room temp (and then lightly warm the bread before eating leftovers).
One Year Ago: Thin and Chewy Toffee Bits Cookies
Two Years Ago: Instant Pot Smoky Honey Cilantro Chicken {Bonus: Slow Cooker Directions}
Three Years Ago: Brownie Batter Puppy Chow {or Muddy Buddies}
Four Years Ago: Double Chocolate Greek Yogurt Cookies
Five Years Ago: Blueberry and Almond Baked Steel Cut Oats
Six Years Ago: Refried Beans {Made in the Slow Cooker and Fat-Free}
Seven Years Ago: Lemon Cupcakes
Eight Years Ago: Healthy Oatmeal Chocolate Chip Cookies
Buttery Pull Apart Bundt Bread
Ingredients
- 1 cup warm water
- ¼ cup (53 g) granulated sugar
- 1 tablespoon instant yeast (see note for active dry yeast)
- 1 large egg
- 1 tablespoon oil
- 1 teaspoon salt
- 3 ¼ to 3 ½ cups (462 to 497 g) all-purpose flour (see note for whole wheat)
- ½ cup (113 g) salted butter, melted
Instructions
- In the bowl of an electric stand mixer fitted with the dough hook (you can make this by hand, too) add the warm water, sugar, yeast, egg, oil, salt, and 2 cups of flour.
- Mix until combined – it’s ok if it is a little lumpy. With the mixer running, continue to gradually add flour until the dough clears the sides of the bowl and forms a ball that is soft but not overly sticky. Knead for 2-3 minutes. Cover the top of the bowl, and let the dough rest for 10-15 minutes. It should puff slightly.
- Pour half (4 tablespoons) of the melted butter evenly in the bottom of a bundt pan (if you don’t have a bundt pan, you can use loaf pans).
- On a lightly floured or greased countertop, press or roll the dough into a 1/2-inch thick rectangle, about 12X10 inches. Using a pizza cutter or sharp knife, cut the dough into 24 semi-equal squares.
- Grab one square at a time, dip the bottom of the square in the butter in the pan and layer the squares against each other (kind of like a trail of dominoes that has fallen over on each other). See pictures in the post for a visual. All 24 squares should fit in a layer around the bottom of the pan. Lift and rearrange the squares, if needed, to fit them all in.
- Cover the bundt pan and let the dough rise until noticeably puffy, 45-60 minutes. After the dough has risen, pour the remaining 4 tablespoons butter over and around the top of the bread.
- Preheat the oven to 375 degrees F.
- Bake the bread for 20-25 minutes until golden brown on top and baked through. Remove the pan from the oven and let rest for 5-10 minutes before turning out onto a plate or platter (lay the plate upside down over the bundt pan and holding onto both the plate and pan at the same time, flip it over so the bread falls out onto the plate).
- Serve warm or at room temperature.
Notes
Recommended Products


Recipe Source: adapted slightly from a recipe a MKC reader, Madison G. sent me

It came out so Delicious and perfect measurement. Thank you!
Dairy intolerant here. Could I substitute butter for margarine or do you have other substitute ideas? Thanks!
Yes, you could definitely try margarine!
With the Lockdown, I think everyone is doing more baking, but we wanted to ask you a question. Yeast, as you probably know, is almost impossible to find right now, so could this recipe be made using thawed out frozen bread dough?
Yes, for sure!
I made this tonight with your Slow Cooker Tomato Basil Soup (a favorite of mine). It was so easy and so delicious! I am working to get more comfortable with yeast and this gave me a lot of confidence. I sprinkled my favorite garlic bread seasoning into the butter and it was amazing!! Also, my niece (who sometime doesn’t eat much) was downing both the bread and the soup. Thanks so much for great recipes consistently!
So delicious!! Definitely a show stopper.
This turned out beautiful and oh so delicious! My kids asked if we could have it every day 🙂
Mel,
Love your recipes. Making this recipe soon. Looks delicious!
Is there a way you could make it so the picture is included in the print out of your recipes? A visual always helps.
Hi Heather – thanks for the feedback. Whenever I’ve included the picture in the printable, I get an overwhelming feedback that other readers don’t want to waste ink to print a picture. I’m trying to add a feature where you guys can select whether the picture prints or not.
We implemented your idea of having our kids cook Sunday dinners several weeks ago (which has been amazing, thanks for the idea!) and my 12 yr old daughter made this bread today to go along with my 13 yr old’s pot roast and it was HEAVENLY!!! The bottom of the bread gets an almost caramel-y crust that is beyond yummy. It was so easy to make that Ellie is confidant she can do it again on her own. Plus, my son said it was even better than the french bread rolls we typically make (and are his favorite), so you know it truly is divine bread! Thanks for an absolute winner, Mel!
These are incredible. Like caramelized heaven
I am constantly looking for reasons to make this!! It is SO good! I am a serious bread lover, and ohhhhh my. Soft texture on the inside with the most deliciously crispy, buttery top… amazing!! I’ve made this in a bundt pan but I’ve also made it in two bread loaf pans. The shape isn’t as fun, but worked in a pinch! Nobody can keep their hands off this bread… it’s too good! Thank you, Mel!!
Snow day today and this was the first thing I knew I wanted to have to go along with chicken and wild rice soup for dinner. So quick and easy and most of all delicious! Thanks Mel!
The recipe is easy to do and turn out perfectly! Thank you!
Made these last night. So easy and so, so delicious!
OMG just made this so good and easy . Thanks for another amazing recipe
This was so so easy and so good. I make a lot of your roll recipes and this is right up there!
I made this the first time for Thanksgiving and everyone LOVED it. The whole pan was gone in one meal. Since then we’ve made it many times and it never disappoints.
I decided to try out this recipe for Sunday dinner just a couple of days ago. My son helped me prepare it and it turned out delicious. I did not change anything in the recipe. Strawberry jam was delicious on the little buttery pieces. Fun recipe! Thank you!
Instantly my husband asked me to make it again later the same night. Crispy and buttery edges reminded us of some amazing pan pizza we’d get while living back east. So crispy and buttery! No wonder it was the top recipe of 2019!
Mel, you rock. This bread was phenomenal. Thank you so much for a wonderful recipe.
J.C.
Wowza! Challenge accepted and we made this as Herbed Parmesan Pull Apart Bread. I had to put 6 Tbls of melted butter in the bundt pan (and only poured 2 Tblsp of butter on top at the end.)with the seasonings: Italian seasoning, oregano, garlic salt, and 6 oz of shredded parmesan. I dredged each piece in this mixture. This was the most amazing version of garlic bread or breadsticks. My family devoured this one! Mel, your website rocks. Thanks for another good recommendation.
Measurements of the seasonings and did you dredge each piece in the dry seasoning blend?
LOVE LOVE LOVE THESE ROLLS!!!
There was a question on this thread before about making it GF. I was in the middle of making it when I read that it might not turn out using GF flour. :(. It actually did and it was amazing!! I tested it on two GF friends. They loved it. Warm, with butter and honey is the way to go. Like I always say in my house, “You can’t go wrong with Mel”!!
That’s amazing, Jenny! Thanks for the update!
Oh, my goodness- Jenny, thank you for sharing!!! I was reading the comments and hoping beyond hope it had been made successfully GF. Yay!!!!! I’d love to hear what brand GF flour you used, or if you make your own blend. I’ve love Nicole’s GFOAS blends, but am using store-bought at the moment…(yes, I’ve been very much feeling the need to simplify, but if a good blend makes these rolls, I’m in!). Thank you in advance!!
Turned out perfect first time! Super easy and delicious.
Good morning!
What an awesome website. Thanks for sharing!
I would love to make those buttery pull part bundt Bread but I do not have
a Special mixer Can they be made by hand? If so, could you provide instructions! Thanks
Yes, I think you could make the dough with a bowl and wooden spoon. Just mix and knead the ingredients until a soft dough forms and knead by hand for 3-4 minutes.
Do you think you could make this with Rhodes rolls or is it best to make the dough in the recipe?
I haven’t tried that so I don’t know – the dough is super easy so I’d suggest trying that at least once!
OK, I got my brand new Bosch already warmed up and made my very first loaf of bread today…(my oldest’s favorite bread…which is a weird, onion-herb bread..dill and onion powder. Nana always bought it from a local bakery and she loved it toasted. She came home from college yesterday and is currently out with her boyfriend and I can’t wait to surprise her in the morning!) Anyway…. tomorrow, after wrapping alllllllll the Christmas presents, I am going to make a bunch of these for our life group families and freeze them for our party later this month to give them. You make it look easier than the caramels, so that is what I am going with AND I get to use my new mixer. Since I don’t have my cookie paddles yet, I feel I must bake all the yeasty stuff I can. I MIGHT, just might try to make this into a honey beer bread recipe too, just to see if it will work. Beer bread is heavier, but we used to love it so much. (I go in spurts in the baking department. Since I cook for the masses most of the time, I don’t get to cook the fun stuff very often. My kids are in for a treat this Christmas holiday! Bosch belt-busting baking days!
These really are amazing as written. I doubt I do anything different to them at all. I put some granulated garlic in it the first time as I was having Italian, but I am going naked for the rest of them that I am making as gifts this year for Christmas. Love it. So very easy.
Yay! I’m glad you loved this recipe…was wondering how it went for you!
This bread is so simple to make, so soft and delicious! What more can you ask for? I am new in baking bread with yeast but so excited to try many of your yeast bread. Thank you for sharing and warm regards from the Philippines!
Instant Favorite! I used all fresh-ground hard white ww flour—not too much! (about 3 to 3-1/4 c.)—and followed the rest of the recipe exactly. Perfectly tender, not-too-buttery, easy-to-make pull-apart bread that is already on the request list for future meals. Thank you, again, Mel!
I also baked it at 350 degrees for 20 min. using whole wheat flour. 🙂
Just made this. I doubled it and cooked in my two bundts and there was a little left for a tester loaf. I am going to wrap well and re-heat on Thursday. It smells and looks divine. At 375 the tops browned quickly and the interior wasn’t done so I reduced the heat to 350 and covered the tops with foil.
We have 20+ for T-Day and I predict this will be wiped out!
Thank you so much for the recipe and the unique presentation.
This really is ridiculously easy, and sooooo yummy! Thank you for the recipe!
Hi Mel, I do have one question re making these in advance… I’m working with only one over here!!! If I prep in the morning and place in the fridge during the last proof, do you think they should come to room temp b4 baking or go straight in the oven with a longer bake time?
BTW just added the apple cranberry pie to the menu. 12:4 guest to pie ratio!!
Haha, that’s a great dessert ratio!! As for the rolls, yes they can definitely go in the refrigerator, just make sure if they haven’t risen fully in there that they get pulled out in time to rise before going in the oven. If the bread is fully risen it can go straight in the oven from the fridge.
Thanks Mel! I really appreciate the time to take to reply to our questions. I hope you have a great thanksgiving!!
Thanks, Amy – you, too!
I did a trial run for Thanksgiving. It was great. Will be making two for Thanksgiving. Did have to add more flour.
Ditto, me too! They are wonderful and so easy!!! Thanks again Mel!
Fun to see this on your site. This style of bread was a specialty of my grandma. I’ve never seen anybody else do it outside of my family. Such a lovely recipe! ♥️
This bread! Outstanding in every way: ease of prep, flavor, texture, presentation! And to top it off, it makes exquisite toast. Can’t wait to make it again.
Mel – I am already thinking about Christmas cookie baking. Because of work and well, life in general, I am in a place where I need to re-think my usual, bake a ton of different kinds of goodies for cookie plates model. I was considering making some of these, freezing them, then giving them as Christmas gifts. How would you recommend that they be frozen and how far ahead? Would you recommend that be defrosted prior to gift giving with a note to wrap in foil and reheat at 350 for 15-20 minutes?? I have made a garlic parmesan version of this twice now and my family loves it. I do also have a few mini loaf pans for mini versions – maybe a cinnamon sugar version to be given along with your hot chocolate mix…. OK, now I am spiraling. Thank you for your advice!
Hey Anna – let’s see, if it were me, I’d probably bake and cool the bread and then freeze in a double layer of plastic wrap (or a large freezer ziploc bag if they come in a size that will fit the bread). And I like your idea of giving them a note that says they can reheat the bread in the oven. Sounds like a fun idea!
Mel – thanks for the quick response! Would you defrost the bread before gifting it or gift it frozen??
I think I’d gift if frozen if possible so it stays fresh tasting as long as possible (and they can thaw when they want to eat it!)
Great – thank you!
These are amazing!! Thank you for all your wonderful recipes. I was wondering if you can freeze these after they have been baked and cooled?
Yes, I think so! They never last quite that long around here but most yeast breads freeze pretty well.
oh my goodness, this was heavenly! i don’t usually use salted butter but per your recommendation i did and it made all the difference. this will definitely be a regular at our dinner table.
You are exactly right! I made this tonight & I will be making it for every holiday & for a gift for people. This is super easy & so delicious!!
This was so yummy!! A big hit for our family! Thank you! How do you recommend storing the leftovers?
I usually pop the leftovers in a ziploc bag and keep at room temp (and then lightly warm the bread before eating leftovers).
This is theeee best thing that can happen in a bundt pan that doesn’t involve chocolate. My whole family died and went to heaven… we may have even ignored the chicken and salad and just plowed through the bread. I did sub milk for the water because that’s how my roll recipe is but honestly I can’t say enough about the deliciousness and EASE. Thank you thank you!!!! A MILLION STARS
I tried this recipe today because the holidays are coming up soon. Not only was it easy to make, it is outstanding to eat!! My husband and I are both bread lovers. He also has a sweet tooth so the idea of cinnamon bread or monkey bread popped into the conversation quickly. Lol. I would rate it as many stars as possible plus a couple!
Thanks for sharing this great recipe online!
Thanks so much, Lorrie! We’ve made this at least once a week for the last month or so. I’m so happy others are loving the recipe as much as we are!
I used my trusty bread machine recipe for this so I can’t comment on the recipe. But my family was tickled by the way I baked this. They loved the pull-apart form and it was fun to have fresh bread with our soup. Thanks for the inspiration!
Glad to know the bread machine worked with this!
If using active dry yeast (and dissolving in 3-4 tbsp of water as you suggest) instead of instant yeast, do you still add the 1 cup of warm water the recipe calls for?
Yes. Use a total of 1 cup warm water.
Yes! Still add the water. You can decrease the 1 cup by a few tablespoons if you need or just keep an eye on the flour and add a tiny bit more to compensate for the water used to activate the yeast.
This looks delicious but I don’t have a bundt pan. Can I use an angel food cake pan? Or am I better to use 2 loaf pans? Let me know! Thanks.
An angel food cake pan might be a disaster because the butter will probably leak out the bottom. I’d suggest using two loaf pans.
This was so yummy and surprisingly easy. I even messed out cutting my squares and ended up with too many and it all worked out. Next time I may add less butter because it was sooo decadent. This goes on my “approved for company list.” Thanks!!
Would you bake on Convection? If so, do you need to lower the temp?
I usually do standard bake but if you wanted to bake on convection, I’d probably lower the temperature by 25 degrees.
Wonderful! Our family enjoyed it. Thanks! I’m looking forward to trying it with various additions: cheese and herbs (as you mentioned above) and cinnamon and brown sugar and ??? who know what other possibilities there are!
I agree! The possibilities have me so excited!
I was gonna shy away from the recipe because I didn’t have a bundt pan. But after so many good reviews, I had to get one! I made a double batch, one half of buttery rolls and the other half for your monkey bread. Both of them Delicious!!! The dough is so soft and nice to work with. Thanks Mel!!!
I’m so glad it ended up being worth buying a bundt pan for, Jocy! Love the idea of making a sweet version!
Thumbs-up from us! I made this to go with some chicken noodle soup since the weather is getting cooler and it was just perfect. I used half red wheat/half all-purpose flour and it turned out great. My husband couldn’t tell and even said, “Are you sure you didn’t just use crescent roll dough?” because it was so buttery and delicious and not whole-wheat-y 🙂 Thanks for such a tasty (and pretty) bread!
Awesome!
Will dough cycle with bread machine work with this recipe? I do not own a stand mixer.
I don’t have a bread machine but I’m guessing it would work as long as the quantity of ingredients fits in your bread machine.
Hi Emmi, I have not made the dough in the bread machine, but the amount of flour is similar to other doughs/breads I’ve made in mine so I think it would work. I would just change the order you add the ingredients in: water, oil, and egg first in the bottom; then flour, sugar, salt; then make a little “well” in the top and add in the yeast.
Again, I haven’t tried it but if I did, that is what I would do! I hope that works for you!
I just tried this in my bread machine today and put the liquids on the bottom, then the dry stuff on top …just kinda threw it all in there and it worked perfect! It’s baking right now so hopefully it tastes ok!
Great feedback for those that have been asking about using a bread machine. Thanks!
I made this bread for lunch today and it was out of this world!! I had put meatloaf and potatoes in the oven on time bake so they would be ready after we got home from Sunday morning church and we had invited some friends over too… anyway when we got home I was like “This meal needs bread and I’ve been wanting an excuse to make that Buttery Pull Apart Bread.” So I proceeded to throw it together just as fast as I could! It was finished baking when everyone was about finished with the rest of their meal but that didn’t matter! They (me included) all ate as though they hadn’t had any food yet!! Delicious and yummy seem like such tame words to describe this bread:) ! After that we finished of the meal with apple crisp and ice cream… Good food and good times!! Oh and one little tip that makes cutting the dough really quick and easy is to use a pizza cutter…