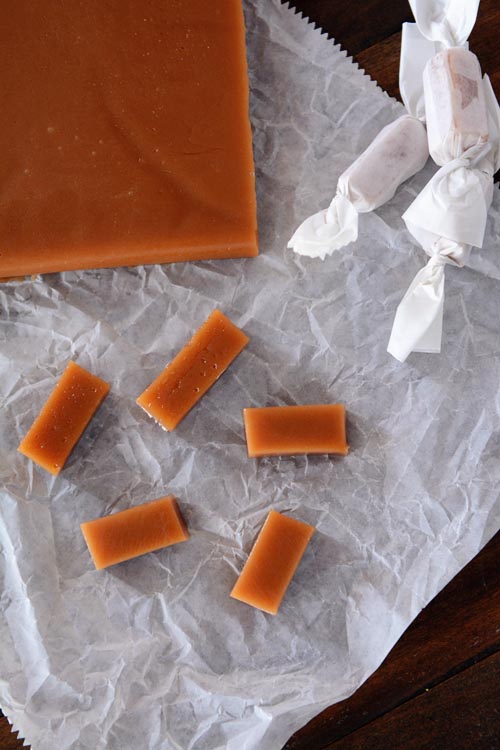
Foolproof No-Stir Homemade Caramels {With Step-by-Step Tutorial}
This amazing recipe for homemade caramels is completely foolproof! No stirring required; the caramels are rich and buttery and creamy…and perfect!
Although I have several caramel recipes here that I really quite adore, I was so, so happy when my Aunt Marilyn passed on this foolproof, no-stir caramel recipe to me a few weeks ago. (I actually asked her about it in my quest to make about a bazillion caramel apples, and in the process, it kind of stepped in as my new go-to caramels recipe for literally everything caramel.)
I’ve never made an easier caramel recipe and I really mean that.
Other than gently combining the first set of ingredients as they begin to melt (and then stirring in the vanilla at the very, very end), it truly is no-stir throughout the cooking, caramelizing process which means you don’t have to sit and babysit the caramel while it cooks.
I mean, don’t go off and start that new DIY doghouse you found on Pinterest or anything, but you can certainly unload the dishwasher and help child A and B with their homework while the caramel bubbles away.
The trick is to use a heavy-bottom saucepan (nothing fancy; my old school Farberware set is plenty good for the task) and moderate the heat of your stove so that the mixture maintains a simmer without burning.
If you turn down the heat and the caramel stops simmering, simply increase the heat little by little until a good simmer is reached and then leave it there. You’ll be good to go.
These caramels are rich and creamy and perfect. I’ve made them at least a dozen times in the last couple weeks (don’t ask why; I fully recognize that’s way too much caramel for any normal person) and I’m sold. Fantastic, perfect recipe.
You will need a candy thermometer; my favorite one is this electronic model. I’ve been using it for years and it still cooks at the right temperature (because, you know, that’s kind of important) and it hasn’t failed me yet.
It will vary slightly, but if you are wondering on timing, I’d say plan on about 45 minutes to an hour to make the caramels start to finish (not counting the cooling time).
I included a little step-by-step tutorial below the recipe. So what are you waiting for! Go make some caramels already!
One Year Ago: Loaded Broccoli Cheese and Bacon Soup
Two Years Ago: Glazed Chocolate Chip Scones {And Halloween Recap}
Three Years Ago: Hearty Turkey and Bean Chili
Foolproof No-Stir Homemade Caramels
Ingredients
- ¾ cup (170 g) salted butter
- ¼ teaspoon salt
- 1 cup light corn syrup
- 2 cups (424 g) granulated sugar
- 2 cups heavy whipping cream, divided (meaning, you’ll add half at the beginning and half later)
- 2 teaspoons pure vanilla extract
Instructions
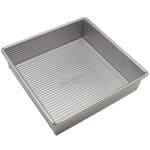
- Line an 8X8-inch pan with parchment paper and set aside.
- In a medium heavy-bottomed saucepan, combine the butter, salt, corn syrup, sugar and 1 cup of the cream. Over low heat, warm the ingredients until the butter is melted. Gently stirring during this part is ok to help combine the ingredients – just take care not to stir too vigorously and splash the liquid high up on the sides of the pan; also, take care to use low heat for this step. Too high of heat can cause the ingredients to melt unevenly and cause the butter to separate.
- Once the ingredients are warmed and melted, increase the heat to medium-low (I keep my stovetop dial between a 3 and 4 the entire time; each stove is different so just keep an eye on the heat). Because these are no-stir caramels, too high of heat will burn the ingredients on the bottom. Moderate the heat of your stove so that the mixture maintains a simmer without burning. If you turn down the heat and the caramel stops simmering, simply increase the heat little by little until a good simmer is reached and then leave it there. You’ll be good to go.
- Clip a candy thermometer to the side of the pan and bring the mixture to a simmer. Cook, without stirring, until the mixture reaches 236 degrees F. Pour in the remaining 1 cup cream. Gently swirl the caramel once or twice with a wooden spoon or spatula to incorporate.
- Again, bring the mixture to a simmer (don’t adjust the heat to sharply – I keep mine set the same as before) and cook until the thermometer registers 245 degrees F.
- Off the heat, carefully stir in the vanilla. It will bubble; just like before, just gently swirl with a spoon or spatula.
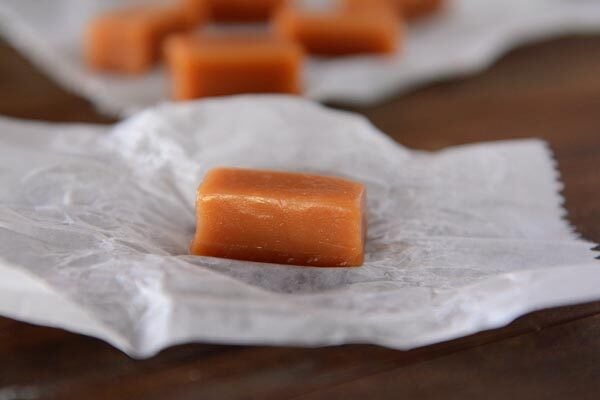
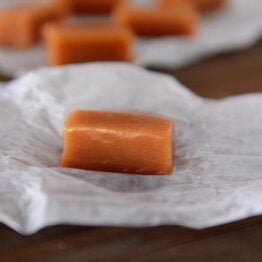
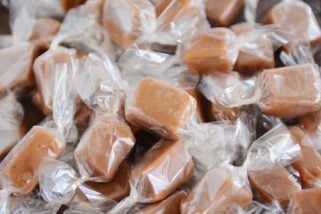
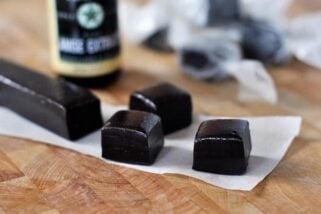
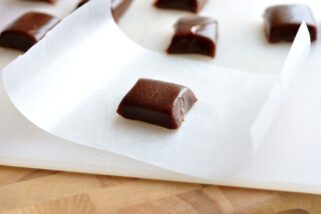
- Immediately pour the caramel into the prepared pan – don’t scrape the sides, just tip the pan until no more drizzles out. Let the pan of caramels cool completely at room temperature before cutting into pieces.
Recommended Products
Recipe Source: adapted slightly from my Aunt Marilyn (added a bit of salt, decreased the cooking time just slightly)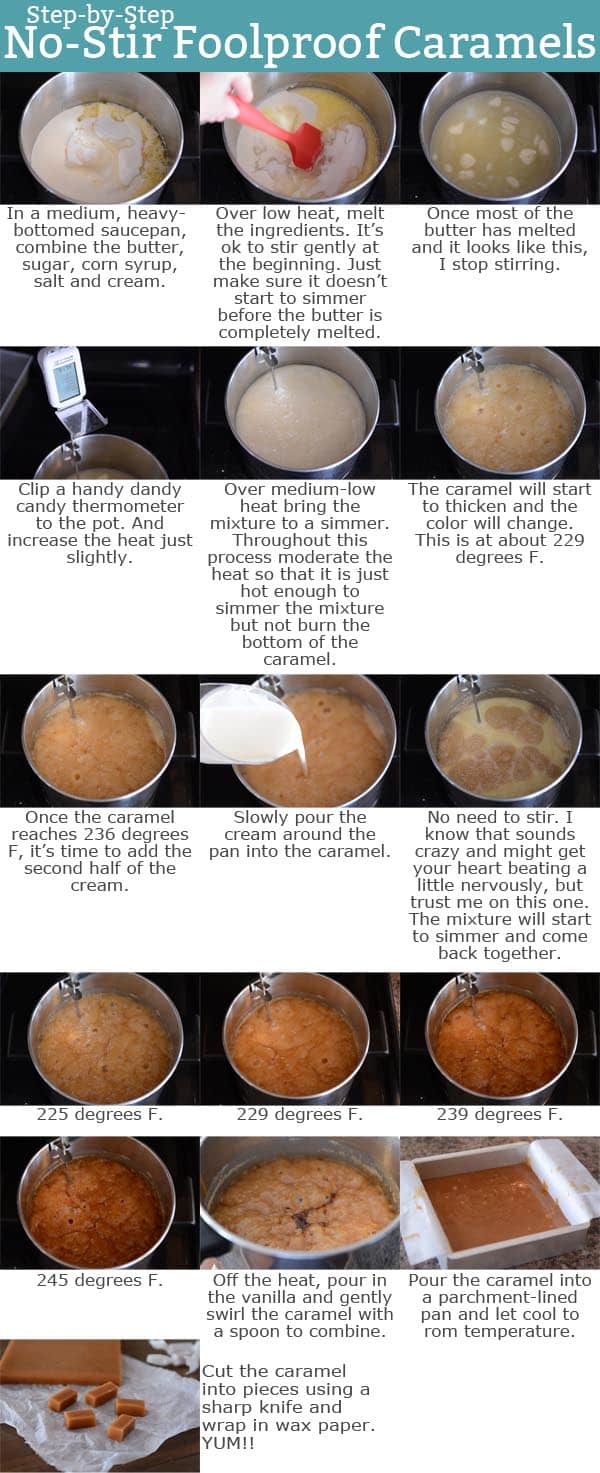
My husband and I made this recipe last night. I did not have time to do it over the holidays. I hate making caramel because of the stirring and I was amazed at this recipe. It was the best I ever had. Will keep it and hand it down.
And my husband can’t keep his hands out of it. Ty ty
Thank you for this recipe!!! These caramels are absolutely delicious! I made several batches before Christmas for parties and gifts and there were rave reviews all around.
Can the recipe be doubled with the same amazing results? (Using appropriately sized pot/pan of course.) Candies tend to be drama queens and the slightest change can set them off!
Yes, I double this all the time!
Oh my goodness gracious!!! These are heavenly!!! I am not a big fan of caramel but these are the absolute best things I have ever tasted in the entire world! yum o!
Hey! What is the approximate time it takes you to cook these?
Anywhere from 45 minutes to 1 1/2 hours (depending on how low I’m keeping the heat). Sorry for the delayed response. I am glad that you liked them!
I made these on Christmas eve to give as gifts and wrapped them on Christmas morning. They where delicious with just the right amount of chew. However I had 1 on Boxing Day and it had gone all crumbly. What do you think I did wrong or could have caused this?
That’s odd, Kimberley – not sure what would have happened. Sounds like the caramels turned to sugar. Sometimes that can happen during the cooking process if the heat shifts abruptly but I’m not sure why it would have happened several days after. Sorry!
Would you recommend substitute light agave syrup in place of corn syrup? Trying to use up what i have in pantry and dont have corn syrup…
I don’t think agave syrup will sub well for the corn syrup – the caramels probably won’t set up the same; I think corn syrup is pretty essential to the recipe.
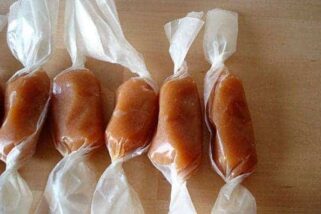
Hey Mel! I’ve made a caramel recipe for years that I absolutely love, but I detest stirring it for 45 minutes so I thought I’d give this one a try this year. Wondering though, have you ever used parchment paper instead of waxed paper to wrap them? I found this on amazon and thought it would certainly increase their cheerablity! http://www.amazon.com/Sweet-Creations-Food-Safe-Parchment-50-Count/dp/B00LA5GKVM/ref=pd_sim_sbs_k_2?ie=UTF8&refRID=17A2SXPEDWBPF902NAWX
Those are very festive and cute wraps, Lydia! I haven’t tried them so I can’t say how they compare to wax paper.
Just finished wrapping my double batch. I was able to get the whole glob of caramel out of the pan thankfully! I can’t wait to give them as gifts. So yummy!
Oh man. I’m kicking myself for not looking at the picture tutorial where you say to line your pan with parchment. I just buttered my pan and now I’m at a loss for how to cut them. But they taste amazing!
Thanks for the feedback, Stacie. I’ll make sure to put that in the recipe.
I am making these right now! Everything seems to be going well, but it seems like it is taking my mixture a long longer to get to the desired temps. Do you think I was too conservative with the heat? I was really worried about burning it. It is simmering and has changed color though.
This happened when I made them too, I was so worried about burning it that I didn’t turn up the heat enough. I slowly increased the heat and the temp went up. Good luck!
Thanks!!
Hey Rene – you can probably increase the heat a bit but if it’s your first time, it doesn’t hurt to play it on the safe side with low heat.
Thanks for the feedback! They turned out great and the kids’ teachers loved them! I’m making a double batch now for family Christmases. I’m going to turn the heat up a bit this time, not too much though. 😉 Thanks for the recipe!
I have made them three different times now and they are so good. Thank you for the delicious recipe. It is a real winner!
Hi Mel, I tried these this week and….success! Thank you so much. I have not had much luck making caramels before but this was so easy. I am wondering if you have tried adding chocolate to these caramels. I have looked at your other recipe for chocolate caramels, but I love the no stir version. Thanks again!
These are wonderful! Thank you. I love the no stirring. Have you tried this recipe with licorice flavoring?
No, but I have another recipe for licorice caramels that is fabulous, although I think this one would be great with anise extract added.
Thank you!
I am making caramel dipped spoons for a hot chocolate bar for teachers at my kids school. Would you cook it a bit longer so the caramel on the spoons isn’t too sticky? Any thoughts appreciated!!
I’m not really sure, Kate – maybe a few degrees higher although cooking it according to the recipe – the caramel should set up just fine. Good luck!
Can the recipe be doubled? I do not have a square pan but do have a 9×13. Thank’s.
Yes! I usually double it and it works great (just make sure to use a fairly big pot so it doesn’t boil over)
Oh man – these look so good!
Question – do you heat the second cup of cream before adding it?
Nope, I don’t heat it before adding.
I’m planning on making your caramel brownies tomorrow and am wondering if you think this caramel recipe would work well for that? If so, would you make the caramels completely, then melt them with the extra cream and put them in the brownies, or would you just make the caramel and pour it into the brownies before the caramel sets up? Thanks for all of your AMAZING recipes!
Hi Lucy – yes, I think this caramel would be divine in those brownies (and serious extra bonus points to you for making the caramel yourself). You could definitely make it ahead of time and cut it into squares and then just use it like the recipe indicates or else if you want to do everything the same day, you could make it and let it cool until thick (probably around 150 degrees or so?) and use it like that to pour on the brownies.
What is the best way to cut the caramel into pieces? Do you use a knife or kitchen shears or something else? Thanks!
I use a really sharp, long knife (in the shape of the popular Santoku knives) to cut them. The sharper the knife the better so it doesn’t get caught up in the stickiness. Also, running the knife under hot water and wiping it dry helps, too.
I lifted the cooled caramels from the pan and then used my pizza cutter. It worked really well!
I used a plastic knife.
I made these last night and they were delicious! The smell was amazing! Since I live in the UK I replaced the corn syrup with golden syrup and the heavy cream with double cream and it worked great. Also I heated the caramel to 250 degrees as suggested in another comment as I live at around 250ft. I’ve never been able to get caramels to harden before and this is the first recipe that has actually worked! I’ll definitely be making these again and again! BTW this also makes amazing caramel popcorn!
I made these last night and have eaten way to many today! This is my first time making caramels and they are delicious and easy!!! Thank you for such a wonderful recipe!
I bake and make several different types of candy, so I am not a novice cook, but I have not found the perfect fudge recipe. I keep trying different fudge recipes, but I am convinced that someone has the perfect recipe. I like my fudge creamy, and chocolaty. Not dry! Can you help me?
I’m afraid I may not be the best person to ask. While I love sweets, fudge is not at the top of my “love” list. If anyone else sees this thread and has a perfected recipe, hopefully they’ll chime in!
I am not a fudge lover either but I really feel like I should be. So, every Christmas I try making a new fudge. This year it was a salted caramel mocha fudge I found on shugarysweets.com. So far it’s my family’s favorite thing I’ve made this year. As for me…still not a fudge lover. But I will say it was SUPER easy to make and it is very creamy. I used Mel’s other caramel recipe, famous Christmas caramels, melted with a bit of heavy cream to swirl into the fudge.
My fudge recipe is incredibly simple. Melt 18 ounces of chocolate in a large bowl. Mix in one can of sweetened condensed milk and any flavorings you want (vanilla, etc). Stir until the fudge comes together in a ball, dump into a pan (lined with parchment or plastic) and flatten it out with a spatula. Chill for an hour or so in the fridge, then cut. It’s smooth, rich, and the flavor of the chocolate that you use shines.
I use my great grandmother’s recipe. It is very labor intensive but so worth it.
4 cups sugar
2 cups cream
1/4 cup corn syrup
2 squares unsweetened bakers chocolate
1 tsp vanilla
Chopped pecans optional
Miss all ingredients except nut and vanilla.
Start cooking on high. Stir vigorously until it boils. Remove spoon and insert thermometer. Reduce heat to medium low. Cook to soft ball 230 degrees. Let stand until cold. Do not put in fridge or cold place. After cooled add nut and vanilla. Using a wooden spoon knead fudge until it thickens and turns to fudge. Press into pan or form into 4 logs and wrap in plastic wrap.
Getting ready to make these today. I’ve made tons of candy but no caramels yet, so it will be fun to see how they turn out. The kids don’t like store bought caramels like the Kraft ones, maybe I can win them over with these. Will post back when they are done.
Thought I would update. I made these yesterday, they were super easy to make, even clean up was easy, just really hot water got all the caramel off. I used my non stick Tramontine pot to make them in. Had to keep my stove to 1.5 but I have a 5 burner gas grill top so it probably heats a bit hotter than an electric or smaller range top. I used my metal bench scraper to cut them, just pushed it straight down. Made it easy to cut straight lines and gave me nice clean cuts.
I was a little worried about how soft they were since I wanted to dip them. But I put them in the fridge while my dark chocolate melted in my chocolate pot (about 10 minutes) and they were perfect for dipping, they held their shape well. You wouldn’t want to leave them in the chocolate long but they were fine for a thorough dip. Once dipped I just left them out on parchment, by evening the caramel had fully set and they were the firm chewy caramel I was hoping for with a very yummy chocolate coating. They will be going on our Christmas candy gift list for sure.
To us they taste more like a toffee than a caramel (not a bad thing), in fact it tastes just like the toffee you make for Christmas Crack (or Christmas Crunch as we call it), just a softer/thicker version. They won the no caramel daughter over with the first bite.
Love the update, thanks Pamela! I’m happy to know they dipped well and I think your neighbors (or whoever gets them) are awfully lucky.
I grew up on this nearly exact recipe! Ours has slightly more butter) My Grandma Rose made them, then my Mom, now I’ve been making them at Christmas for 20+ years. My Mom would chocolate dip hundreds of caramels (and other goodies)every Holiday. This is the best recipe ever. Incidentally, I do not have a thermometer, I test with a bowl of ice water just like Mom. Its not the best, as my results vary- some chewy, some made for sucking on, but always absolutely fabulous! I use waxed paper squares to wrap them in, then eat them till I’m sick! haha. 🙂 Thanks!!
I’m addicted to sea salt carmels. Do you think I could sprinkle these with sea salt after I pour the carmel in the pan?
Hi, I made these last night and they were wonderful. As good or better than the homemade caramels I buy from the local store! My only issue is that I made the mistake of lining my pan with wax paper instead of parchment paper so the caramel stuck pretty good to the wax paper after it cooled! Next time I’ll read the instructions more carefully and use parchment paper to line my pan. Thanks for sharing this great recipe!
Hi! I did this exact same thing! If you wet a clean cloth, than squeeze the excess water and microwave it for 30 seconds, lay it on top of the wax paper for 30 seconds – a minute and it will slide right off!
Mel, would a copper-bottom Revere ware pan be a heavy enough bottom for the pan?
Hi Peggy – I’m not familiar with that type of pan but if it has a thick layer on the bottom of the pan without being just a super thin piece of metal, it should be heavy-bottomed enough.
Mel, I made these today. They are very delicious and don’t stick to your teeth. Are these caramels supposed to be pretty soft?Mine were pretty softish, able to cut and wrap them, but they are still pliable. I am just wondering if this is how they are supposed to be. Thanks
These caramels are definitely soft and chewy. If they seem too soft, adding a few extra degrees to the cooking time can help firm them up next time (which may be due to variances in thermometers and/or altitude).
Mel,
I am so excited about making these. I have had some home made caramels, that were dipped in chocolate. Do you think this could be done with this recipe? If so, what kind of chocolate? It would need to harden, so it wouldn’t be messy.
Thanks!
Yes, I think these could definitely be dipped in chocolate! I’d just use a good quality chocolate that melts well and tastes good. Ghirardellis bittersweet baking chips are my personal favorite.
Mel, these look sooo amazing! Thanks for sharing such an amazing recipe…AGAIN!
Have you tried doubling this recipe? If so, did it work the same?
Mel, making these now? The written instrustions say to butter the pan, but the picture instructions say to line the pan with parchment. I will probably use the parchment,then butter that too. Also, do you think you could cut these with a pizza cutter? Thanks. Wish me luck,I’m going in!!!
Do you have to adjust for altitude? I am at 4500 ft- do I still use the same temperatures?
Good question, Katie. I live at about 2,700 feet. When I made the original recipe (it said to bring the caramel to 248) they were way too hard, so I adjusted the temp to 245 which was perfect for where I live.
I just googled and found this article which suggest to subtract 2 degrees for every 1,000 feet you live above sea level. I haven’t tested this recipe at higher or lower elevations but you could experiment based on the information here:
http://candy.about.com/od/candybasics/qt/Adjusting-Candy-Temperatures-For-High-Altitude-Cooking.htm
Mel, you are so young but man, you are such an inspiration and I just love your recipes. I have shared most of them with my daughters and they get compliments. They always say, ‘oh its Mel’s!” When they ask who is Mel, as they dont have a friend with the name Mel, then they laugh and say you are on FB. SO know your recipes are being loved in South Africa too. Bless you for sharing! Keep it up.
I make licorace caramels for my family and they sure love them. The recipe is just about the same except use sweetened condensed milk instead of cream and then add 3/4 teaspoon black coloring and 3/4 teaspoon of licorace oil. They are really good! Sure enjoy your website.
Hi, couldnt you use just about any flavored oil and make other flavors of caramels as well?
Yes, I think you could definitely experiment with flavors!
I have a big caramel making party with my neighborhood friends every year, and we are going to try this recipe, thanks! Question, why do you say not to scrape the bowl???
I was wondering the same thing. Maybe something to do with crystallization?
I didn’t see the instruction not to scrape the pan; when I did the little crystallized bits on the side of the pan where the surface of the caramel had been got into the caramel; when I ate the caramels I got quite a few with little hard (not crystalline just hard caramel) chunks mixed in. They still tasted good but it was unnerving to bite into a caramel and wonder if it was going to be tough!
I love homemade caramels so much. In fact, I probably shouldn’t know how to make them. Pretty sure this will up my caramel intake dramatically! 🙂 Thanks for the step-by-step!
Wow! I have always wanted to make homemade caramels but anything on the stove scares me a little. Love the step by step tutorial – looks like a fantastic recipe!
Where did you get that pan? It’s super square and straight and I must have it.
I agree. You must have it. But unfortunately Wilton discontinued making these pans which is a travesty since they are amazing. The sides are perfectly straight and I love them dearly. I bought them years ago and when I went to find the link to post here, I realized they don’t make them anymore. People rave about the Fat Daddio pans (amazon). You might try those. Does it make you think of that time we acted like professional cake decorators in Wisconsin? Think: purple pansies.
I found this one on amazon:
http://www.amazon.com/Parrish-Magic-Line-Square-Pan/dp/B000A8J31E/ref=pd_sim_hg_1?ie=UTF8&refRID=04GN8FZBMB1N8SMAE30T
It has good reviews, it’s a little more but it is made in the USA.
It’s like you can read my mind! Just last week I was thinking that I need a good caramel recipe and you’ve once again delivered. Thanks Mel!
YEAH for Aunt Marilyn! These caramels look amazing, Mel! Now, My fingers are crossed that you will find time to perfect a salted caramel version. Thanks to you, I am addicted to salted caramels! 🙂
I have been making WAY too many caramels lately, too! I haven’t lost a filling yet, but I think I’m close. Oh well, I have to try your version now 🙂
Also wondering about the caramel apples, if it would be suitable and would you just dip them in when finished instead of pouring it into a pan?
looks really yummy and a nice addition to the toffee I make as Christmas treats. I would also like to know how long you think these keep.
Looks fantastic!! I’m curious as well- could you use this to make caramel apples?
These look so delicious & easy enough to actually try!
Question – thinking about making these for a cookie exchange & possibly as gifts for Christmas. What do you know about storage – ie should we store in fridge or room temp. How long would they last before you should eat them?
Thank you!
Hi Erika – once I wrap the caramels in waxed paper, I store them in a covered tupperware-like container for a week (but you can refrigerate them covered for even a little longer than that – just be sure to take them out and let them come to room temp before serving so no one breaks a tooth).
Hi Mel,
I love the recipe. My question is can you make some caramel in advance and freeze to until needed?
Thank you in advance
Sissy
God Bless
I’ve never frozen this, Sissy – but you could experiment and see if it would work.
Can you use this recipe for caramel apples? I have been searching for a homemade caramel apples for a long time! Thanks Mel! As always it looks amazing 🙂
Hi Lisa (and others who asked!) – good question and the answer is yes! That’s actually what I started initially using the recipe for and it works like a dream. I’ll be doing a pretty informal post about my caramel apple process (probably not an official post) really soon but basically, I make this recipe with the same method but after I add the cream when it gets to 236 degrees F, I then bring it to a simmer and only cook it to 238 degrees (instead of 245). I stir in the vanilla and let it cool to 190-200 degrees before dipping in the apples.
Thank you! Can’t wait to try it both ways.
awesome! This Is the exact same recipe that has been in my family for over 45 years and a family Christmas tradition.
These look perfectly soft and chewy! YUM!
Gah, why do I immediately want to make everything you post? Thank you for adding photos, it’s helpful to see the stages.
Update: Made these on Thursday and they came out so well! I was anticipating a burned sugar disaster because it was my first time making candy, but they were delicious.
You’ve got me drooling for homemade caramels – oh my! Printed the recipe, and hopefully today will get around to making these!