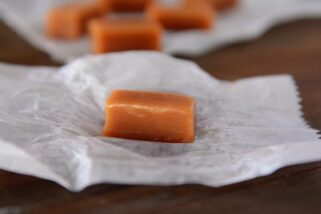
My Mom’s Famous Caramels
These Christmas caramels are the best. Homemade caramels are essential at the holidays and these creamy, sweet morsels will not disappoint.
Thirty years. More than 30 years, actually, these caramels have been part of my life.
Now that you know what decade my age resides in, let me tell you a little secret:
These caramels are the best. Ever.
My mom has been making these caramels at Christmas ever since I can remember.
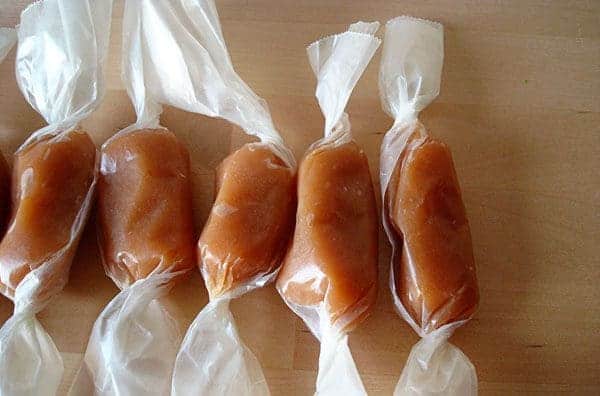
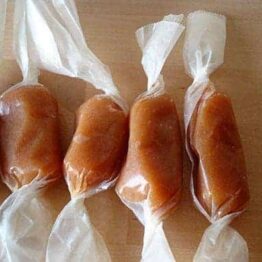
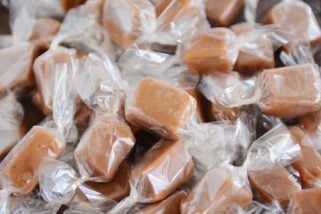
We kids would sit in an assembly line and help wrap them in waxed paper (and sneak a few in our mouths) to give to neighbors and friends.
I have since carried on the tradition of making these. Candy making can be a bit intimidating and scary, but with a handy-dandy candy thermometer (ultra cheap varieties are sold at most stores) and a bit of patience, it isn’t very difficult.
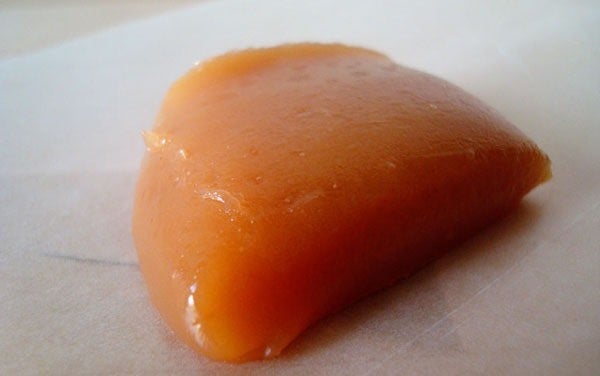
Homemade caramels are essential at the holidays and these creamy, sweet morsels are the only ones I ever make. Thanks, mom!
A Few Tips:
*I think one of the most common reasons candy-making can cause frustration is because of errors in the candy thermometer you may be using. It is a good idea to calibrate your cooking thermometer before each use – and it is quite easy. Bring a pot of water to a boil. After the water has reached a full rolling boil, insert your candy thermometer into the water, being sure not to let the tip touch the bottom of the pot and inserting the tip at least 2 inches into the water and the temperature on the candy thermometer should read 212 degrees F. If your candy thermometer reads a few degrees higher or lower – no fear! You don’t need to go out and buy a new candy thermometer (although long-term you may consider it), you simply need to adjust cooking temperature of your candy the few degrees your thermometer was off in the boiling water.
*This particular caramel recipe is unusual in that you don’t need to stir after adding the second half of the sweetened condensed milk. This is a bonus because you don’t need to slave away at the stove stirring for hours – but still be careful to check your candy thermometer often to make sure the correct temperature has been reached (and not exceeded!). Also, in order for the caramel not to scorch, remember to cook the caramel over medium-low heat. This requires time and patience because the caramel won’t cook as quickly as at high heat, but trust me, unscorched caramels are worth the wait!
*Finally, when pouring the caramel onto a buttered baking sheet, do not scrape the caramel from the bottom and sides of the pan. Simply turn the pan and let the cooked caramel roll out onto the baking sheet – when it has stopped flowing out, stop pouring and resist the temptation to scrape up the caramel stuck to the sides and bottom. Just walk away. Well, don’t just walk a way, but put the pan in the sink and work on spreading out your caramels. You don’t want the icky stuff left over on the pan. Trust me.
My Mom’s Famous Caramels
Ingredients
- 2 cups (424 g) sugar
- 1 ½ cups light corn syrup
- 1 can sweetened condensed milk, add only ½ to begin with
- ¼ teaspoon salt
- 1 cup (227 g) butter
- 2 teaspoons vanilla
- 1 ½ cups chopped toasted pecans, optional
Instructions
- Butter the sides and bottom of a 9X13-inch pan. Set aside.
- In a medium heavy saucepan, add sugar, corn syrup, 1/2 can sweetened condensed milk, salt and butter.
- Over medium-low heat, stirring constantly to ensure the sugar is completely melted, bring the mixture to a boil and add the rest of the sweetened condensed milk when it begins to boil.
- Insert the candy thermometer and clip onto your pan at this point. Once the second half of the condensed milk has been added and the mixture is boiling again, stop stirring to prevent sugar crystallization (which means the caramels will have a grainy texture). Boil the mixture still at medium-low heat, without stirring until the mixture reaches the soft ball stage on a candy thermometer (234 degrees F). If you like your caramels a bit firmer, you can cook them up to 248 degrees F, which is firm ball stage but I prefer mine really soft (I will warn you that most people find this stage a bit too soft so use your best judgment and preference).
- When the caramel reaches the right temperature, immediately remove the pan from the heat and stir in the vanilla and toasted pecans (if using).
- Carefully pour the hot mixture into the prepared pan without scraping the bottom and sides of the pan. Let the caramel cool completely before cutting into squares and wrapping in waxed paper.
Recommended Products

Recipe Source: my mom, Michel W.


Hving never made any type of candy before I was nevous, but I pushed forward. I made a batch and they came out AWESOME. But a word to the wide that the enire process wil take you about 3-3.5 hrs I have found (1 hrs to slowly get the ingredents up to the right temp, 1 hr cooling , and 1 hr to wrap by hand (plus you need to cut little wax paper squares. Couple things I did learn along the way to share >
1) GO DIGITAL – I simply used a digital thermometer s my candy thermometer wasn’t doing me jusice. to make it work I took a Binder Clip from an office supply store and clipped it to the side of the pot and then slipped my thermometer through the top of the clip. It stayed in place and I had a perfect reading down to 1/10th of a degree.
2) NO STIRRING – Definately do not stir once you get to boiling as you will get little pieces of blacked sugar (on the bottom of the pan) into yur carmele. Albeit, I actually liked the little burnt pieces (just a little though) as it gave it another dimention to the carmels. Kinda tasted like a marshmells does after cooking it over a BBQ to brown.
3) Lined Cookie Sheet – I didn’t have enough wax paper so I used Reynolds Wrap NON-STICK Foil. I lined a std sided cookie sheet to pour out the hot carmel onto and it works PERFECTLY! You can alo use this same non-stick foil (cut into squares) to wrap each piece of carmel. BTW, i love using this non-stick foil for many other things too. And if it stops sticky hot carmel from sticking to it, then you know it works extremely well!
4) Cutting into individual pieces – I tried a sharp Santuku knife without success. The carmel kept sticking to the edge of the blade and made it ineffecive, so I ended up using a pizza cutter. Worked perfectly!
5) Wrapping – Seems that a piece of wax paper about 3″x 3″ works best but expirement. I ended u running out and used Reynolds Non-Stick Foil and it works awesome. Still 5 days later they still do not stick to the foil. Highly recomended.
That’s about it. Hope these tips help a few other people. Again, these are awesome, but they do take time and effort to make.
Enjoy!
Craig S – thanks for your detailed review and notes on this recipe! You are right, caramels are an investment of time, no doubt about that. I’m thrilled this recipe turned out well for you and that you liked the caramels. Again, thanks for including your insights!
Tried this one and failed miserably! I had the nasty burned stuff on the bottom of my pan-aggghh. I’ve tried boiling it off, and soakin it for 2 days-still won’t all come off. The caramel seemed to not mix too well-almost seemed to have butter floating on the surface. I cooked it between soft and firm stage. Added the vanilla when done and it didn’t want to mix, but almost clumped in it. I did manage to get them wrapped, but when I went to unroll them, they are either dripping in butter, or they are stuck to the wax paper and just a gooey mess….may have to try again when I have more patience…
Karisa – SO sorry about the burned caramels. I hope if you dare try again that they work out better. You might try this recipe for a more no-fail version. They haven’t burned on me yet (just omit the chocolate for a normal caramel).
I have a similar version of caramels that I make each Christmas. Everyone loves them. I have a tip to share. Pour the caramel into a jelly roll pan lined with parchment paper. Once they’re cooled, simply lift the paper out, with the caramel still on them, onto a cutting board and you can cut them right on the paper. It’s amazing! You can even reuse the parchment paper over and over again. Oh, and I use the Pampered Chef pizza cutter to cut them. It works pretty slick too.
Thanks for the tip, Linda!
I made these yesterday and they are amazing! Thanks for a wonderful recipe! Mine are on the soft side, but I was still able to wrap them. Especially wanted to say thank you for the calibration instructions – the one time I’ve attempted caramels before, they ended up as toffee, and after calibrating the candy thermometer this time, it is indeed 50(!!) degrees off! I used a new one this time, with perfect results. Thanks again!
Allison – I’m thrilled these caramels worked out so well for you. I can’t believe your thermometer was 50 degrees off! I can imagine the chaos that must have caused in cooking candy!
I made these caramels around Christmas time, split them into two batches (one for my family, one for my husband’s family) and still had about 75+ LARGE caramels per family! They were absolutely delicious, and even the non-sweet-eaters loved them! I sprinkled some salt on them before wrapping and it was divine. I used kosher salt because I didn’t have sea salt, but I’m getting ready to make them again this week or next and I will definitely be using sea salt. Thanks for the awesome recipe!
Sierra – I’m thrilled you liked these caramels and I love the idea of sprinkling a little salt on them before wrapping them up. Thanks for letting me know!
Hey Melanie, I have never had luck with caramles, but decided to try this recipe. I made them as directed, stirring on medium-low heat for the first half, and then not stirring after adding the second half of the scm. But, when the caramels reached the right temp,(which took about 45 min-1 hr. overall) and I poured them in the 9X13, I noticed that the bottom of the saucepan was covered in a crust of dark (burned?) caramel. Does this mean they scorched? Is this normal? Is there a way to avoid this…I never went above a medium-low temp? Should I use a less deep saucepan? My caramel was only about 2 inches deep in the pan I used. Thanks for any help. I really want to figure caramel out!
Melanie~ Just made these….they are delicious! Thanks for the super recipe and all the tips! I cooked mine until they reached 240 degrees and I loved the texture. Mine turned out extremely “oily” (maybe from the corn syrup????) but even though they were messy they still tasted great. I was pretty proud of myself as this was my 1st attempt at candy making. Thanks for a great recipe!
I’m going to have to try these out. I have a good, dark, firm caramel recipe but wanted something softer too, can’t wait to try it.
As for the comments about wasting ingredients, don’t throw it out! Caramel is a forgiving candy as it can be recooked. I can’t tell ya how many times I’ve had to chop the caramels up add water and recook them to the proper temperature.
You have to start it on a low temperature add in .5-1 cup water and stir until it becomes smooth and comes to a boil. Then stick in the thermometer and let it go to the right temperature. If it’s too hard to get out of the pan stick the pan in a warm oven for a few minutes and it should become workable and soft enough to remove
Amy F. – so did the finished caramels turn out ok? It is normal if you aren’t stirring a caramel recipe like this one to have a layer of tough/almost burned caramel on the bottom of your pan – that’s why you don’t want to scrape the caramels out of the pan because you don’t want to dig all the scorched pieces out, instead just pour into the 9X13 pan without scraping the bottom and sides of the pot. I don’t know that you need to adjust anything unless your caramels themselves had a scorched taste. If so, then yes, I would recommend using a deeper pot, especially because you want your candy thermometer to be at least 2 inches into the caramel to get a good reading (without the thermometer touching the bottom of the pot). Hope this helps!
Splendid Things – I’m glad your first attempt at candy turned out so well! I’m really impressed. These caramels do turn out pretty “buttery” – due to the butter content probably and not the corn syrup. Anyway, thanks for letting me know you liked them!
TaLaisa – thanks for the tip on recooking caramels. I have never heard of that and have never tried it – so thanks for the expertise.
Love how these turned out. So yummy. I have to admit I was scared when I saw the ‘don’t stir’ directions. I’ve made caramels for years and this went against everything I’ve learned. But I stuck with it and loved that I didn’t have to stir.
There was a moment of brief freak out when I smelled the burning caramel on the bottom of the pan. I thought for sure they would be ruined. I let them cook to 234 and then poured it into a bowl before stirring in the vanilla. I was really nervous about that stuff on the bottom getting into and ruining the flavor of the batch.
They are smooth and creamy and I love the texture. I usually hide my Christmas gift treats in cold storage, so I don’t eat them all and these are dangerously still chewable after all night in there. Good thing they’re the second to last thing to make because they wouldn’t last a week here.
Thanks for the great recipe!
And you’re welcome about the recooking tip. It’s a good one. Undercooked caramels are a drag and overcooked ones are a dental liability. I’m glad I could share the love. The caramel flavor does intensify and the color darkens when you recook them.
TaLaisa – ok after your first comment about recooking caramel, I’ve dubbed you the “Caramel Queen” so I was thrilled to read your comment and know you liked this recipe. I feel honored because obviously you know a thing or two about caramels. Thanks for letting me know you liked the recipe!
Thanks for your reply Melanie. The caramels tasted good, except a little of the burned stuff from the bottom got mixed in when I mixed in the vanilla. I think TaLaisa’s idea of mixing in the vanilla in a bowl after removing the caramel from the pan might help me next time. Thanks for the tips and encouragement! (and the great blog that I check faithfully every day and have passed on to all my family and friends :)) Merry Christmas!
Amy F. – thanks for your good attitude despite the caramels not working out! Let me know if you try them again and thanks for your sweet comment. I’m so glad you like this blog. Have a Merry Christmas!
Thank you for this post! I made them as part of a homemade candy Christmas present for my family. Everyone raved about them!
Rene – thank you for letting me know you liked these caramels! I’m very glad they were a success.
Thanks so much for the recipe,have always wanted to try making caramels. My daughter and I made an attempt at making them for her husband to take to work. We got nervous when while stirring the first 8mins we noticedsome dark specks in the mix( maybe we were cooking it too fast) we thought it was burning so in all my wisdom !! I popped them in the microwave to complete the cooking. ( I make a South African fudge in the microwave so thought it was okay to do) It worked well but we found that all the caramels stuck to the paper. My son-in -law couldn’t use any of the three batches we made.I know you have the solution. Next time we will cook at a lower temp,and not stir the second half ,we did not realize that the browning was normal on the bottom of the pot.By the way they tasted delicious, I still have a batch we put in the freezer that got a few darker specks in them,those wrappers also are all stuck to the candy. Sorry for the lengthy comment.
Gaye – I’ve never had any experience cooking candy in the microwave so I’m not sure how that may have altered the texture and stickiness of these, but I’m sorry they didn’t work out better for you and your daughter. I’m guessing next time it would help to cook them at a lower temperature, especially if your saucepans aren’t heavy-duty. Good luck if you make them again!
Thank you. I am going to try them again tomorrow. I may have to take out a small loan to pay for all these ingredients that I keep wasting! 🙂
Julie – I’m so sorry you’ve had a frustrating time making caramels. Candy making can be so finicky and I feel badly these didn’t work out for you. I think you should be fine going by temperature if you have calibrated your thermometer and it is reading correctly. Here are a few reasons caramels can separate – if the caramel is “shocked” by a sudden temperature change (i.e. the heat is cranked up suddenly) or if they are cooked at too high of a temperature all throughout the process. Another reason they can separate is if they are stirred during the second boil (although this is a reason for debate among candy makers because many caramel recipes state to stir the entire time). I’m sure there are other reasons, also, but I’m not an expert at exactly what could have happened. I hope that helps a little and if you dare make them again, I’ll send good caramel thoughts your way!
I am having the worst time with caramels!! I have made three batches this week and none of them have turned out. One was too soft and the other two were too hard. Even though there was 20 degrees difference between them. I am at a loss. I have calibrated my temperature gauge…it is spot on. My second batch (your recipe) separated and were hard. I don’t know what I am doing wrong. Any suggestions? I’m thinking of just going by “ball stage” instead of temperature.
Tasha – I was so excited to read your comment! I am so, so, so glad these worked out, especially as your first time making caramels. Amazing! Thanks for letting me know.
Anonymous – I use salted butter. I never have unsalted on hand and salted always works out great.
I just made these after never having made caramels before – they turned out perfectly!!! I’m thrilled. I didn’t even ruin the first batch like I usually do because your directions were so good.
Thank you!!
traditions are awesome. traditions involving food are even better. traditions involving sweet treats are the best of all. great recipe, great post!
My mom makes the exact same carmels! That’s awesome! They are sooo good. I can’t pass a season by without making them at least once.
Yummy! I’m going to have to try these as I love homemade caramel.
This recipe looks so good! I want to give it a try, but was wondering if you use salted or unsalted butter? Thank you!
thank you!!! i am so eager to try these, especially with your great intro and description.
Just in time for a yummy Sunday treat-tomorrow:)
I have never tried making caramels and now that I have read this I am anxious to try them. Wish me luck.
Extremely similar to my recipe, except I keep stirring all the way through. I think next time I’ll try your method. Sounds less labor intensive. 🙂 Thanks so much for sharing!!
Your caramels look great! I actually just made some, but I used my grandmas recipe. Hers has sugar, brown sugar, butter, heavy cream, milk, corn syrup, vanilla! Oh, but they are so good! 🙂
Thanks for the recipie! I tried to make carmels last Christmas, but I was pulling my hair out after 2 or 3 ruined batches…I think my thermometer may be off a few degrees, so thank you for the extra tips on making them turn out perfect!!
Heather P. – I’ve never tried adding chocolate but I have thought about it! Let me know if you try it. I’ve always thought if I did, I would stir in about 2 ounces semisweet chocolate into the caramels at the end, being careful not to scrape up any browned bits from the bottom.
Email sent from my Aunt Marilyn:
Caramels were delicious! They had an even “heartier” taste than mine. Mine are more mellow, I think. I really liked them.
Oh, I am so glad you posted this! I was looking for a good caramel recipe.
My mom’s caramel recipe is very similar to this recipe except it calls for brown sugar and a few of the amounts of ingredients are slightly different. I’ve carried on the tradition of making this for Christmas. Thanks for the post, it brought back great memories.
I think you read my mind. I have a caramel recipe that I make every Christmas. A friend gave it to me and it’s pretty infamous around these parts. To me though, there is only one problem with the caramels–no butter in the recipe. So I thought to myself, I wish I could find a really good, tried and true, caramel recipe with butter in it. Wha-la! Melanie is on it! I am definitely making this recipe to replace my butterless caramels this year!
And oh my goodness, did you see you on PW Cooks the other day? You are big time, woman!
Hey Everyone – I’ve updated the recipe with a few tips and hints based on some feedback I received so make sure to look back if you are planning on making the recipe!
Homemade caramels are the best! I can’t bring myself to try another recipe since I’m in love with my own, but as always I enjoy reading your blog and looking at your gorgeous pictures. I just love this “Sugar Rush” feature you’re doing!
I will add my witness that these caramels are great. They are soft and buttery. I have been the beneficiary of these caramels for years, and look forward to them every Christmas. I like them as much as the almond-toffee recip on this blog which is also a holiday favorite of ours.
Walkers
We are going to try these caramels out. Have you ever tried adding chocolate to them? Chocolate caramels are great.
Heather P.
I’m so glad you posted your mother’s recipe. I have seen quite a few recipes for caramel, but I’ve decided to try yours out since it has been in the family for so long. Thanks!
I was just looking for a caramel recipe! These sound exactly like what I wanted! Thanks!
Thanks for sharing this great recipe. I’ve never made caramels and this sounds easy and yummy
These look great! I have never used a candy thermometer. Do you leave it in the whole time or stick it in when the mixture starts the “last boil”?
These sound wonderful! I can’t wait to make them.
My mom also makes caramels around the holidays. I’ve never made them with her, and I can’t ask for the recipe since I don’t own a candy thermometer, but I surely do like them! Thanks for sharing.