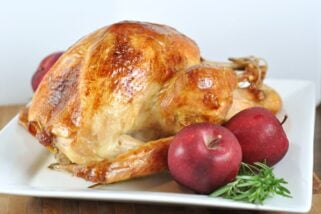
Turkey
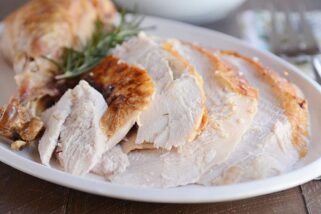
The turkey is usually the main attraction of the Thanksgiving feast, so if you want a no-fail, delicious Thanksgiving turkey look no further!
I used to be scared of cooking turkeys. They frightened me. They are big. They have the potential to transmit food-borne illnesses if cooked improperly. They are heavy. They are unattractive in their naked, uncooked form. I was intimidated.
That is, until my Aunt Marilyn pulled through with her incredible 2-hour turkey recipe/method.
For the record, I’ve made this twice now (my Aunt has made it numerous times).
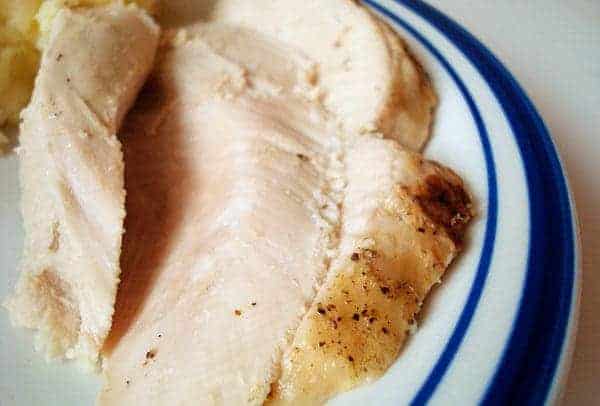
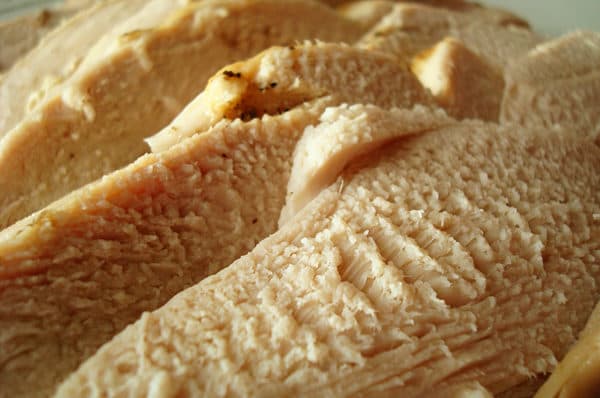
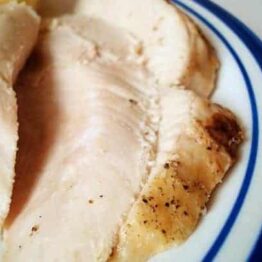
The first time I happened to set my oven on fire, but let’s not dwell on that, because the second time, this turkey was undeniably the juiciest, most tender, flavorful turkey I’ve ever had.
No brining, no overnight bakes and soaks, just old-fashioned seasonings and a unique cooking method.
The name is a tad misleading because with oven preheating time included, it takes a bit longer than two hours, but the result is well worth it. It is the main attraction, after all, so it does deserve some extra TLC.
I’m no longer afraid of the Thanksgiving bird and I will never need another turkey recipe. This one’s a keeper. Oh, and the drippings make unbelievably delicious gravy.
Make Ahead Tip:
The only tip I’ll mention is to be sure and plan ahead for defrosting your turkey! The safest way to defrost a turkey is in the refrigerator. If your turkey is frozen, the best method to plan on is to place the turkey in the refrigerator and allow approximately 24 hours of defrosting for every 5 pounds of turkey. That means, plan ahead! If your turkey weighs 20 pounds, you’ll need four days of defrosting time.
Turkey
Ingredients
- 1 (18-22) pound turkey, I’ve used a 14-pound turkey with great results, also
- Carrots, celery (cut into large chunks), onion (peeled and cut into large chunks), garlic cloves (peeled and smashed)
- Juice of 1 lemon
- 1 tablespoon salt
- 1 tablespoon pepper
- 1 tablespoon poultry seasoning
- Butter
- Brown paper bag
Instructions
- Preheat the oven to 500 degrees and let it heat for one hour. Meanwhile, remove giblets and neck and wash the turkey. Fill the cavity of the turkey with carrots, celery, garlic and onion. Combine the lemon juice, salt, pepper and poultry seasoning in a small bowl. With your hands, rub the entire turkey with the lemon juice mixture.
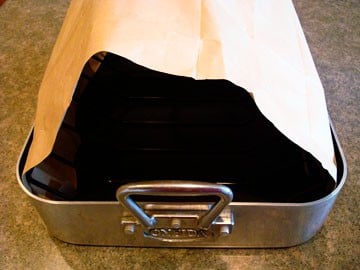
- Place the turkey breast down (this is opposite of how a turkey is normally cooked – so just flip the turkey upside down) in a large roasting pan. Place the roasting pan in the hot oven for as many minutes as the turkey weighs (ie. 19 lb. turkey = 19 minutes). Bake for the allotted time.
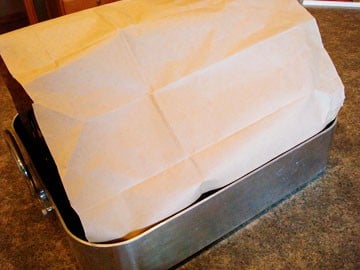
- Meanwhile, grease a large brown paper bag with butter on both sides. Remove the roasting pan from the oven and carefully (because the turkey and roasting pan are HOT) make a tent out of th paper bag and drape it over the turkey, taking care to tuck the sides of the bag into the roasting pan (otherwise, the butter will drip off the bag, leap onto the oven burner and possibly create a large fire…I may or may not know this from experience). See pictures below for a visual image. Turn the oven down to 400 degrees and cook the turkey for two hours.
- Remove the roasting pan and turkey from the oven and let turkey sit for 20 minutes. Remove turkey from the roasting pan and pour the drippings into a medium-sized saucepan. Bring to a boil. Make a slurry from flour and water (to the consistency of thick, heavy cream) and add to the drippings until desired consistency is reached.
Recommended Products


Recipe Source: adapted slightly from Aunt Marilyn
*There is information, like this link, that recommends not using grocery store paper bags for cooking. If you are concerned about that, you can try a large oven bag, but I’ve never tried it and can’t attest to how it would work.
Here is a sideview of the roasting pan with the paper bag tucked INTO the sides. The paper bag should be greased with butter on both sides and tucked in like picture below. With my large roasting pan, I still had to trim about four or five inches off the side of the paper bag so it wasn’t too long to tuck in.
Front View. No biggie, I promise!
I made this for the second time for Thanksgiving yesterday and I am SOLD. Best turkey ever, even my guests raved about it. Sounds like a crazy idea but works so well.
Hi Mel! I ended up using this method again to roast my 25 lb turkey. I had to add an extra hour to the bake time, but it was DELISH!! Very moist and flavorful. I ended up filling the cavity with the ingredients from your brined turkey recipe (ie. sage, rosemary, apple, cinnamon stick, onion) and a little celery, but followed this recipe for the rub on the skin. I got rave reviews from the family!! And, the gravy was awesome, too! I do want to try your brined turkey recipe soon. I have no doubt that it would be as awesome as this one. Thank you and I hope you had a fabulous Thanksgiving. From a fellow Minnesotan!
Mel…help! I’m cooking a turkey for the first time ever. A friend bought the bird…a 27 pound fresh turkey! Can you help? Had decided to use your Aunt Marilyn’s 2 hour method, until I found out the weight of the bird. I also have a convection oven. Advice, please…
The Other Mel
Hi Mel – have you read through the comments on this post? I think I remember someone commenting they used a larger turkey for this so it might be worth checking out. It’s been years since I’ve made turkey this way since I found my favorite brine/roasted turkey recipe so I haven’t tried it out with a convection oven (only recently got one). Is your oven the type that can switch between normal baking and convection? If so, I’d err on the side of using the regular baking function.
Hey Mel!
So I’ve used this method with a 15lb turkey and it turned out amazing. I think I need a bigger bird this year. Would you recommend a 20 lb or two smaller ones and doing them side by side. I didn’t know if you thought they would be moister as two? Love the method by the way, it’s honestly the best turkey I have ever had!!
Ashley
Ashley – can you fit two smaller turkey side-by-side in your oven? If so, I’d do that, I think smaller turkeys tend to stay a bit more moist. However if you can’t fit them in, a larger turkey will work, you just have to fine tune the baking times/temp.
I made this today with a 13 lb. turkey. Although I had it thawing in the fridge for 4 days (instead of the recommended 3 for that size), it was still a little icy when I went to prepare it this afternoon! So I had to finish thawing it in the sink filled with cold water, which was about another hour. So, a word to the wise, check in the morning of the day you want to cook that your turkey is thawing like it should.
Then, my next problem, after cooking for most of the 2 hours, I checked the turkey a little early, and it looked like it was at the perfect temperature. However, after letting it rest and starting to carve, I noticed the legs were not done! So I carved most of the breast meat off and then put the rest back in the oven. I think with having the turkey upside down, it’s hard to stick a meat thermometer in the right place to get a good reading. Also, I may just need more practice and experience in this whole cooking large pieces of meat thing. It’s not my first time cooking a turkey, but it’s been a while.
My third problem was with the gravy. There just was not much drippings; I only got like 3-4 tablespoons. So I supplemented with chicken broth. I don’t have a real roasting rack, so I used a cooling rack, but I don’t think it elevated the turkey enough, and the juices piled up and congealed and burned on the bottom of the pan.
Despite the delay and struggles, the meat was VERY moist and tender, the skin crisp, and the spice/lemon rub added some most delicious flavor. So overall, it was worth the effort.
I like this. It is the best job I ve seen.
I just want to say THANK YOU!! This year I cooked my first turkey and I used this recipe. I was very nervous. It came out great! My family loved it and couldn’t get enough! So tender and juicy!
Thanks!
Thanks 🙂
BreeAnn – yes, go ahead and butter both the top and under side of the brown bag. Good luck!
So I did this last year and I have to say that it worked great!! It was amazing and when I told my guests that I did it in 2 hours they were very surprised. I’m going to try doing a 24.5 lb turkey and leave it in a little longer. It was so juicy and tender. Thanks for sharing this secret recipe. I love getting your recipes every day and it gets me excited about cooking something new! I’ll let you know how the larger turkey turns out.
Hello- I was introduced to your blog from a friend and have been making lots of your recipes! I am excited to try making this turkey tomorrow, but I am wondering, when you say to butter both sides of the bag, do you mean underneath the bag and on top of the bag? Or do you just mean all sides of the bag that are actually touching the turkey? I just want to make sure I do this right! This is my first time making a turkey by myself and I’m pretty nervous!!
Thanks!
Krystyna – there should be enough juices in the roasting pan that the breast of the turkey shouldn’t burn. It won’t get crisp like it would if it was breast-side up but it will stay nice and juicy.
Hey I have a quick question and couldn’t read threw all of the comments to see if someone else asked this…. will the breast burn or get real crisp since it’s down on the pan?? I’ve been doing thanksgiving dinner at my house for 2 years now and I’ve tried 3 other ways and they were very good but not real real juicey and so I read your blog and loved it so I’m going to try it this year. :))) thanks
Will this method work for a turkey that’s been dry rubbed with spices, then slauthered
with a layer of seasoned mayonaise? and if i combine the mayo method along with your 2 hr turkey cooking method would I put only the dry rub on the turkey for the 500 degree cooking, then apply the mayo afterwards before tenting to prevent it from burning. I got the mayonaise method from baking bites.com. thank you
Hi Monica – I’ve only ever made this turkey the way the recipe states. You could try it with your variations – I’m not sure how all those spices/mayo would fare with the high temp for the first step in baking. You’ll probably have to experiment and see how it would work out. Good luck!
I made this the other day with a 15 lb turkey. Just to make sure everyone does it right (I had to read the comments) you grease BOTH sides of the bag! It turned out wonderful! So juicy. It was my first turkey and a huge success. Next time I may try injecting it with spice before baking it.
From the USDA website…
Do Not Cook in Brown Paper Bags
Do not use brown paper bags from the grocery or other stores for cooking. They are not sanitary, may cause a fire, and may emit toxic fumes. Intense heat may cause a bag to ignite, causing a fire in the oven and possibly contaminating the turkey. The ink, glue, and recycled materials in paper bags may emit toxic fumes when they are exposed to heat. Instead, use commercial oven cooking bags.
Monica – I don’t know because I’ve only ever used the paper bag method. I wouldn’t recommend wax paper based on the coating it has and the high heat but parchment may be worth a try – sorry I don’t know for sure!
Will this method work using parchment paper or wax paper?
We made this for Thanksgiving and it turned out so good and was so moist. FYI, we had a 25lb bird and it still took just the 2hrs. The skin came out perfectly golden although doesn’t look very pretty when flipped right side up on a platter due to the golden part being on the under side. I think we will try this right side up next year and see how our results are. Thanks so much =)
I used your recipe and our turkey turned out great. We had your brother Jed and Erin over so I was under some pressure, but I’m glad to say it was moist and delicious. I did add extra time, probably about 40 min to get the middle done, but maybe that is because I stuffed it with too many vegetables. Anyway, thanks! Your post gave me lots of needed confidence!
I just wanted to let you know in case you were wondering that it worked!! And worked perfectly! No need to increase time even a little.
Everyone could not believe how moist it was and I continue to be shocked that I cooked TWO 15lbs turkeys in 2 hours flat!
Thanks:)
I’m using this recipe tomorrow. My mother has little faith in it and right now thinks I’m crazy for thinking that a turkey can get done in 2 hours. I must be crazy!
So I was wondering if this method would work with 2- 15 lbs turkeys cooking at the same time?? Does this increase the time? Will it work at all?? That makes 30 lbs all together so I wonder what I should do?
Thanks:)
TPD – I’ve never tried two turkeys at once so I can’t give you a for sure answer. Do you have the oven space for two roasting pans? You’ll definitely need a roasting pan for each turkey in order for the buttered brown bag method to work. You’ll basically need to check the temperature after the 2 hour mark and bake longer if it needs more time (my guess is you’ll need at least 2 1/2 hours).
I just bought a 12.5 lb turkey and was wondering if this method would work? do I need to cook less than 2 hours or at less than 400 degrees? I just don’t want it to turn out dry. This will be the first turkey I’ve ever made. Thanks for your help 🙂
Jillian – I’ve never cooked a turkey that small, but I would check the turkey after 1 1/2 hours and chances are, it will probably be done. Good luck!
So I was wondering if this method would work with 2- 15 lbs turkeys cooking at the same time?? Does this increase the time? Will it work at all?? That makes 30 lbs all together so I wonder what I should do?
Thanks:)
I did a 19# turkey last year using this cooking method and it was fantastic. I really couldn’t believe this method would work with a large turkey but it brought rave reviews and the best gravy I have ever made and lots of it. Simple, easy, non stressful and delicious. Thanks for sharing.
Just a word of caution to those using a roaster (the separate plug-in unit things). They typically work great for turkeys, but it doesn’t work if you turn the turkey upsidedown…found out the hard way….doesn’t cook the top at the same rate, which is good if its breast side up (doesn’t dry out), but you really need the heat close to get the dark meat cooked. Whoops! We cut it up and finished it in the oven, so it wasn’t lost. Just a bit delayed. Delicious with the paper bag trick though — will definitely do that again. Thanks for the tips, Mel!
Dianne – yes, I cut off the base of the bag so that both ends are open.
Did you cut off the end of the paper bag so that both ends are open?
Will aluminum foil work instead of the paper bag?
Lorie – good question…I’m not sure! I’ve never tried it that way but several commenters have indicated they have used a large lid, so I assume the foil should work the same way.
Hi Melanie, I’ve made A LOT of your recipes, so I am trying this for Christmas dinner. I will use a roasting pan with the lid as Marissa did , so I was wondering, do I put the turkey in the oven at 500 (uncovered) and then take it out, butter the lid and put it back in the oven when the temp reaches 400? Or would I just leave the turkey in the oven covered the entire time since I am not using the paper bag? I hope this makes sense 🙂
Thanks!
Lorie – still roast the turkey uncovered at 500 degrees for the amount of time you calculate depending on the weight. Then, butter the lid and lower the heat to 400 and cover the turkey. Continue to roast until the turkey is done. You don’t need to wait for the oven to get to 400 before you put the turkey back in. Just butter the lid, place it over the turkey and lower the heat. The turkey can stay in the oven while the oven temp regulates. Hope that helps!
Hi! This recipe is awesome! I didn’t have any paper bags, but I had a smallish turkey (12 lbs.) and a large-ish roasting pan with a lid. I buttered the lid and followed the rest of the directions exactly. I was a little afraid of letting the bird go for the entire two hours because it was small, but I took a leap of faith and cooked it for the whole time. It turned out perfect! Thank you!
Marissa – clever idea to use your lid – I never would have thought to do that and sounds like it worked great if you have a lid big enough. Thanks for checking in to let me know!
Yup! I bought a roasting pan that may be cheap, only 30 bucks. But it worked out! I was also going to mention something that would be useful. I stuffed this turkey with my mom’s recipe (which I should give you) and it worked out fine. I used all 2 hours for a 12 lb turkey. As long as the poultry is 180 deg. and the stuffing is 165, it’s done. Oh and the drippings were divine in my gravy. Love you forever for this recipe
Heidi – thanks for the stuffing tips (and I’m glad you got a reasonably priced roasting pan!).
Hi Mel,
You’re so sweet to go to the trouble to look for me 🙂 We made our T-day feast early this year so we ate yesterday! This was my first undertaking of preparing a whole spread for my little family and I was nervous. I can’t even articulate the excitement when I saw this golden beauty emerge from my oven. As we checked it’s temp, it gushed with juiciness. My husband said, “Are you kidding me!!?” As he snapped pictures of it. I used like 4 brown lunch bags and stapled them together. (since I was scared of grocery bags) I buttered both sides thinking, “Who thinks of this method?” They’re probably laughing at my ingenuousness! Alas, I did it and will do this method every year. My mom said she’ll try this one too! THANKS A BAJILLION!
Heidi – so did you end up buying a roasting pan? Just curious! Ok, so I have to say you are BRILLIANT for the paper lunch bag/staple idea. Seriously! So many have been concerned about the brown grocery bag and that is the perfect solution. Love you for that. I am thrilled that this turned out such a juicy turkey. Thanks for checking in already!
I have been looking at roasting pans for a while and then gave up cause I have zero experience with them. I just buy the flimsy disposable aluminum thingys. Thanksgiving is just around the corner! I shouldn’t use one of those bad boys for a massive turkey. I see 3rd degree burns and an ER in my future. Tell me about yours! What size is it and did it come with a rack inside? Do you remember the cost too? THANKS!
Heidi – well, I actually received my roasting pan as a gift several years ago and to be honest, it isn’t the best one around. It is nonstick which means the drippings burn on the bottom of the pan and manages to create a burning smell while the turkey is roasting. Lovely, I know. So I’m not the best resource since I wouldn’t really recommend the one I have. I checked out the Cook’s Illustrated recommendations since I whole-heartedly trust them and they recommend a few pans that are over $200. Yikes! However, they included a KitchenAid brand in their high recommendations that is about $50 and that is pretty reasonable for a good roasting pan, I’d say. The name of the pan is: KitchenAid Gourmet Distinctions Roasting Pan with Rack and the model number is 549023. Hope that helps!
Hi Mel- My friend and I are planning to make this turkey for Thanksgiving next week and I was just wondering what happens to the vegetables you put inside? (I’ve never made a turkey, can you tell?) Do you serve them with the turkey? Do you throw them away? You’re not supposed to use them in the stuffing, are you? Thanks for your help!
Hillary – the vegetables inside of the turkey are usually just there for aromatics – in plain terms, they create flavor in the turkey meat, but I always discard them after roasting the turkey. They usually are so mushy from cooking so long and imparting all of their flavor to the turkey that they aren’t good for much else. Good luck with your first venture into cooking a turkey!
I tried this method for my very first time cooking a turkey by myself and it was somewhat disastrous. First off, I used a 25 pound turkey and that may have had something to do with it (this was the size of the turkey I was given to cook, though.). I adjusted the time, adding on an extra 15 minutes and using a meat thermometer, I determined it still needed more time, so I added another 15 minutes. Finally, the thermometer registered 165 on the thighs, so I assumed it was done. It was not and by the time I had carved it enough to see this, there was no salvage for it. I loved the way the skin got crispy (although it did overbrown a little) and the meat that was cooked, tasted wonderful. Then I tried to make gravy out of the drippings. YUCK! There was no flavor, a lot of grease and charred bits in it. I ended up blending it in my blender to get a smoother consistancy and to attempt to bind it together (it kept separating because of the grease). It seemed a little better after that and I sent it to the party this was for only to hear that by the time it got there, it was a congealed mess. I think I would be willing to try this again with a smaller turkey and lower heat/longer cooking time after the initial high temp crisping. Anyway, live and learn… just thought I would share. 🙂
Brooke – so sorry this turkey didn’t work out for you! It sounds like you may be on to something that with a turkey that large the cooking time at the end needs to be longer, too. I hope it works out better for you if you dare try it again!
Veronica – I think the reasoning is just to get the oven smoking hot but I’m glad it worked well for you this way.
Oh, I also was wondering if there’s a reason the oven needs to preheat for an hour? I just preheated it until it was at 500 (about 15 min) and I didn’t have any problems.
Veronica – I’m sorry the pictures weren’t there to help you. Until I get them updated, please feel free to email me if you need me to put them in right then or give more direction. Regardless, I’m so glad that the turkey turned out! I’m relieved, actually! Thanks so much for letting me know.
Last week my husband and I were grocery shopping when we passed some frozen turkeys and stopped. “Why do we have to wait until Thanksgiving and Christmas to eat turkey?” he asked. “We don’t!” I replied, so we picked one out and plopped it in the cart. I remembered reading this recipe you posted back in November and knew I had to try it since this is actually the first turkey I cooked since it was posted (his Mom usually makes the T-day turkey). Unfortunately, I followed it at a time when the pictures were missing so I had to kinda guess on the paper bag. I cut it so that it was one layer of paper (instead of folded), then my hubby pointed out that the instructions didn’t even say to cut it (except that you cut five inches off to trim it, so I figured you probably cut it to make it a long piece first. I was worried that maybe the paper should have been left in two layers and it might catch on fire since it was only one but it didn’t so I guess I did it right! The turkey turned out fabulous. I used a 13-pounder so I cut 15 minutes off the cooking time (at 400 degrees). It was perfect. Seriously the most moist turkey we’ve ever had! I really like the flavor of a brined turkey, so next time I’m going to try brining it and then following this method for baking it–it should be like the best turkey EVER! I’ll have to let you know how that goes. Anyway, thanks for posting–this is brilliant.
I made this today and it turned out very moist and yummy. My husband was a little concerned when I told him it only had to cook 2 hours, but it was cooked perfectly.
Also, my gravy turned out except that it was way salty. I’m thinking maybe I didn’t add enough of the slurry. It would have been good if it wasn’t so salty.
Amanda – I’m glad that this turkey turned out well, especially since your husband had reservations! Thank you for letting me know (and hopefully the next time the gravy won’t be too salty).
Anonymous – (is this you, Liz?) – I’m glad the turkey was a hit, although I’m sad you didn’t get to taste it. Mostly I’m just glad you are over your fear of cooking turkeys – like me. It’s a liberating feeling, huh?
First I have to say, your first paragraph about your previous thoughts on turkey are (were) my thoughts exactly. I was asked to cook a turkey for the same church party that I took the potatoes to tonight. Eventhough I had never cooked a turkey before I thought this would be a good challege for me. The only reason I said yes was because I knew I had a tried and true recipe from you. I am so glad I did it. It turned out being much easier than I thought. The only thing I was disapointed about was that I never even got to taste it! I droped the turkey off at the church kitchen and someone else carved it. I am happy to report that the person in charge of carving the turkeys came and told me mine was the best! I am totally regreting that I didn’t have him save me even a small piece to try. Oh well, I know I will cook another turkey because it is no longer intimidating.
Danielle – I’ve been waiting nervously for comments on whether the turkey turned out and I was thrilled, THRILLED to read your comment. I laughed out loud about your husband boasting about your turkey to listeners and non-listeners alike. I’m so glad you and family loved it!
Jordan and Heather – likewise, I am so relieved to read your comment and see that the turkey turned out great! I’m especially glad that your gravy turned out delicious. And I guess it goes to show that many interpretations of the “bag theory” work!
I made my turkey this way just yesterday and it turned out fabulous. I just read through all these comments to see how it turned out for everyone and realized that I didn’t cut the bag the way I was supposed to. I only cut out one of the sides and I left the bottom on, so basically I only had one end open to the oven, but it still turned out great! Also, I didn’t use a rack, but I still got awesome drippings and my gravy was so yummy! – just thought I would let you know how it went – thanks for the recipe!
“This was by far THE most moist and juicy turkey I have ever tasted in my life!” This is a direct quote from my husband’s mom, who is not always so forthcoming with the compliments.
My husband was skeptical about the bag thing, but is now boasting our bird to anyone who will listen (and some who will not.)
Honestly I don’t think I will ever try another way of cooking a turkey. THANKS MELANIE and AUNT MARILYN!
Lindsay – sorry the gravy didn’t work out. I looked at the picture on your blog. You aren’t kidding! I’ll have to troubleshoot the gravy issue. Mine seems to turn out just fine (I scrape up the drippings from the pan, add chicken stick or turkey stock and thicken with cornstarch) so I don’t know what could be happening. I wonder if adding a couple of cups of water to the bottom of the roasting pan during cooking would help. Anyway, glad the turkey itself and the stuffing was ok. Thanks for letting me know!
I used your stuffing recipe (yum) and turkey recipe too today. My turkey came out great but my gravy was a disaster. I posted a picture on my blog if you want to take a look. My mother in law was shaking her head in awe, saying she had never seen anything like that. Oh well. We still ate a plenty!