Easy Rustic Crusty Bread with Tutorial {No Mixer, No Kneading}
This homemade rustic crusty bread is the most delicious bread that will ever come out of your oven! No kneading or a stand mixer required!
This is the bread recipe that can change your life. I’m serious. Just scroll down and read through the comments and then you’ll believe me. Here are a couple comments among hundreds of rave reviews:
One of the best bread recipes I have ever made! A real favorite with my family and excellent for sandwiches. Super easy!
I made this recipe for the first time this past weekend and it turned out perfect! It truly was an incredibly easy recipe to follow.
This is the first bread recipe i’ve ever successfully made! It’s delicious and so easy I used active dry yeast, and the working with yeast tutorial was a huge help! great recipe, Mel.
This rustic crusty bread recipe is perfect for beginning and expert bread makers alike. It’s like a perfect loaf you’d get right out of a bakery – for a fraction of the cost. Many artisan-type loaves of bread like this take days to make, but this bread recipe only takes a few hours!
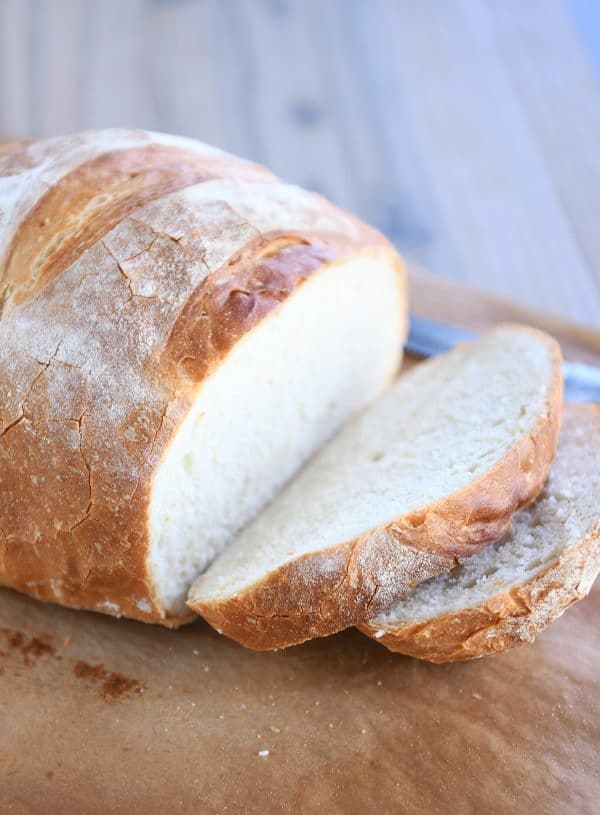
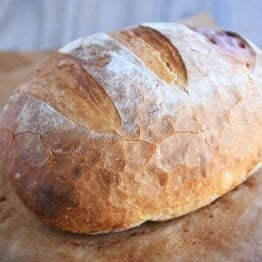
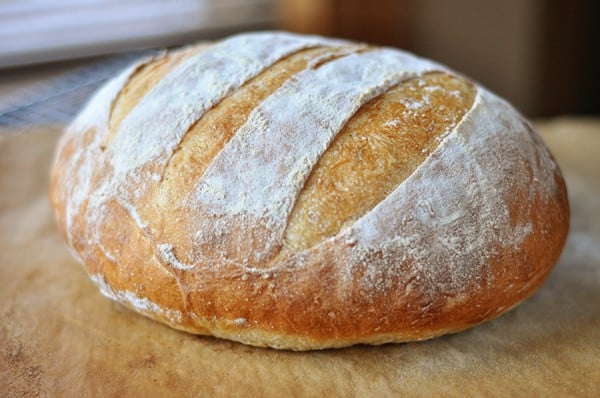
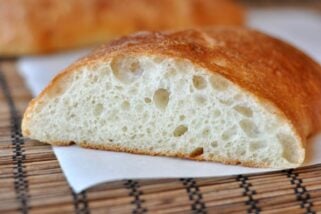
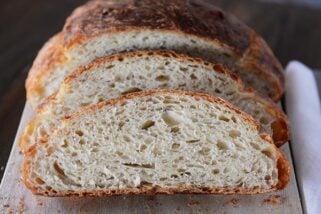
And you won’t believe how easy it is. Not only is it no-knead, but you don’t need a stand mixer, electric mixer or any kind of mixer to make it. Just a bowl and a spoon. From start to finish, it is ready to bake in about 2-3 hours. The crust is golden, thin and crunchy, and the crumb is tender and soft.
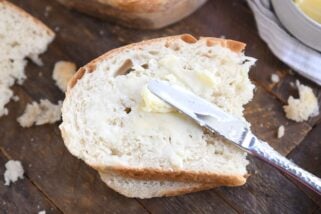
It doesn’t have the airy holes of a no-knead type bread, the crumb is tighter and slightly more dense, but it is glorious for paninis, garlic bread or just served plain (think: tear off chunks as you go!) with a wide variety of meals.
The recipe makes between two and four loaves, depending on how big you want to make them. I usually make two bigger loaves out of the batch, and I like to bake up both loaves the same day and pop one in the freezer for easy access next time we get the hankering for delicious, crusty bread.
How to Make Rustic Crusty Bread
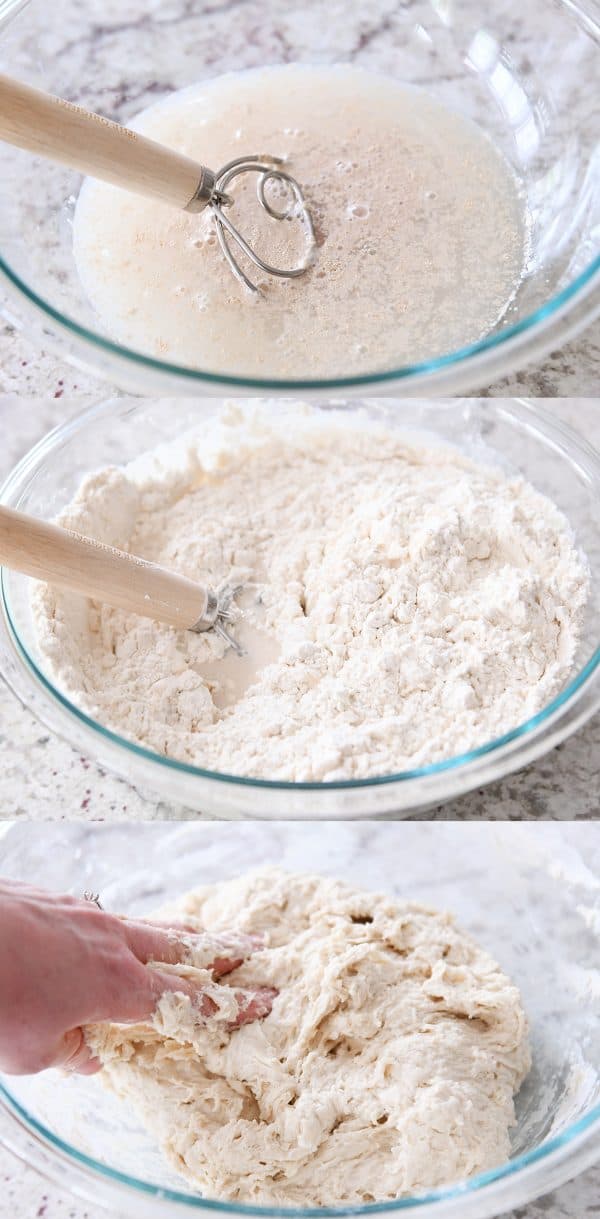
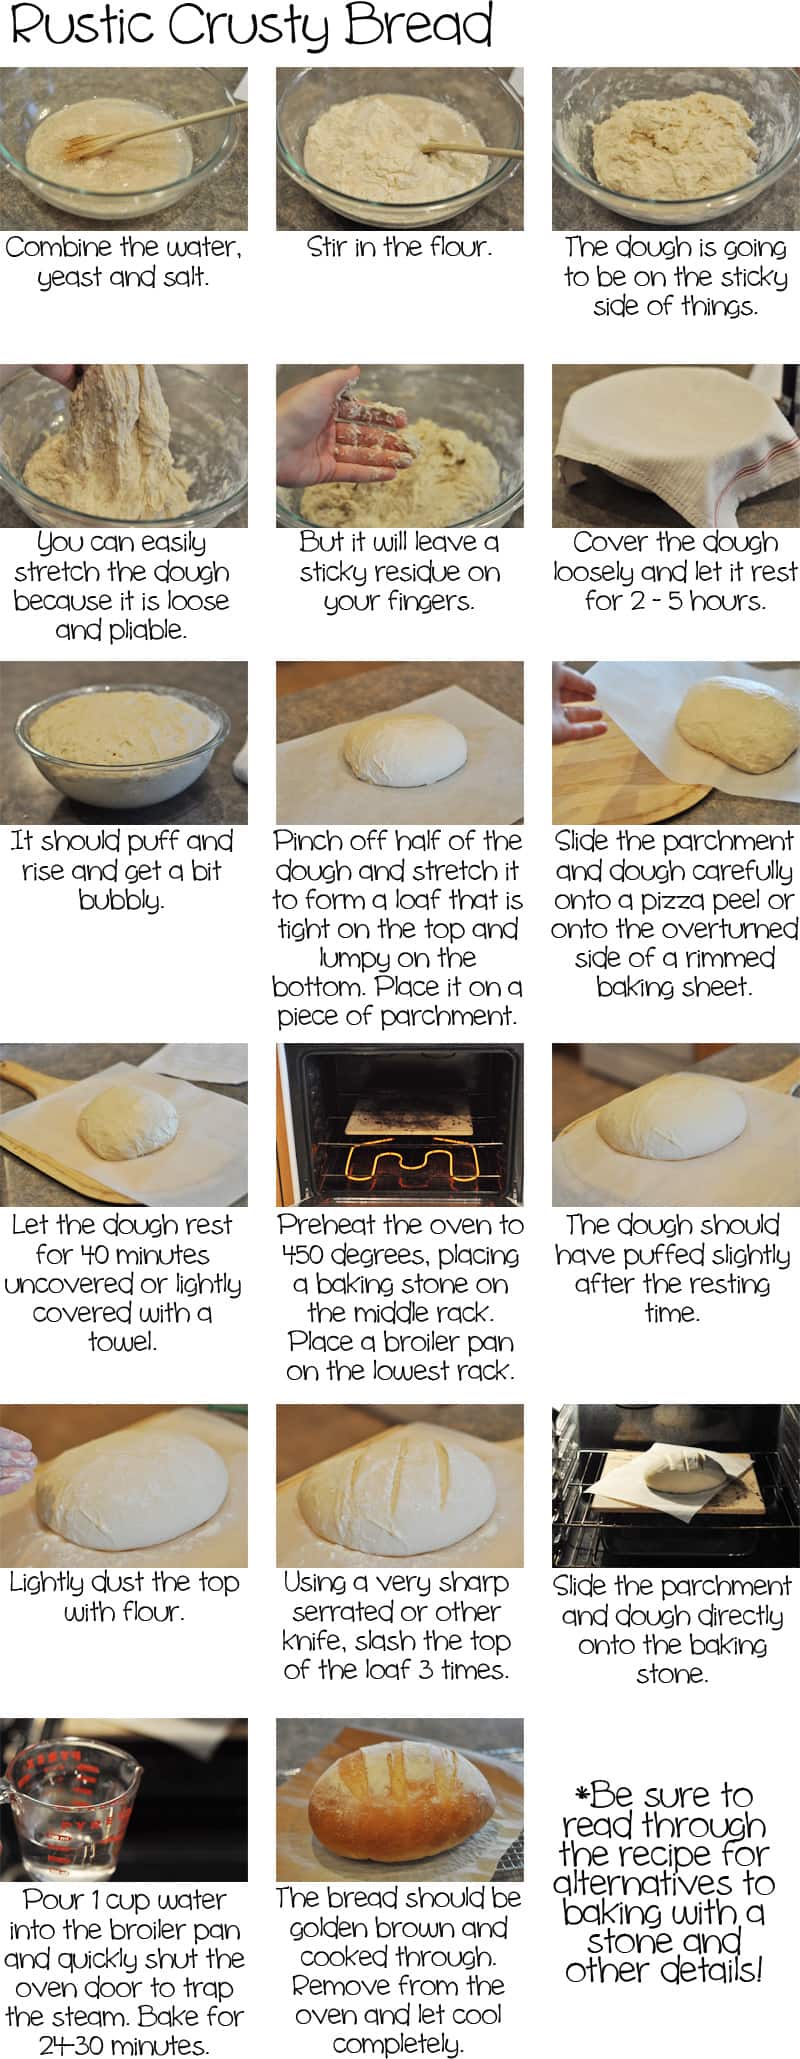
In a large bowl, combine the water, yeast and salt. Give it a little mix. And then add in the flour. Make sure to measure the flour with a light hand (or use the weight measure). You can mix with a spoon or spatula; I have been converted to the wonders of this Danish dough hook {aff. link}, but eventually with this dough, I get in there with my hands and mix it up the rest of the way.
The texture of the dough will be shaggy and much softer and stickier than a traditional kneaded bread dough. Make sure there are no pockets of flour and the dough is well mixed.
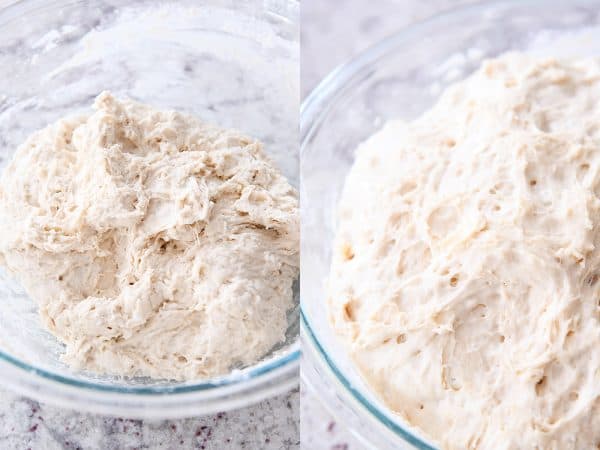
Cover the dough right in the bowl and let it rise until puffy and doubled.
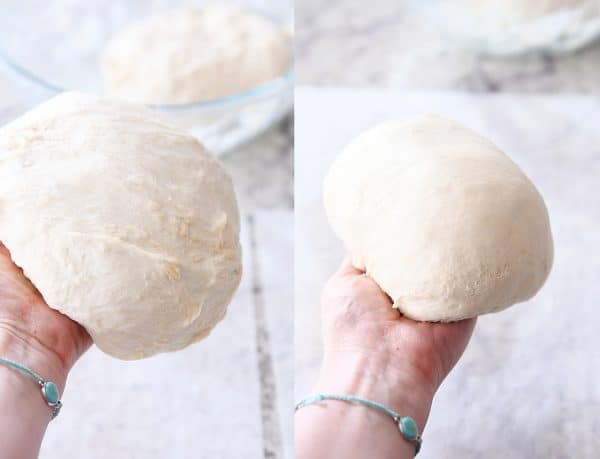
At this point, to shape into loaves, I grease my hands really well with cooking spray and split the dough into two pieces (you can make four smaller loaves out of the batch, if desired). Take one of the pieces and work it in your hands, turning the edges underneath until it’s a relatively tight, smooth loaf. Regrease your hands if the dough is super sticky.
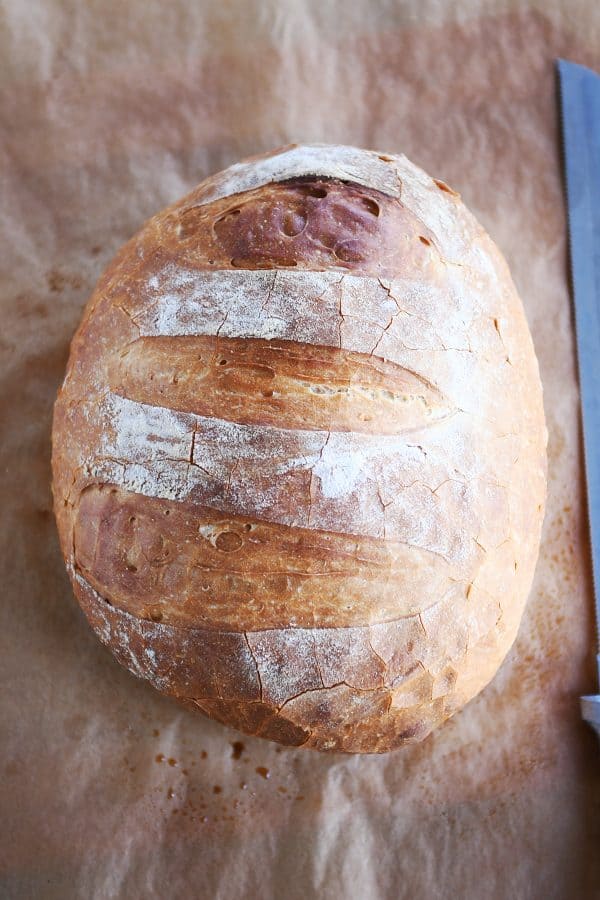
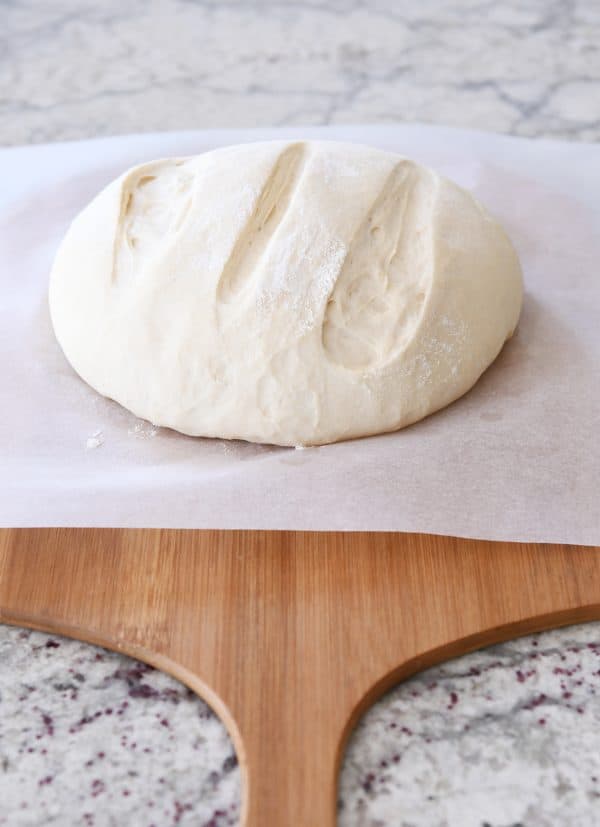
Place each loaf in the center of a piece of parchment paper and dust the top lightly with flour. Using a baker’s lame {aff. link}, razor, or really sharp knife, slash the dough 3-4 times on top, about 1/2-inch deep or so.
When I originally posted this recipe, I waited to slash the dough until after it had risen, but this sometimes causes the dough to deflate completely (especially if you don’t have a really sharp razor or knife), so I’ve started doing the slash action before it rises. Haven’t looked back. Works great and you still get the definitive, pretty “decoration” on top of the loaf as it bakes.
Cover the dough and let it rise until puffy (it won’t necessarily double in size).

Carefully slide the parchment with the loaf on top onto a baking/pizza peel {aff. link}. I suppose now is the time to mention that you want to preheat a baking stone {aff. link} in the oven to 450 degrees F and let it preheat at that temp for 20-30 minutes before baking the bread. If you don’t have a baking stone, you can try preheating an overturned aluminum baking sheet (although it may warp and bend out of shape a little at that temp, so be careful).
I highly recommend both a pizza peel and a baking stone for this recipe. Totally worth it for this bread alone.
Once the baking stone has preheated long enough, carefully slide the parchment and bread onto the baking stone. Note: I have never had parchment paper catch fire in the oven using this recipe (or homemade pizza), but take care that the parchment doesn’t touch the heating element or sides of the oven. Also, I think the thinner/cheaper the parchment paper, the more chance this could happen.
You can put a broiler pan on the bottom of the oven and add 1-2 cups hot water OR you can toss a few ice cubes onto the bottom of the oven right after sliding the bread onto the stone and then quickly (but gently) close the oven door. The steam from the water is going to help create that beautiful crust.

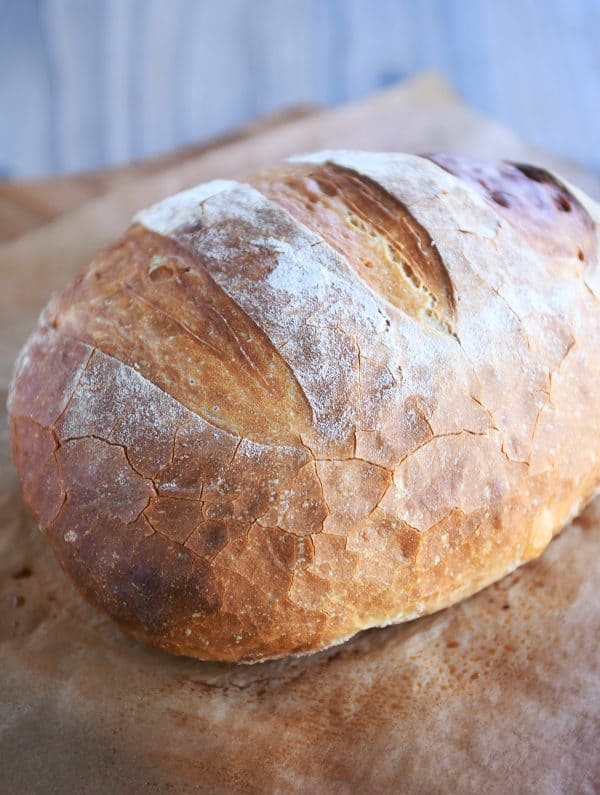
Bake the bread for about 25 minutes, give or take. It’ll puff even more in the oven. Look at that golden crust! Wowser.
This rustic crusty bread is my go-to bread to take to new neighbors, friends in need of a pick-me-up or when I am taking dinner into someone, and I make it several times a month just for our family to enjoy. It really is a life changing recipe.
I hope you’ve been able to see just how easy it is to make! I have no doubt you’ll feel like a total bread making rock start after you make this rustic crusty bread!
Equipment for Rustic Crusty Bread
While this bread doesn’t require a stand mixer, I’ve found the following to be helpful, especially if you want to ensure perfect crusty bread every time! Affiliate links for the products below.
- Baker’s lame (for slashing the bread)
- Parchment paper
- Pizza paddle/peel
- Baking stone
- Best inexpensive, bread knife ever
- Optional: Danish dough whisk
Easy Rustic Crusty Bread
Ingredients
- 3 cups warm water, about 100 degrees
- 1 ½ tablespoons instant yeast
- 1 tablespoon salt, I use coarse, kosher salt
- 6 ½ cups (923 g) unbleached, all-purpose flour, plus more for dusting dough (see note)
Instructions
- In a large bowl mix yeast and salt into 3 cups lukewarm water (about 100 degrees). Stir in flour, mixing until there are no dry patches. Dough will be quite loose. Cover lightly with a kitchen towel but don’t seal the bowl airtight. Let the dough rise at room temperature 2 hours (or up to 5 hours).
- Bake at this point or refrigerate, covered in an airtight container, for as long as two weeks. When ready to bake, cut off a grapefruit-size piece with serrated knife (I have only ever made two loaves out of the batch of dough so I just divide the dough in half to form my first loaf). Turn the dough in your hands to lightly stretch the surface, creating a rounded top and a lumpy bottom. Put the dough on a piece of parchment paper set on a pizza peel or a rimmed baking sheet turned upside down.
- Slashing: you can dust the top of the dough lightly with flour and slash now (before rising) or wait until after the loaf has risen. I’ve found waiting and slashing the dough after rising can sometimes cause the loaf to collapse, so after making this bread for years, my preferred method is to dust the top of the loaf lightly with flour at this step, before rising, and slash the top with a baker’s lame or sharp knife 3-4 times.
- Let the dough rest for 40 minutes for room temperature dough; if you have used the dough out of the refrigerator, let it rest for 1 1/2 hours. Repeat with remaining dough or refrigerate it.
- Place a broiler pan on the bottom rack of the oven (if you don’t have a broiler pan – no worries! Tossing 5-6 ice cubes in the bottom of the oven when you put in the bread works really well, too). Place a baking stone on the middle rack and preheat oven to 450 degrees. Heat the stone at that temperature for 20 minutes before baking.
- After the dough has rested and is ready to bake, if you haven’t already (see step #3), dust the dough lightly with flour, slash the top with serrated or very sharp knife three times.
- Slide the dough (with the parchment paper) onto the baking stone. Pour one cup of hot water into the broiler pan (or toss 5-6 ice cubes in the bottom of the oven) and shut the oven quickly but gently to trap the steam. Bake the bread until well browned, about 24-28 minutes. Cool completely.
Notes
Recommended Products


Recipe Source: adapted from The New York Times via Jeff Hertzberg’s Artisan Bread in Five Minute a Day
Recipe originally published February 2012; updated May 2019 with new pictures, recipe notes, commentary.
I made this today and used my bread machine to mix a half recipe. I took out have it was mixed and kneaded and proceeded from there. It came out great. We both loved it and now I don’t have to spend $4 on a loaf of crusty bread at the store. This time around I used King Arthur Bread Flour. Next time I might try the all purpose flour and compare.
Ok here goes 66 year young guy that has been making bread since I was 12. Been looking for a bread that has a crunchy crust. My normal dough has two extra ingredients from this one more sugar for one and lard, crisco or other oil product. Not to brag but I get good results and reviews from my bread and sticky buns, BUT i cannot get a crunchy crust. Have used water in pan, spray bottle, combos of both, until I finally just threw up my hands and quit trying. Even this recipe has not given me the crunch I am looking for. You know the one where you can hollow it out and use it for a bowel. Love the taste and will continue to use the recipe but sure would like to know where I have been going wrong for 40 some years
Old Man Bob – have you tried the no-knead bread that was made famous by Jim Lahey (and I think NY Times published it)? It makes by far the crustiest bread ever and might be just what you are looking for. I posted the recipe a long time ago (pictures are terrible, sorry) but you should definitely give it a try:
http://www.melskitchencafe.com/2008/01/no-knead-bread-revolution.html
lf there is such a thing as a baking yeast bread phobia I have it. I’ve been baking up a storm since I was a child but avoided yeast breads at all costs. No idea why but lets just say me and yeast bread were never to cross paths. I did get brave and venture into the yeast breadsticks with great success but had no urge to go further. That is until Dh looked at me and said he really wanted some homemade bread. I said do you want breadsticks or biscuits? Oh no he wanted homemade yeast bread, breadsticks just wouldn’t do.
So today I sucked up my fear and began this recipe. Sure I was doing something disastrously wrong every step of the way. Thanks to your photos I could see mine looked just like yours but I knew there was no way this was going to end well. All went well until I added the water for steam. My oven is a regular and a convection, the fan brings in heat no matter which method you use so of course when I added the water the fan blew it right out the door in one poof.
I closed the oven door and hoped for the best. My bread (cooked both loaves at once side by side on the overturned baking sheet) never did get a deep golden brown but after it went 10 minutes beyond the recipe time I could see it was definitely done. I pulled it out and patiently (ok not so patiently) waited for it to cool. Then the moment of truth. I cut through a nice hardy crust and saw a soft perfect bread in the middle. SUCCESS!! But how did it taste? Well DH took some to work and the kids loved it so much they asked if they could have it for their snack.
A bread the kids are willing to trade their sweets for? I do believe that is a winner. It’s such a thick hearty bread I figured it needed something to sop up so I served it for dinner with your spaghetti sauce that we love.
Happy to say my phobia is gone and I am going to venture into your other yeast breads soon. Thank you for such a great tutorial.
Yay, Pamela! I’m so, so happy this bread worked for you. You are going to be a bread-making master before you know it!
This recipe is so well written and the picture tutorial at the end is brilliant. I’ve made this bread several times with great success.
Amazingly good. I used beached AP flour and it was fine. Also brushed it after the 2nd rise with egg white to get a nice golden glossy finish. Yum! No more more store bought bread for me either. Thanks for a non-scary experience.
Awesome recipe, after the initial mix and rise time I did add a little more flour and knead the dough for maybe 30 seconds, otherwise the dough wasn’t formable and too sticky. Other than that this recipe worked great , soooo easy and delicious!
Thank you for sharing this recipe and for the super useful step-by-step pictures, Mel! I have already made this bread way too many times. Actually, I blogged about it today and when my husband saw me uploading the pictures he asked me to make it again – so the dough it’s rising as we speak! 🙂
Thank you for your response Mel! Yes that definitely makes sense. I made the bread last week for the holidays and it turned out great. Can’t wait to try your other recipes!
made this bread this afternoon and it was absolutely wonderful! I didn’t have parchment paper so let the dough rise on floured wax paper then to bake it I put some flour down on aluminum and then placed that on top of the pizza stone! It was delicious!!!
Mel, This is amazing – I’ve never made yeast breads and this came out beautiful!!! I made a vegetable beef soup today and my wife loves crusty bread with soup. This is perfect for the occasion – I’m no longer afraid of making bread.
Is the dough supposed to still be sticky after the first rise? I live in Illinois and it’s -17 degrees today – not humid at all :).
Patricia – this dough is slightly stickier than other bread doughs I’ve used but it shouldn’t be so sticky that the loaf doesn’t hold it’s shape. Were you able to work with it ok and shape it into a loaf? I’ve found greasing my fingers and hands helps to shape the dough.
This was my first successful attempt at baking bread. I just made this recipe last night, after another bread recipe failed me. It was SO. GOOD. It made 2 large loaves, which I baked in a bread cloche. It took about 30 minutes per loaf. What a keeper of a recipe! Thank you!
Hi Mel!
I absolutely LOVE your blog. My wonderful mother turned me on to your website. She taught me everything I know about cooking (and I still have so much to learn). I am currently a college graduate student, and love to cook when I have the right resources (and time). I made my second ever loaf of bread when I tried your French Bread recipe, and it turned out wonderful!
I did have one question for this recipe. I think I understand the difference between active dry and instant yeast. Is there a reason you add the instant yeast to water first? I thought instant yeast didn’t have to proof? I read your tutorial on yeast, but I think I’m still a little confused. Thank you so much for your wonderful recipes! You are such a joy to read and to cook with 🙂
~Allyson
Hi Allyson – good question! Instant yeast doesn’t have to proof (like you said) but it doesn’t hurt it to be added to the water and in this recipe, it’s just a matter of how the ingredients are mixed not necessarily to let the yeast proof. Does that make sense?
I had been looking and looking for a recipe to make a crusty “French” bread with some nooks and crannies inside and this works perfectly! Thank you so much for this recipe.
By the way – I’m really glad to have found your blog! It’s very easy to follow your tutorials & find information. And reading above…I now realize the rising problem was I used active dry yeast…not instant. Now I just need a new stone & can try again! 🙂
Reading all these comments of successful bread making, I’m kind of bummed. I’ve never had a problem with my bread turning out, so I thought this recipe would be great. My bread just came out of the oven and it’s…egh. Didn’t really rise like usual; it’s very small and I guess I’ll have to try this again to see what went wrong.
The part I’m most upset about is I opened the oven and found my baking stone is cracked in three pieces. I just went to the website for my stone and it said: do not preheat the stone, it is safe up to 450 degrees (I guess not this time), and to prevent extreme temperature changes (would the steam do this?). I am only writing as a precaution to others -make sure your stone is actually able to withstand these requirements!
I hope to have better luck next time!
This recipe was so super easy, and I felt awesome pulling this gorgeous bread out of the oven like a pro. Thanks so much for your detailed instructions, it was hard to mess it up when you see what it is supposed to look like! I’m also really impressed with your Thanksgiving spreadsheet, thanks again for sharing!
Thanks for the reply! I think I may have over-floured it a tad as well. Better luck next time I suppose, thanks again!
I recently made this with white whole wheat flour and it came out decent, but didn’t rise very well in the oven. It rose well initially but not in the oven, so I found it was dense. It’s my first time with bread making and I was wondering if it’s because I followed this recipe with active dry yeast over instant? Is there a difference? Or does something else cause it not to fluff up in the oven?
Joan – there is a difference between active dry yeast and instant – I have a post about it here.
http://www.melskitchencafe.com/2009/11/tutorial-working-with-yeast.html
Using whole wheat flour can make a bread more dense so take care not to overflour the dough.
I made this bread last night as my first foray into bread making. The entire time it was rising, I was convincing myself that I messed it up. Then when it was baking I was preparing myself for disappointment. Oh man, did I get the opposite! The bread came out perfectly and was delicious!! I took a loaf over to my boyfriend’s house for a dinner party and it was gone in minutes. Thank you for the awesome tutorial and for helping me feel like a pro in the kitchen!
I want to make kid size bread soup bowls with this. I was thinking to make 8 out of the recipe. Any idea how long I would cook them or know when they were done? Love this bread, by the way. I’ve made it several times. Have you experimented with using wheat flour?
Hi Marci – I’ve used half white wheat flour with this bread dough before and it was slightly more dense but still yummy. I would probably bake the little bread bowls for 15-20 minutes. Good luck!
Hi – why does mine always flop??? Have tried this and a similar recipe 3 times now and initially in thhe bowl I get a good rise very quickly then it all settles back into a very gloopy mix and it is impossible to shape into a ball type shape – more like a flat shape and it doesn’t rise again after that – it tastes “ok” but is only about 2 inches high – so looks more like a disc… Any ideas? I’m about ready to accept I will never be able to bake bread which I want to as I want my kids to eat home cooked bread
Pete (I live in Hong Kong and at moment the temp in kitchen is about 27C (I guess that’s about 80F – is it too warm?)
Pete, try adding a bit more flour especially if it isn’t holding its shape. That should help!
OMG! This was sooo easy to make and came out perfect! Tasted great!!!! Next time I make it (prob this upcoming week!!!) I’m going to add roasted garlic… nom nom nom!!! Thank you for sharing and I am truly thankful I came across your website!!! It’s awesome!!
I made 2 loaves of this bread this weekend. One for Sunday dinner and the other for paninis tonight. It was simplistic and absolutely delicious. Everyone raved about it. Thanks for the great recipe Mel!!!
Paper can reach spontaneously combustion at around 480 degrees. If your folks have corners of paper hanging over the stone in a gas oven you could easily reach that point during the heating cycle. The steam bath should mitigate this risk a bit but not eliminate it. I always trim the corners so that they do not hang off the stone and all should be good. PS… Fahrenheit 451 is a book that is based upon the temperature which book pages burn…
I was looking for a recipe for a crusty bread, saw this one, and made it on the spot. I followed the recipe, except for the stone. I subbed a sheet pan turned upside down, and it worked great! This bread is crusty, with a yummy soft chewy center. Plus, as a widow on a fixed income who still has a couple kids at home, I really appreciate that it only needs a few ingredients. Hat’s off to you, Mel! This recipe is a WINNER!
The best and easiest recipe for bread making ever!!
Olivia:
I have made this three times now. The last time, I failed to put the water into the oven with the bread. The color just was not good at all when skipping that step. This time, I used bread flour and did everything else exactly. However, I only used 6 cups of flour (King Arthur Unbleached Bread Flour) as the dough was perfect, according to the images on this site.
You, in my opinion, simply added too much flour. This dough is not meant to be the typical dough you think of. It is very sticky and loose, more than most bread doughs I have encountered. So just stick with the 6 to 6 1/2 cups. Depending on your humidity, anyway.
This is really great bread and it bakes to perfection for 27 minutes in my oven.
Thank you for the recipe, but it just didn’t work out for me. First, I noticed there mixture was way too moist after letting it rise, so I added about 2 cups more flour. I think this is what screw the recipe up for me. I let the bread bake for 30 minutes and pulled it out because it wasn’t even close to being golden brown. I didn’t want to over cook the bread waiting on it to get brown. The inside was done. I’ll have to try this again with 8 1/2 cups of flour right off the bat and see how it goes. I wonder if adding more flour after it has risen just doesn’t work well.
I just found this recipe, and I’ve gotta say that I am now addicted to your blog and super excited about how easy this looks! My 5 month old went down for a nap, and I remembered that I had a new jar of yeast, so I decided to give it a shot. The dough is currently rising for its first time and the baby is STILL napping. Can’t wait to bake it and TASTE it. The one thing I was determined to do when I decided to be a stay-at-home-mom was to learn to bake bread. This was a great first recipe to try, it makes it seem far less intimidating! Thank you for your great tutorial!
I made this bread to eat with our spaghetti dinner tonight and it was delicious and very simple to make. I may forgo the water in the pan in the oven though, because I really like my crust hard. It was delicious though. Thank you for a great and very simple bread recipe. I could make this bread every day.
~FringeGirl
This is my first attempt at making bread and I loved hoe easy the directions are! But I did run into a problem. My dough was still pretty sticky after I let it rise for 3hrs so forming the loaves was very difficult. What did I miss?
Breonna – this dough stays pretty sticky (that’s what helps give the artisan-like airiness in the crumb). If it was too sticky to handle, even with greased hands (I spray my hands with cooking spray), try adding a touch more flour next time.
I tried this recipe the other day and I made some observations.
1) Followed recipe exactly. Did the first rise for 2 hours (2:40 with the proofing once it was risen) and baked a loaf. It was delicious.
2) The second half of this recipe, I let go for the full 5 hours. I baked this one off as well.
The full 5 hours resulted in a MUCH nicer bread. Shape, color, texture… taste. It was just superior to the 2 hour rise in all aspects.
My advice to anyone with the time to do this is to let this do its thing for the full 5 hours. You will love this great recipe even more.
One more thing:
I needed a bit more flour than the recipe called for (here in Boston), probably another 3/4 cup. I did not read every comment here, but it seems as though a couple of others had to add a little extra to get the same look in the pictures for once it is done being mixed together.
Other than that, thank you very much for this recipe. I’ve been looking into baking bread for a long time now and this recipe has really shown me that I will enjoy it.
Yes, I had the same issue..I needed more flour because it was so wet/liquid-y
I made this two days in a row and today a double batch. This is what I have been looking for… Crisp crust and great air holes. Looks beautiful and tastes even better. A couple of changes was to bump the temp to 500 and cook about 20 minutes. Also I added a tablespoon of sugar… Not sure why up I always add a bit of sugar to bread. Didn’t taste sweet but I thinks adds color to the crust. Great site!!!
OK . . . figured it out! I used table salt instead of kosher salt. I referenced Jeff Hertzberg’s recipe. Will try again tomorrow to make it with the right salt 🙂
Thank you for sharing thus update, Deb. I am about to make thus bread and I wondered about the tablespoon of salt too, and I was prepared to yes table salt. Now I can skip that disappointment!
I just finished baking this bread and it was very easy! I do wonder why a whole tablespoon of salt and 1-1/2 tablespoons of yeast is required. It does taste a bit salty for me. Just checking to make sure that you meant tablespoon and not teaspoon.
I have pictures and would like to know how to post those on here.
This is quite possibly the best bread I’ve ever made.
HOLY CRAP MEL THIS BREAD IS AMAZING. I just made it today and it looks like I can stop buying all those loaves of crusty delicious bread from the supermarket because I can have them fresh out of the oven. Thanks for the awesome tutorial 🙂 great instructions
I have tried this recipe twice, and each time I have found that the dough is too dry to incorporate all of the flour. I am wondering if I am not mixing long enough or is it ok to add more water? Thanks!
Kerry – I would decrease the amount of flour if you are having trouble incorporating it. Try using 1/2 cup less and see how that goes.
This bread is incredible. I was a little wary that it would turn out the way I wanted it to (or the way yours did Mel), but with all the great reviews, I knew I had to try. I was not let down one bit. In fact, it surpassed all my expectations. I thought I had added too much flour and messed it all up, but my loaves baked up beautifully. I have a feeling this is a recipe that would be hard to mess up! I am going to make this all-the-time!
Just a follow up to my previous post… The bread came out GREAT and is by far the best bread I’ve ever made! Thank you!
I’ve been trying for years to find a good and easy bread recipe. I usually stick with bread machine dough, but with my bread maker stuck in California, I had an excuse to try something new. Thank you for this wonderful recipe. I’m making bread twice a week now, and not buying any at the store!
This is in the oven as I type! I’m very excited about this bread and I hope mine comes out as lovely as yours looks. I think my dough was a lot on the sticky side… but hopefully it still comes out good! Thanks for the great recipe!
Yumm!! Loved it! Never buying bread from the store again!
This is awesome!! I have made three batches in the last two days. I am a single dad with two teenage boys with me all the time. They love fresh made bread … I love the no-knead ease of the whole process. It is so easy to integrate into all of the other things I am doing. I will be making some dough batches to rise on my lunch this week so I can bake them when I get home from the office. I need to train my boys to prep the loaves a little before I get home. I haven’t had a chance to read all of the comments, so I apologize in advance if I am repeating at all, but the bread comes out so much nicer if you let the dough rise for 5 hours. Also … I am looking forward to picking up some green onions (I have several bricks of Asiago in the fridge) to make my favorite bread that is produced at the local grocery chain in Salt Lake that bakes artisan bread. I definitely will enjoy not paying $5.00 a loaf!!! Thanks so much for sharing this wonderful and easy recipe.
I think that the problems some of you are hav ing is because the recipe tells you to add the salt to the yeast then add water. Everyone I know that makes bread is aware that adding salt directly to the yeast will kill at least half of the yeast. It’s best to mix your salt into the flour therefore encorporating the salt gently to the yeast and you’ll have a much happier bread experience.
This is fantastic! I make this every time I cook pasta! Has any one tried making this in a whole wheat version?
I also had my dough rise beautifully after 2 hours then shrink and turn runny by the time I was ready to cook it 3 hours later. In the future, I will let it rise for 2 hours, no more!
You are my hero! I’ve been making recipes from this site like crazy ever since I discovered it recently and they’ve all been such a hit with my family! I made this bread the other night and it was AMAZING. I froze half the dough though instead of baking them both (I was all baked out)…how do I handle the frozen dough to bake it now?
Hi Valerie – I would let the dough come to room temperature (either in the refrigerator or on the counter, the counter method will take less time, obviously) and then shape it into a loaf and let it rest/rise according the recipe and bake it. It’s pretty simple, really, you just need to defrost the dough and you’ll be good to go! Glad you are enjoying the recipes, thank you!
I don’t get it. You copied the NY Times recipe almost word-for-word. That’s not plagiarism? If you were an HONEST content creator, you would have simply linked to the recipe instead of copying it. Shame on you.
A Content CREATOR – there is a full link crediting Jeff Hertzberg and the NY Times for their recipe so please don’t accuse me of something I haven’t done. I wish you the best at creating the best content you can! I’ll do the same.
Very nicely stated Mel.