Easy Rustic Crusty Bread with Tutorial {No Mixer, No Kneading}
This homemade rustic crusty bread is the most delicious crusty bread that will ever come out of your oven! So simple, it doesn’t need a mixer or kneading!
This is the bread recipe that can change your life. I’m serious. Just scroll down and read through the comments and then you’ll believe me. Here are a couple comments among hundreds of rave reviews:
One of the best bread recipes I have ever made! A real favorite with my family and excellent for sandwiches. Super easy!
I made this recipe for the first time this past weekend and it turned out perfect! It truly was an incredibly easy recipe to follow.
this is the first bread recipe iโve ever successfully made! itโs delicious and so easy i used active dry yeast, and the working with yeast tutorial was a huge help! great recipe, mel.
This rustic crusty bread recipe is perfect for beginning and expert bread makers alike. It’s like a perfect loaf you’d get right out of a bakery – for a fraction of the cost. Many artisan-type loaves of bread like this take days to make, but this bread recipe only takes a few hours!
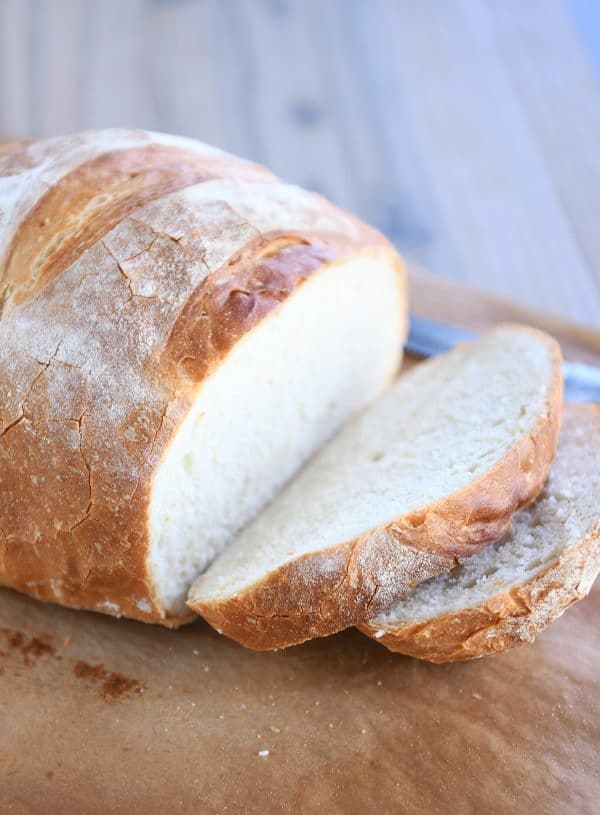
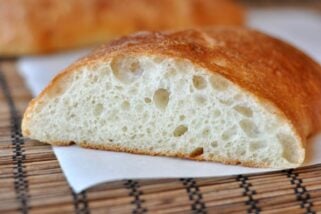
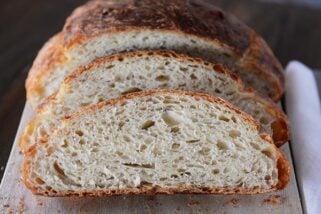
And you won’t believe how easy it is. Not only is it no-knead, but you don’t need a stand mixer, electric mixer or any kind of mixer to make it. Just a bowl and a spoon. From start to finish, it is ready to bake in about 2-3 hours. The crust is golden, thin and crunchy, and the crumb is tender and soft.
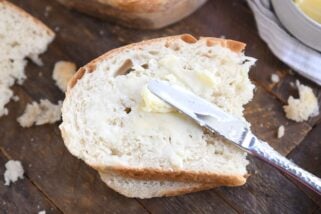
It doesn’t have the airy holes of a no-knead type bread, the crumb is tighter and slightly more dense, but it is glorious for paninis, garlic bread or just served plain (think: tear off chunks as you go!) with a wide variety of meals.
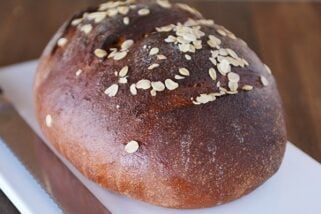
The recipe makes between two and four loaves, depending on how big you want to make them. I usually make two bigger loaves out of the batch, and I like to bake up both loaves the same day and pop one in the freezer for easy access next time we get the hankering for delicious, crusty bread.
How to Make Rustic Crusty Bread
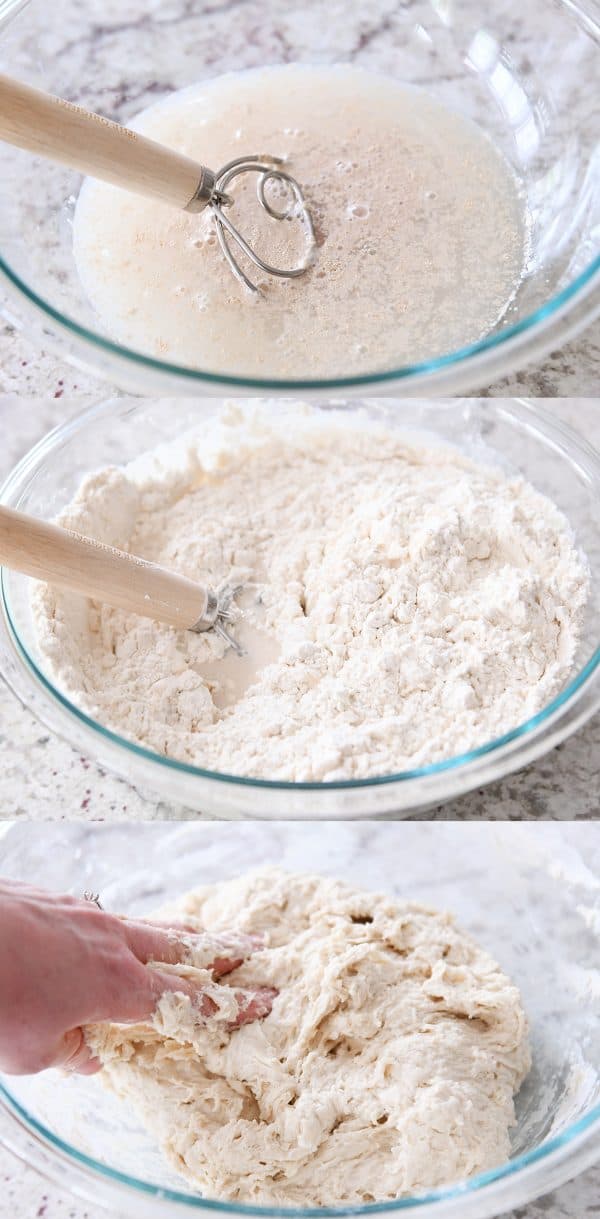
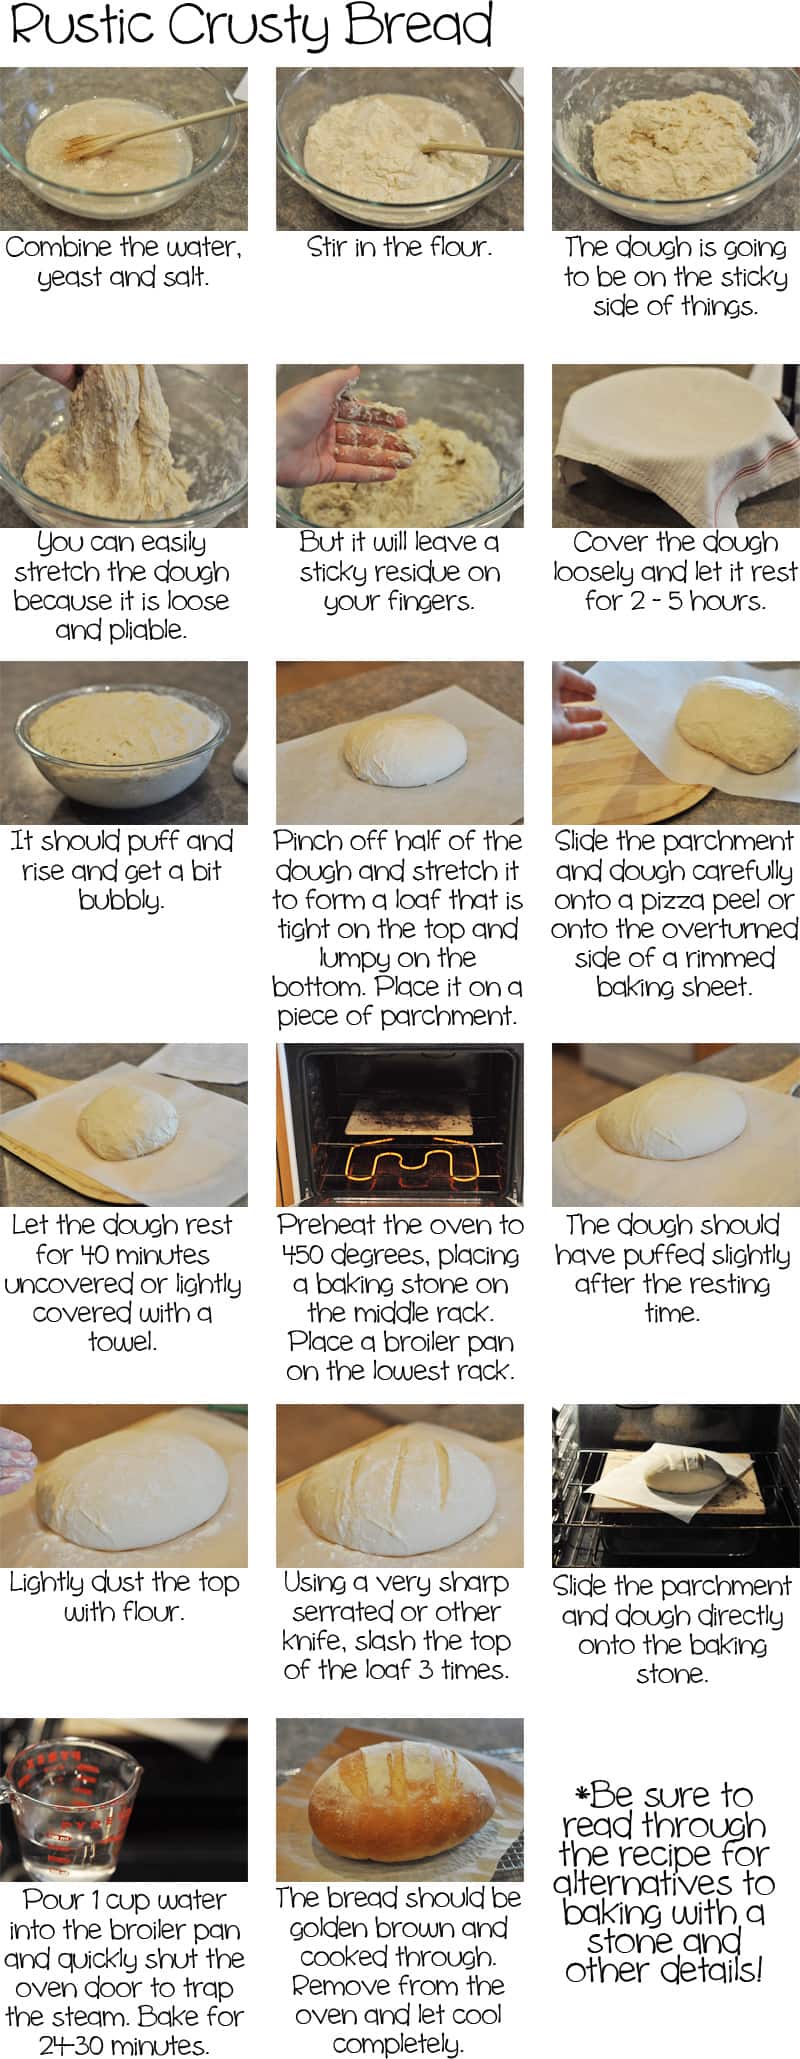
In a large bowl, combine the water, yeast and salt. Give it a little mix. And then add in the flour. Make sure to measure the flour with a light hand (or use the weight measure). You can mix with a spoon or spatula; I have been converted to the wonders of this Danish dough hook {aff. link}, but eventually with this dough, I get in there with my hands and mix it up the rest of the way.
The texture of the dough will be shaggy and much softer and stickier than a traditional kneaded bread dough. Make sure there are no pockets of flour and the dough is well mixed.
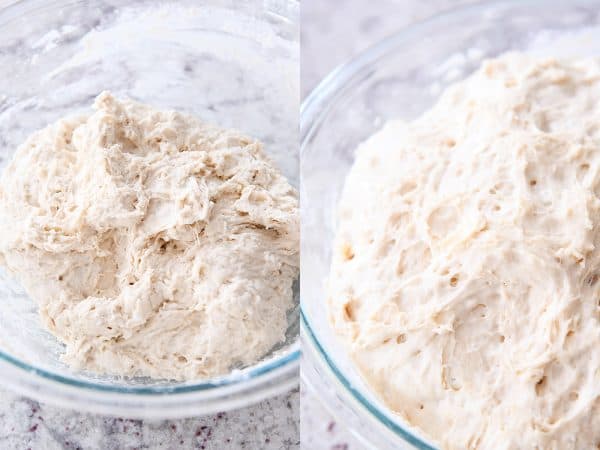
Cover the dough right in the bowl and let it rise until puffy and doubled.
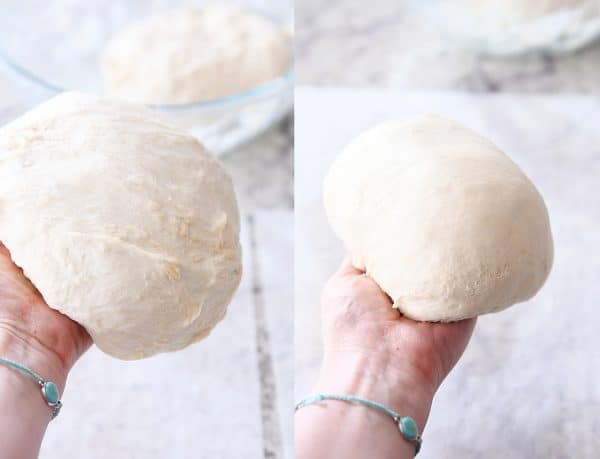
At this point, to shape into loaves, I grease my hands really well with cooking spray and split the dough into two pieces (you can make four smaller loaves out of the batch, if desired). Take one of the pieces and work it in your hands, turning the edges underneath until it’s a relatively tight, smooth loaf. Regrease your hands if the dough is super sticky.
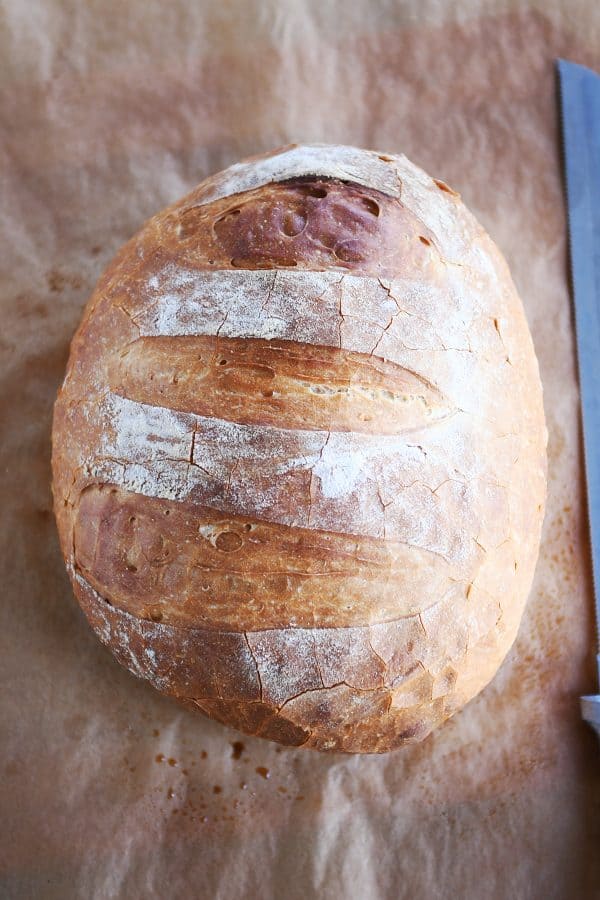
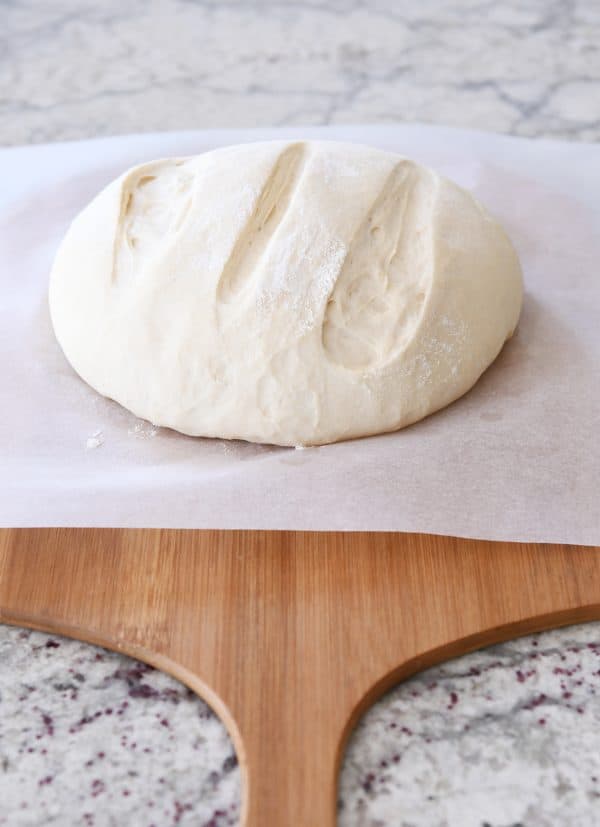
Place each loaf in the center of a piece of parchment paper and dust the top lightly with flour. Using a baker’s lame {aff. link}, razor, or really sharp knife, slash the dough 3-4 times on top, about 1/2-inch deep or so.
When I originally posted this recipe, I waited to slash the dough until after it had risen, but this sometimes causes the dough to deflate completely (especially if you don’t have a really sharp razor or knife), so I’ve started doing the slash action before it rises. Haven’t looked back. Works great and you still get the definitive, pretty “decoration” on top of the loaf as it bakes.
Cover the dough and let it rise until puffy (it won’t necessarily double in size).
Carefully slide the parchment with the loaf on top onto a baking/pizza peel {aff. link}. I suppose now is the time to mention that you want to preheat a baking stone {aff. link} in the oven to 450 degrees F and let it preheat at that temp for 20-30 minutes before baking the bread. If you don’t have a baking stone, you can try preheating an overturned aluminum baking sheet (although it may warp and bend out of shape a little at that temp, so be careful).
I highly recommend both a pizza peel and a baking stone for this recipe. Totally worth it for this bread alone.
Once the baking stone has preheated long enough, carefully slide the parchment and bread onto the baking stone. Note: I have never had parchment paper catch fire in the oven using this recipe (or homemade pizza), but take care that the parchment doesn’t touch the heating element or sides of the oven. Also, I think the thinner/cheaper the parchment paper, the more chance this could happen.
You can put a broiler pan on the bottom of the oven and add 1-2 cups hot water OR you can toss a few ice cubes onto the bottom of the oven right after sliding the bread onto the stone and then quickly (but gently) close the oven door. The steam from the water is going to help create that beautiful crust.
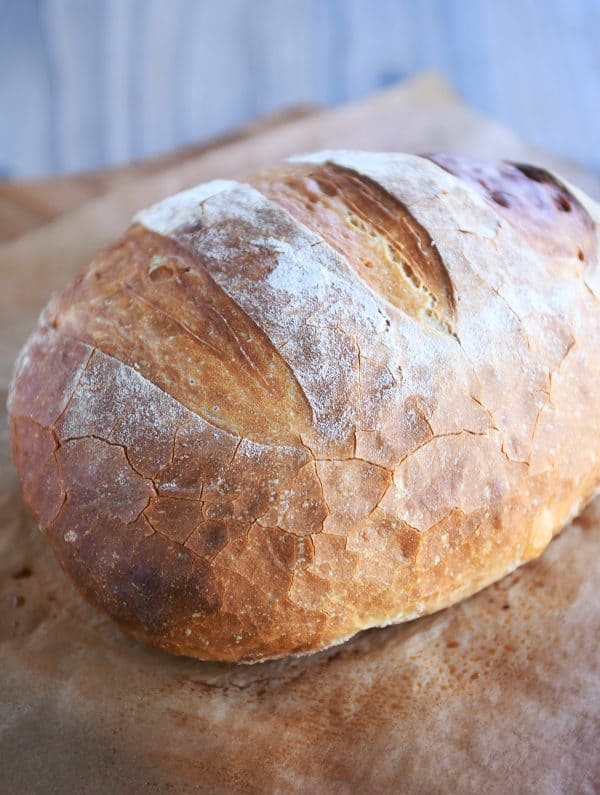
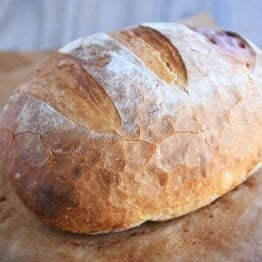
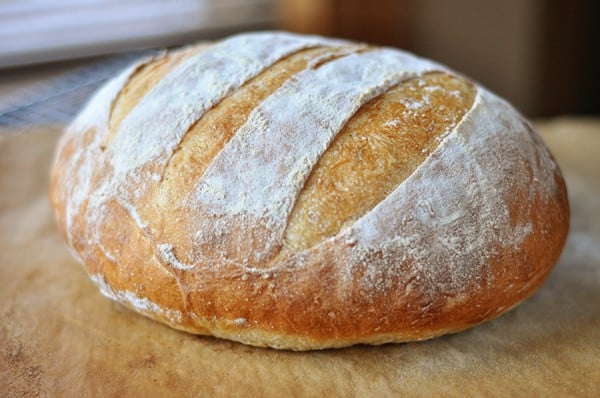
Bake the bread for about 25 minutes, give or take. It’ll puff even more in the oven. Look at that golden crust! Wowser.
This rustic crusty bread is my go-to bread to take to new neighbors, friends in need of a pick-me-up or when I am taking dinner into someone, and I make it several times a month just for our family to enjoy. It really is a life changing recipe.
I hope you’ve been able to see just how easy it is to make! I have no doubt you’ll feel like a total bread making rock start after you make this rustic crusty bread!
Equipment for Rustic Crusty Bread
While this bread doesn’t require a stand mixer, I’ve found the following to be helpful, especially if you want to ensure perfect crusty bread every time! Affiliate links for the products below.
–Baker’s lame (for slashing the bread)
-Parchment paper
–Pizza paddle/peel
–Baking stone
-Best inexpensive, bread knife ever
-Optional: Danish dough whisk
Flour: I often use half finely ground white whole wheat flour with good results. The bread is a bit more dense with the whole wheat flour but still delicious. Baking: if you don't have a baking stone, try turning a rimmed baking sheet upside down and heating it in the 450 degree oven for 10 minutes prior to baking. When ready to bake, slide the parchment paper with the dough on it directly onto the overturned baking sheet and bake according to the recipe. You can also stretch the rounded dough into an oval and place in a greased loaf pan. Let it rise for 40 minutes if fresh (add an extra hour if the dough has been refrigerated). Bake in the loaf pan in the 450 degree oven, watching the time carefully - check after 20-22 minutes. As an Amazon Associate and member of other affiliate programs, I earn from qualifying purchases.Easy Rustic Crusty Bread
Ingredients
Instructions
Notes
Recommended Products
Recipe originally published February 2012; updated May 2019 with new pictures, recipe notes, commentary.
I’d really like to get good at this recipe but I’m having some problems. My bread although it does rise it tends to spread out quite a bit. Do I need to add more flour? I do weigh it out. Also if I store it in the refrigerator in an airtight container it gets a bit gray on top which isn’t appetizing. Again what am I doing wrong?
If the dough is spreading out too much you can add a bit more flour (try 1/2 cup or so) OR bake it in a Dutch oven. Are you storing the dough in the refrigerator or the baked bread?
i made this last night, i forgot the salt tho it turned out excellent though and it went well with the salad i madeย
This has definitely become my familyโs favorite bread and the number one request of my baking.ย
Itโs easy and oh so delicious! Got the next batch rising to have with soup tonight and everyone is looking forward to it.ย
Thanks for posting this great recipe and instructions.ย
So good! Made it for the first time today and it is a keeper. I kept one loaf and gave one to a friend. Will make another fresh batch tonight. I’m sure our 3 kids will scarf it up. Thank you for this recipe!
This is amazing right out of the oven. I made two loaves and froze the second. How would you recommend I reheat the second loaf to make it warm and crusty again? Thanks for a great recipe!ย
You can try popping it into a baking stone in the oven for a few minutes.
Not sure where I went wrong, but this dough is so soft, I canโt form it into any kind of a loaf. ย So sticky I canโt even get the bottom side down. ย Going to go ahead and bake it like focaccia. ย Put the second half of the recipe in the refrigerator, and Iโll try to make pizzas later.
Nice simple recipe! The dough was super active during the rise, it kept threatening to overflow my Kitchenaid bowl. I ended up punching it down and giving it a fold each 3o minutes to control the beast, haha. Formed the dough into 2 large boules and baked at 425. My oven gets a bit testy at 450. I just added an extra 5 minutes and cracked the door to let it cook a bit longer with the residual heat. The resulting loaves were wonderfully fluffy and HUGE! Of course with a quick proof time you’re not going to get a deep tangy flavour but the texture was lovely and perfect for sopping up some lentil curry. Thanks for the easy recipe.
I am really enjoying this recipe for a rustic loaf! My dough is never quite as moist but it comes out perfectly. I’ve also made buns with it. Thanks so much!!
Easy and tasty bread! ย I used about one quarter whole wheat flour and the remaining amount as bread flour. ย Also, used olive oil to grease my hands. ย Did not rise as much as i thought it should โ next time I will give it more time to rest… ย Will definitely make again. ย Great recipe โ thanks!
Hello, me again, made another mistake. The parchment paper I used is not oven safe above 420 F. So to any other obvious mistake makers, check that out beforehand.
Can I do this recipe with a sour dough starter? How much would I use?ย
I haven’t tried that so I’m not sure – sorry!
Excellent bread, really fun to make, got Very excited when the dough doubled in size, don’t know how it tastes yet. MADE A BIG MISTAKE not related to the recipe but wanted to leave a comment just in case someone who also didn’t know sees this: DO NOT put ice in a hot glass pan!!! big explosion, thankfully no injuries, had a freakout anyway. first bread will not turn out because the oven was open for awhile and the heat escaped, not to mention the glass bits. High hopes for second bread. Will maybe bake it tomorrow when I’ve calmed down. Face palm. Good luck everyone.
My bread ended up really flat and dense. I’m pretty sure I activated the yeast right and everything. So, I’m not sure what is wrong. Do you happen to know what happened? The taste of the bread was delicious. Might make again if I know what happened.
Hi Bell, try adding another 1/4 to 1/2 cup flour
Hi Bell, what was the texture and consistency of the dough when you shaped it into a loaf?
the consistency wasn’t super bubbly, but I don’t think it was super dense.
Absolutely amazing! I halved the recipe and also added 1/3 cup chopped Kalamata olives and 1 teaspoon of rosemary during the mix. The olives stayed suspended during the bake no problem. I was so happy to see an amazing bake rise when put on the stone. Crust came out beautiful. My wife and I horfed down half a loaf toot sweet. The only regret was that I didn’t make the full recipe for 2 loaves. Thanks so much.
Great! Easy to make and was delicious!
He, Mel,
Iโve made this recipe now 3 times, and while it always tastes great I end up with a flat round instead of a loaf. At what point would I add the extra half cup of flour? ย It looked and felt fine after mixing, but handling it was a mess!
You can try adding more flour right at the beginning before the dough rests.
I made this bread and it was delicious but my pizza stone cracked in 4 places while cooking this. ย I put it in the cold oven and heated like the recipe. I Googled what would make it crack and one of the things said moisture, it must have been from the hot water I added in the pan underneath. Have you experienced this?
I’m sorry to hear that – I haven’t had that happen before!
AWESOME BREAD. I make bread different breads often and this was so easy I plan to make this my new go to bread. My family just loved it. We ate one loaf in one day.
Mel how would you suggest storing the second loaf or leftovers?
The baked loaves freeze great or I store the loaves in bread bags at room temperature. ๐
If I only have bleached flour, can I use that in this recipe or will it make a noticable difference? I don’t usually buy bleached flour but that was all the store had at the time and I’ve really been wanting to make this bread now that I finally found rapid yeast in store!
Thanks!
It should be fine!
This is one of my new favorite breads! My dough was really sticky, but rather than adding more flour and trying to shape it and slash it, I just let it rise as a blob of dough and baked it on a jelly roll pan instead of transferring to a pizza stone. It didnโt rise as tall, but it was beautiful and had the perfect texture. We ate this up so fast and Iโll be making it regularly again. It tasted so good with your cheese fondue recipe too, by the way! Thanks again, Mel, for another family favorite.
Hello ! I’ve yet to make the bread, as all I have is active dry yeast, and not instant yeast! How would I go about substituting the active dry yeast in? How much water should be used, and how much active dry yeast? Thank you for any help in advance!
Here’s a post with details about using active dry yeast in place of instant yeast https://www.melskitchencafe.com/guide-to-baking-with-yeast/
I’ve made this bread many times now and it’s a favorite. The looseness of the dough throws me each time, but I end up adding more flour after the first rise to get it to shape nicely into an oval. I use a wide and slightly longer-style loaf pan designed for rustic-type breads and bake as directed. I did add a bit of honey this time for sweetness, so we will see how that goes. Great recipe!
At what point can you add herbs and spices? And what are some ideas for different flavors that you have tried?
Have you ever made 1/2 the recipe? We just don’t need this much bread at once.ย
Thanks!
Yes, you can halve the recipe. And you can knead in herbs and spices after it rises in the bowl OR stir them in when adding the flour.
Great recipe! Question, Can I substitute the white bread flour with other flours? (Rye, whole meal etc). After a healthier, less refined option. Will the same no knead recipe work?ย
You can definitely experiment! I’d recommend first trying half white flour/half whole wheat (or other type of whole grain flour) and work up from there.
Love the recipe. Easy and delicious. I love baking half the loaf and leaving half the dough in the fridge. Thank you!
This was the first loaf of bread I’ve ever made and I was very nervous but it turned out so soft, chewy and delicious tasting! I couldn’t believe how simple it was.
I really appreciate the details, explanations, and tips. I will definitely be making this bread again and using more of Mel’s recipes in the future.
I have made this bread several times now and it is so sticky and difficult to work with after the rise. I have to flour my hands, the dough, and work area just to try to contain it. It is a good tasting loaf but hard to form into a loaf with any structure.
I made this bread today. I cut the recipe in half because it is just my husband and I. A good thing I did. We would probably eaten the whole thing. It was delicious! The best flavor and so easy. I did bake it in my cast iron dutch oven. Heated it in the 450 oven before I put the dough in. I have made this recipe before and we loved it. I felt like I had put too much flour in before. It was good but felt like I over floured trying to handle the dough. Today I decided I was going to make sure I didn’t do that. I put just a little more water in then the recipe called for. It was very soft. After rising for 4 hours, I floured my hands, picked up the very soft dough in my hands, stretched the top out and down a little, tucked in the bottom and put it on parchment in a bowl for the last 40 minute rise. Removed the dutch oven from the oven and put parchment and all in the dutch oven and covered it with the lid. Bake for 15 minutes ( remember it was just a 3 cup of flour loaf) uncovered and bake 10 more minutes all at 450. Perfect. Crusty. But not so crusty it crumbled all over when I cut it. And the inside was soft, chewy and beautiful holes. We had wonderful bread and salad for supper. Warm bread. Let it cool 15 minutes and then took 2 slices off. It was delicious. All we could do, to not eat more. Thank you so much for the recipes and all the time you put into the recipes and making videos. You are the best. Thank you.
Hi Mel, I have made this bread on several occasions and it is outstanding! I am looking to make crusty buns for chicken Parmesan sandwiches and and wondered if I could use this same recipe and make mini loaves and use as buns? What do you think? Thinking each loaf would make 4 or 6 large buns? Do you think this would work and how long would I bake for? Or if you don’t think this will work, do you have an easy crusty role recipe you cold recommend. Thanking you in advance.
I think it’s a great idea!
I searched for a easys recipe and this is the hardest thing I have very made. the writter’s writing is too hard to understand and I am never going to use this again.
Oh my gosh! This bread is amazing. I’ve already made it twice this week, and it’s gone in 2 days. It’s come out perfectly both times. This will be my new go-to bread recipe.
I have never been able to make bread,ย this recipe turned out beautifully! Thank you!!! ย Canย you add jalapeรฑos and cheese to this recipe?
Yes, it works really well with add-ins!
I have made about 30 loaves during this quarantine we are in! ย I have baked loaves as the recipe directs, and I have added a million ingredients to make it โstuffed breadโ. Cheeses, spices, meats, and veggies! ย I just press the balled dough flattish and place the fillings on top and jelly roll it in. Works like a charm and Iโve been feeding my neighborhood.ย
Thank you for a wonderful recipe! ย
So easy and so beautiful! Almost too pretty to eat but my family and I gobbled it up. Thank you for the wonderful post- I will make again and again!
Can I use bread flour instead of all purpose flour
Yes
I tried to this recipe everything was fine until I tried to make balls is was so sticky I couldn’t form the balls I sprayed enough cooking spray in both of my hands but it was impossible to make them what did I do wrong?
You can try adding another 1/4 to 1/2 cup flour if the dough is too sticky.
My dough was so sticky after rising. I ended up adding more flour. I live in Denver so I wonder if that is part of my problem. The bread tastes good but is pretty dense. I used about 1/3 bread flour and 2/3 unbleached flour. I’ll try it again.
Mel,
I made this and it turned out great! ย Thank you! ย At what point would you add herbs, cheese or olives?
Hi Michael, I’d knead any add-ins into the bread right before shaping it into loaves.
Turned out beautiful, not sure how people had problems! No knead, ย tasty, easy, bread! ย Will be making more.ย
Mine looked like your photos in the mixing bowl. But NOTHING like yours when you made them unto loaves. I followed your recipe and I was very disappointed.
Can you give me a bake time if I made this into bread bowls please. I have made the big rounds and live the taste and simplicity of thisย
For bread bowls, I’d suggest 15-18 minutes.
It was wayyyyyyy too wet after letting it rise for three hours I ended up adding more flour and kneading it for about 10 min until it seemed like the right consistency, shaped it let it rise another two hours on the tray and then baked it. It was very good after all that extra work
Sorry, i meant sugar**:)
I wondered the same thing but I used salt and it worked.ย
Aren’t we suppose to use suger instead of salt to activate the yeast?
I made this for fondue night a few weeks ago and everyone loved it! I decided to try it for grilled cheese sandwiches tonight and it did not disappoint! They were so good especially dipped in tomato soup to soften up the crust a bit. Heaven in my mouth!
Dough was too loose, i ended up with an almost flat bread
Mine was also a very wet dough (and I added a bit of olive oil, so it got wetter), and when shaping it, I had doubts about whether it would be flat, but it rose well and was delicious!
If it can help:
Water temperature is really important.
I didn’t punch the air out after first rise, only shaped into boules, as described (stretched 4-6 times each loaf).
The 40 min resting (if your kitchen is cool/cold, leave it longer)
You can also add a bit more flour if too wet (as read here up to half a cup)
It’s worth retrying, this bread was outstanding!
Good luck!
Hi Mel, Can I add honey or sugar to this recipe? If so, how much should I add?
I’m sure you could..if you are wanting to add it for sweetness, you’ll have to experiment with amounts (I like this bread without any honey or sugar so I haven’t tried it).
Mel,
I made this and it turned out great! ย Thank you! ย At what point would you add herbs, cheese or olives?
I deleted all of my other crusty bread recipes after I made this twice. I have the stand mixer and all that fancy stuff – didnt need any of it. I seasoned my flour with garlic powder and italian seasonings and made this for spaghetti night. Delicious and easy. I made a 2nd small loaf for a New Orleans sandwich known as a muffaletta that I have been craving for weeks , off the charts , it was the perfect bread, this is my go-to recipe from now on. Thanks for sharing.
This was the worst bread recipe I’ve ever used. I’ve made bread for years and I’m really disappointed.
The dough is so sticky and watery after 5 hours of resting that it is impossible top manipulate with my hands, never mind form into a round shape.
Such a waste of baking goods.
You must have used too much water. Or not enough flour. I just made two batches of this recipe and all four loafs turned out great. I thought it was the easiest recipe that I’ve used.
Excellent recipe! I know there are bread snobs who hate no knead, but Iโm sorry, this tastes just as good as kneaded bread Iโm also surprised by some of the poor reviews…kinda like the cookie mug cake Your step by step instructions are clear and perfect. I did find the flavor just ok using the same day method. The next day method it was much better (which is to be expected). I experimented throwing in some sourdough starter and did the overnight method and it was perfect. So delicious! I thought Iโd need to adjust the flour, but I used the exact amount (always measure!) and it was perfect, and I live in a humid climate. This is the perfect recipe for my boys to start their bread making. So easy & delicious! Thanks!ย
Hi I made this bread a few times and love this reciepe. I did however use about 2 more cups of flour because it was like working with pudding.
I had the opposite problem from some posters….this was dry….and it did not rise. ย I followed the directions exactly but there is a lot of flour (6 1/2 cups) and not enough water. It was a disappointment….
How would the times be adjusted to have this bake in a dutch oven? Thanks!
You could compare it to this recipe and see what adjustments to make: https://www.melskitchencafe.com/crusty-artisan-bread/
My husband absolutely loves bread and found this recipe and I tried it today. I was a little skeptical as the dough was so sticky and I couldn’t shape the loaf but I persevered and the end result was amazing. The bread was absolutely delicious and my entire family loved it. Next time I will use some more flour to help shape the loaf because it was so sticky. I will also use a razor blade for the slashes as my sharp knife didn’t do the job.
Made this twice and the recipe has too much water or not enough flour. Both times when I followed this recipe exactly (I weighed the flour) the risen bread held no shape. I will switch back to my original recipe takes longer but is far and away a better bread.
I have made this bread twice. The taste is wonderful and people thought it looked like a bakery bread which I condidered a compliment! Today is my second time, and it was super sticky, even though I know I measured exactly. I had to flour my hands and work surface before I could shape at all. Your pictures look so much smoother and tighter than I was able to shape my loaves. I aldo had problems with my lame making good cuts the dough was so soft. It wanted to drag and pull through the loaves.
Hi Mandy – a lot will depend on the temperature, humidity and elevation of where you live. If it is that sticky, you can add up to 1/2 cup more flour and it’ll still turn out great.
I tried this recipe a month ago and have started making my family bread with it since then! it is exceptionally successful! Thank you for sharing!
Just made this recipe for the first time…. So fast and for being minimal ingredients and wait time it turned out phenomenal!! The crumb was so light n fluffy and the outside was chewy… Whipped up some honey cinnamon butter and it was devoured in no time… Glad it makes 2 nice size loaves… My new fav and versatile go to bread.. thanx Mel!
Curious, I have a fancy Miele oven with the steam burst, any suggestions if ย you would recommend the water burst and howโs many?
I’m really unfamiliar with that steam burst function so you’d have to experiment but it certainly sounds promising!
Iโve been making homemade bread for decades. This is my new favorite. My 13-year-old son helped make it for a school project (what might historical bread be like). We baked one loaf one day then a second one the following day. I loved being able to pull the dough out of the fridge. Have you ever mixed in other ingredients like cheese or herbs?
That’s awesome! Yes, I’ve mixed in asiago cubes (small) and rosemary. Delicious!
Are you able to bake this is a Dutch oven?
Yes, I think you definitely could.
Youโve convinced me to try this! ย What is the purpose of the slashing? ย Is it for looks only or does it impact the baking of the bread?ย
It helps the bread rise!
The purpose for slashing is as the dough bakes it has gases escaping and gives it an outlet So it dnt cause a large air bubble in burst out makin ur bread look ugly lol so its a cool/pretty functional purpose ๐
Hey Mel, I just read through the step-by-step directions, as well as the recipe before I print it off, and noticed the printable recipe doesn’t mention putting the 1-2 cups of hot water in the broiler pan, though it does suggest the ice cubes. Since I know I’ll be working off the printed version, I’ll pencil in adding the water on my copy but thought you’d want to add it to the printable version, too. Looking forward to making this delicious sounding bread!
Thank you, Liz! I’ll get that fixed.
Wow! This was so good. I made one for a neighbor and kept the second one for my family and could not have been more pleasantly surprised at the ease and deliciousness of the bread. Loved it! (My neighbor actually told me I should start a bakery! Making the us rockstars in the kitchen).ย
Way to go, Carissa!
Hi Mel – can I bake this in a regular bread tin or alternately shape as a longer loaf more of a rectangle shape than the round? Thanks..
Barry
Yes to both!
thanks Mel for responding.. great help.
This might sound like a very dumb question, but with the ice cube method, do you mean literally just put the ice cubes in the bottom of the oven? Like, touching the oven itself?? Sorry if this is a dumb question I was just very confused lol
Yes, that’s what I mean! (Not a dumb question) It’s best to consult your oven’s user manual to make sure they don’t recommend against it (I’ve done it dozens of times with no problem but others have expressed concern because of their particular ovens).
Hi. I’m new to bread making. Mine came teasing very good, good texture, but flat. Like an inch and a half high. What did I do wrong?
Sounds like you might need a bit more flour to help it rise up instead of flattening.
Veeery good
I was looking for a great recipe to share with my blog readers as we actively celebrate the Last Super today! I love how you share your preferred method, but also offer work arounds for those of us who don’t have all the same tools. I look forward to pointing some new readers to you page!
The penultimate photograph of your recipe has a caption, with text, saying “Bake for 2″?”40 minutes”. My question mark refers to a symbol which could be a 4, or a distorted +. Or is it an “H”?
Kindly explain what that symbol is, and what it means.
Bottom line – “Bake for” how many minutes?
Thank you.
Ian Walsh.
I don’t know what symbol you are talking about, sorry, but the bread bakes for 24-28 minutes.
Great recipe and the directions were so easy to follow thank you so much for sharing. I will be experimenting with it and adding herbs and spices. Mine was a little too sticky after first rise so I just added some more flour into my hands as needed,
I’ve been hunting for a great bread recipe for years. This is it. Nice crust, nice crumb. Great for sandwiches and makes a wicked peanut butter toast.
The only thing I did differently was to spray the loaf with water after about 5 minutes in the oven instead of the ice cube/water method. Works just as well without excessive steam.
Thanks for the recipe!
For starters, I’d like to make dough for just one loaf of bread. Could you give me the amount of ingridient for one loaf of bread? Please.
You could try cutting the recipe in half.
Hi!
Can I use bread flour instead of all purpose?
Yes
Do you have similar recipe for 12 grain or a rye bread? Or how could I adjust using those flours?
I’m not sure; I haven’t tried it with those flours so I don’t know. Sorry!
New to baking here. What does “turn the dough mean?
Will using enriched bleach flour make a big difference?
Thank you!!
Different flours can affect the outcome, but bleached flour will probably work fine. By “turn the dough” it means to hold the dough in your hands and form a round shape by folding the edges down toward the bottom.
Have been using this recipe for a bit now and continue to experiment with it. ย Adding chopped Rosemary, adding garlic, introducing EVOO for additional flavors and this is just a Great Recipe! ย Thanks Mel, and keep the recipes and tips coming!
Tim
Great additions, Tim! Yum!
HI Mel
I ย make this bread all the time . It’s perfect every time. It’s our favorite rustic breadย
I am wondering if I wanted to add dried fruit and or nuts when would I add them.
Will affect the baking time ?ย
Thanksย
It shouldn’t!
I added raisins and chopped pecans once it finished rising in the shaping stage then followed the rest of the instructions. It turned out amazing what a great versatile recipe . Thanks Melย
The printable recipe has no “list of ingredients” that i saw anywhere? Seems like an important thing to have on a printed recipe.
Hi Jason – what browser are you using? I can see the list of ingredients when I print so I’m not sure why that might be happening for you. Let me know and I can do some more digging.
After the past half hour or so on your wonderful, most obviously filled-with-love-and-loveliness site, mouth watering the entire time, Iโve decided that you could make the talented and creative Martha Stewart seem positively uninspired.ย
Wow! Itโs a pleasure to have come across such a culinary artist showcasing her amazing work. Thank you!
Wow, what a fun and sweet comment. Thanks, Gloria!
I made this bread this afternoon–Fantastic! A crisp outside and as good as it can be crumb! I have baked bread for over 50 years and this has got to be the easiest, best tasting bread recipe I have ever tried. My favorite is a sourdough loaf that I’ve perfected over the years. Now I have two faves! Because I know from experience what adding buttermilk to a bread recipe will do, I exchanged one of the cups of water for buttermilk. However, next time around I will use just water and see if it makes a difference.
Thank you Mel!!!
This was the first bread Iโve ever baked and it defiantly earned all five stars! Thank you so much! Iโm currently experimenting two different batches on with Asiago cheese and another with garlic paste, rosemary, and Parmesan. Fingers crossed they are as good as the normal batch.ย
I make this bread all of the time. Delicious bread and never disappoints.
Hollo, I’m asking for advice ๐
This is my first time making the recipe, and I’m getting ready to take the bread out of the fridge to bake tomorrow morning. The recipe says that I should let it rest for 1 1/2 hours, but is it fine if I let it rest for more than that??
Thanks!
It really depends on the warmth of your kitchen – you don’t want it to overrise before going into the oven, so keep an eye on that.
I love this bread recipe. Super crunchy on the outside and soft on the inside. Itโs delicious!!! ย I use the ice cube method and a pizza stone. Itโs great every time! ย Thanks for sharing
This bread is very, very heavy and way too ‘crusty’ to cut through.
It’s a good recipe -quick and easy- but the actual bread is way too dense and heavy to enjoy.
It also has an after-taste of yeast/beer, and i hate beer.
Very disappointing after reading reviews.
It took two tries, but I got it right the second time. I had trouble adjusting the dry active yeast (I didnโt let it fully dissolve the first time) and I couldnโt shape it much because it was so sticky. Think Iโll add 1/4 cup more flour next time since it was a tad flatter than Iโd like. But huzzah!
Samantha, salt kills yeast, yeast thrives on sugar…..I would use the warm water and yeast. let your yeast proof, you’ll see what I mean as it does this….wait until the have added flour THEN add your salt on top of the flour…..I have NO clue why anyone (the crowd of bakers/chefs?) write any bread recipe to add salt with the yeast…:)… I PROMISE . this WILL work for you…
I love this bread and make it all the time, it’s easy and so good ! ย Could I add olives to make it into an olive bread? If so when would I add the olives ?ย
Thanksย
Cheryl
You could definitely experiment! You’d probably want to knead them in before shaping into loaves.
I’ve made this bread recipe multiple times. My whole family LOVES it!! Thank you for such a simply, yet delicious bread recipe! ๐
One of the best bread recipes I have ever made! A real favorite with my family and excellent for sandwiches. Super easy!
Made this recipe today as my first attempt at artisan bread!!! It was delicious, easy and well loved my our family! Thanks for making bread-making a breeze.
Do you happen to have a baker’s percentage of this recipe? It would be really helpful.
So easy and so good. First time I made it with all purpose flour. Today I used half white whole wheat and half all purpose. Both yummy. Today’s crust was a bit chewier.
I have made this recipe several times and I love it so much. Its always a big hit with my family. Its a very simple recipe which it makes it so wonderful for many differant meals. Tonight its broccoli cheese bread bowls. Thank You. P
S i love your cookie recipes too.
Thank you!
Can I use bread flour?
Yes; the resulting bread will be chewier and a bit sturdier in texture.
Hi Mel, I’ve made this recipe before and was wondering is it possible to cut the recipe in half?
Hi Mel,
I seldom leave comments, but I feel that I should on this occasion.
My bread machine broke down a couple of weeks ago after 10 years of making dough, rolls and loaves.
So, I am using this as an opportunity to make loaves and rolls by hand. I have had mixed results so far.
I came across your recipe and method yesterday evening and spent some time reading and thinking. For this first attempt, I departed from your instructions after Step 2.
For my first attempt, starting at 06:45 this morning, I followed step 1 and allowed the mix to rest for just over 2-hours. At 09:00, I transferred the mix to a loaf tin and allowed it to prove for almost an hour in a Halogen Oven on Thaw. The mix rose, so at 10:00 I turned the oven to 225ยฐ C for 25 minutes hoping to get a crust. I used an extension ring to create extra space in order to avoid burning.
Half an hour later and a medium brown rough crust looked good. I turned the machine off and removed the tin. The tin has been non-stick in the past, but on this occasion, the bottom of the loaf came away โ I will oil the tin before my next attempt.
However, for a first attempt I am more than encouraged. The method is the simplest and most work light method that I have come across so far. The mix stage is straightforward and short, otherwise the two hours is free time and can easily be fitted into many busy schedules.
The crust was the best I have achieved to date. The crumb was soft and springy. The taste for just four ingredients (the same as for French bread) was very good. I have now had a sandwich and toast โ good results for both.
I will be adding this method to my collection of recipes of tried and tested favourites. My second attempt will be on Thursday morning using an oiled tin and/or liner.
Thank YOU!
I made this recipe for the first time this past weekend and it turned out perfect! It truly was an incredibly easy recipe to follow. My entire family loved the bread so this will certainly be my go-to recipe from now on. I do have one quick question though. Am I able to freeze the bread after baking in case I make a big batch once a month? Thank you for the recipe!!
Yes, this bread freezes great!
Hi there! Question – do we not knead this dough at all? My dough was still quite sticky after rising for 3 hours. So much so that I wasn’t able to form it into a neat ball like yours and definitely had to peel layers off sticky dough from my fingers. Otherwise, I followed the recipe and instructions exactly. Thanks!
Hi Kelly – this recipe doesn’t require much kneading. It’s possible another 1/4 to 1/2 cup flour might help your dough come together a bit better.
this is the first bread recipe i’ve ever successfully made! it’s delicious and so easy ๐ i used active dry yeast, and the working with yeast tutorial was a huge help! great recipe, mel.
Yay! I used to bake in high school a lot (mostly out of the box kind of stuff, but I really enjoyed it) and fell out of the habit in college once I became overloaded with working multiple jobs on top of theatre and class responsibilities. I decided recently now that I’ve graduated and work has slowed down to start up the hobby that used to make me happy… Except, real baking! Not out of a box. This recipe was the first one I tried, and it was perfect! So easy to follow. Your detailed instructions were excellent for a beginner, and I appreciate that you gave alternatives for people (young beginners like me) who don’t have fancy baking stones and broiler pans. The bread was such a success. I took a loaf over to a friend’s get-together for them to try (thinking everyone would encouragingly eat a couple slices and then forget about it), and the five of them demolished the entire thing in 30 minutes! It was such a rewarding experience, so thank you for the recipe! I’ll be taking a look at your other recipes to keep learning and growing as a baker. This experience was remarkably encouraging.
Hi Mel,
What’s the difference between this recipe and your Artisan Bread recipe where you bake it in a cast iron pot? Would you say this bread would still be an artisan type bread?
It’s similar except the no-knead bread (baked in a cast iron pot) is an even wetter/looser dough, which means the no-knead bread has those artisan-looking pockets in the crumb after baking. This bread is less artisan-style for that reason. The crumb of this rustic crusty bread is tighter and not as airy/holey.
Can I use self rising flour instead of AP? ย And if so, do I need to make any adjustments with other ingredients? Thanks.ย
I’ve never tried that and I don’t know how the leavening already added to self-rising flour will affect the bread, but you can definitely experiment.
Question ?? I have made this bread several times it tastes great, however after the resting time it’s a little sticky and I can’t get it smooth on top. ย My bread doesn’t look the same as the pictures inside and out. What could I be doing wrong?ย
If you want a really smooth top, you can add a bit more flour so you can work the dough into a smoother ball.
Add the flour at the very beginning or when I take it out of the bowlย
Thanksย
I made this bread for Mother’s day and it was a big hit! My MIL thought I got it from the bakery. The only thing I did differently was add an egg wash before I put it in the oven, but that is a personal preference since I like the crusty crust on my bread.
I would just like to enlighten you that as you have not specified if you are useing celsius or fahrenheit it can be confusing to people that are not chef’s like me as here in australia 100 degrees is boiling water and that would kill the yeast, also you still need to list all ingredients even if they are implied you have left out the water on the ingredient list
I tried finding imformation in the comments, but I couldn’t find what I was looking for. If you slice each loaf completely, about how many slices do you get?
It really depends on how long the loaf is (vs wide). But maybe 8-10?
I made this bread yesterday and was amazed by the results. I was distracted when I was measuring out the ingredients and I think I accidentally added 4 1/2 cups of flour instead of 6 1/2. My dough was a runny mess as a result, and I added roughly 1 cup of flour to try and help. The result was still quite a sticky, runny dough but I left it to rise regardless. I literally had to pour the dough on the baking tray rather than shape it, and I had low expectations. But when I took it out of the oven and cut into it, I couldnโt believe my eyes! Inside was heavenly soft and airy, and the bread had a really nice yeasty taste, with a chewy, cripsy crust, almost like ciabatta. It came out nothing like the recipe had intended, but yet it was still some of the best bread Iโve made! Haha
Amazing bread I have made this bread twice now. I only make half at a time . It’s crusty on the outside and soft and chewy inside. The only thing is I have to add a little bit more water otherwise I followed the instructions exactly. It now my go to bread !!!!ย
Has anyone tried baking in a Kamado style charcoal Bbq?
Enjoy recipe added jalapeno and cheddar once. Wow!
Can I sub your flour for Almond mill/flour?
I haven’t tried it, but I don’t think it will turn out the same (due to the gluten and other components of wheat flour vs almond flour).
I love this recipe! I came out great on the first try.
any tips on making the inside a little more airy and less dense.?
Thanks
Could you try a longer rise, Keith?
Mel,
I let it rise for about 4hrs. Should I try longer?
Thanks
Hey Keith, sorry my question was confusing. how long did you let the dough rest before baking (after it had been formed into a loaf)? I think increasing this time a bit will help!
Please, give a for this a video!!!
I make this bread regularly and often add cheese sundried tomatoes and Kalamata olives to it.
Hi Mel. Is it feasible to cut this recipe in half?
Yes!
Hi Jaclyn, I by grated asiago in 140g tubs, dump the whole tub in with other ingredients. Works like a charm. ๐
I have done this recipe a lot of time – but I proof the dough for at least 12 hours to get a very nice and “tough” inside. after 12 hour I put the dough on a floured table and flatten it a little and fold in the edges, take it in my hands and put it in a skillet that I have add some oil in, then a kitchen towel over it and let it proof for at least 2 hours more – then put the dough in a hot dutch oven 450ยฐF 30 min with lid and some more min without lid if u want a more crispy surface.
Best bread recipe ever!!! I’ve made this so many times and it always gets so many raves. I usually add kalamata olives and fresh rosemary, which makes it even better. Thanks!!!
Would it be possible to use active dry yeast instead of instant? What would be the different/extra steps?
I’ve only ever used instant yeast, but usually active dry yeast will work as long as you proof it in a bit of warm water first and 1 1/2 the yeast amount.
Tried this today and we all loved it! My boys were even asking me how hard it is to make, a la “do you think I could make this?” ๐ They want me to make it every day now… and I would have to, since they ate a whole loaf before it could even cool down.
This is a super recipe and definitely a keeper – thank you!!
Tried this today. I baked the first loaf (1/2 of the recipe) in my microwave/convection oven. Preheated to 450 ย for 10 min. with a pizza pan in there. Slid the dough onto the pizza pan and threw in 5 ice cubes (it was on a silicone baking mat.). 22 minutes at 450 and it was done. I’m still challenged by the convection oven.
I plan to try to make this for Panini sandwiches. Do you know about how many sandwiches could I expect to get out of two loaves of this bread? Thanks!
Hey Julie – if you make two loaves out of one batch of bread, I think you could probably get 8-10 slices out of each loaf (although the slices on each end as the loaf tapers down will be quite small)
I want to know how you made this into “asiago” style cheesy bread?? It sounds delicious!ย
Hey Jaclyn – I cube Asiago cheese (1/8-inch cubes) and knead them into the dough. It’s a little messy but worth it.
Hi Jaclyn, I by grated asiago in 140g tubs, dump the whole tub in with other ingredients. Works like a charm. ๐
Hi!ย
I attempted this recipe but ended up with a bread that was very dense and a bit mushy, is it likely that I played with it too much after letting it rise? I also skipped the 40 minute rest prior to baking…
-newtobakingย
You definitely need to let it rest for that 40 min! ย And playing with it too much can also mess up the texture (happens with any sort of dough: bread, pie crust, biscuits, ect..)ย
Delicious easy to make bread! Had to make the second loaf on the same day after the family demolished the first. I baked mine in a hot cast iron pan- worked fantasically, crisp crunchy crust all around.
I had to pull it out of the oven after 22 minutes as the bottom was starting to burn. The slices closest to the outside were fine, bit the center wasn’t completely baked. Oven temp was 450. I did use bread flour, so maybe that’s the issue – does it burn faster than regular AP flour? Anyway, the parts that were fine were delicious so I’ll try again.
Hey Jeff – you might try turning your oven down 25 degrees, too. That might help!
This loaf came out beautiful and delicious. I used one cup of water and two cups of buttermilk (just because I had some). Super easy to make and I am not an experienced baker.ย
love this recipe. been making it over a year now, perfect every time. i forgot the salt today but im sure it will still be good.
I lived in Bolivia for years and have been wanting some good crusty bread like I could get there. This is it!!! Thank you so much!!! I only use 1/2 tablespoon of salt and add 4 TBS of sugar, but that’s just my liking.
Hi there! I make this bread often and love it. I want to make it for some friends for the holidays but they are gluten free. Have you ever tried GF four in it? If so how did it turn out? Is a 1:1 ratio okay?
I haven’t tried making this gluten-free. Sorry!
Have you even used bread flour in the recipe and if so, were the results similar?
I have used bread flour a time or two. The resulting baked bread is definitely chewier…it’s yummy both ways (I don’t always have bread flour on hand, so I mostly use all-purpose flour).
โHoly shiz balls! Thatโs like Great Harvest worthy! You should change your name to Martha!โ
That was my sister in lawโs reaction when she saw this loaf of bread:) Holy cow it was beautiful and it tasted like heaven! My husband and kids gobbled ย it up so fast, I was scrambling to get some for me!ย
I was nervous- when I went to make the dough into a loaf shape, it was sooooo sticky. I could hardly even shape it. It was mostly just plopped onto the parchment paper. I wasnโt sure how it was going to turn out. But it came out of the oven looking like perfection!ย
Youโve done it again Mel! Thanks for another rockstar recipe!
Haha…thanks! ๐ So glad it worked out!
What I found you donโt have parchment paperย
I’ve made this bread and it was so easy and tasty. I want to make rolls using this recipe for Thanksgiving.
Would that work, and how would I need to adjust the cooking temp/time?
Hi Karen – I haven’t ever made rolls with this bread – I’m not sure how they would work out, but it’s definitely worth a try. I’d probably bake at 425 degrees for 14-17 minutes for rolls.
My dough looked exactly the same, until I tried to pick it up after rising. It was so loose and wet I couldnt form it at all! I am a decently experienced bread maker – I have made bread a few times a months for the last few years… Not sure where I went wrong ๐ Going to try to bake it, anyway!
Hi Mel,
Just tried this tonight and although the flavor is great, it cam out more disc like and only about 2 inches high, which won’t work for my grilled cheese sandwiches, haha. My kitchen was 75 degrees probably, I let it rise 2 hours, used all AP flour. I made a large ball though so wondering if that was the reason it didn’t rise, should it be smaller? Also, I only had a half tablespoon of rapid rise so used a tablespoon of active. Maybe that is the issue? Mine was also very sticky even when greasing my hands, for next time would you recommend adding a 1/2 cup or less more flour? Thanks!
If it was overly sticky that might be the culprit – it needs enough flour to have structure to rise up instead of flatten and rise out, if that makes sense. Try adding a bit more flour next time (I don’t think the yeast should be an issue).
So good!! ย I replaced the water with whey from making yogurt and it worked out beautifully! ย It was so easy too! ย Thank you!! ย
Huge hit with my family!
Easy and amazing- I’ve made this recipe many times using varying flour types. Brilliant stuff
I can never get the bottom to brown like the top. ย I have also removed the parchment midway but that does not help either.
Wondering if after 15 minutes I can turn it ย upside down.ย
You could certainly try, although I have found if I move my oven rack to a different spot (lower or higher) that can help, depending on the oven (I’ve moved a lot and have had to experiment with different ovens). Usually, if I move it to a position in the upper part of the oven, it browns better. You might try that??
This recipe is fantastic and easy to make. I’m so tickled about the way she explained how to achieve the best results in making this. You must give it a try. You will not be disappointed.
HAPPY BREAD BAKING !
I’ve had success with my dutch ovens for steaming…would it work with your loaves?
As in baking the bread in the dutch oven? If so, yes, I think that would work!
Yes, I’ve been using the dutch oven method a lot. I also like to throw Rosemary into the dough or even bacon! Delish! btw I made your Rock Salt Honey Roasted Chicken on Sunday. (3rd time) It is amazing! Hubby said best dinner! Served with roast brussel sprouts and bacon, corn and bread. Love your site! Keep up the good work!
Yum to all of that! ๐
Hi Mel, I simply looove bread and your recipe looks super delish. I’ve been making my own bread at home for years now and agree that you don’t necessarily need a stand mixer. However, it does make the job so much easier. My mixer saves me some serious energy and time, I don’t know how I would manage without it! Vicky ๐
Is bread recipe is wonderful, and basic! I made one regular sized loaves and two smaller ones….it’s a keeper recipe for sure! I’ll be making this a lot too, for our family of 8. ๐
I’m trying this recipe for the first time. I noted that you said it would be quite tacky early on. When it comes to the step of shaping the bread you have not mentioned doing it on a floured board or with flour on your hands. I was wondering whether that was because you assumed that we would automatically do that or whether it shouldn’t be done. I did do that cos that’s what I’ve always done. First loaf is currently in the oven so we’ll see hey!
Hi Colleen, I usually just shape it in my hands without any flour (sometimes a little cooking spray on my hands to help with stickiness)…but either way will work!
Thanks. I’ll try that next time. I’ve just tasted the first loaf (couldn’t wait till it was completely cool) and it’s delicious. Thank you! This will be my bread of choice from now on!
I knew I would like this recipe since it is the same ingredients from another recipe i use – but doubled and baked slightly differently. So i wanted to try it. However i had a baking fail. I put a glass dish in for the water bc I don’t hv a broiler pan. I warmed my water but not enough. You guessed it – goodbye 8×8 glass dish! Pls warn your readers not to use a glass dish and to use boiling water – not just hot. The bread is looking great still. Can’t wait to taste it!
Oh yikes, sorry about that, Leanna!
What do you use if you don’t have a broiler pan?
Throw 5-7 ice cubes in the bottom of the oven! Works amazingly well.
Ive been making this recipe every week for a few weeks now and I’m in love. My roommate said the other day he thought it had been store bought. I used half white, half wheat. Thanks!
My search for a fabulous artisan style bread is over. This is so easy and delicious. Thank you a zillion times. The fondue was outstanding as well and since we do not use alcohol I appreciated a comparable recipe we could use with kids.
I made this last year and it was fantastic… making it again tonight\tmrw for a big family get together.
thanks!
You mention this recipe on the Amazing and Simple Greek Feta Dip page — you say to make it into smaller, thinner loaves. Do you mean like four of them? And it probably changes the cooking time a bit? Thanks!!
Yes, like four loaves…or even smaller if you want. The baking time won’t change too drastically – maybe just by a few minutes.
It worked perfectly! (I did four loaves.) And was delicious with the dip. We had some leftovers so we ate it with cheese the next day — I bet it is absolutely delicious as a panini! It was super yummy with just the cheese! Thanks!!
Love this recipe! Has become my go-to. Family and friends rave about it. Baking a loaf today with rosemary and thyme. Just about to come out of the oven. Smells wonderful. Thank you for this great recipe!
LOVED this bread! Made it for the first time tonight, can’t wait to make it again.
Thank you Mel!
Omg! Made this today to go with stew and boy it was yummilicous!!! Thank you for such an awesome recipe! This will be my go to recipe for rustic breads ๐
This recipe was my very first foray into making bread. It was excellent and looked better and tasted better than crusty breads I’ve purchased from bakeries.
I lost the recipe for years and searched and searched online to find it. Then today, I found the printed recipe in an old file and the website address was there at the top of the pages.
Thank you, belatedly, so much for sharing this simple yet delectable recipe.
So happy to hear this, Jane!
wow, so i just made the bread. The second loaf is in the oven as I type this. It looks marvelous, smells great and was pretty easy to make…Now comes the task of waiting …. until it is cool enough to devour. I hope it tastes as good as it looks…. Thanks for a great recipe โฅ
Have you ever baked a loaf the tried freezing it? Just wondering how it holds up! I don’t think it’ll be a problem having two loaves around but I’d prefer to not eat both within a few days!!
Yes! The baked bread freezes perfectly.
Tried it in two different ways; there was enough dough for 4 small loaves so I baked two fresh and froze two. Thawed out the dough over the past day and tried it out just now, the second two loaves came out just fine. This is an excellent and ridiculously easy recipe to follow, has now become my go-to standard bread recipe. Love it… now, if I could only stop eating 1/2 a loaf each time I bake it…
I made this recipe, and there were a few issues.
1. I used bread flour. I was happy with the cohesive crumb that I got with that – it works really well for sandwiches.
2. I added a Tb sugar because I just can’t not feed my yeast.
3. I had to add more flour – I’m at around 2,000 feet so I don’t think that was it. I wasn’t able to handle the dough at all without the extra flour. The first loaf came out a little flat. The second loaf was a bit higher and had more flour. I think it needed the extra flour to have the substance to go up rather than out. Next time I make this I plan to add enough flour until it has a more standard bread texture and see how that goes.
4. Salt. It was waaayyy too salty. I was accused of misreading the recipe but no – it really says 1 Tb salt. I’m going to try 1 tsp next time.
Other than too salty, the flavor was great and I really loved the thick, chewy crust – that was a big hit with the family. I’m looking forward to trying this with some whole wheat flour, and a sourdough version as well.
Send me the sour dough version
I love that you did a list and pictures! This was delicious. Thank you. โก
Just made this recipe and beautiful loaves of bread! So easy!! Thanks! Will definitely make more to share with friends.
Should I be concerned about adding salt to yeast? Won’t salt kill yeast if added b/f it blooms?
It works fine to add it together in this recipe. I think in other recipes that can happen – especially if the salt amount is excessive (and definitely with active dry yeast) but it works here.
What if I don’t have a broiler pan? Could I just put water in a 9×13? Or could I bake it in the same kind of Dutch oven dish as your no-knead recipe?
I think either would work fine – I’d recommend using a metal 9X13 and not glass (wouldn’t want it to break).
How do you store the dough in the fridge? Is a Tupperware container sufficient?
This is rising on the counter right now, excited to make the first loaf tonight!
Yes, a tupperware with a lid should work just fine (make sure there’s room for the dough to expand).
What should I do after I refrigerate the dough? I left mine in the fridge so I coud make the bread the next morning.
Just follow these directions from step #2 in the recipe: When ready to bake, cut off a grapefruit-size piece with serrated knife (I have only ever made two loaves out of the batch of dough so I just divide the dough in half to form my first loaf). Turn the dough in your hands to lightly stretch the surface, creating a rounded top and a lumpy bottom. Put the dough on a piece of parchment paper set on a pizza peel or a rimmed baking sheet turned upside down. Let the dough rest for 40 minutes for room temperature dough; if you have used the dough out of the refrigerator, let it rest for 1 1/2 hours. Repeat with remaining dough or refrigerate it.
If you’re baking on the cookie sheet turned over, do you still use the broiling pan with water underneath?
Yes, you can if you want a crusty exterior on the bread.
Hi Mel,
I made this last week as a test, using half the recipie portions and making two small loafs. They came out perfectly and looked just like the photos about.
This week I made a larger loaf again using half the recipie. However during the 40 minute rest period I covered the dough completely (the pervious week I had left it uncovered). I found that it spread out cracking the skin on top. I baked the loaf without reshaping it and although its baked well it didn’t rise up as much as the previous weeks.
Is there anything I can do to prevent it from spreading? Should I leave the dough uncovered durng the rest period?
Thanks! Awesome recipe and I love the image guide!
Sounds like leaving it uncovered may produce the result you had the first time although I’m not sure why it would have spread more covered unless the covering (towel? plastic wrap?) was a little too tight and it didn’t have room to rise up instead of out. Glad you are enjoying the recipe!
Mel, have you ever made this with all 100% white whole wheat flour and added gluten?
No, but I’ve made it with 50% whole wheat flour (white wheat, no additional gluten) and it’s delicious.
This is a very good recipe that results in delicious bread. Thanks for sharing it.
Am I completely missing something, or is the amount of water not mentioned at all in the recipe?
It is mentioned here in step 1: In a large bowl mix yeast and salt into 3 cups lukewarm water (about 100 degrees). Stir in flour, mixing until there are no dry patches. Dough will be quite loose. Cover lightly with a kitchen towel but don’t seal the bowl airtight. Let the dough rise at room temperature 2 hours (or up to 5 hours).
This is probably a total rookie question– I don’t have a broiler pan (and didn’t even know what one was so I googled it…) For this recipe where it just needs to hold water, can I replace it with a 9×13 or an oven-safe skillet or something just to hold the water and provide the steam? Or am I missing something that the broiler pan does specifically here? Thanks so much for all your awesome recipes!!! I always leave your site having gained 5 lbs just looking at all the recipes I want to try ๐
nevermind! i just dug a little deeper in the really old comments and found the answer! ๐ I will use another aluminum or metal pan instead. can’t wait to try it!!
Mel – at the beginning of this post under note you reference using half finely ground White Whole Wheat Flour. Are you referring to White Hard Wheat that you have ground? I love making Artisan bread and am excited to try your recipe. I am learning so much from you. THANK YOU
Yep, hard white wheat. ๐
Hi Mel,
It would be wonderful if you updated this recipe with weight for the flour. I think that might take a lot of the guesswork out. No knead bread can go from a giant tortilla to a thick dough puck in almost no time. But, you know, no pressure. I love you just the same if you don’t get around to it!
I’ll officially weigh the next time I make this, Whitney – but I almost always use 5 ounces of flour per cup so I’m pretty sure it will be right around 32.5 ounces.
Freaking awesome! Cooked this in the dutch oven on our wood stove this morning. Let rise 20 min at room temp 63F placed in uncovered preheated dutch oven let rise for an additional 20 min, covered and cooked for 1 hr maintained a temp of 425+/- on stove top. Came out great perfect for fall/ winter in Idaho!
Mine is cooling as we speak. Thank you.
Hi, and thanks for posting the recipe and instructions, Mel. I’d like to bake the bread this weekend to go with a homemade sausage, kale, and potato soup. Just for clarification: whether or not you’re using the baking stone, you should also put water in the broiler pan to steam the bread, correct?
Thanks in advance for the clarification. I look forward to trying the bread. ๐
Hi Bil – yes, I’d recommend using the water no matter what the bread is baking on. It gives it that nice, crusty crust. ๐
Have made other types of bread but this is a fun and easy recipe, great for hearty soups and stews. I did need to add more flour to be able to shape the loaves. Baked beautifully on my pizza stone. Thanks for sharing. The pictures were really helpful…never worked with such a wet dough.
Made this bread yesterday and it’s wonderful. Shared it with fresh cracked dungeon us crab with neighbors last night. They lov d the bread, so I’m making more today. Thanks for the post, it’s appreciated!
I’ve NEVER made bread before, and I’m really scared and excited to make this. It’s also my first time to your site. I get envious of my friend who makes her own bread and it’s delicious, but she uses a bread maker, which is a totally different case in my opinion. I don’t have a baking stone or parchment paper, so I’m going with the loaf pan option. Do I still need to include the broiler pan step with the loaf pan option? I’m hoping my bread turns out as rustic and crusty as yours did
Using the broiler pan will give it a crusty exterior so if you’re after that, I’d probably still use it.
Love this recipe! wanting to change it up a bit. I’m going to do 4 cups white flour and 2.5 whole wheat, but I also want to add some grains (flax, sunflower seeds, chia, maybe oats?). Ever tried anything like this? Any advice? Haha
I haven’t tried add-ins like that but sounds like it would be great!
So we are now in 2015. This recipe is from 2012. What happened in between those years? I don’t know. But I do know that this morning while browsing for an easy bread recipe I came across yours. And I daringly decided to try it.
Well, I didn’t had much expectations since I know making bread is easy… but a bit tricky.
Anyways, the dough was sticky and I wasn’t sure if it will come out as I was hoping. But all my fears disappeared when I saw right out of the oven this two beautiful rustic, crusty and “free shaped” breads! I was in heaven, as if I won an Oscar or something like that.
Fantastic, easy, delicious. I’ll never buy bread again.
Thank you!
Hi Mel –
Do you still have a printable PDF available? The link for it no longer works!
Many thanks,
Chelsea
I just updated the link.
Mel oh my goodness this bread was the best yet thank you thank you for sharing it you are a doll. Not only is it lovely to look at it tastes awesome! Truly you are one of the best cooks on the planet and your baby is more beautiful than ever
Happened upon this recipe looking for a quick rustic bread. I made it, it was sticky and gloppy and I had NO hope whatsoever that this would be anything but a giant pita bread.
Wrong. It’s delicious. Toothsome interior,. chewy but tender crust. A keeper.
Thank you for posting this and you have a new subscriber, too!
I am going to try this today. I love your pictures, they are nice and small and step by step. Sometimes I hate scrolling through large pictures on blog recipes just to get to the recipe.
I have made this bread in the past but tonight after the initial rise, it was so sticky and “wet” I couldn’t even form it into a loaf or barely get it out of the bowl. I also couldn’t get it off my hands after picking it up. Any idea why it was so sticky? Followed the recipe just like before.
Not sure what happened but I was so frustrated and just threw it away. Not sure if I want to waste more ingredients trying this one again.
Has the temperature/humidity changed since you made it last? That can definitely factor into the texture of a dough although I can’t say exactly what would cause it to be ultra sticky this time. Sorry it didn’t work out for you!
Thanks for the recipe, most awesome bread I make, was worried about stickiness;
I also used bread flour. Great taste!
Mel, I love your site and have had more consistent success with your recipes than those from any other sites! I made this bread for fondue (also from you) a few weeks ago, and I got to thinking, could I shape the dough to make more of a baguette-like bread? What do you think?
Jihyei – so happy you are enjoying the recipes! As for this bread, actually, I think you probably could. As you know, the dough is a little on the soft side but I think you could probably experiment shaping it into various lengths/widths as long as they are transferrable to the oven. Good luck!
made this yesterday it was my second attempt at making yeast bread. I don’t have to look any further for a great bread recipe. Thanks.
Thanks for such a detailed tutorial!
Oh my goodness. I made your bread tonight (with a few changes) and it was amazing. I added lots of Italian herbs to the dough as well as 2 tablespoons olive oil, then salted (sea salt) and buttered the top of the bread just before putting it in the oven, and it was ridiculously tasty. It came out looking a bit more like focaccia bread. It probably sat out a bit too long, but it’s perfect for eating on the side with dinner.
I made this bread today. Easiest bread recipe I have ever used. The bread came out fantastic!
I made this last night into 6 bread bowls… worked great! ๐ Thanks!!
Made this last night and it was better than the bread I have been making! Definitely a keeper!
Just wanted to let you know that this bread baked beautifully in my Dutch oven and it was fabulous! I followed all the instructions exactly until it was time to bake. I placed the Dutch oven in a 450 degree oven for 30 minutes, removed the Dutch oven, placed the dough in and covered the pot and baked in oven for 30 minutes. After 30 minutes I removed the cover and baked for another 15 minutes. Perfect bread!!
This bread is in the oven right now and I can’t wait to taste it!!
Just in case this is helpful to anyone else, I don’t havea broker pan and thought I would just use a glass casserole dish to hold the water instead. My heat transfer engineering husband is shaking his head at me on this one, because, of course, when I poured the hot water into the preheated glad dish, the whole thing cracked right apart in my oven!! Bad idea!! Don’t use glass (everyone else probably already realizes this;) good lesson for me:)
Love this recipe! Whenever I have to bring something to a potluck or party, I make this bread and whip up some honey butter and I’m greeted like a hero! My question is, a dear friend recently found out she is gluten intolerant-do you know if just switching out to gluten free flour would work? It’s so tough for her to find food she loves in gluten free and what better gift than homemade bread!
Hi Susan – you are a nice friend to try to accommodate your gluten-free buddy! Unfortunately I have not tried making this bread gluten-free and can’t tell you whether or not it will work for sure. Good luck if you experiment! Otherwise, you might try doing some searching online for gluten-free artisan breads.
If you use cup 4 cup gluten free flour it comes out very nicely!
Of the 87 times I have made it, at least 40 of those times It has flattened during rising times and not puffed in baking. Do you know why this could be? I have notice that happening less when I use one cup of WW flour. Thanks!
Maria – It is very likely because the bread is overrising before baking (when this happens, it doesn’t have enough oomph to continue rising in the oven and like a balloon, it reaches its max and then deflates). It could also be due to underflouring – which would make sense why the sturdier whole wheat flour helps the bread maintain it’s structure a bit better.
Thank you! I will try letting it rise for less time in the first rising. ๐
I made this recipe and it turned out great! But I’m not quite sure what I was supposed to do with the second half of the dough. I formed both loaves at the same time and just left the second loaf sit on the parchment paper while I baked the first. It then got flatter than the first loaf. Should I have done it differently?
michelle cox – I usually let the second half sit out while the first half bakes but I’ve noticed if my kitchen is overly warm, the second loaf will deflate a bit like you mentioned so I’ve started placing the second loaf in the refrigerator and gently removing it when it’s time to bake. Hope that helps!
This recipe is SO delicious! I’m not sure how to store it to keep the crust… crusty. It seems to soften if you put it in a bag.
For other people making it, salt kills yeast, so NEVER add it directly to the yeast. I add it mixed in with the flour, or sometimes will do a starter of just a small amount of the flour, yeast and water and then add the salt after about an hour with the remaining flour.
Hi Mel. I made my very first loaf of bread using this recipe! The outcome was better than I thought (even when I don’t have an oven stone). However, the middle part of my bread is still a little doughy while the crust was beautifully browned.
Do I lower down the oven temperature? Or should I let the dough rise longer? My dough rested for 2.5 hours before I popped it into the oven.
I still have half the dough left so I’m really trying to improve! =)
Cindy – If the center was doughy, I’d suggest baking it a little longer. An extra 3-5 minutes can help the bread bake through to the middle – if it’s browning too much with the extra time, it might be that her oven bakes hotter (very common, ovens can vary quite a bit in actual temperature) so reducing the temp by 25 degrees and adding extra minutes may help. Good luck!
I just made this and I’m laughing so hard, because I forgot to half the dough. It’s huge!!! Lol! I just added about 10 minutes to the cooking time, and the crusty outside looks great! I’m sure it will be delicious. Thank you for such an easy recipe that yields such beautiful bread!
Just wanted to let you know, the extra ten minutes was perfect to bake the whole recipe amount through. I also used an upside down cookie sheet, because I don’t have a stone. The bread is delicious! I will be making this on a regular basis…in halves LOL! The slices are enormous!
Thanks for a wonderful recipe, the step by step pictures are very helpful. My family loves this bread and we make it all the time!
Hi Mel
Would it work to use rapid rise yeast to get the 5 hour effect in less time or will it not be as good?
Thanks, Aaron
Jody – As far as I know, instant yeast and rapid rise yeast are the same thing and can be used interchangeably, so yeast labeled rapid rise should work just fine in this recipe.
Hi Mel,
Thanks for posting a fabulous bread recipe! I noticed some were asking you about whole wheat flour, and I’m here to say that I’ve used some. I made these loaves today, and I used 4 cups of white all purpose, and 2 1/2 cups of whole wheat bread flour. It turned out FANTASTIC!!! The bread is fluffy and light, and not dense at all for a no knead bread. You can definitely add this variation to your recipe for your readers. ๐ Thank you for posting this with great instructions, and beautiful photos. I’ve been trying to bake bread and with horrible results. This is the first bread I’ve made that not only LOOKS good but tastes divine! This is now officially my bread recipe. ๐
Curious Little Bird – That is awesome that it worked out with whole wheat flour. Thank you so much for checking back in to let all of us know!
Fan-frikkin-tastic! It was delicious. Does the dough really keep for two weeks in the fridge? That’s great if it does.
Jordan – The original recipe says it can stay in the fridge that long although I’ve never personally tried it. The yeast flavor will definitely be more pronounced but it sounds like a lot of people have kept it in the fridge with no problems.
thanks for the link mel.
took awhile for me to try it. fell and broke my wrist in cast so please excuse typing.
tried the no knead today.works real well in my dutch oven. a little tweaking on my part and it will be great.
thanks again and keep them coming
I made this today and used my bread machine to mix a half recipe. I took out have it was mixed and kneaded and proceeded from there. It came out great. We both loved it and now I don’t have to spend $4 on a loaf of crusty bread at the store. This time around I used King Arthur Bread Flour. Next time I might try the all purpose flour and compare.
Ok here goes 66 year young guy that has been making bread since I was 12. Been looking for a bread that has a crunchy crust. My normal dough has two extra ingredients from this one more sugar for one and lard, crisco or other oil product. Not to brag but I get good results and reviews from my bread and sticky buns, BUT i cannot get a crunchy crust. Have used water in pan, spray bottle, combos of both, until I finally just threw up my hands and quit trying. Even this recipe has not given me the crunch I am looking for. You know the one where you can hollow it out and use it for a bowel. Love the taste and will continue to use the recipe but sure would like to know where I have been going wrong for 40 some years
Old Man Bob – have you tried the no-knead bread that was made famous by Jim Lahey (and I think NY Times published it)? It makes by far the crustiest bread ever and might be just what you are looking for. I posted the recipe a long time ago (pictures are terrible, sorry) but you should definitely give it a try:
http://www.melskitchencafe.com/2008/01/no-knead-bread-revolution.html
lf there is such a thing as a baking yeast bread phobia I have it. I’ve been baking up a storm since I was a child but avoided yeast breads at all costs. No idea why but lets just say me and yeast bread were never to cross paths. I did get brave and venture into the yeast breadsticks with great success but had no urge to go further. That is until Dh looked at me and said he really wanted some homemade bread. I said do you want breadsticks or biscuits? Oh no he wanted homemade yeast bread, breadsticks just wouldn’t do.
So today I sucked up my fear and began this recipe. Sure I was doing something disastrously wrong every step of the way. Thanks to your photos I could see mine looked just like yours but I knew there was no way this was going to end well. All went well until I added the water for steam. My oven is a regular and a convection, the fan brings in heat no matter which method you use so of course when I added the water the fan blew it right out the door in one poof.
I closed the oven door and hoped for the best. My bread (cooked both loaves at once side by side on the overturned baking sheet) never did get a deep golden brown but after it went 10 minutes beyond the recipe time I could see it was definitely done. I pulled it out and patiently (ok not so patiently) waited for it to cool. Then the moment of truth. I cut through a nice hardy crust and saw a soft perfect bread in the middle. SUCCESS!! But how did it taste? Well DH took some to work and the kids loved it so much they asked if they could have it for their snack.
A bread the kids are willing to trade their sweets for? I do believe that is a winner. It’s such a thick hearty bread I figured it needed something to sop up so I served it for dinner with your spaghetti sauce that we love.
Happy to say my phobia is gone and I am going to venture into your other yeast breads soon. Thank you for such a great tutorial.
Yay, Pamela! I’m so, so happy this bread worked for you. You are going to be a bread-making master before you know it!
This recipe is so well written and the picture tutorial at the end is brilliant. I’ve made this bread several times with great success.
Amazingly good. I used beached AP flour and it was fine. Also brushed it after the 2nd rise with egg white to get a nice golden glossy finish. Yum! No more more store bought bread for me either. Thanks for a non-scary experience.
Awesome recipe, after the initial mix and rise time I did add a little more flour and knead the dough for maybe 30 seconds, otherwise the dough wasn’t formable and too sticky. Other than that this recipe worked great , soooo easy and delicious!
Thank you for sharing this recipe and for the super useful step-by-step pictures, Mel! I have already made this bread way too many times. Actually, I blogged about it today and when my husband saw me uploading the pictures he asked me to make it again – so the dough it’s rising as we speak! ๐
Thank you for your response Mel! Yes that definitely makes sense. I made the bread last week for the holidays and it turned out great. Can’t wait to try your other recipes!
made this bread this afternoon and it was absolutely wonderful! I didn’t have parchment paper so let the dough rise on floured wax paper then to bake it I put some flour down on aluminum and then placed that on top of the pizza stone! It was delicious!!!
Mel, This is amazing – I’ve never made yeast breads and this came out beautiful!!! I made a vegetable beef soup today and my wife loves crusty bread with soup. This is perfect for the occasion – I’m no longer afraid of making bread.
Is the dough supposed to still be sticky after the first rise? I live in Illinois and it’s -17 degrees today – not humid at all :).
Patricia – this dough is slightly stickier than other bread doughs I’ve used but it shouldn’t be so sticky that the loaf doesn’t hold it’s shape. Were you able to work with it ok and shape it into a loaf? I’ve found greasing my fingers and hands helps to shape the dough.
This was my first successful attempt at baking bread. I just made this recipe last night, after another bread recipe failed me. It was SO. GOOD. It made 2 large loaves, which I baked in a bread cloche. It took about 30 minutes per loaf. What a keeper of a recipe! Thank you!
Hi Mel!
I absolutely LOVE your blog. My wonderful mother turned me on to your website. She taught me everything I know about cooking (and I still have so much to learn). I am currently a college graduate student, and love to cook when I have the right resources (and time). I made my second ever loaf of bread when I tried your French Bread recipe, and it turned out wonderful!
I did have one question for this recipe. I think I understand the difference between active dry and instant yeast. Is there a reason you add the instant yeast to water first? I thought instant yeast didn’t have to proof? I read your tutorial on yeast, but I think I’m still a little confused. Thank you so much for your wonderful recipes! You are such a joy to read and to cook with ๐
~Allyson
Hi Allyson – good question! Instant yeast doesn’t have to proof (like you said) but it doesn’t hurt it to be added to the water and in this recipe, it’s just a matter of how the ingredients are mixed not necessarily to let the yeast proof. Does that make sense?
I had been looking and looking for a recipe to make a crusty “French” bread with some nooks and crannies inside and this works perfectly! Thank you so much for this recipe.
By the way – I’m really glad to have found your blog! It’s very easy to follow your tutorials & find information. And reading above…I now realize the rising problem was I used active dry yeast…not instant. Now I just need a new stone & can try again! ๐
Reading all these comments of successful bread making, I’m kind of bummed. I’ve never had a problem with my bread turning out, so I thought this recipe would be great. My bread just came out of the oven and it’s…egh. Didn’t really rise like usual; it’s very small and I guess I’ll have to try this again to see what went wrong.
The part I’m most upset about is I opened the oven and found my baking stone is cracked in three pieces. I just went to the website for my stone and it said: do not preheat the stone, it is safe up to 450 degrees (I guess not this time), and to prevent extreme temperature changes (would the steam do this?). I am only writing as a precaution to others -make sure your stone is actually able to withstand these requirements!
I hope to have better luck next time!
This recipe was so super easy, and I felt awesome pulling this gorgeous bread out of the oven like a pro. Thanks so much for your detailed instructions, it was hard to mess it up when you see what it is supposed to look like! I’m also really impressed with your Thanksgiving spreadsheet, thanks again for sharing!
Thanks for the reply! I think I may have over-floured it a tad as well. Better luck next time I suppose, thanks again!
I recently made this with white whole wheat flour and it came out decent, but didn’t rise very well in the oven. It rose well initially but not in the oven, so I found it was dense. It’s my first time with bread making and I was wondering if it’s because I followed this recipe with active dry yeast over instant? Is there a difference? Or does something else cause it not to fluff up in the oven?
Joan – there is a difference between active dry yeast and instant – I have a post about it here.
http://www.melskitchencafe.com/2009/11/tutorial-working-with-yeast.html
Using whole wheat flour can make a bread more dense so take care not to overflour the dough.
I made this bread last night as my first foray into bread making. The entire time it was rising, I was convincing myself that I messed it up. Then when it was baking I was preparing myself for disappointment. Oh man, did I get the opposite! The bread came out perfectly and was delicious!! I took a loaf over to my boyfriend’s house for a dinner party and it was gone in minutes. Thank you for the awesome tutorial and for helping me feel like a pro in the kitchen!
I want to make kid size bread soup bowls with this. I was thinking to make 8 out of the recipe. Any idea how long I would cook them or know when they were done? Love this bread, by the way. I’ve made it several times. Have you experimented with using wheat flour?
Hi Marci – I’ve used half white wheat flour with this bread dough before and it was slightly more dense but still yummy. I would probably bake the little bread bowls for 15-20 minutes. Good luck!
Hi – why does mine always flop??? Have tried this and a similar recipe 3 times now and initially in thhe bowl I get a good rise very quickly then it all settles back into a very gloopy mix and it is impossible to shape into a ball type shape – more like a flat shape and it doesn’t rise again after that – it tastes “ok” but is only about 2 inches high – so looks more like a disc… Any ideas? I’m about ready to accept I will never be able to bake bread which I want to as I want my kids to eat home cooked bread
Pete (I live in Hong Kong and at moment the temp in kitchen is about 27C (I guess that’s about 80F – is it too warm?)
Pete, try adding a bit more flour especially if it isn’t holding its shape. That should help!
OMG! This was sooo easy to make and came out perfect! Tasted great!!!! Next time I make it (prob this upcoming week!!!) I’m going to add roasted garlic… nom nom nom!!! Thank you for sharing and I am truly thankful I came across your website!!! It’s awesome!!
I made 2 loaves of this bread this weekend. One for Sunday dinner and the other for paninis tonight. It was simplistic and absolutely delicious. Everyone raved about it. Thanks for the great recipe Mel!!!
Paper can reach spontaneously combustion at around 480 degrees. If your folks have corners of paper hanging over the stone in a gas oven you could easily reach that point during the heating cycle. The steam bath should mitigate this risk a bit but not eliminate it. I always trim the corners so that they do not hang off the stone and all should be good. PS… Fahrenheit 451 is a book that is based upon the temperature which book pages burn…
I was looking for a recipe for a crusty bread, saw this one, and made it on the spot. I followed the recipe, except for the stone. I subbed a sheet pan turned upside down, and it worked great! This bread is crusty, with a yummy soft chewy center. Plus, as a widow on a fixed income who still has a couple kids at home, I really appreciate that it only needs a few ingredients. Hat’s off to you, Mel! This recipe is a WINNER!
The best and easiest recipe for bread making ever!!
Olivia:
I have made this three times now. The last time, I failed to put the water into the oven with the bread. The color just was not good at all when skipping that step. This time, I used bread flour and did everything else exactly. However, I only used 6 cups of flour (King Arthur Unbleached Bread Flour) as the dough was perfect, according to the images on this site.
You, in my opinion, simply added too much flour. This dough is not meant to be the typical dough you think of. It is very sticky and loose, more than most bread doughs I have encountered. So just stick with the 6 to 6 1/2 cups. Depending on your humidity, anyway.
This is really great bread and it bakes to perfection for 27 minutes in my oven.
Thank you for the recipe, but it just didn’t work out for me. First, I noticed there mixture was way too moist after letting it rise, so I added about 2 cups more flour. I think this is what screw the recipe up for me. I let the bread bake for 30 minutes and pulled it out because it wasn’t even close to being golden brown. I didn’t want to over cook the bread waiting on it to get brown. The inside was done. I’ll have to try this again with 8 1/2 cups of flour right off the bat and see how it goes. I wonder if adding more flour after it has risen just doesn’t work well.
I just found this recipe, and I’ve gotta say that I am now addicted to your blog and super excited about how easy this looks! My 5 month old went down for a nap, and I remembered that I had a new jar of yeast, so I decided to give it a shot. The dough is currently rising for its first time and the baby is STILL napping. Can’t wait to bake it and TASTE it. The one thing I was determined to do when I decided to be a stay-at-home-mom was to learn to bake bread. This was a great first recipe to try, it makes it seem far less intimidating! Thank you for your great tutorial!
I made this bread to eat with our spaghetti dinner tonight and it was delicious and very simple to make. I may forgo the water in the pan in the oven though, because I really like my crust hard. It was delicious though. Thank you for a great and very simple bread recipe. I could make this bread every day.
~FringeGirl
This is my first attempt at making bread and I loved hoe easy the directions are! But I did run into a problem. My dough was still pretty sticky after I let it rise for 3hrs so forming the loaves was very difficult. What did I miss?
Breonna – this dough stays pretty sticky (that’s what helps give the artisan-like airiness in the crumb). If it was too sticky to handle, even with greased hands (I spray my hands with cooking spray), try adding a touch more flour next time.
I tried this recipe the other day and I made some observations.
1) Followed recipe exactly. Did the first rise for 2 hours (2:40 with the proofing once it was risen) and baked a loaf. It was delicious.
2) The second half of this recipe, I let go for the full 5 hours. I baked this one off as well.
The full 5 hours resulted in a MUCH nicer bread. Shape, color, texture… taste. It was just superior to the 2 hour rise in all aspects.
My advice to anyone with the time to do this is to let this do its thing for the full 5 hours. You will love this great recipe even more.
One more thing:
I needed a bit more flour than the recipe called for (here in Boston), probably another 3/4 cup. I did not read every comment here, but it seems as though a couple of others had to add a little extra to get the same look in the pictures for once it is done being mixed together.
Other than that, thank you very much for this recipe. I’ve been looking into baking bread for a long time now and this recipe has really shown me that I will enjoy it.
Yes, I had the same issue..I needed more flour because it was so wet/liquid-y
I made this two days in a row and today a double batch. This is what I have been looking for… Crisp crust and great air holes. Looks beautiful and tastes even better. A couple of changes was to bump the temp to 500 and cook about 20 minutes. Also I added a tablespoon of sugar… Not sure why up I always add a bit of sugar to bread. Didn’t taste sweet but I thinks adds color to the crust. Great site!!!
OK . . . figured it out! I used table salt instead of kosher salt. I referenced Jeff Hertzberg’s recipe. Will try again tomorrow to make it with the right salt ๐
Thank you for sharing thus update, Deb. I am about to make thus bread and I wondered about the tablespoon of salt too, and I was prepared to yes table salt. Now I can skip that disappointment!
I just finished baking this bread and it was very easy! I do wonder why a whole tablespoon of salt and 1-1/2 tablespoons of yeast is required. It does taste a bit salty for me. Just checking to make sure that you meant tablespoon and not teaspoon.
I have pictures and would like to know how to post those on here.
This is quite possibly the best bread I’ve ever made.
HOLY CRAP MEL THIS BREAD IS AMAZING. I just made it today and it looks like I can stop buying all those loaves of crusty delicious bread from the supermarket because I can have them fresh out of the oven. Thanks for the awesome tutorial ๐ great instructions
I have tried this recipe twice, and each time I have found that the dough is too dry to incorporate all of the flour. I am wondering if I am not mixing long enough or is it ok to add more water? Thanks!
Kerry – I would decrease the amount of flour if you are having trouble incorporating it. Try using 1/2 cup less and see how that goes.
This bread is incredible. I was a little wary that it would turn out the way I wanted it to (or the way yours did Mel), but with all the great reviews, I knew I had to try. I was not let down one bit. In fact, it surpassed all my expectations. I thought I had added too much flour and messed it all up, but my loaves baked up beautifully. I have a feeling this is a recipe that would be hard to mess up! I am going to make this all-the-time!
Just a follow up to my previous post… The bread came out GREAT and is by far the best bread I’ve ever made! Thank you!
I’ve been trying for years to find a good and easy bread recipe. I usually stick with bread machine dough, but with my bread maker stuck in California, I had an excuse to try something new. Thank you for this wonderful recipe. I’m making bread twice a week now, and not buying any at the store!
This is in the oven as I type! I’m very excited about this bread and I hope mine comes out as lovely as yours looks. I think my dough was a lot on the sticky side… but hopefully it still comes out good! Thanks for the great recipe!
Yumm!! Loved it! Never buying bread from the store again!
This is awesome!! I have made three batches in the last two days. I am a single dad with two teenage boys with me all the time. They love fresh made bread … I love the no-knead ease of the whole process. It is so easy to integrate into all of the other things I am doing. I will be making some dough batches to rise on my lunch this week so I can bake them when I get home from the office. I need to train my boys to prep the loaves a little before I get home. I haven’t had a chance to read all of the comments, so I apologize in advance if I am repeating at all, but the bread comes out so much nicer if you let the dough rise for 5 hours. Also … I am looking forward to picking up some green onions (I have several bricks of Asiago in the fridge) to make my favorite bread that is produced at the local grocery chain in Salt Lake that bakes artisan bread. I definitely will enjoy not paying $5.00 a loaf!!! Thanks so much for sharing this wonderful and easy recipe.
I think that the problems some of you are hav ing is because the recipe tells you to add the salt to the yeast then add water. Everyone I know that makes bread is aware that adding salt directly to the yeast will kill at least half of the yeast. It’s best to mix your salt into the flour therefore encorporating the salt gently to the yeast and you’ll have a much happier bread experience.
This is fantastic! I make this every time I cook pasta! Has any one tried making this in a whole wheat version?
I also had my dough rise beautifully after 2 hours then shrink and turn runny by the time I was ready to cook it 3 hours later. In the future, I will let it rise for 2 hours, no more!
You are my hero! I’ve been making recipes from this site like crazy ever since I discovered it recently and they’ve all been such a hit with my family! I made this bread the other night and it was AMAZING. I froze half the dough though instead of baking them both (I was all baked out)…how do I handle the frozen dough to bake it now?
Hi Valerie – I would let the dough come to room temperature (either in the refrigerator or on the counter, the counter method will take less time, obviously) and then shape it into a loaf and let it rest/rise according the recipe and bake it. It’s pretty simple, really, you just need to defrost the dough and you’ll be good to go! Glad you are enjoying the recipes, thank you!
I don’t get it. You copied the NY Times recipe almost word-for-word. That’s not plagiarism? If you were an HONEST content creator, you would have simply linked to the recipe instead of copying it. Shame on you.
A Content CREATOR – there is a full link crediting Jeff Hertzberg and the NY Times for their recipe so please don’t accuse me of something I haven’t done. I wish you the best at creating the best content you can! I’ll do the same.
Very nicely stated Mel.
Hi Mel,
This bread is absolutely, unbelievably amazing. So good that I made it three times this holiday season. I just couldn’t believe that only four ingredients could produce such magic. Everyone loved it! We even joked that I should open a bakery, selling only this bread and we’d be rich, haha.
The first two times I made this, my loaves were much much flatter than yours. I think a few other have commented on this. The flavor and texture were still amazing, btw! The third time I used more flour until I felt that I had a dough that would hold together better, while still leaving the sticky residue on my fingers. Bingo! That was the key. Now I know how to make those perfect looking loaves like you have in the photo. Thanks for another great recipe!
Hi Mel,
I’m making these into rolls for our pulled pork sandwiches tonight and am excited to see how they turn out. The reason for my post, though, is to tell you how much I enjoy your blog. I’ve been reading it faithfully for 3.5 years. Yours is my favorite blog — for your sweet personality, great writing, down-to-earth style, and self-deprecating sense of humor. I’ve tried so many recipes, and several have become family favorites (angel food cake with chocolate whipped cream, sweet and sour meatballs, cornbread, and oven-baked chimichangas). Thanks so much for your efforts. You rock! Have a Happy New Year.
Hi Mel,
Just found your site, immediately made the bread and it was absolutely perfect! I was a little worried when it was so sticky but it came out amazing. Thank you for the great recipe, I baked the entire thing and am going to dry some of it out to make stuffing!
To Judy Lipofsky:
I am not sure what technically happens, but I do know that there is a window of time where the bread is ready to be baked and if you overshoot that, the yeast dies or something, and it will do exactly what your bread did.
If you want to make the dough and then bake it more than a couple of hours later, then you must refrigerate it. It’s the temperature that determines the speed the yeast develops its gas and lives it’s lifetime.
I have made this dough, baked one loaf and refrigerated (in a bowl with plastic wrap on top) the remaining dough and baked another loaf the next day (after letting the dough come to room temperature).
Successfully baking bread is based on time and temperature as you are using a living organism (the yeast) to produce the “lift” in the dough that gives you fluffy and tasty (also dependent on the yeast) bread.
Hope this helps and you will have a better experience next time!
I tried making the bread first time today. After 2 hours it had almost reached the top of the bowl, but I wasn’t ready to bake yet, so went away for 2 more hours. When I got home it had shrunk back to about half the height of the bowl and was like soup. I added about 1 1/2 cups more flour and still no way could I shape it. So I spooned it into a buttered pie pan and baked it. It was delicious but flat. Where did I go wrong? The temp in the house was about 75 degrees and we are at sea level (Florida)
Hi Judy – bread can be a fickle thing. If left to rise for too long, it will do exactly as you described and collapse. With this particular bread recipe, where the dough isn’t as stiff as other yeast bread doughs, I can see how it could get kind of soupy upon collapse. Just like the other advice, if you think you’ll be gone during the prime rising time, refrigerate the dough to slow down the rising.
I made this today and it was delicious! Thank you so much for sharing.
Mel, great recipe! I have been making all the bread we consume for my family for probably around 30 years, and I love this quick way to have homemade bread!
I do use bread flour, and kosher salt, just to answer the question a couple of people had.
I have also found that adding a tablespoon of medium rye flour to the flour mixture adds a touch of the french bread taste.
I also vary the ingredients so that it “looks right”. Sometimes I use more flour or more water or less of these, just depending on how it looks. The reason this varies is that the temperature and humidity in the kitchen at the time of making the bread will affect the requirements of the recipe.
This bread is fabulous!!! My husband was so impressed-he thought it looked like it came from the bakery. I can’t believe it is so easy but tastes like you worked on it all day! We have eaten it everyday since I made it last week. I am getting ready to make it again. Oh, and I made a panini with it yesterday for lunch-the best bread I’ve ever used for a panini. Thank you so much.
Beth – I haven’t used bread flour but I’m sure you can. Bread flour has more gluten so that may affect the consistency of the dough a bit but I think it should still work fine.
Hi Mel! This bread looks fab and from all the comments, it must taste just as good as it looks. Do you think I can sub bread flour for AP flour? Can’t wait to make it. Thanks for all the photos they are very helpful.
I’ve never tried to make bread without a machine before. At least not that I recall. This is so simple, yet so delicious!!! Made mine into 3 loaves to eat with home made potato soup. Everyone raved. Making more today.
the crusty bread recipe sounds great just got married am going to try my mom said to use kosher salt can I thank you
I love the Artisan Bread in 5 Minutes a Day recipe- I also love how you dusted with flour and sliced the top of the loaves to give them an extra special look. Nice photos, too!
A comment regarding those who are having their loaves turn out flat (or the dough puddle)- I’ve had this problem in the past, and it always seems to be a result of letting the loaf rest for too long after shaping. This seems to happen especially when it is very warm out. You can slice the loaves on an angle to get taller slices when this happens.
Also, regarding the dough that is too dry- I’ve also experienced that, and it always happens when I’m distracted while counting, so I assume I mis-count cups of flour. I just add a little water and mix it in.
I dump everything into my bowl before mixing and I’ve never had any problems with this method.
I’ve never used the pan of water underneath, so I shall have to give that a try next time I make it.
Thanks for the great panini tips!
I’ve used this recipe a few times and it’s my absolute favorite! I’ve also done it in a dutch oven, which makes it extra crispy – it’s in there for about 25 minutes with the lid on and then another 12-15 with it off. The last time I made this bread, I mixed in half a cup of chopped kalamata olives – so delicious. Thanks Mel!
Debbie – bless you for the care you are giving to your mother! Yes, I think you could freeze the unbaked loaves but because the dough is so tender and soft, it might be easier to freeze the baked loaves. Then you could pull them out and warm them in a 250 degree oven until they are warm and soft again. I’m guessing the extra water is due to humidity and other climate factors.
Thank you Mel for your wonderful blog. I have enjoyed many of you recipes in only the few weeks since I discovered it. I have been nursing my 87-year old mother and have been making this recipe as my therapy. I divided the recipe into 4 mini loaves and pass them out as thank-you’s for anyone who shows us kindness. Do you think I can freeze the unbaked loaves? It also seems that I have to consistently add an extra 1/2 cup of water. I don’t know if that is a humidity factor (we live at the beach in NC) or a reflection of how I am measuring the flour. Thanks again!
This recipe is absolutely delicious! What I like to do is cover the dough with a little bit of olive oil and let it sit for a bit. Bake it in that oil and it tastes great!
Julie – I’m not exactly sure if adding the flour all at once will make a difference but since it worked out when you added it gradually, I’d suggest doing that from now on. When I make it, I add it gradually just because it is easier to stir in. Also one thing to consider is to measure the flour lightly…I use the scoop and sweep method trying not to pack it in the cup. Good luck!
Love this recipe but have had some trouble! I am sure it’s my error. I have somehow been messing it up. The first time I made it, I added all the flour at one time. Is that bad? Should I stir it as I add it? It was so dry I had extra flour in the bottom of my bowl. I threw it out and started over. The second time I stirred it as I added the flour with perfect results. I tried again tonight and it had the dry issue again. I added the flour all at one time again because in my mind that shouldn’t matter. Does it? Maybe I am mis counting my cups of flour. Just wondering if you had any advice. I noticed no one else has had this issue, so I figured it was operator error. Thanks.
Hi Cat – I think you could cook it longer and it would develop a thicker, more crackly crust. I think the original recipe baked it for over 30 minutes but when I tried it, it was too dark for my taste; however, it’s worth a try if you want more of a crust.
Thanks so much for this recipe and photos! I made it today and it is really good. I followed the instructions exactly and it looked just like the photos. It is delicious, but I’m curious, is there a way to make it even more crusty? Mine had good crackle with each bite but not the thick crusty crunch I’ve been searching for. I cooked it 26 min and I couldn’t tell how crusty it would be until it cooled. Should I cook a little longer? Should I use a little more water than the 1 cup? It’s great as is and I will be making it again even if I can’t get a thicker crust. Thanks!
Kasia – I always store the cooled leftovers in a ziploc bag. When I want a crisp crust again, I reheat the bread (uncovered) in the oven at 250 degrees for 5-10 minutes. That might help the soggy crust issue!
Any tips on the storage of this bread? i made it and it turned out great i use it to make open face sandwiches in the morning and my kids love it, but when i cowered it with tin foil the next day the crust got soggy. Any suggestions?
Mel, this was so easy to make and was, hands down, the best bread I have ever made. Thank you for sharing this with us.
I made this bread yesterday and it came out great! It was my first time ever making bread! Thank you for the great recipe!!!
Mel..this bread is fantastic!! So easy to make. We live around the GB/Appleton area, so as I am sure you already know, good bakery bread is hard to come by. This rivals some of the best artisan breads I have found. Thanks for posting.
Could this bread be any easier? I honestly feel guilty when I serve it and get rave reviews. But I get over the guilt quickly. Thanks for making it even easier with your awesome step-by-step action.
And when is that baby coming? Or did I miss it and she’s here already? Either way congrats you inspirational momma!
Hi Mel,
I wanted to let you know I tried this recipe again today. This time, instead of increasing the flour, I made sure my hands were wet when I shaped the loaves (I read this somewhere). This made handling the dough so much easier! Now I have a loaf cooling for supper and it’s all I can do not to eat the whole thing myself! Yumm-o!
using unbleached flour DOES make a difference versus bleached flour.
We found the unbleached flour holds up better and gives a better texture of the bread. We especially like King Arthur’s flour (and yes, the brand makes a difference two).
I have two of Jeff and Zoe’s books. I starting making this bread several years ago when I developed a sensitivity to soy lecithin. (They put that stuff in everything.) My two cents would be – Don’t give up even if you don’t have perfect results keep at it. I have even baked it in an iron skillet. I have started using a scale and this helped me with consistency. And your warning about not cutting the bread too soon is so correct. The remaining loaf will be gummy. It is like cutting into meat without letting it rest – the first bite is good, but the rest will be bad.
I love your storyboard tutorial. Great photos.
Terri – yes, you can double the recipe and split it four ways.
Made these for dinner tonight…we boys loved them…both were gone in under 30 minutes!! And sooo easy!! This is now my go to recipe for home made bread!
Mel, can I double the recipe next time and just split it four ways? Or is it better to make two separate recipes?
I made this tonight with about half white whole wheat, half all-purpose flour. We loved it! I did not add any vital wheat gluten. This went great with your Tomato Basil Bisque we had tonight. Thank you!!
I made this into the 2 loaves for a group of hungry kids in our babysitting swap (always a good way to try recipes out right?) and it was a hit. Both loaves were gone really quickly. I used bread flour (just what I had more of)- which has the higher gluten – and it was delish. WARNING I also should have used a metal broiler pan…since I heated a GLASS pan up under my pizza stone. The hot glass pan cracked when I added the cool water. The steam still had it’s effect, the crust was thick and chewy and very golden brown. The second loaf (no steam) was lighter in color. It still tasted great, but I loved the steams outcome. I knew not to add water to a hot pan…ah well. The lengths we go to get our artisan bread. ๐
Just made this yesterday and ate paninis with it. Fabulous, fabulous instructions! I would have added more flour, but your pictures and instructions reassured me and it turned out perfectly! I live in Germany and they charge a few euros or this simple type of bread! Now I know how to make it and can take it back to the US with me!! Thank you!
Made this last night. It took all my will power not eat that and nothing else for dinner!
Made this bread today and I’m loving it!!! Super easy!! I only used 6 cups of white flour and it was perfect (I live in Idaho; I don’t know if that is what makes a difference) the extra 1/2 c would have made it too dry. I also only cooked it for 20 minutes and it was perfect! I will definitely be making it again and again! As, always, I love your recipes! I can’t wait to experiment with 1/2 wheat flour! I’ll let you know!
Lisa – as far as I know, fast rise or rapid rise yeast is the same as instant yeast – which sounds like it worked after reading your last comment! Thanks for checking back in to let me know.
Lillie – I do not live in a dry climate. I live in the humid midwest (Wisconsin) so it sounds like we live in similar climates. It sounds like you are doing great – my recommendation for dense bread is to let the dough rise longer (which you are right, can take longe rin the cooler winter months) and take care not to add too much flour. Good luck!
I ended up trying it with the fast acting yeast and it was amazing! We ate half of the loaf for dinner and I froze the other half to enjoy later this week so it stays nice and fresh. And the other half of dough is in the fridge, and i will probably split that into 2 batches instead of one, so that we have 2 smaller loaves. Thank you so much for sharing this recipe and all of the tips. You have made a bread-makin’ believer out of me!
I was wondering if you live in a dry climate. My attempts at some of your bread recipes seem to need quite a bit more flour for the dough to look like yours. And then the finished result seems a little dense. It’s pretty humid where I live, so I thought that might be it. Or maybe the winter weather means my kitchen is cold so things need longer to rise. I am definitely not a bread expert, but I’m trying!
hi mel! i am just about to attempt this recipe. looks so good! i am just worried about the yeast. i have never used yeast before and i am not sure if i have the right thing. i bought the SAF Perfect Rise Yeast. It says fast rising active dry yeast, but doesn’t say instant yeast. Is this the same thing? thanks so much!
Mel-
I made this yesterday and it turned out fabulous! Crusty and chewy on the outside, soft on the inside. Thanks for another GREAT recipe!
Ok, I made this bread and didn’t read any of the comments on here (big mistake!) and cut into one loaf straight from the oven and we ate it with our dinner that night. Yeah, it was ok, but the texture was off. So I let the second loaf cool completely on a rack, then tossed it onto a ziploc and sliced it up the next day and used it to make a panini sandwich. Wow! You’re not kidding. Best. Panini Bread. EVER! I use my panini grill almost daily and this bread is simply perfect, and I love, love, love that I can make it myself. Awesome! I love the simplicity of the recipe, I love how delicious this bread is, and I love that I can whip up the dough and ram it in the fridge to use it at my convenience over the next few days. Heaven! Thank you a million times over for sharing this gem!
This is the easiest yeast bread I have ever made!!! It should be filed under quick breads. It’s crusty deliciousness made everyone in my house happy. It was great dipped in the Smoked Salmon Chowder. A yummy thank you!!
Hey Mel I just thought I would follow up after my previous comment. My elevation is 626 feet. I ended up needing to add over a cup of flour until I got the right consistency. It still wasn’t as tall or as dark brown as your loaf but it was very delicious with your broccoli cheese soup. I will definitely make this again and I’ll just add more flour next time!
Love your panini spreadsheet! We’ll be trying some of your combos very soon! I didn’t see it on your sheet, so I just thought I’d add that one of our favorite spreads is pesto!
Best. Bread. Ever. I love making bread and have tried many of your recipes but this one is the best yet! I love that it turned out so chewy. Like, sink-your-teeth-in-and-give-a-good-tug chewy. The recipe was so simple and the bread so delicious! Mel, thanks for another recipe I will use over, and over again.
Shaela – yikes! That is scary! I use regular parchment paper and slide my parchment paper right onto my baking stone. I’ve never had that happen but it sounds like you should definitely scrap that idea and perhaps try just baking it on a baking sheet or if you have a pizza peel of sorts, sliding the bread onto the stone sans parchment paper (using cornmeal to help it not stick). I’m sorry that happened and am so glad you were able to put out the fire! Is there any chance the parchment paper came into contact with the heating element?
I told my husband I made the bread and he tasted it and didn’t believe me, he said I thought you meant you “made it at the store” hahaha! Awesome recipe. And I didn’t have a stone or a broiler pan. I just used a regular cookie sheet with the parchment paper and another cookie sheet to act as the broiler in the bottom.
Mel-so I made the bread tonight and all went great until the baking part. My loaf looked beautiful. Then I went to transfer the loaf ontop of the parchment paper to the over and as I was setting the parchment on the stone in the oven it went up in flames! I quickly pulled it out and seriously had a flame a foot high. Very scary but I was luckily able to quickly grab some water to dump on it. Are you not suppose to put the parchment paper in the oven? And when you said parchment…that is parchment paper right?
Really, really delicious!
I made this today and it was superb! I found the dough incredibly sticky as well (our elevation is 2500 ft.) But the results were so great I will keep messing with the flour until it works. I have seen this recipe before but I was intimidated by it. Thanks for breaking it down!
Update: I stuck with it and baked two beautiful loaves, although they’re not very tall. They’re exceptionally tasty, though! I served it to the in-laws for dinner tonight and got rave reviews. The next time I make this, I’ll try adding more flour to see if that makes the loaves form a little better.
Elevation is only about 1200 feet, so nothing special.
same thing happened to me, I just went with it and it still came out amazing!!
I had the same problem with my dough. It was super runny and sticky after the first rise, so I ended up adding nearly one cup more flour and kneading it by hand until it came together. Don’t worry about adding a bit more flour–my loaves baked up beautifully. Thanks for the post, Mel.
Jennie and Ashley – out of curiosity, what elevation do you both live at? I’ve never had to add more than the 6 1/2 cups but if you can’t stretch the dough (like in the pictures) then yes, you may need to add more flour. Just like most yeast doughs, you’ll still want to judge it by texture which is why I wanted to include the step-by-step photos. I don’t think it’s too late to salvage it, Ashley. Try stirring or kneading in another 1/4 to 1/2 cup of flour and letting it rest/rise again. If the dough can’t hold its shape after forming into a loaf then that’s probably a good indication a bit more flour is needed. Good luck, ladies! Let me know how it turns out.
Jennie I am having the same problem! Mine has been rising for over 2 hours and when I tried to grab a hunk it stuck all over my hands and then kind of shrunk down. Dough Puddle is the perfect description to what I’m looking at. I’m wondering if I needed more flour as well. Is it too late to salvage it?
I’m making this right now – I really hope it comes out as nice as yours! The dough came out really, really sticky, even after the first rise. It’s not forming a nice shape as it’s resting. It kind of looks like a dough puddle. Should I have added more than the 6 1/2 cups of flour at the beginning? Oh well, I’ll see how it comes out in a little while…
Btw, I love your blog and use your recipes all the time. So yummy! In fact, on Thanksgiving, my husband said your turkey gravy recipe was better than he’s ever had before, so good he wanted to drink it.
What a perfect looking bread. I tried making it before but not quite successful. The crust and taste of my “failing bread” was okay, but inside didn’t have air pocket as I like them to be. I guess I’ll follow your recipe and give it a try again….and YES, (raising my hand), I love panini! ๐
Marie – the recipe states instant yeast so that’s what I use and I alternate between the SAF and Fleischmann brand. Hope that helps!
HI Mel,
Can you be a little more specific for me about the yeast you use for this recipe? (brand, dried, active, etc)
Thanks!
Kathleen – don’t push the steam if it just won’t work…it will still taste great!
Jamy – thanks for the compliment! I use a Nikon D90 with the 50mm/1.8 or sometimes the 35mm/1.8 lens.
Beautiful pictures! I just love your photography. Mind if I ask what camera you have?
This was so good and so easy! Not scared to make my own bread now!
I noticed several were asking about using whole wheat. I like King Arthur white whole wheat and I use vital wheat gluten if I’m going 100%. I don’t add if I’m only going half ap and half white wheat. I also like to add 1/2 cup oil to the recipe when I want a soft sandwich bread. The addition of oil is fantastic for everything like cinnamon rolls, pizza crust, flatbread and buns. I blog about this recipe as well and love how easy Mel made the tutorial!
Mel, I make my bread just like this and use 7 cups white whole wheat flour and 3 1/2 cups water. I store in a plastic shoe box with lid and let it rise in the microwave, then I store in the fridge whenever I want to make fresh bread. This same dough makes awesome flatbread in the cast iron with a lid. It will make about 13, you can freeze. You’re tutorial is fantastic and so is your spreadsheet. A-types just love your work. Keep it up!
If you can stand the wait and leave some of the dough in the refrigerator it will get somewhat sour with time (5-9 days). I usually make a second batch while the first is raising to have for later in the week.
Hi, Looks like a great recipe. Do you have to steam? I have a tiny oven that is why I am asking. Thanks.
I’ve made this several times and have used both bleached and unbleached flour without noticing a difference. Honestly, I sometimes forget the water to dump in the broiler pan too (I make this from memory and sometimes with 3 kids under 4…I forget stuff!) and it also turns out fine then, though using the water is better. It’s a really, really forgiving recipe – we love it!
sweetpea – you know, I don’t really know the answer to your question because I only ever buy unbleached flour (I but it in big 20# bags at Sam’s Club). I haven’t used regular bleached flour in years so I don’t have it on hand to test it out in this recipe. My guess is that it won’t make a huge difference. I’d use what you have on hand (bleached or unbleached). I’m pretty sure Jeff Hertzberg (author of Artisan Bread in 5 Minutes a day) uses unbleached flour as his standard since it is a bit more widely accepted and saluted in professional baker’s worlds.
Jone – I suppose you could divide in half and make one loaf but it doesn’t take any additional effort to make the full batch and then you have two loaves to enjoy (the baked loaves freeze beautifully).
Diane K – if you don’t have a broiler pan, another aluminum-type pan would work but don’t use a glass pan! If the pan heats up and you add water that isn’t hot enough, your glass pan will crack so substitute a broiler pan with an aluminum or other metal pan.
Cammee – I’m sure you could make this in your Bosch but I think it would be a bit of a nightmare because the dough is so much stickier and wetter than regular bread dough that I can see it just getting caught around the middle part of the Bosch. So reach inward and get in touch with your inner pioneer – I don’t want you cursing my name when your Bosch is covered in sticky bread dough (plus the dough is soft enough it really isn’t too difficult to dig out a wooden spoon and just go at it).
We are huge panini fans here. I can’t wait to try this bread. Do we have to make it in a bowl and stir it with our own hands like the pioneers, or can we be lazy and use our Bosch?
This looks so amazing. Thank you for kindly sharing. I can’t wait to get started!
I’m pretty sure I don’t own a broiler pan, so would it be tragic if I just put the water in any old baking dish?
Also, I’m sure I haven’t mentioned enough how much I love your website – I can try new foods without needing to go out and restock my pantry, and you have great recipes from simple to a little more complex… Anyway, I’m a huge fan.
I have used my large sided cookie sheet/jellyroll pan…good luck-:)
I’ve made this recipe a lot and love it every time. A few months ago, though, my (round pizza) stone cracked in four pieces halfway through the baking time. I researched this on-line and found out that stones can crack in the presence of moisture (which the cup of boiling water would certainly do). So I’ve been making it on a baking sheet since then and it’s been almost just as good (my pizza is definitely not as good though so I need to go buy another stone!) I don’t expect anyone to stop using their stone based just on my experience, but I thought I’d just post it as a general warning. Thanks for the great picture tutorial, Mel!
Mine did the exact same thing! Thanks for the idea about a baking sheet!
I use Old Stone Oven 14×16 stone. Excellent reviews, thick, maintains even heat. Have baked many loaves of artisan breads and pizzas.
Could you divide the 3 ingredients in half and just make one loaf?
does using unbleached AP flour as opposed to bleached AP flour really make a difference? (I want to be fair
to the recipe).
A suggestion for any other non-panini press owners out there – – I use my waffle iron or george forman grill. Both work great at making paninis! I have an overnight artisan bread recipe that I like, but I’m curious to try this one.
This looks so good! I am so excited to make it. I have been looking for a recipe for a crusty bread like this. I hope mine will turn out as nice as yours! Thanks.
Looks amazing and easy. Making it to go with Italian Wedding Soup for dinner tonight. Hope it turns out good! Thanks!
Michelle T. – I’ve never used whole wheat flour in it (yet) so I can’t attest to how it would turn out. I think if it were white whole wheat and you also add a bit of gluten flour then it should fare pretty well. I’m hoping to try it in the next few weeks but if anyone gets to it first, let me know how it goes!
Heather – I only bake one loaf at a time. It doesn’t hurt the second loaf to sit and rise for a bit while the first loaf is baking. Of course, if you have a large enough baking stone, you could probably bake them both at the same time.
Love panini’s! & I love my Griddler! I was lucky enough to have my chef sister buy me one for my wedding- bless her.
This recipe looks amazing. Do you think it would work with whole wheat flour?
The Artisan Bread in 5 minutes a day is one of the best cookbooks I own! There are so many great variations! This past weekend I made the buttermilk base, and made cinnamon “roll” bread for french toast=amazing!!
One of my favorites, is to add fresh (or dried) thyme and rosemary to the base. It makes the most amazing bread!
I’ve always wanted to know how to make this kind of bread, and your guide seems very simple and easy to use! Your bread turned out so lovely. Thanks for sharing.
Can you bake both loaves at the same time?
We are totally on the Artisan Bread in Five Minutes a Day bandwagon–it’s fun to see you messing with it too. I try to keep some dough in my fridge at all times so we can just pull off a hunk and have bread for dinner anytime we want in any shape we want (made baguettes and epi last week!). And paninis, oh, yes. We have the same panini grill and use the heck out of it!
Rachel, they have a similar recipe in their Healthy Bread in Five Minutes a Day cookbook that is made with hard white wheat flour but it adds vital wheat gluten and a smaller amount of all-purpose flour.
Anyone ever tried it with hard white wheat flour?
YES YES YES!
I’ve made this several times….. it’s DELICIOUS!
I want to also strongly urge your readers to NOT EAT THIS straight out of the oven. It does not taste as good. You HAVE to let it cool completely…. it messes with the texture if you don’t.
The most amazing thing with this bread is you can actually double the recipe and store the dough in the refrigerator after the first rise and pull chunks off of it for up to two weeks and follow directions for the 2nd rise from that. The longer the bread sits, it takes on a sourdough texture/taste. YUMMY!
I bought the book that this recipe comes from – lots of neato recipes!
You make it look easy! I just tried to make bread this weekend and failed miserably! ๐
This is perfect! I have been needing a good recipe for this kind of bread. We love paninis at our house too. Thanks for all of the new panini ideas! I am going to print out your charts and put them in my cookbook binder.
Picture only shows one loaf in the oven. Do you bake them at the same time?
I’m not a panini lover, but I am obsessed with baking bread. There is something therapeutic about making a loaf of bread and something even more satisfying about enjoying the flavor and texture of each loaf. I love getting new bread recipes. I’m going to have to try this today!
LOVE your panini spreadsheet–we are a little obsessed ourselves so I totally get your addiction ๐
Janet – thanks for the heads up! Yes, it is an error in my step-by-step which I will correct…but you let it rest for 2-5 hours for the first rise (in the bowl). Thanks!
Just got a panini press for my birthday – off to the kitchen to make this bread. Plan on making a Cuban Panini Sandwich tonight for dinner. Thanks for the recipe!!
You make it look soooo easy!! I’m going to have to try this like tomorrow! ๐
My last bread making attempt was a dismal failure. I am going to try this today and hopefully it will work out as beautiful as yours. Since I don’t have a baking stone I will try it the way you suggest. Wish me luck!
Mel- you are my culinary hero! I have had this bread recipe bookmarked forever, and for some reason just haven’t made it. Your tutorials are the best, and you always make every recipe so doable! I love panini, and this is one perfect loaf of crusty perfect bread. Now that you have tested this recipe I have no excuse not to make it! Thanks! ๐
Looks delicious, but there’s a difference in rise times. Your photo instructions give the first rise time as 40 minutes, but the written recipe above says 2-5 hours. I assume 2-5 hours is correct?
You make it look so easy! I’m going to have to try this one… and soon!