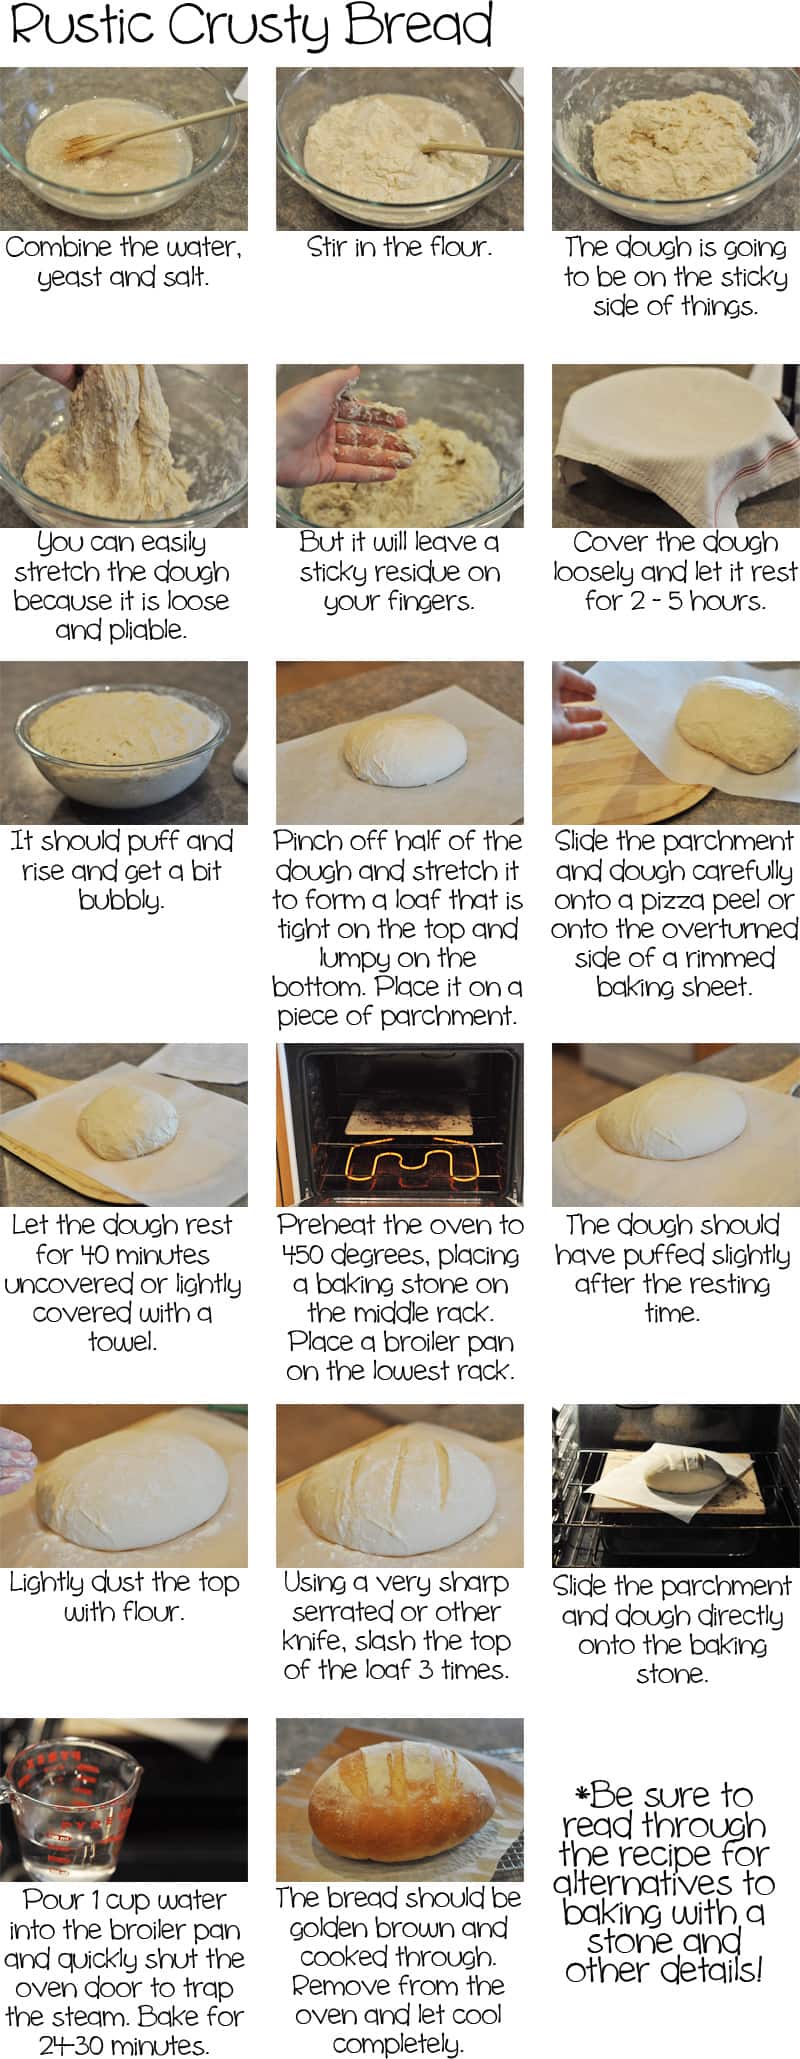
Easy Rustic Crusty Bread with Tutorial {No Mixer, No Kneading}
This homemade rustic crusty bread is the most delicious bread that will ever come out of your oven! No kneading or a stand mixer required!
This is the bread recipe that can change your life. I’m serious. Just scroll down and read through the comments and then you’ll believe me. Here are a couple comments among hundreds of rave reviews:
One of the best bread recipes I have ever made! A real favorite with my family and excellent for sandwiches. Super easy!
I made this recipe for the first time this past weekend and it turned out perfect! It truly was an incredibly easy recipe to follow.
This is the first bread recipe i’ve ever successfully made! It’s delicious and so easy I used active dry yeast, and the working with yeast tutorial was a huge help! great recipe, Mel.
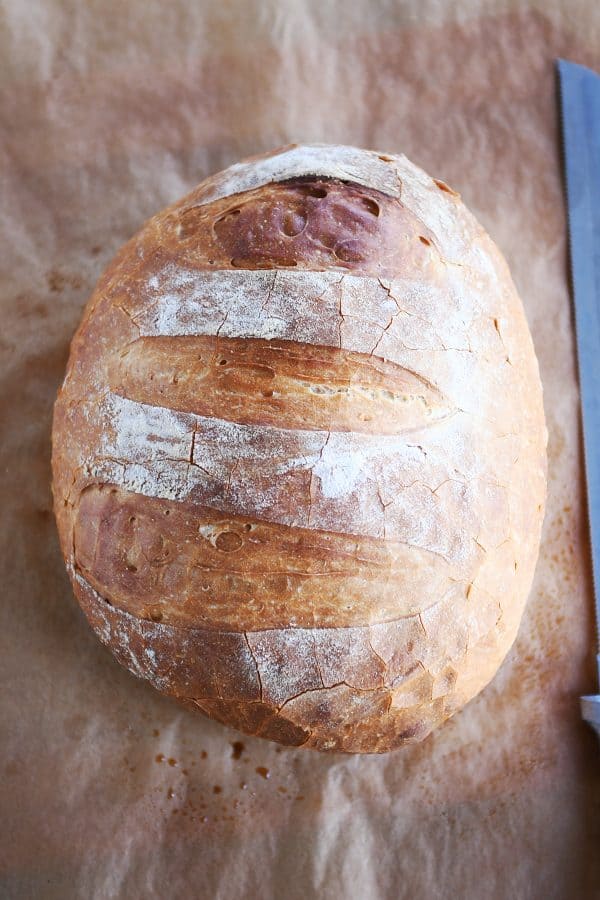
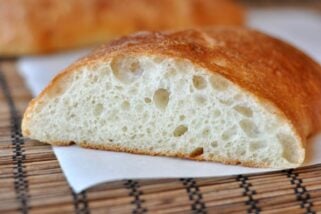
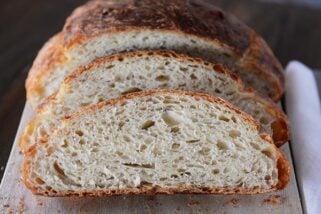
This rustic crusty bread recipe is perfect for beginning and expert bread makers alike. It’s like a perfect loaf you’d get right out of a bakery – for a fraction of the cost. Many artisan-type loaves of bread like this take days to make, but this bread recipe only takes a few hours!
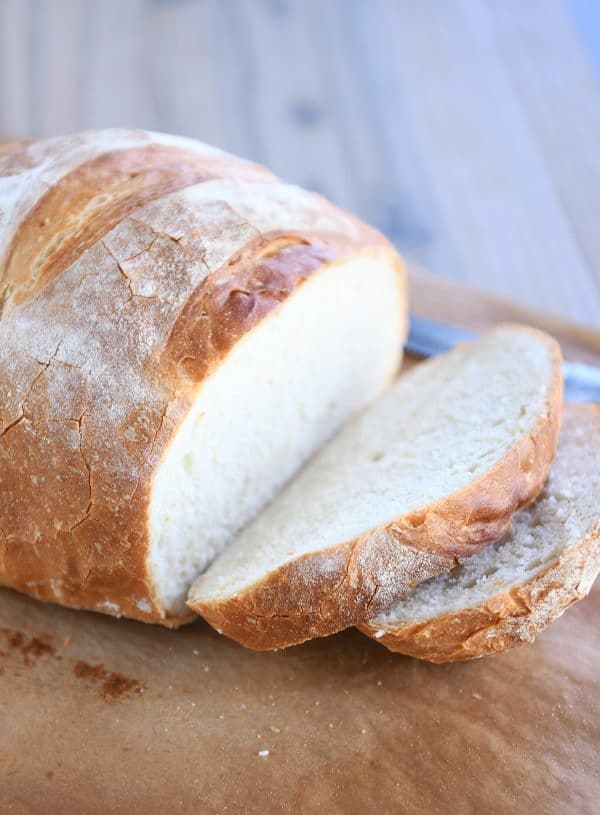
And you won’t believe how easy it is. Not only is it no-knead, but you don’t need a stand mixer, electric mixer or any kind of mixer to make it. Just a bowl and a spoon. From start to finish, it is ready to bake in about 2-3 hours. The crust is golden, thin and crunchy, and the crumb is tender and soft.
It doesn’t have the airy holes of a no-knead type bread, the crumb is tighter and slightly more dense, but it is glorious for paninis, garlic bread or just served plain (think: tear off chunks as you go!) with a wide variety of meals.
The recipe makes between two and four loaves, depending on how big you want to make them. I usually make two bigger loaves out of the batch, and I like to bake up both loaves the same day and pop one in the freezer for easy access next time we get the hankering for delicious, crusty bread.
How to Make Rustic Crusty Bread
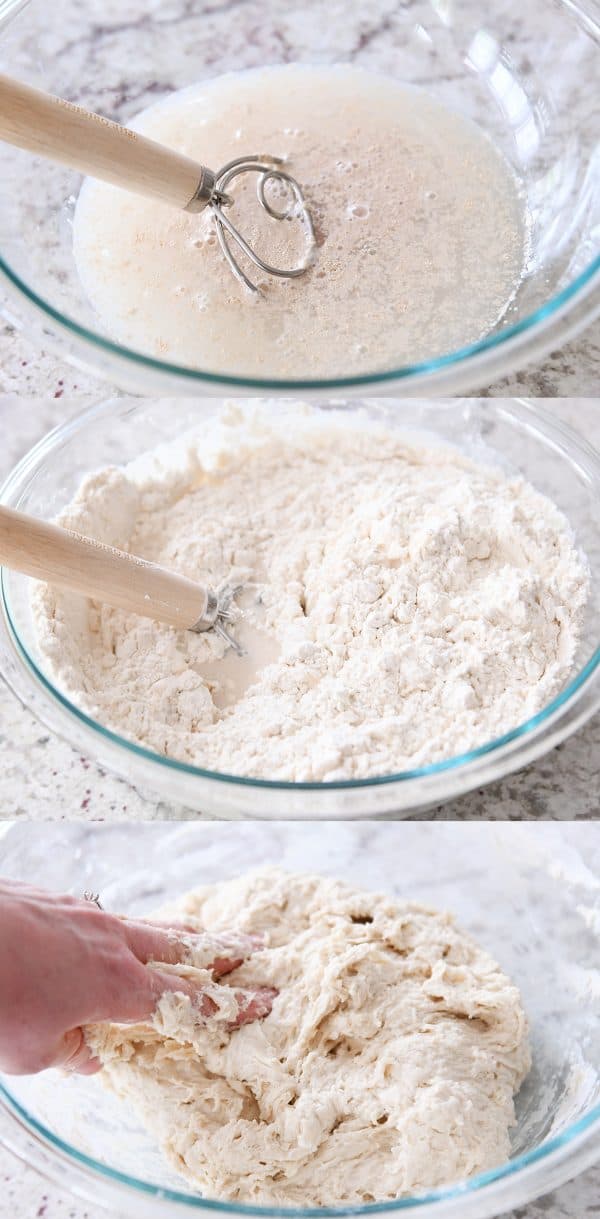
In a large bowl, combine the water, yeast and salt. Give it a little mix. And then add in the flour. Make sure to measure the flour with a light hand (or use the weight measure). You can mix with a spoon or spatula; I have been converted to the wonders of this Danish dough hook {aff. link}, but eventually with this dough, I get in there with my hands and mix it up the rest of the way.
The texture of the dough will be shaggy and much softer and stickier than a traditional kneaded bread dough. Make sure there are no pockets of flour and the dough is well mixed.
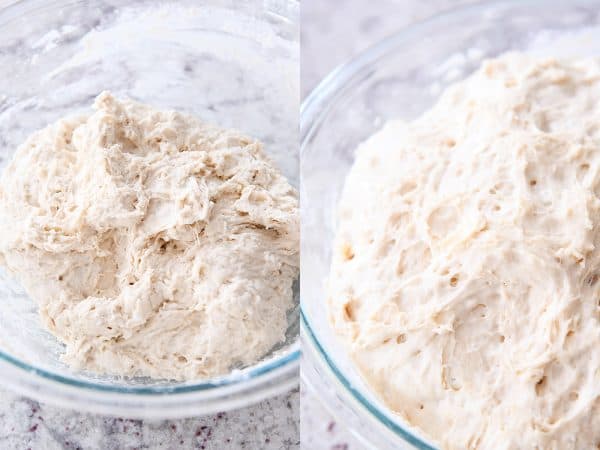
Cover the dough right in the bowl and let it rise until puffy and doubled.
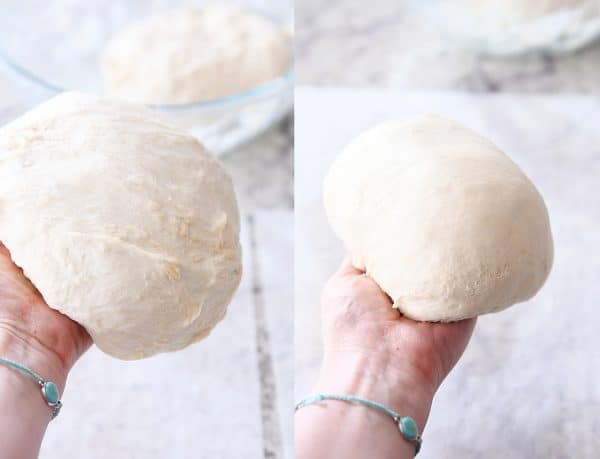
At this point, to shape into loaves, I grease my hands really well with cooking spray and split the dough into two pieces (you can make four smaller loaves out of the batch, if desired). Take one of the pieces and work it in your hands, turning the edges underneath until it’s a relatively tight, smooth loaf. Regrease your hands if the dough is super sticky.
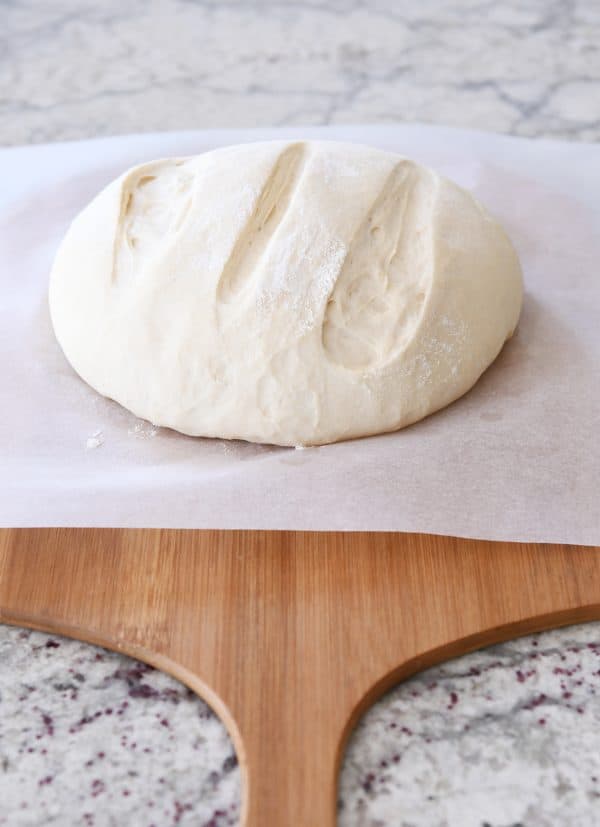
Place each loaf in the center of a piece of parchment paper and dust the top lightly with flour. Using a baker’s lame {aff. link}, razor, or really sharp knife, slash the dough 3-4 times on top, about 1/2-inch deep or so.
When I originally posted this recipe, I waited to slash the dough until after it had risen, but this sometimes causes the dough to deflate completely (especially if you don’t have a really sharp razor or knife), so I’ve started doing the slash action before it rises. Haven’t looked back. Works great and you still get the definitive, pretty “decoration” on top of the loaf as it bakes.
Cover the dough and let it rise until puffy (it won’t necessarily double in size).

Carefully slide the parchment with the loaf on top onto a baking/pizza peel {aff. link}. I suppose now is the time to mention that you want to preheat a baking stone {aff. link} in the oven to 450 degrees F and let it preheat at that temp for 20-30 minutes before baking the bread. If you don’t have a baking stone, you can try preheating an overturned aluminum baking sheet (although it may warp and bend out of shape a little at that temp, so be careful).
I highly recommend both a pizza peel and a baking stone for this recipe. Totally worth it for this bread alone.
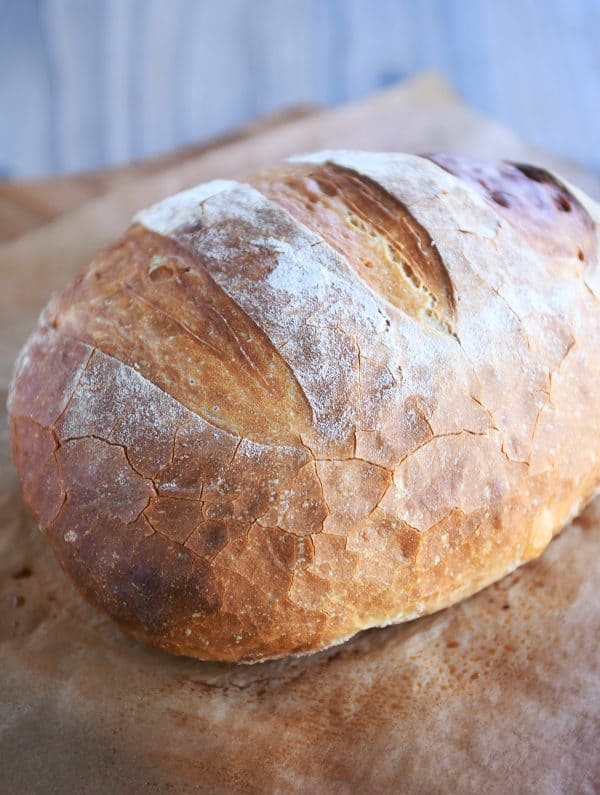
Once the baking stone has preheated long enough, carefully slide the parchment and bread onto the baking stone. Note: I have never had parchment paper catch fire in the oven using this recipe (or homemade pizza), but take care that the parchment doesn’t touch the heating element or sides of the oven. Also, I think the thinner/cheaper the parchment paper, the more chance this could happen.
You can put a broiler pan on the bottom of the oven and add 1-2 cups hot water OR you can toss a few ice cubes onto the bottom of the oven right after sliding the bread onto the stone and then quickly (but gently) close the oven door. The steam from the water is going to help create that beautiful crust.

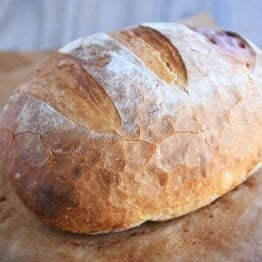
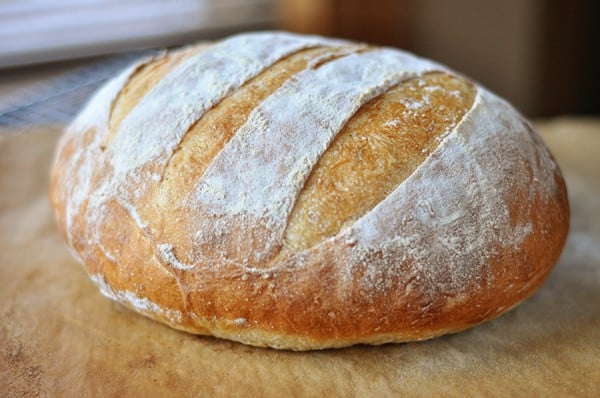
Bake the bread for about 25 minutes, give or take. It’ll puff even more in the oven. Look at that golden crust! Wowser.
This rustic crusty bread is my go-to bread to take to new neighbors, friends in need of a pick-me-up or when I am taking dinner into someone, and I make it several times a month just for our family to enjoy. It really is a life changing recipe.
I hope you’ve been able to see just how easy it is to make! I have no doubt you’ll feel like a total bread making rock start after you make this rustic crusty bread!
Equipment for Rustic Crusty Bread
While this bread doesn’t require a stand mixer, I’ve found the following to be helpful, especially if you want to ensure perfect crusty bread every time! Affiliate links for the products below.
- Baker’s lame (for slashing the bread)
- Parchment paper
- Pizza paddle/peel
- Baking stone
- Best inexpensive, bread knife ever
- Optional: Danish dough whisk
Easy Rustic Crusty Bread
Ingredients
- 3 cups warm water, about 100 degrees
- 1 ½ tablespoons instant yeast
- 1 tablespoon salt, I use coarse, kosher salt
- 6 ½ cups (923 g) unbleached, all-purpose flour, plus more for dusting dough (see note)
Instructions
- In a large bowl mix yeast and salt into 3 cups lukewarm water (about 100 degrees). Stir in flour, mixing until there are no dry patches. Dough will be quite loose. Cover lightly with a kitchen towel but don’t seal the bowl airtight. Let the dough rise at room temperature 2 hours (or up to 5 hours).
- Bake at this point or refrigerate, covered in an airtight container, for as long as two weeks. When ready to bake, cut off a grapefruit-size piece with serrated knife (I have only ever made two loaves out of the batch of dough so I just divide the dough in half to form my first loaf). Turn the dough in your hands to lightly stretch the surface, creating a rounded top and a lumpy bottom. Put the dough on a piece of parchment paper set on a pizza peel or a rimmed baking sheet turned upside down.
- Slashing: you can dust the top of the dough lightly with flour and slash now (before rising) or wait until after the loaf has risen. I’ve found waiting and slashing the dough after rising can sometimes cause the loaf to collapse, so after making this bread for years, my preferred method is to dust the top of the loaf lightly with flour at this step, before rising, and slash the top with a baker’s lame or sharp knife 3-4 times.
- Let the dough rest for 40 minutes for room temperature dough; if you have used the dough out of the refrigerator, let it rest for 1 1/2 hours. Repeat with remaining dough or refrigerate it.
- Place a broiler pan on the bottom rack of the oven (if you don’t have a broiler pan – no worries! Tossing 5-6 ice cubes in the bottom of the oven when you put in the bread works really well, too). Place a baking stone on the middle rack and preheat oven to 450 degrees. Heat the stone at that temperature for 20 minutes before baking.
- After the dough has rested and is ready to bake, if you haven’t already (see step #3), dust the dough lightly with flour, slash the top with serrated or very sharp knife three times.
- Slide the dough (with the parchment paper) onto the baking stone. Pour one cup of hot water into the broiler pan (or toss 5-6 ice cubes in the bottom of the oven) and shut the oven quickly but gently to trap the steam. Bake the bread until well browned, about 24-28 minutes. Cool completely.
Notes
Recommended Products


Recipe Source: adapted from The New York Times via Jeff Hertzberg’s Artisan Bread in Five Minute a Day
Recipe originally published February 2012; updated May 2019 with new pictures, recipe notes, commentary.

Have you ever baked a loaf the tried freezing it? Just wondering how it holds up! I don’t think it’ll be a problem having two loaves around but I’d prefer to not eat both within a few days!!
Yes! The baked bread freezes perfectly.
Tried it in two different ways; there was enough dough for 4 small loaves so I baked two fresh and froze two. Thawed out the dough over the past day and tried it out just now, the second two loaves came out just fine. This is an excellent and ridiculously easy recipe to follow, has now become my go-to standard bread recipe. Love it… now, if I could only stop eating 1/2 a loaf each time I bake it…
I made this recipe, and there were a few issues.
1. I used bread flour. I was happy with the cohesive crumb that I got with that – it works really well for sandwiches.
2. I added a Tb sugar because I just can’t not feed my yeast.
3. I had to add more flour – I’m at around 2,000 feet so I don’t think that was it. I wasn’t able to handle the dough at all without the extra flour. The first loaf came out a little flat. The second loaf was a bit higher and had more flour. I think it needed the extra flour to have the substance to go up rather than out. Next time I make this I plan to add enough flour until it has a more standard bread texture and see how that goes.
4. Salt. It was waaayyy too salty. I was accused of misreading the recipe but no – it really says 1 Tb salt. I’m going to try 1 tsp next time.
Other than too salty, the flavor was great and I really loved the thick, chewy crust – that was a big hit with the family. I’m looking forward to trying this with some whole wheat flour, and a sourdough version as well.
Send me the sour dough version
I love that you did a list and pictures! This was delicious. Thank you. ♡
Just made this recipe and beautiful loaves of bread! So easy!! Thanks! Will definitely make more to share with friends.
Should I be concerned about adding salt to yeast? Won’t salt kill yeast if added b/f it blooms?
It works fine to add it together in this recipe. I think in other recipes that can happen – especially if the salt amount is excessive (and definitely with active dry yeast) but it works here.
What if I don’t have a broiler pan? Could I just put water in a 9×13? Or could I bake it in the same kind of Dutch oven dish as your no-knead recipe?
I think either would work fine – I’d recommend using a metal 9X13 and not glass (wouldn’t want it to break).
How do you store the dough in the fridge? Is a Tupperware container sufficient?
This is rising on the counter right now, excited to make the first loaf tonight!
Yes, a tupperware with a lid should work just fine (make sure there’s room for the dough to expand).
What should I do after I refrigerate the dough? I left mine in the fridge so I coud make the bread the next morning.
Just follow these directions from step #2 in the recipe: When ready to bake, cut off a grapefruit-size piece with serrated knife (I have only ever made two loaves out of the batch of dough so I just divide the dough in half to form my first loaf). Turn the dough in your hands to lightly stretch the surface, creating a rounded top and a lumpy bottom. Put the dough on a piece of parchment paper set on a pizza peel or a rimmed baking sheet turned upside down. Let the dough rest for 40 minutes for room temperature dough; if you have used the dough out of the refrigerator, let it rest for 1 1/2 hours. Repeat with remaining dough or refrigerate it.
If you’re baking on the cookie sheet turned over, do you still use the broiling pan with water underneath?
Yes, you can if you want a crusty exterior on the bread.
Hi Mel,
I made this last week as a test, using half the recipie portions and making two small loafs. They came out perfectly and looked just like the photos about.
This week I made a larger loaf again using half the recipie. However during the 40 minute rest period I covered the dough completely (the pervious week I had left it uncovered). I found that it spread out cracking the skin on top. I baked the loaf without reshaping it and although its baked well it didn’t rise up as much as the previous weeks.
Is there anything I can do to prevent it from spreading? Should I leave the dough uncovered durng the rest period?
Thanks! Awesome recipe and I love the image guide!
Sounds like leaving it uncovered may produce the result you had the first time although I’m not sure why it would have spread more covered unless the covering (towel? plastic wrap?) was a little too tight and it didn’t have room to rise up instead of out. Glad you are enjoying the recipe!
Mel, have you ever made this with all 100% white whole wheat flour and added gluten?
No, but I’ve made it with 50% whole wheat flour (white wheat, no additional gluten) and it’s delicious.
This is a very good recipe that results in delicious bread. Thanks for sharing it.
Am I completely missing something, or is the amount of water not mentioned at all in the recipe?
It is mentioned here in step 1: In a large bowl mix yeast and salt into 3 cups lukewarm water (about 100 degrees). Stir in flour, mixing until there are no dry patches. Dough will be quite loose. Cover lightly with a kitchen towel but don’t seal the bowl airtight. Let the dough rise at room temperature 2 hours (or up to 5 hours).
This is probably a total rookie question– I don’t have a broiler pan (and didn’t even know what one was so I googled it…) For this recipe where it just needs to hold water, can I replace it with a 9×13 or an oven-safe skillet or something just to hold the water and provide the steam? Or am I missing something that the broiler pan does specifically here? Thanks so much for all your awesome recipes!!! I always leave your site having gained 5 lbs just looking at all the recipes I want to try 😉
nevermind! i just dug a little deeper in the really old comments and found the answer! 🙂 I will use another aluminum or metal pan instead. can’t wait to try it!!
Mel – at the beginning of this post under note you reference using half finely ground White Whole Wheat Flour. Are you referring to White Hard Wheat that you have ground? I love making Artisan bread and am excited to try your recipe. I am learning so much from you. THANK YOU
Yep, hard white wheat. 🙂
Hi Mel,
It would be wonderful if you updated this recipe with weight for the flour. I think that might take a lot of the guesswork out. No knead bread can go from a giant tortilla to a thick dough puck in almost no time. But, you know, no pressure. I love you just the same if you don’t get around to it!
I’ll officially weigh the next time I make this, Whitney – but I almost always use 5 ounces of flour per cup so I’m pretty sure it will be right around 32.5 ounces.
Freaking awesome! Cooked this in the dutch oven on our wood stove this morning. Let rise 20 min at room temp 63F placed in uncovered preheated dutch oven let rise for an additional 20 min, covered and cooked for 1 hr maintained a temp of 425+/- on stove top. Came out great perfect for fall/ winter in Idaho!
Mine is cooling as we speak. Thank you.
Hi, and thanks for posting the recipe and instructions, Mel. I’d like to bake the bread this weekend to go with a homemade sausage, kale, and potato soup. Just for clarification: whether or not you’re using the baking stone, you should also put water in the broiler pan to steam the bread, correct?
Thanks in advance for the clarification. I look forward to trying the bread. 🙂
Hi Bil – yes, I’d recommend using the water no matter what the bread is baking on. It gives it that nice, crusty crust. 🙂
Have made other types of bread but this is a fun and easy recipe, great for hearty soups and stews. I did need to add more flour to be able to shape the loaves. Baked beautifully on my pizza stone. Thanks for sharing. The pictures were really helpful…never worked with such a wet dough.
Made this bread yesterday and it’s wonderful. Shared it with fresh cracked dungeon us crab with neighbors last night. They lov d the bread, so I’m making more today. Thanks for the post, it’s appreciated!
I’ve NEVER made bread before, and I’m really scared and excited to make this. It’s also my first time to your site. I get envious of my friend who makes her own bread and it’s delicious, but she uses a bread maker, which is a totally different case in my opinion. I don’t have a baking stone or parchment paper, so I’m going with the loaf pan option. Do I still need to include the broiler pan step with the loaf pan option? I’m hoping my bread turns out as rustic and crusty as yours did
Using the broiler pan will give it a crusty exterior so if you’re after that, I’d probably still use it.
Love this recipe! wanting to change it up a bit. I’m going to do 4 cups white flour and 2.5 whole wheat, but I also want to add some grains (flax, sunflower seeds, chia, maybe oats?). Ever tried anything like this? Any advice? Haha
I haven’t tried add-ins like that but sounds like it would be great!
So we are now in 2015. This recipe is from 2012. What happened in between those years? I don’t know. But I do know that this morning while browsing for an easy bread recipe I came across yours. And I daringly decided to try it.
Well, I didn’t had much expectations since I know making bread is easy… but a bit tricky.
Anyways, the dough was sticky and I wasn’t sure if it will come out as I was hoping. But all my fears disappeared when I saw right out of the oven this two beautiful rustic, crusty and “free shaped” breads! I was in heaven, as if I won an Oscar or something like that.
Fantastic, easy, delicious. I’ll never buy bread again.
Thank you!
Hi Mel –
Do you still have a printable PDF available? The link for it no longer works!
Many thanks,
Chelsea
I just updated the link.
Mel oh my goodness this bread was the best yet thank you thank you for sharing it you are a doll. Not only is it lovely to look at it tastes awesome! Truly you are one of the best cooks on the planet and your baby is more beautiful than ever
Happened upon this recipe looking for a quick rustic bread. I made it, it was sticky and gloppy and I had NO hope whatsoever that this would be anything but a giant pita bread.
Wrong. It’s delicious. Toothsome interior,. chewy but tender crust. A keeper.
Thank you for posting this and you have a new subscriber, too!
I am going to try this today. I love your pictures, they are nice and small and step by step. Sometimes I hate scrolling through large pictures on blog recipes just to get to the recipe.
I have made this bread in the past but tonight after the initial rise, it was so sticky and “wet” I couldn’t even form it into a loaf or barely get it out of the bowl. I also couldn’t get it off my hands after picking it up. Any idea why it was so sticky? Followed the recipe just like before.
Not sure what happened but I was so frustrated and just threw it away. Not sure if I want to waste more ingredients trying this one again.
Has the temperature/humidity changed since you made it last? That can definitely factor into the texture of a dough although I can’t say exactly what would cause it to be ultra sticky this time. Sorry it didn’t work out for you!
Thanks for the recipe, most awesome bread I make, was worried about stickiness;
I also used bread flour. Great taste!
Mel, I love your site and have had more consistent success with your recipes than those from any other sites! I made this bread for fondue (also from you) a few weeks ago, and I got to thinking, could I shape the dough to make more of a baguette-like bread? What do you think?
Jihyei – so happy you are enjoying the recipes! As for this bread, actually, I think you probably could. As you know, the dough is a little on the soft side but I think you could probably experiment shaping it into various lengths/widths as long as they are transferrable to the oven. Good luck!
made this yesterday it was my second attempt at making yeast bread. I don’t have to look any further for a great bread recipe. Thanks.
Thanks for such a detailed tutorial!
Oh my goodness. I made your bread tonight (with a few changes) and it was amazing. I added lots of Italian herbs to the dough as well as 2 tablespoons olive oil, then salted (sea salt) and buttered the top of the bread just before putting it in the oven, and it was ridiculously tasty. It came out looking a bit more like focaccia bread. It probably sat out a bit too long, but it’s perfect for eating on the side with dinner.
I made this bread today. Easiest bread recipe I have ever used. The bread came out fantastic!
I made this last night into 6 bread bowls… worked great! 🙂 Thanks!!
Made this last night and it was better than the bread I have been making! Definitely a keeper!
Just wanted to let you know that this bread baked beautifully in my Dutch oven and it was fabulous! I followed all the instructions exactly until it was time to bake. I placed the Dutch oven in a 450 degree oven for 30 minutes, removed the Dutch oven, placed the dough in and covered the pot and baked in oven for 30 minutes. After 30 minutes I removed the cover and baked for another 15 minutes. Perfect bread!!
This bread is in the oven right now and I can’t wait to taste it!!
Just in case this is helpful to anyone else, I don’t havea broker pan and thought I would just use a glass casserole dish to hold the water instead. My heat transfer engineering husband is shaking his head at me on this one, because, of course, when I poured the hot water into the preheated glad dish, the whole thing cracked right apart in my oven!! Bad idea!! Don’t use glass (everyone else probably already realizes this;) good lesson for me:)
Love this recipe! Whenever I have to bring something to a potluck or party, I make this bread and whip up some honey butter and I’m greeted like a hero! My question is, a dear friend recently found out she is gluten intolerant-do you know if just switching out to gluten free flour would work? It’s so tough for her to find food she loves in gluten free and what better gift than homemade bread!
Hi Susan – you are a nice friend to try to accommodate your gluten-free buddy! Unfortunately I have not tried making this bread gluten-free and can’t tell you whether or not it will work for sure. Good luck if you experiment! Otherwise, you might try doing some searching online for gluten-free artisan breads.
If you use cup 4 cup gluten free flour it comes out very nicely!
Of the 87 times I have made it, at least 40 of those times It has flattened during rising times and not puffed in baking. Do you know why this could be? I have notice that happening less when I use one cup of WW flour. Thanks!
Maria – It is very likely because the bread is overrising before baking (when this happens, it doesn’t have enough oomph to continue rising in the oven and like a balloon, it reaches its max and then deflates). It could also be due to underflouring – which would make sense why the sturdier whole wheat flour helps the bread maintain it’s structure a bit better.
Thank you! I will try letting it rise for less time in the first rising. 🙂
I made this recipe and it turned out great! But I’m not quite sure what I was supposed to do with the second half of the dough. I formed both loaves at the same time and just left the second loaf sit on the parchment paper while I baked the first. It then got flatter than the first loaf. Should I have done it differently?
michelle cox – I usually let the second half sit out while the first half bakes but I’ve noticed if my kitchen is overly warm, the second loaf will deflate a bit like you mentioned so I’ve started placing the second loaf in the refrigerator and gently removing it when it’s time to bake. Hope that helps!
This recipe is SO delicious! I’m not sure how to store it to keep the crust… crusty. It seems to soften if you put it in a bag.
For other people making it, salt kills yeast, so NEVER add it directly to the yeast. I add it mixed in with the flour, or sometimes will do a starter of just a small amount of the flour, yeast and water and then add the salt after about an hour with the remaining flour.
Hi Mel. I made my very first loaf of bread using this recipe! The outcome was better than I thought (even when I don’t have an oven stone). However, the middle part of my bread is still a little doughy while the crust was beautifully browned.
Do I lower down the oven temperature? Or should I let the dough rise longer? My dough rested for 2.5 hours before I popped it into the oven.
I still have half the dough left so I’m really trying to improve! =)
Cindy – If the center was doughy, I’d suggest baking it a little longer. An extra 3-5 minutes can help the bread bake through to the middle – if it’s browning too much with the extra time, it might be that her oven bakes hotter (very common, ovens can vary quite a bit in actual temperature) so reducing the temp by 25 degrees and adding extra minutes may help. Good luck!
I just made this and I’m laughing so hard, because I forgot to half the dough. It’s huge!!! Lol! I just added about 10 minutes to the cooking time, and the crusty outside looks great! I’m sure it will be delicious. Thank you for such an easy recipe that yields such beautiful bread!
Just wanted to let you know, the extra ten minutes was perfect to bake the whole recipe amount through. I also used an upside down cookie sheet, because I don’t have a stone. The bread is delicious! I will be making this on a regular basis…in halves LOL! The slices are enormous!
Thanks for a wonderful recipe, the step by step pictures are very helpful. My family loves this bread and we make it all the time!
Hi Mel
Would it work to use rapid rise yeast to get the 5 hour effect in less time or will it not be as good?
Thanks, Aaron
Jody – As far as I know, instant yeast and rapid rise yeast are the same thing and can be used interchangeably, so yeast labeled rapid rise should work just fine in this recipe.
Hi Mel,
Thanks for posting a fabulous bread recipe! I noticed some were asking you about whole wheat flour, and I’m here to say that I’ve used some. I made these loaves today, and I used 4 cups of white all purpose, and 2 1/2 cups of whole wheat bread flour. It turned out FANTASTIC!!! The bread is fluffy and light, and not dense at all for a no knead bread. You can definitely add this variation to your recipe for your readers. 🙂 Thank you for posting this with great instructions, and beautiful photos. I’ve been trying to bake bread and with horrible results. This is the first bread I’ve made that not only LOOKS good but tastes divine! This is now officially my bread recipe. 🙂
Curious Little Bird – That is awesome that it worked out with whole wheat flour. Thank you so much for checking back in to let all of us know!
Fan-frikkin-tastic! It was delicious. Does the dough really keep for two weeks in the fridge? That’s great if it does.
Jordan – The original recipe says it can stay in the fridge that long although I’ve never personally tried it. The yeast flavor will definitely be more pronounced but it sounds like a lot of people have kept it in the fridge with no problems.
thanks for the link mel.
took awhile for me to try it. fell and broke my wrist in cast so please excuse typing.
tried the no knead today.works real well in my dutch oven. a little tweaking on my part and it will be great.
thanks again and keep them coming