Easy Rustic Crusty Bread with Tutorial {No Mixer, No Kneading}
This homemade rustic crusty bread is the most delicious bread that will ever come out of your oven! No kneading or a stand mixer required!
This is the bread recipe that can change your life. I’m serious. Just scroll down and read through the comments and then you’ll believe me. Here are a couple comments among hundreds of rave reviews:
One of the best bread recipes I have ever made! A real favorite with my family and excellent for sandwiches. Super easy!
I made this recipe for the first time this past weekend and it turned out perfect! It truly was an incredibly easy recipe to follow.
This is the first bread recipe i’ve ever successfully made! It’s delicious and so easy I used active dry yeast, and the working with yeast tutorial was a huge help! great recipe, Mel.
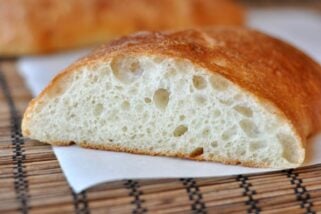
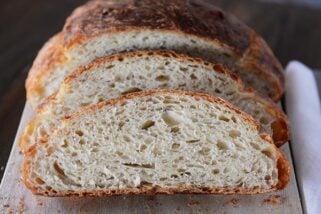
This rustic crusty bread recipe is perfect for beginning and expert bread makers alike. It’s like a perfect loaf you’d get right out of a bakery – for a fraction of the cost. Many artisan-type loaves of bread like this take days to make, but this bread recipe only takes a few hours!
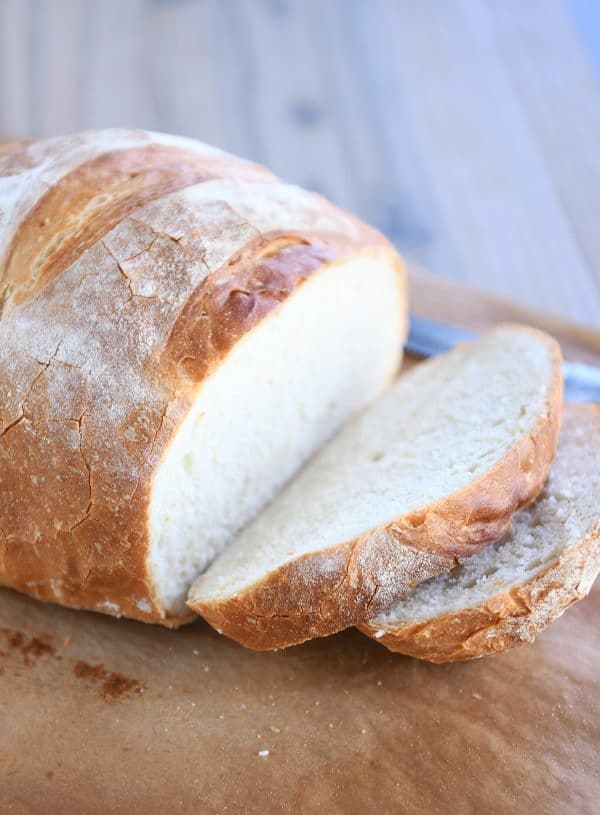
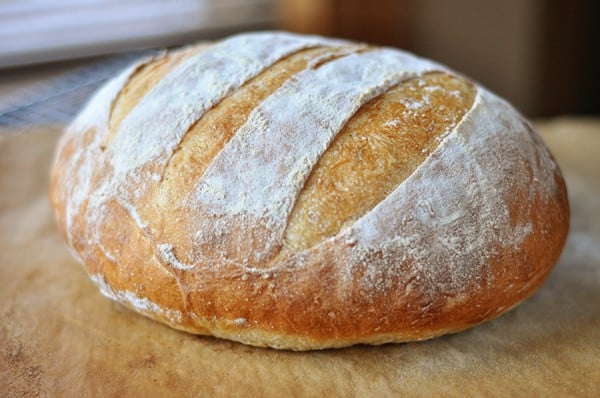
And you won’t believe how easy it is. Not only is it no-knead, but you don’t need a stand mixer, electric mixer or any kind of mixer to make it. Just a bowl and a spoon. From start to finish, it is ready to bake in about 2-3 hours. The crust is golden, thin and crunchy, and the crumb is tender and soft.
It doesn’t have the airy holes of a no-knead type bread, the crumb is tighter and slightly more dense, but it is glorious for paninis, garlic bread or just served plain (think: tear off chunks as you go!) with a wide variety of meals.
The recipe makes between two and four loaves, depending on how big you want to make them. I usually make two bigger loaves out of the batch, and I like to bake up both loaves the same day and pop one in the freezer for easy access next time we get the hankering for delicious, crusty bread.
How to Make Rustic Crusty Bread
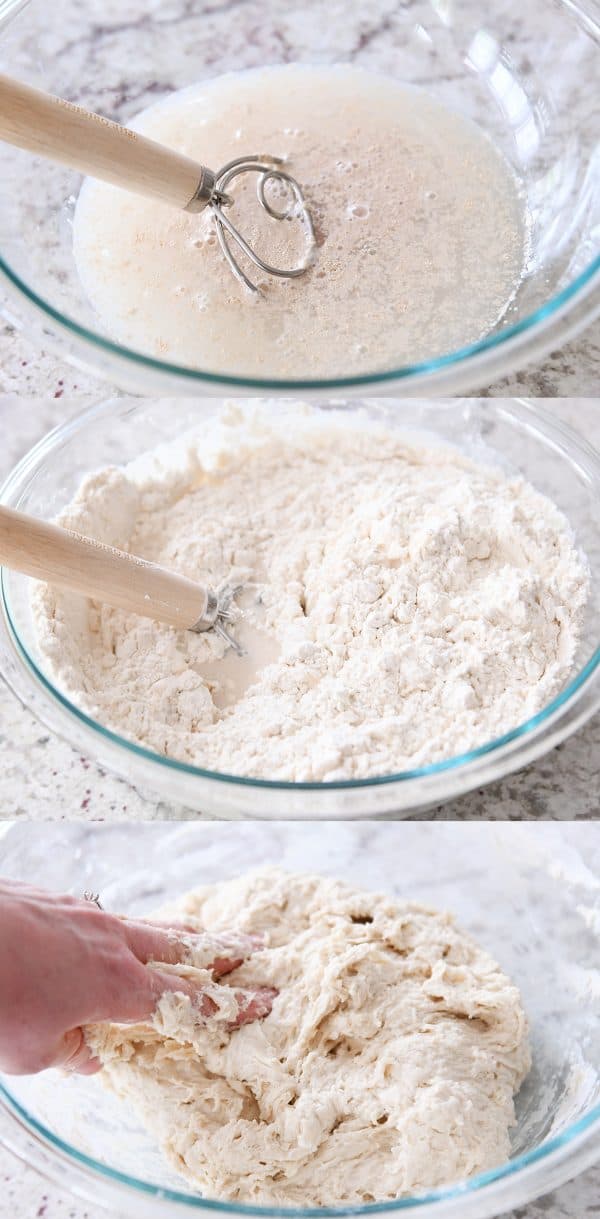
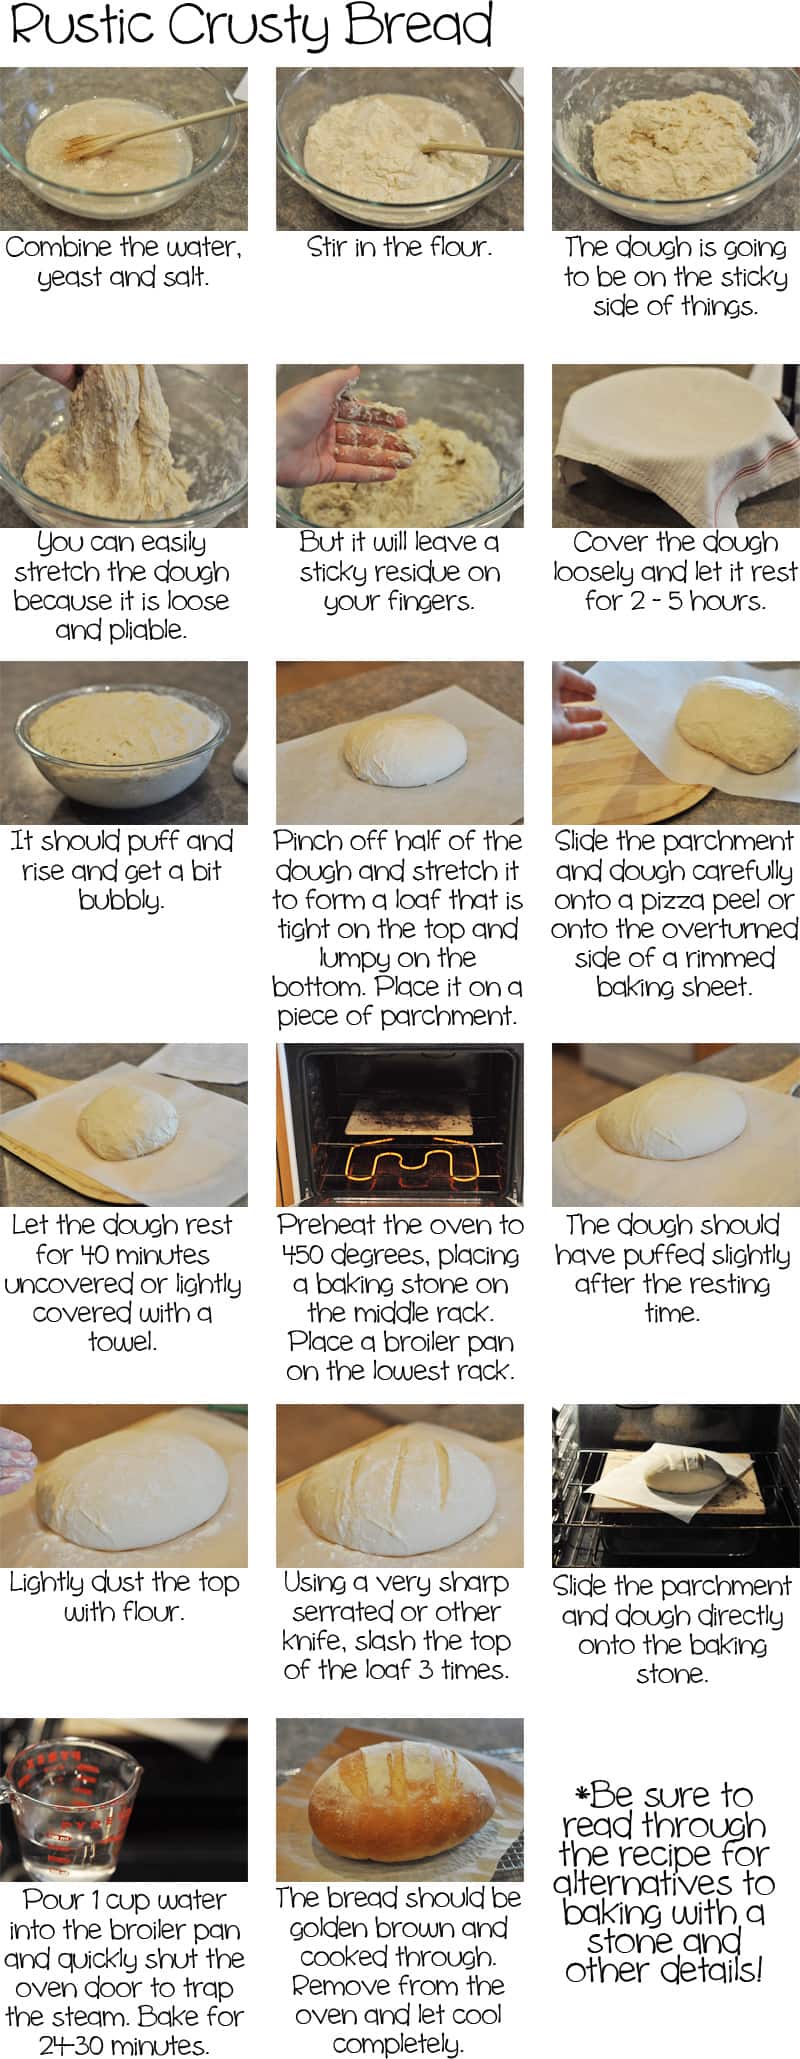
In a large bowl, combine the water, yeast and salt. Give it a little mix. And then add in the flour. Make sure to measure the flour with a light hand (or use the weight measure). You can mix with a spoon or spatula; I have been converted to the wonders of this Danish dough hook {aff. link}, but eventually with this dough, I get in there with my hands and mix it up the rest of the way.
The texture of the dough will be shaggy and much softer and stickier than a traditional kneaded bread dough. Make sure there are no pockets of flour and the dough is well mixed.
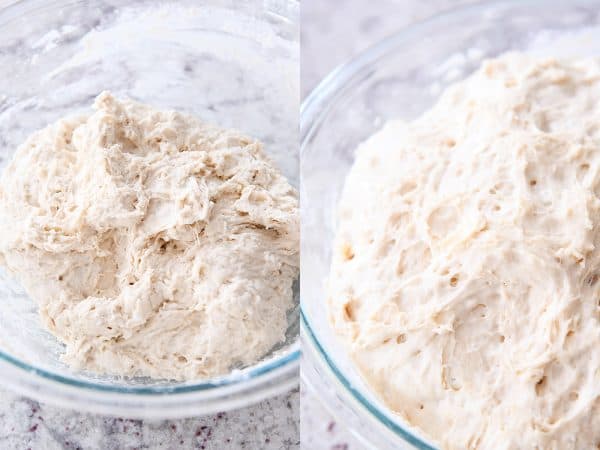
Cover the dough right in the bowl and let it rise until puffy and doubled.
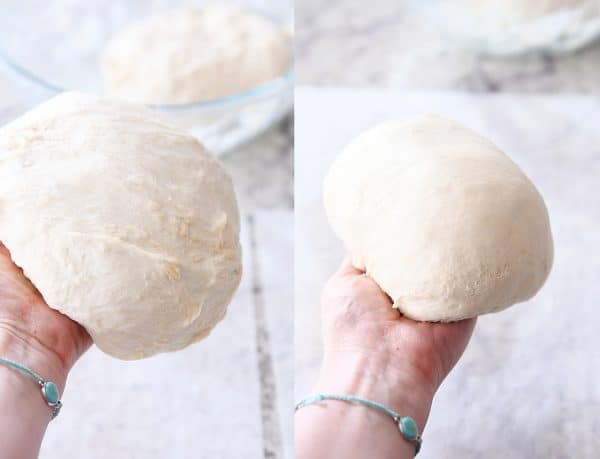
At this point, to shape into loaves, I grease my hands really well with cooking spray and split the dough into two pieces (you can make four smaller loaves out of the batch, if desired). Take one of the pieces and work it in your hands, turning the edges underneath until it’s a relatively tight, smooth loaf. Regrease your hands if the dough is super sticky.
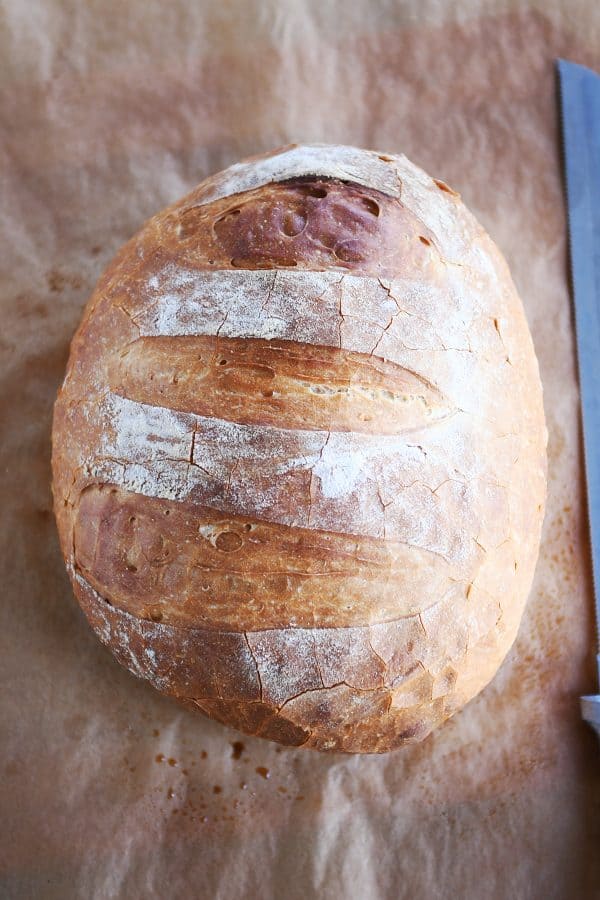
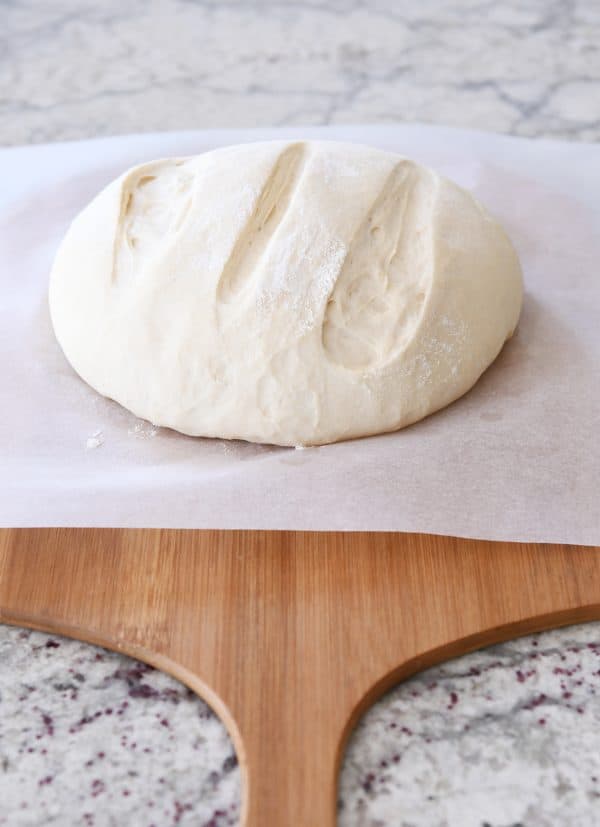
Place each loaf in the center of a piece of parchment paper and dust the top lightly with flour. Using a baker’s lame {aff. link}, razor, or really sharp knife, slash the dough 3-4 times on top, about 1/2-inch deep or so.
When I originally posted this recipe, I waited to slash the dough until after it had risen, but this sometimes causes the dough to deflate completely (especially if you don’t have a really sharp razor or knife), so I’ve started doing the slash action before it rises. Haven’t looked back. Works great and you still get the definitive, pretty “decoration” on top of the loaf as it bakes.
Cover the dough and let it rise until puffy (it won’t necessarily double in size).

Carefully slide the parchment with the loaf on top onto a baking/pizza peel {aff. link}. I suppose now is the time to mention that you want to preheat a baking stone {aff. link} in the oven to 450 degrees F and let it preheat at that temp for 20-30 minutes before baking the bread. If you don’t have a baking stone, you can try preheating an overturned aluminum baking sheet (although it may warp and bend out of shape a little at that temp, so be careful).
I highly recommend both a pizza peel and a baking stone for this recipe. Totally worth it for this bread alone.
Once the baking stone has preheated long enough, carefully slide the parchment and bread onto the baking stone. Note: I have never had parchment paper catch fire in the oven using this recipe (or homemade pizza), but take care that the parchment doesn’t touch the heating element or sides of the oven. Also, I think the thinner/cheaper the parchment paper, the more chance this could happen.
You can put a broiler pan on the bottom of the oven and add 1-2 cups hot water OR you can toss a few ice cubes onto the bottom of the oven right after sliding the bread onto the stone and then quickly (but gently) close the oven door. The steam from the water is going to help create that beautiful crust.

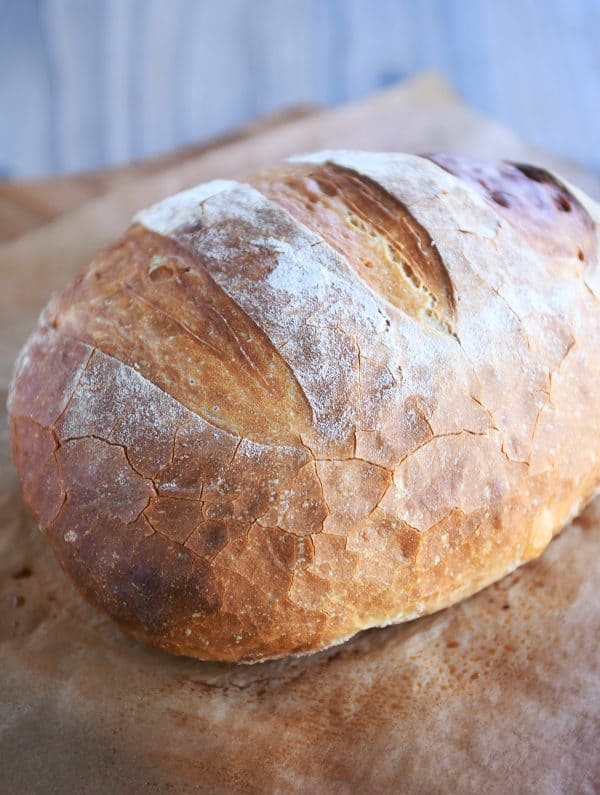
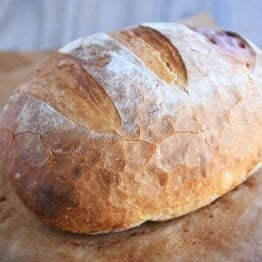
Bake the bread for about 25 minutes, give or take. It’ll puff even more in the oven. Look at that golden crust! Wowser.
This rustic crusty bread is my go-to bread to take to new neighbors, friends in need of a pick-me-up or when I am taking dinner into someone, and I make it several times a month just for our family to enjoy. It really is a life changing recipe.
I hope you’ve been able to see just how easy it is to make! I have no doubt you’ll feel like a total bread making rock start after you make this rustic crusty bread!
Equipment for Rustic Crusty Bread
While this bread doesn’t require a stand mixer, I’ve found the following to be helpful, especially if you want to ensure perfect crusty bread every time! Affiliate links for the products below.
- Baker’s lame (for slashing the bread)
- Parchment paper
- Pizza paddle/peel
- Baking stone
- Best inexpensive, bread knife ever
- Optional: Danish dough whisk
Easy Rustic Crusty Bread
Ingredients
- 3 cups warm water, about 100 degrees
- 1 ½ tablespoons instant yeast
- 1 tablespoon salt, I use coarse, kosher salt
- 6 ½ cups (923 g) unbleached, all-purpose flour, plus more for dusting dough (see note)
Instructions
- In a large bowl mix yeast and salt into 3 cups lukewarm water (about 100 degrees). Stir in flour, mixing until there are no dry patches. Dough will be quite loose. Cover lightly with a kitchen towel but don’t seal the bowl airtight. Let the dough rise at room temperature 2 hours (or up to 5 hours).
- Bake at this point or refrigerate, covered in an airtight container, for as long as two weeks. When ready to bake, cut off a grapefruit-size piece with serrated knife (I have only ever made two loaves out of the batch of dough so I just divide the dough in half to form my first loaf). Turn the dough in your hands to lightly stretch the surface, creating a rounded top and a lumpy bottom. Put the dough on a piece of parchment paper set on a pizza peel or a rimmed baking sheet turned upside down.
- Slashing: you can dust the top of the dough lightly with flour and slash now (before rising) or wait until after the loaf has risen. I’ve found waiting and slashing the dough after rising can sometimes cause the loaf to collapse, so after making this bread for years, my preferred method is to dust the top of the loaf lightly with flour at this step, before rising, and slash the top with a baker’s lame or sharp knife 3-4 times.
- Let the dough rest for 40 minutes for room temperature dough; if you have used the dough out of the refrigerator, let it rest for 1 1/2 hours. Repeat with remaining dough or refrigerate it.
- Place a broiler pan on the bottom rack of the oven (if you don’t have a broiler pan – no worries! Tossing 5-6 ice cubes in the bottom of the oven when you put in the bread works really well, too). Place a baking stone on the middle rack and preheat oven to 450 degrees. Heat the stone at that temperature for 20 minutes before baking.
- After the dough has rested and is ready to bake, if you haven’t already (see step #3), dust the dough lightly with flour, slash the top with serrated or very sharp knife three times.
- Slide the dough (with the parchment paper) onto the baking stone. Pour one cup of hot water into the broiler pan (or toss 5-6 ice cubes in the bottom of the oven) and shut the oven quickly but gently to trap the steam. Bake the bread until well browned, about 24-28 minutes. Cool completely.
Notes
Recommended Products


Recipe Source: adapted from The New York Times via Jeff Hertzberg’s Artisan Bread in Five Minute a Day
Recipe originally published February 2012; updated May 2019 with new pictures, recipe notes, commentary.

I would just like to enlighten you that as you have not specified if you are useing celsius or fahrenheit it can be confusing to people that are not chef’s like me as here in australia 100 degrees is boiling water and that would kill the yeast, also you still need to list all ingredients even if they are implied you have left out the water on the ingredient list
I tried finding imformation in the comments, but I couldn’t find what I was looking for. If you slice each loaf completely, about how many slices do you get?
It really depends on how long the loaf is (vs wide). But maybe 8-10?
I made this bread yesterday and was amazed by the results. I was distracted when I was measuring out the ingredients and I think I accidentally added 4 1/2 cups of flour instead of 6 1/2. My dough was a runny mess as a result, and I added roughly 1 cup of flour to try and help. The result was still quite a sticky, runny dough but I left it to rise regardless. I literally had to pour the dough on the baking tray rather than shape it, and I had low expectations. But when I took it out of the oven and cut into it, I couldn’t believe my eyes! Inside was heavenly soft and airy, and the bread had a really nice yeasty taste, with a chewy, cripsy crust, almost like ciabatta. It came out nothing like the recipe had intended, but yet it was still some of the best bread I’ve made! Haha
Amazing bread I have made this bread twice now. I only make half at a time . It’s crusty on the outside and soft and chewy inside. The only thing is I have to add a little bit more water otherwise I followed the instructions exactly. It now my go to bread !!!!
Has anyone tried baking in a Kamado style charcoal Bbq?
Enjoy recipe added jalapeno and cheddar once. Wow!
Can I sub your flour for Almond mill/flour?
I haven’t tried it, but I don’t think it will turn out the same (due to the gluten and other components of wheat flour vs almond flour).
I love this recipe! I came out great on the first try.
any tips on making the inside a little more airy and less dense.?
Thanks
Could you try a longer rise, Keith?
Mel,
I let it rise for about 4hrs. Should I try longer?
Thanks
Hey Keith, sorry my question was confusing. how long did you let the dough rest before baking (after it had been formed into a loaf)? I think increasing this time a bit will help!
Please, give a for this a video!!!
I make this bread regularly and often add cheese sundried tomatoes and Kalamata olives to it.
Hi Mel. Is it feasible to cut this recipe in half?
Yes!
Hi Jaclyn, I by grated asiago in 140g tubs, dump the whole tub in with other ingredients. Works like a charm. 🙂
I have done this recipe a lot of time – but I proof the dough for at least 12 hours to get a very nice and “tough” inside. after 12 hour I put the dough on a floured table and flatten it a little and fold in the edges, take it in my hands and put it in a skillet that I have add some oil in, then a kitchen towel over it and let it proof for at least 2 hours more – then put the dough in a hot dutch oven 450°F 30 min with lid and some more min without lid if u want a more crispy surface.
Best bread recipe ever!!! I’ve made this so many times and it always gets so many raves. I usually add kalamata olives and fresh rosemary, which makes it even better. Thanks!!!
Would it be possible to use active dry yeast instead of instant? What would be the different/extra steps?
I’ve only ever used instant yeast, but usually active dry yeast will work as long as you proof it in a bit of warm water first and 1 1/2 the yeast amount.
Tried this today and we all loved it! My boys were even asking me how hard it is to make, a la “do you think I could make this?” 😀 They want me to make it every day now… and I would have to, since they ate a whole loaf before it could even cool down.
This is a super recipe and definitely a keeper – thank you!!
Tried this today. I baked the first loaf (1/2 of the recipe) in my microwave/convection oven. Preheated to 450 for 10 min. with a pizza pan in there. Slid the dough onto the pizza pan and threw in 5 ice cubes (it was on a silicone baking mat.). 22 minutes at 450 and it was done. I’m still challenged by the convection oven.
I plan to try to make this for Panini sandwiches. Do you know about how many sandwiches could I expect to get out of two loaves of this bread? Thanks!
Hey Julie – if you make two loaves out of one batch of bread, I think you could probably get 8-10 slices out of each loaf (although the slices on each end as the loaf tapers down will be quite small)
I want to know how you made this into “asiago” style cheesy bread?? It sounds delicious!
Hey Jaclyn – I cube Asiago cheese (1/8-inch cubes) and knead them into the dough. It’s a little messy but worth it.
Hi Jaclyn, I by grated asiago in 140g tubs, dump the whole tub in with other ingredients. Works like a charm. 🙂
Hi!
I attempted this recipe but ended up with a bread that was very dense and a bit mushy, is it likely that I played with it too much after letting it rise? I also skipped the 40 minute rest prior to baking…
-newtobaking
You definitely need to let it rest for that 40 min! And playing with it too much can also mess up the texture (happens with any sort of dough: bread, pie crust, biscuits, ect..)
Delicious easy to make bread! Had to make the second loaf on the same day after the family demolished the first. I baked mine in a hot cast iron pan- worked fantasically, crisp crunchy crust all around.
I had to pull it out of the oven after 22 minutes as the bottom was starting to burn. The slices closest to the outside were fine, bit the center wasn’t completely baked. Oven temp was 450. I did use bread flour, so maybe that’s the issue – does it burn faster than regular AP flour? Anyway, the parts that were fine were delicious so I’ll try again.
Hey Jeff – you might try turning your oven down 25 degrees, too. That might help!
This loaf came out beautiful and delicious. I used one cup of water and two cups of buttermilk (just because I had some). Super easy to make and I am not an experienced baker.
love this recipe. been making it over a year now, perfect every time. i forgot the salt today but im sure it will still be good.
I lived in Bolivia for years and have been wanting some good crusty bread like I could get there. This is it!!! Thank you so much!!! I only use 1/2 tablespoon of salt and add 4 TBS of sugar, but that’s just my liking.
Hi there! I make this bread often and love it. I want to make it for some friends for the holidays but they are gluten free. Have you ever tried GF four in it? If so how did it turn out? Is a 1:1 ratio okay?
I haven’t tried making this gluten-free. Sorry!
Have you even used bread flour in the recipe and if so, were the results similar?
I have used bread flour a time or two. The resulting baked bread is definitely chewier…it’s yummy both ways (I don’t always have bread flour on hand, so I mostly use all-purpose flour).
“Holy shiz balls! That’s like Great Harvest worthy! You should change your name to Martha!”
That was my sister in law’s reaction when she saw this loaf of bread:) Holy cow it was beautiful and it tasted like heaven! My husband and kids gobbled it up so fast, I was scrambling to get some for me!
I was nervous- when I went to make the dough into a loaf shape, it was sooooo sticky. I could hardly even shape it. It was mostly just plopped onto the parchment paper. I wasn’t sure how it was going to turn out. But it came out of the oven looking like perfection!
You’ve done it again Mel! Thanks for another rockstar recipe!
Haha…thanks! 🙂 So glad it worked out!
What I found you don’t have parchment paper
I’ve made this bread and it was so easy and tasty. I want to make rolls using this recipe for Thanksgiving.
Would that work, and how would I need to adjust the cooking temp/time?
Hi Karen – I haven’t ever made rolls with this bread – I’m not sure how they would work out, but it’s definitely worth a try. I’d probably bake at 425 degrees for 14-17 minutes for rolls.
My dough looked exactly the same, until I tried to pick it up after rising. It was so loose and wet I couldnt form it at all! I am a decently experienced bread maker – I have made bread a few times a months for the last few years… Not sure where I went wrong 🙁 Going to try to bake it, anyway!
Hi Mel,
Just tried this tonight and although the flavor is great, it cam out more disc like and only about 2 inches high, which won’t work for my grilled cheese sandwiches, haha. My kitchen was 75 degrees probably, I let it rise 2 hours, used all AP flour. I made a large ball though so wondering if that was the reason it didn’t rise, should it be smaller? Also, I only had a half tablespoon of rapid rise so used a tablespoon of active. Maybe that is the issue? Mine was also very sticky even when greasing my hands, for next time would you recommend adding a 1/2 cup or less more flour? Thanks!
If it was overly sticky that might be the culprit – it needs enough flour to have structure to rise up instead of flatten and rise out, if that makes sense. Try adding a bit more flour next time (I don’t think the yeast should be an issue).
So good!! I replaced the water with whey from making yogurt and it worked out beautifully! It was so easy too! Thank you!!
Huge hit with my family!
Easy and amazing- I’ve made this recipe many times using varying flour types. Brilliant stuff
I can never get the bottom to brown like the top. I have also removed the parchment midway but that does not help either.
Wondering if after 15 minutes I can turn it upside down.
You could certainly try, although I have found if I move my oven rack to a different spot (lower or higher) that can help, depending on the oven (I’ve moved a lot and have had to experiment with different ovens). Usually, if I move it to a position in the upper part of the oven, it browns better. You might try that??
This recipe is fantastic and easy to make. I’m so tickled about the way she explained how to achieve the best results in making this. You must give it a try. You will not be disappointed.
HAPPY BREAD BAKING !
I’ve had success with my dutch ovens for steaming…would it work with your loaves?
As in baking the bread in the dutch oven? If so, yes, I think that would work!
Yes, I’ve been using the dutch oven method a lot. I also like to throw Rosemary into the dough or even bacon! Delish! btw I made your Rock Salt Honey Roasted Chicken on Sunday. (3rd time) It is amazing! Hubby said best dinner! Served with roast brussel sprouts and bacon, corn and bread. Love your site! Keep up the good work!
Yum to all of that! 🙂
Hi Mel, I simply looove bread and your recipe looks super delish. I’ve been making my own bread at home for years now and agree that you don’t necessarily need a stand mixer. However, it does make the job so much easier. My mixer saves me some serious energy and time, I don’t know how I would manage without it! Vicky 🙂
Is bread recipe is wonderful, and basic! I made one regular sized loaves and two smaller ones….it’s a keeper recipe for sure! I’ll be making this a lot too, for our family of 8. 🙂
I’m trying this recipe for the first time. I noted that you said it would be quite tacky early on. When it comes to the step of shaping the bread you have not mentioned doing it on a floured board or with flour on your hands. I was wondering whether that was because you assumed that we would automatically do that or whether it shouldn’t be done. I did do that cos that’s what I’ve always done. First loaf is currently in the oven so we’ll see hey!
Hi Colleen, I usually just shape it in my hands without any flour (sometimes a little cooking spray on my hands to help with stickiness)…but either way will work!
Thanks. I’ll try that next time. I’ve just tasted the first loaf (couldn’t wait till it was completely cool) and it’s delicious. Thank you! This will be my bread of choice from now on!
I knew I would like this recipe since it is the same ingredients from another recipe i use – but doubled and baked slightly differently. So i wanted to try it. However i had a baking fail. I put a glass dish in for the water bc I don’t hv a broiler pan. I warmed my water but not enough. You guessed it – goodbye 8×8 glass dish! Pls warn your readers not to use a glass dish and to use boiling water – not just hot. The bread is looking great still. Can’t wait to taste it!
Oh yikes, sorry about that, Leanna!
What do you use if you don’t have a broiler pan?
Throw 5-7 ice cubes in the bottom of the oven! Works amazingly well.
Ive been making this recipe every week for a few weeks now and I’m in love. My roommate said the other day he thought it had been store bought. I used half white, half wheat. Thanks!
My search for a fabulous artisan style bread is over. This is so easy and delicious. Thank you a zillion times. The fondue was outstanding as well and since we do not use alcohol I appreciated a comparable recipe we could use with kids.
I made this last year and it was fantastic… making it again tonight\tmrw for a big family get together.
thanks!
You mention this recipe on the Amazing and Simple Greek Feta Dip page — you say to make it into smaller, thinner loaves. Do you mean like four of them? And it probably changes the cooking time a bit? Thanks!!
Yes, like four loaves…or even smaller if you want. The baking time won’t change too drastically – maybe just by a few minutes.
It worked perfectly! (I did four loaves.) And was delicious with the dip. We had some leftovers so we ate it with cheese the next day — I bet it is absolutely delicious as a panini! It was super yummy with just the cheese! Thanks!!
Love this recipe! Has become my go-to. Family and friends rave about it. Baking a loaf today with rosemary and thyme. Just about to come out of the oven. Smells wonderful. Thank you for this great recipe!
LOVED this bread! Made it for the first time tonight, can’t wait to make it again.
Thank you Mel!
Omg! Made this today to go with stew and boy it was yummilicous!!! Thank you for such an awesome recipe! This will be my go to recipe for rustic breads 🙂
This recipe was my very first foray into making bread. It was excellent and looked better and tasted better than crusty breads I’ve purchased from bakeries.
I lost the recipe for years and searched and searched online to find it. Then today, I found the printed recipe in an old file and the website address was there at the top of the pages.
Thank you, belatedly, so much for sharing this simple yet delectable recipe.
So happy to hear this, Jane!
wow, so i just made the bread. The second loaf is in the oven as I type this. It looks marvelous, smells great and was pretty easy to make…Now comes the task of waiting …. until it is cool enough to devour. I hope it tastes as good as it looks…. Thanks for a great recipe ♥