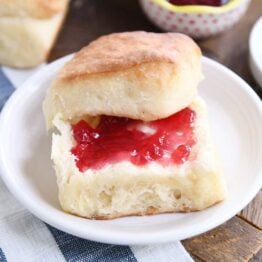
Amazing Easy Fluffy Blender Rolls
These easy fluffy blender rolls are AMAZING. No kneading and no mixer required, the dough is a dream to work with. Best rolls ever!
If a food blogger already has over ten dinner roll recipes in her archives, should she a) keep a new, life changing roll recipe to herself or b) risk the haters’ comments about hyperbole, and post it for the world to make and love?
B. I choose B.
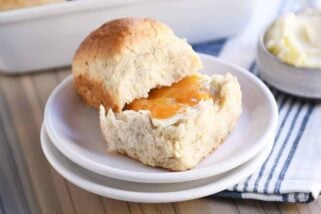
You guys, this roll recipe is amazing. For what they require in effort (spoiler alert: hardly anything), they are easily the fluffiest rolls I have ever made.
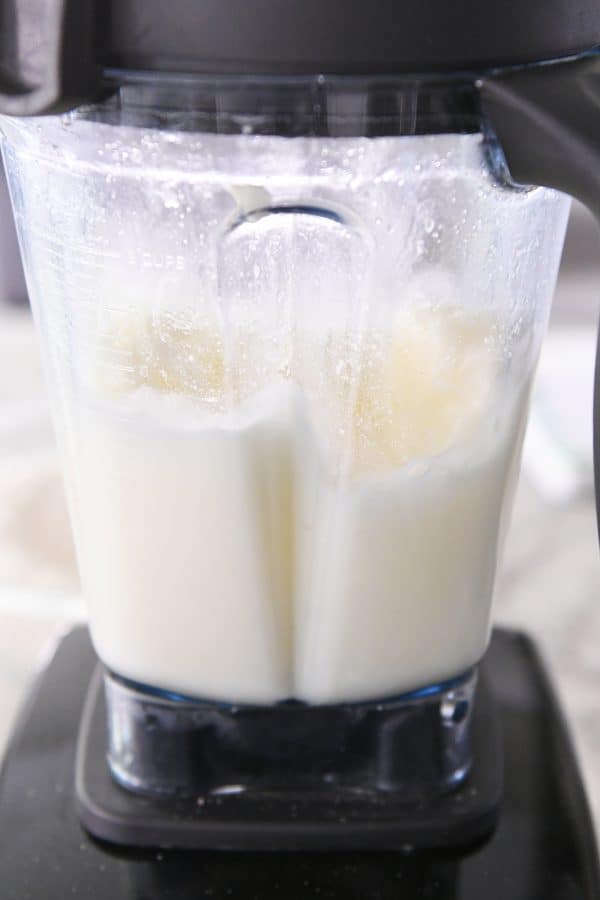
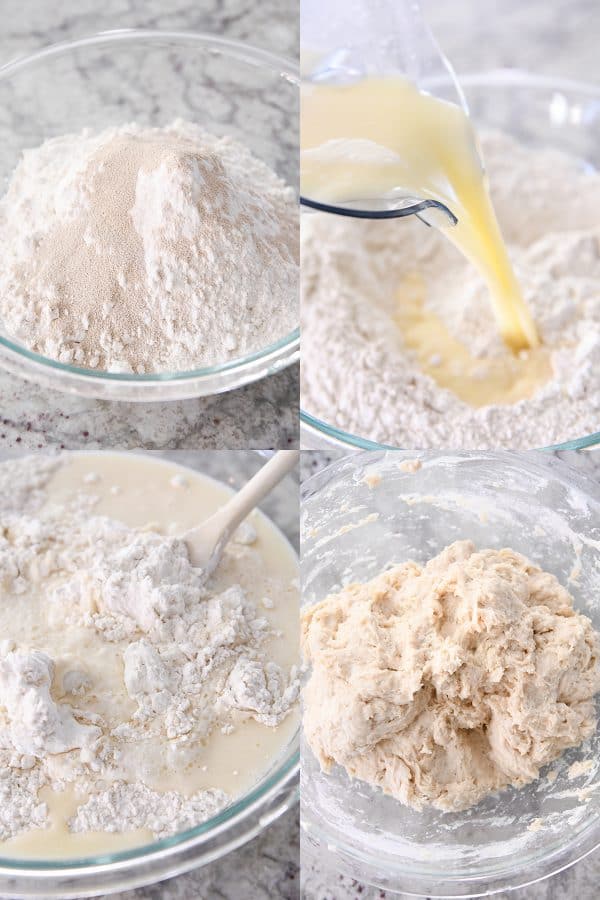
The wet ingredients are quickly mixed together in a blender and everything is stirred together by hand in a big bowl. No kneading. No mixer. It’ll take you 10 minutes tops to make the dough.
Last December, a fantastic reader, Marci T., sent me her recipe for “blender rolls.”
At first glance, the ingredients seemed pretty similar to these Parker House rolls that have been on my site forever. But I was intrigued by both the lack of stand mixer and the addition of a blender.
And I was quickly won over! These easy fluffy blender rolls are extraordinary. I have easily made them over a dozen times this last year, and each time, we can’t get over how soft and fluffy they are.
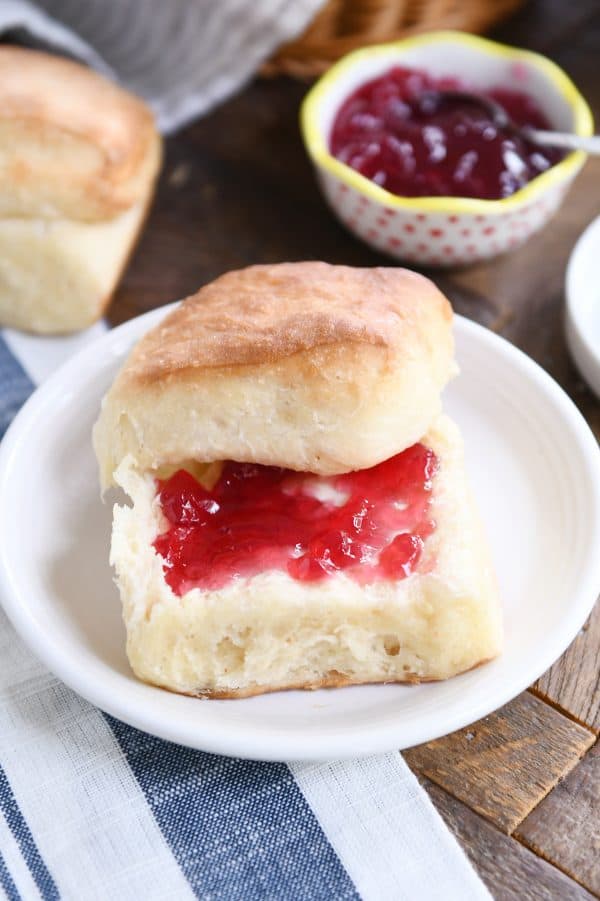
They are definitely going to be the rolls I make this Thanksgiving. (They are perfect for splitting in half and buttering, and I can already tell they will make the most fantastic leftover turkey sandwiches.)
How to Make Blender Dinner Rolls
All ingredients except the flour and yeast go into a blender:
- hot, hot water
- butter (straight from the fridge; don’t even need to cut it into pieces)
- sugar
- salt
- eggs (I add these after the first four ingredients have blended for a few seconds)
I honestly think the blender makes a difference here. Blending these ingredients until they are frothy and well-combined is key to the light and fluffy roll outcome!
The wet ingredients go straight into the flour and yeast and everything gets mixed until no flour streaks remain.
The texture of the dough will be soft, sticky and a little bumpy. Don’t over mix or knead the dough.
Just cover and let rise until puffy and doubled, about 1 1/2 hours depending on how warm and toasty your kitchen is.
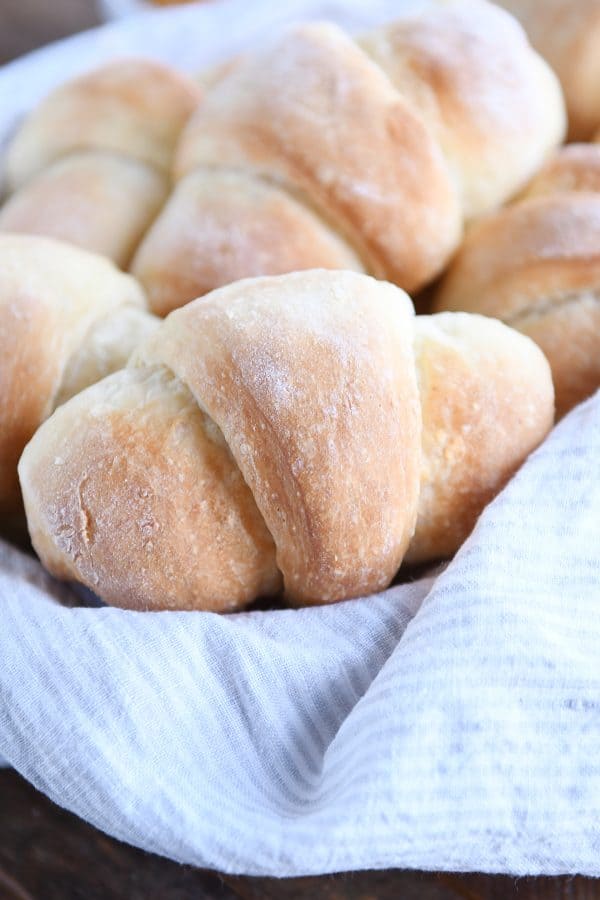
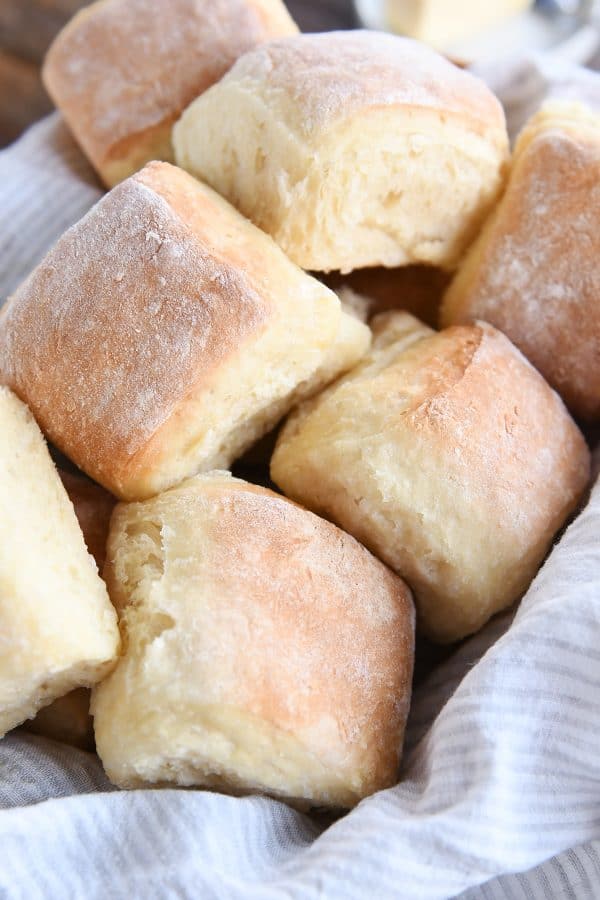
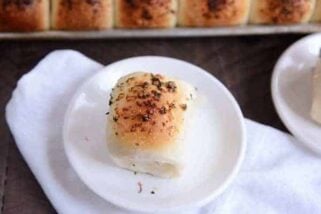
Roll Them Parker House Style
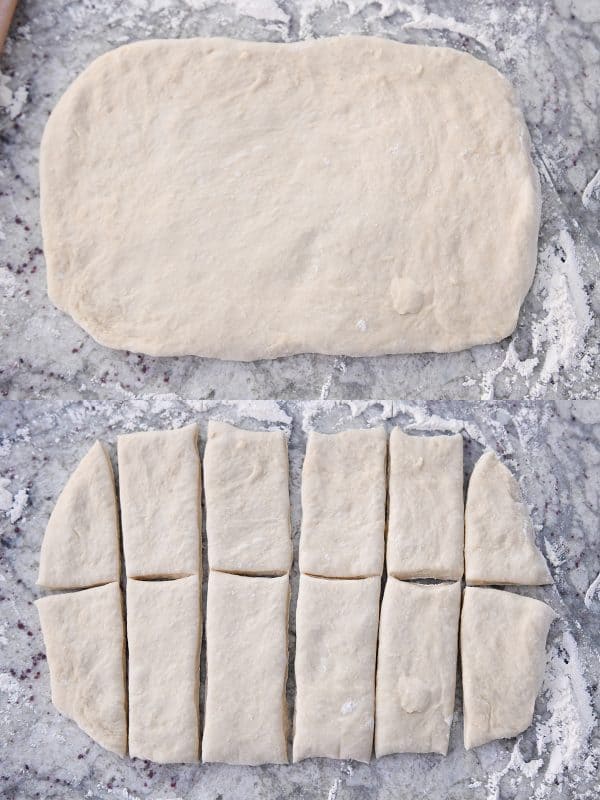
I almost always make these Parker House style (i.e. folded over) but I’m a rebel and instead of cutting them into circles, I take the easy way out and go for rectangles (which makes them square rolls once folded over).
Split the roll dough into two pieces.
The dough is pretty sticky, so on a lightly floured counter, roll each piece into a thick rectangle, about 9X14-inches (the thicker the rectangle, the fluffier the rolls will be – I try for about 1/4-inch thick or slightly thicker).
Cut the rectangle in half lengthwise and then cut each half into six pieces.
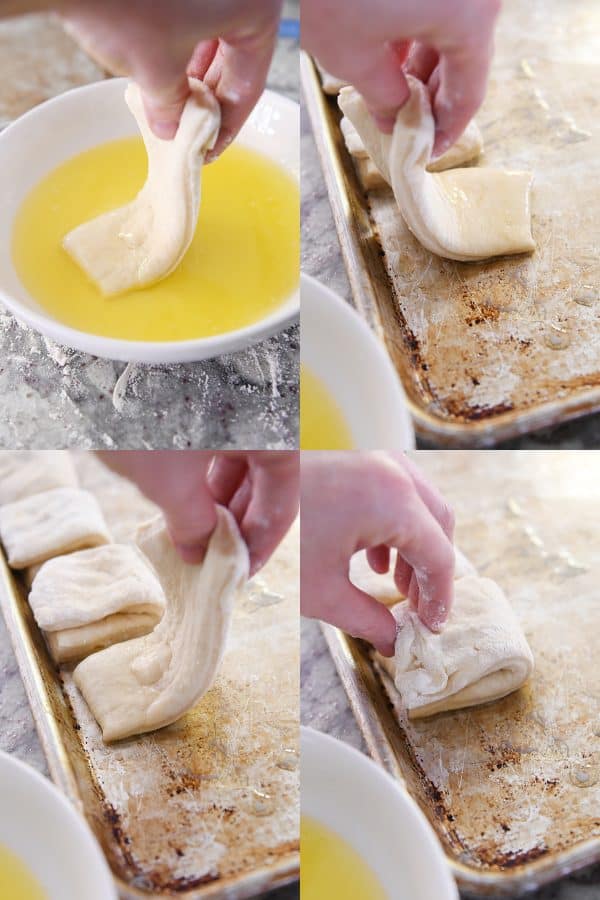
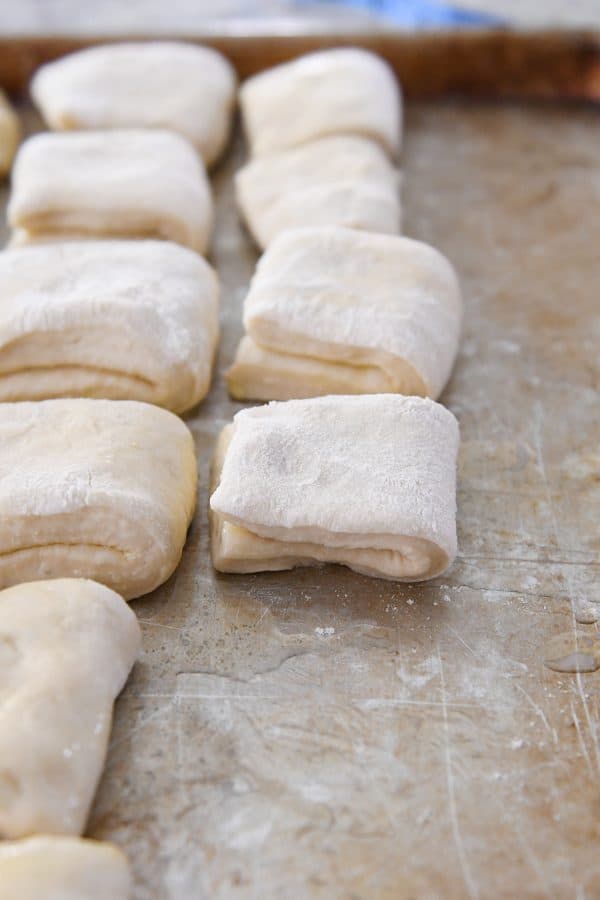
Dip the bottom of each rectangle into butter and then swipe the buttered end back and forth on a half sheet pan and fold in half.
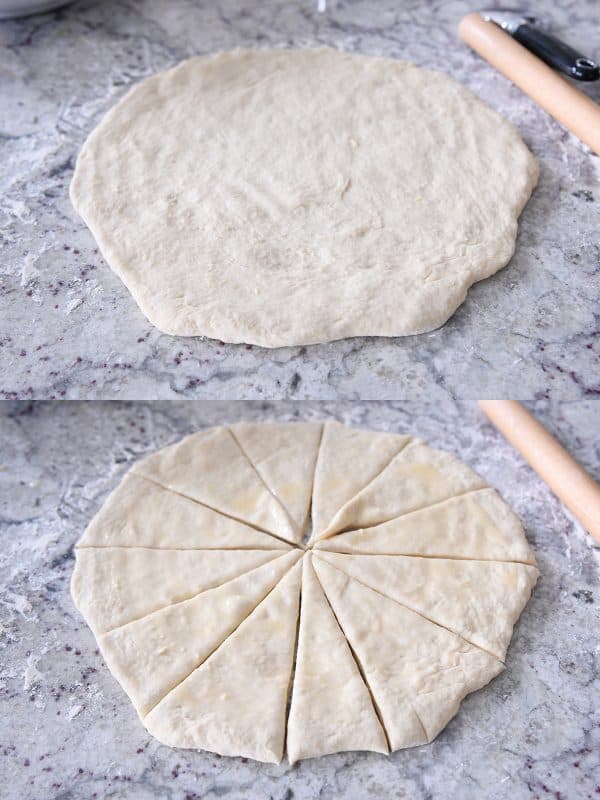
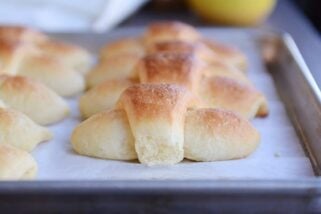
Roll Them Crescent Style
For a bit fancier presentation, you can roll them crescent style.
Again, on a lightly floured counter, split the dough in half and roll each half into a thick circle about 14-inches in diameter.
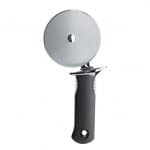
Brush with butter and cut the circle into 12 triangles and roll each up starting with the wide end.
Rise and Bake
Cover the rolls and let rise until noticeably puffy (but not necessarily doubled).
Bake at 375 degrees F for 15-18 minutes until golden.
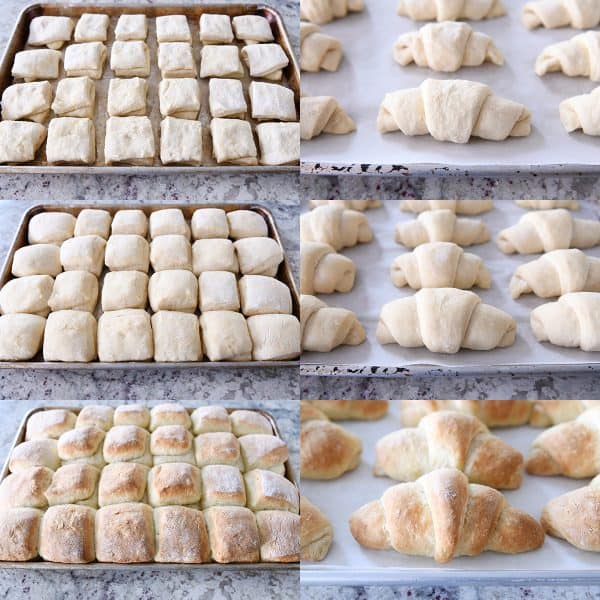
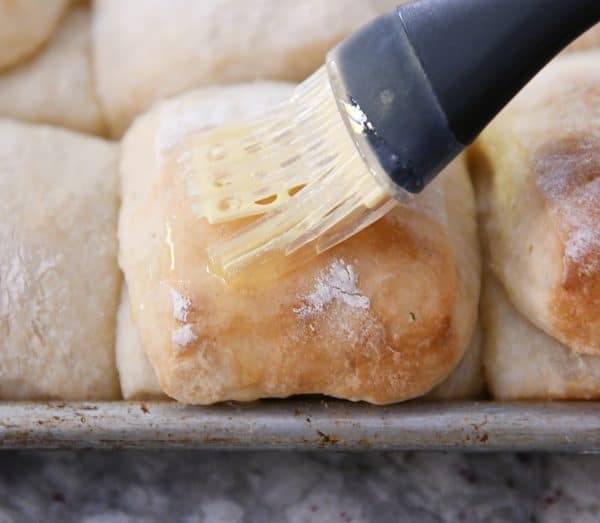
Out of the oven, you can brush the tops with melted butter or leave them with that delightful bakery-style lightly floured top.
How to Get Rolls Perfectly Golden
I hear from a lot of you that your rolls have trouble browning in the oven. They taste great, but they stay kind of pale and pasty in color.
Here are a few tips that might help:
- bake at a higher temperature like 375 or 400 degrees F
- don’t open the oven while baking (it lets out all that critically hot air!); use an oven light to check on them
- place an oven rack a little higher in the oven (bread and rolls tend to brown better above the halfway point)
- add just 1-2 minutes onto the baking time
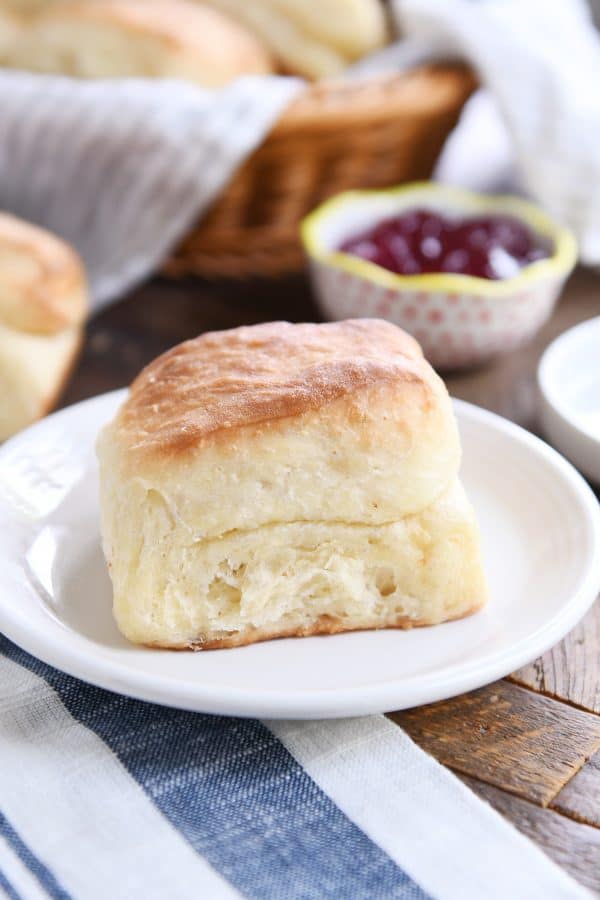
I hope it’s clear from these pictures and my probably-annoying repetition how fluffy and amazing these rolls are.
My Aunt Marilyn, who’s opinion should never be discounted, declared these the best rolls she’s ever had. If that’s not a ringing endorsement, I don’t know what is.
I’ve also heard from Marci (who gave me the recipe) that they make pretty amazing cinnamon rolls (and orange rolls!), too.
Apparently, these easy fluffy blender rolls are the most overachieving, perfect rolls on the planet.
They’re easy enough for roll-making newbies and exciting enough for expert bread makers. I really, really hope you love them!

FAQs for Fluffy Blender Rolls
The baked and cooled rolls freeze great! I haven’t tried freezing the dough or the shaped rolls before baking.
The rolls can be shaped and placed on a sheet pan, covered, and immediately put in the refrigerator (before they rise) for up to 24 hours. They will probably rise a bit in the refrigerator. Take them out to come to room temperature and finish rising and bake as directed.
Here are a few tips that may help your rolls brown better or more evenly: bake at a higher temperature like 375 or 400 degrees F;
don’t open the oven while baking (it lets out all that critically hot air!);
place an oven rack a little higher in the oven (bread and rolls tend to brown better above the halfway point); add 1-2 minutes onto the baking time.
Absolutely! I do it all the time. For a double batch, I double everything straight across except the yeast. I use 2 1/2 tablespoons yeast for a double batch (instead of 3 tablespoons).
Yes! Active dry yeast needs to dissolve/proof in water before adding to the dry ingredients (whereas instant yeast can be added directly to the dry ingredients without proofing). For active dry yeast, add the yeast to the blender after adding the eggs and blend for a few seconds.
I haven’t tried these with 100% whole wheat flour, but I have subbed out two cups of the white flour for whole wheat and it works great. I recommend using white whole wheat flour for a lighter, less dense result (as opposed to red whole wheat flour).
One Year Ago: Chewy Malted Chocolate Chip Cookie Bars
Two Years Ago: Fluffy Honey Oat Dinner Rolls
Three Years Ago: The Best Chicken {or Turkey} Pot Pie
Four Years Ago: Triple Chocolate Fudge Peanut Butter Cookies
Five Years Ago: Amazing Crustless Pumpkin Pie Cupcakes
Six Years Ago: Chocolate Caramel Pecan Pie
Seven Years Ago: Creamy Confetti Corn with Bacon
Eight Years Ago: Chocolate and Coconut Cream Pie Bars
Easy Fluffy Blender Rolls
Ingredients
- 2 ½ cups hot water, not boiling; just hottest water from tap
- ½ cup (113 g) salted butter
- ⅓ cup (71 g) granulated sugar
- 2 teaspoons salt
- 2 large eggs
- 7 cups (994 g) all-purpose flour (see note)
- 1 ½ tablespoons instant yeast (see note for active dry yeast)
- 6 tablespoons butter, melted
Instructions
- To a blender, add the hot water, butter (I just throw the whole stick in there), sugar, and salt. Blend for 10-15 seconds until well-combined. Add the eggs and blend until smooth.
- In a large bowl, whisk together the flour and yeast.
- Pour the wet ingredients over the flour and stir with a spoon (or use your hands) until well-combined and no dry streaks remain. The dough will be sticky and bumpy.
- Cover and let rise until noticeably puffy and doubled, about 1 1/2 to 2 hours.
- Divide the dough in half.
- For folded square rolls, on a lightly floured counter, roll half of the dough into a thick rectangle, about 9X14-inches. Cut in half lengthwise and then cut each half into six rectangle pieces. Dip the bottom of each piece in butter and swipe the buttered end back and forth on a half sheet pan and then fold in half (see pictures in post for a visual). Repeat with remaining dough, spacing the rolls about 1/4-inch apart.
- For crescent rolls, on a lightly floured counter, roll half of the dough into a thick circle, about 14-inches in diameter. Brush with melted butter. With a pizza cutter, cut into 12 equal pieces. Roll each piece up starting with the wide end and place on a parchment-lined half sheet pan. Repeat with remaining dough.
- Cover the rolls and let rise until puffy, about 1 1/2 hours.
- Preheat the oven to 375 degrees F. Bake for 15-18 minutes until golden. If desired, brush tops with melted butter while still warm.
Notes
Recommended Products


Recipe Source: adapted slightly from a MKC reader, Marci T. (thanks so much, Marci!)

Yummy!!! I just made to go with dinner as a practice for Thanksgiving and it was so easy! I used 2 cups Kamut flour and the rest bread flour. I also used Dry active yeast and followed the directions you gave! Thanks for another great recipe!
Thanks, Janet! The reviews are the best – especially when it helps others know about using other types of flour. Thank you!
I made these today. I usually don’t make any homemade rolls because I never have success. These are AWESOME! I used 4 cups white bread flour and 3 cups whole wheat and they are so light and fluffy! I will definitely make these again.
Thanks so much, Kathie! Appreciate you including your details of incorporating whole wheat flour!
So I have a quick question…how does the yeast get activated by the hot water, if that heat has been cooled by the stick of butter?
The heat isn’t completely cooled off by the butter so there’s enough heat to help the yeast.
Ok! Thanks so much!
I made these to go with soup earlier this week and we loved them! So easy and some of the yummiest, fluffiest rolls I’ve had in a long time. Thanks for this recipe! It’s a new favorite.
Oh and I read the instructions wrong and cut each rectangle into 24 instead of 12 pieces so we got 48 small rolls and I actually loved the smaller size.
Not a bad idea, Kiersten!
I made these yesterday for the heck of it, and let my family make their own sandwiches with them for dinner. They are brilliant! So easy, fluffy and delicious. I hadn’t noticed how buttery the recipe is before I set out to make them, but you’ll never hear anyone in my family complain about buttery rolls. They kind of remind me of your bundt pan bread, which is on our Thanksgiving menu and will no doubt be requested for every holiday meal until the end of time. Thanks for yet another great recipe!
Glad you loved these, Megan! And yes, I think you’re right about the similarities of this dough and the bundt pan bread!
Just made these yesterday and put them in the fridge to bake today. They came out delicious. Will make these again loved the blender method. I do have to tell you that I read the recipe wrong and only put in 1 1/2 tsp of yeast an realized it during the rising process and then I just added the extra yeast and was worried that they wouldn’t come out but they did!!! I couldn’t believe it Thanks Mel and Auntie for another delicous recipe.
Thanks for the comment and review, Monica! I’m glad that they worked out well despite the yeast issue!
These were SO EASY. I love to make rolls and have never tried a roll as easy as this one. They are delicious too! I loved the flavor. They were so easy I decided to make 2 batches at the same time. One I tried without egg because we have an egg allergy at our house. I halved the recipe and subbed 1/4 cup oil for the egg. I was surprised how well they turned out. They did not get the height out of it like the batch I made with eggs, but they still tasted great and my daughter was happy with me.
I will make them again. I will also recommend it to my sister-in-law who doesn’t bake. I also added a note to my recipe that they are a great side roll. You know, the ones you spread with butter and jam or eat 6 of them plain, but I wouldn’t make them as a sandwich roll. I wouldn’t fill it pulled BBQ pork. It doesn’t hold the wet meat too well.
Thanks for sharing yet another roll recipe. It was so worth it!!
Hey Katie! Thanks for detailing your changes making them egg-free. I appreciate that and I know others will, too! Good note to make – I think you’re probably right about a wet filling!
I use your recipes often but hardly ever comment. Well, these rolls were amazing!! I rarely make rolls outside of special occasions or holidays, but I’m already thinking of making them again before Thanksgiving. My husband and kids loved it made so many.
This made me so happy, Emma! Seriously, thank you for taking the time to comment! I’m so happy you loved these rolls!
I tried these blender rolls and was amazed how easy they are. I have never made bread from scratch before but will definitely make these again!!
I’m so proud of you, Carrie! Way to go!
This sounds intriguing! Would Marci share her cinnamon roll and orange roll recipe using this dough? I could wing it but I’d feel better with a recipe! Thanks for all you do, Mel. New recipes get me exciting to keep making meals.
Hi Mel! Excited to try these. If I want to halve the recipe, how much yeast should I use? I don’t have room in my freezer to freeze any leftover rolls and my family is small!
Thanks so much.
Silly me, I didn’t read carefully and just looked at your photos, so when I cut out the rolls I used the whole slab of dough to get 12. I thought they seemed giant…and they were! No complaints, though, and I will freeze the rest to use for hamburger buns. They got rave reviews and I will be making them for Thanksgiving with the proper sizing.
I’m glad they worked out well, Laurie! Sorry if my instructions weren’t clear enough!!
Your recipe was very clear, Mel, it was totally my mistake! My second (properly sized) batch is rising right now. I know they will be a hit for Thanksgiving…fingers crossed for leftovers!
I made these again and did half crescent, half square just for fun. My question is, do you have any tips for the square ones to keep the dough from stretching out so much when I lift them to dip them in the butter? I feel like I need a video for this, LOL! Thanks, Mel! My youngest (8) asked if this was a Mel recipe (that’s his standard question now that he’s decided you’re a “good cooker”) and this time he said, “Mel never lets us down.” How right he is!
Well, I think your son is pretty awesome. Haha. I find the same issue happens with the dough stretching – I try to keep the dough almost completely in my fingers and hand when I pick it up so that it doesn’t stretch and then I hold on to a good part of it when I dip it into the butter. I know that’s not super helpful, but that’s kind of my method.
Hey Dani, for a half batch, I’d use 2-3 teaspoons yeast
Thanks, Mel! I made them over the weekend and used one packet instant yeast. They tasted incredible! Definitely the fluffiest rolls I have made. Thanks again for all your help and instruction. Now I just need to figure out the timing for how to add these to my thanksgiving menu!
Glad they worked out, Dani! Thanks for letting me know!
What about using gluten free flour with this recipe?
Someone else commented with this GF result:
I made them tonight with gf flour (cup 4 cup). I halved the recipe. They turned out really good almost biscuit like but fluffy for gf. I added 2 TBS of psyllium husks with 1/3 cup of water and let it sit for about 10 min. I added the psyllium husk mixture when I added the blender mixture to the flour mixture. When the dough rose the first time I put it in a gf flour silpat, wet my hands to press it out and sprinkled gf flour on top then cut with a bench cutter. Bake time was longer. All my kids snarfed them. Next time I want to try them with King Arthur GF flour.
I made these today to go with corn chowder for dinner. They are wonderful! Mine weren’t quite as pretty as yours, but they were so fluffy and delicious. I love trying new recipes, especially baking recipes, so post as many roll recipes as you want! My husband was so disappointed because he has no sense of taste or smell right now. I think we all have the Rona, but he’s the only one with no taste and smell and he’s such a foodie so this is trying his patience! We are fine and our symptoms have all been quite mild so far!
Well, first, I’m glad you loved these, Madison! But second, I’m super bummed for your husband! (Although I’m glad all of your symptoms have been mild so far!)
I cannot wait to make this recipe. Rolls are my nemesis, even though I make a mean bread. I have no idea what is going on with my rolls! I’m hopeful that this light and airy seeming recipe will make all the difference. Thanks, Mel!
Let me know how it goes, Tabitha! I’d be happy to help troubleshoot!
What is YOUR all-time favorite roll recipe on this site??
I don’t think I could choose! I honestly make all of them still – but these are top contender along with the french bread rolls and Lion House rolls and the cornmeal crescent rolls. 🙂
Long-time follower here, and I just made these rolls today. My entire family is in heaven. I cannot get over how fluffy and amazing they are. Easily the best rolls I’ve ever made, and I’ve made a lot! This is a treasure of a recipe! Thank you!
Thank you so much, Stacie!
These were so easy to make and tasted amazing. I used active dry yeast and added it to the blender at the end like Mel said to do. Definitely going to keep this recipe!!
Yay! Thanks for letting me know, Bri! I appreciate it!
I have been making your Parker House rolls for my Thanksgiving rolls for years. I just roll them in balls like any other rolls. I only make them on Thanksgiving and am super looking forward to them..I’ll have to try these, but not yet
Hi Mel,
Thank you! I saw this recipe this morning and made them tonight. Some are squares and some are crescents and they are all delicious!
I used my food processor for the liquid ingredients and a Danish whisk to mix the liquid with the flour. It’s a beautiful dough to work with. Kudos to Marci too. 🙂
Thanks so much, Katie!! Glad the food processor worked well for the wet ingredients. I LOVE my Danish whisk…it’s perfect for this dough!
Mel!!!! This roll recipe was a winner! I made it tonight for dinner and you’re exactly right – they were light, fluffy, and incredibly easy to make! I had ten minutes to spare so I started the dough and let it rise while I was busy doing things around the house. You weren’t lying, it really did take 10 minutes of hands on time to prep these rolls before shaping them and letting them rise again. My family loved them. Thanks for sharing your talents with us!!
Oh yay, Denise!! So happy you loved them! Whenever I am in love with a recipe I have a little angst when I post because I’m worried no one will like the recipe…so I’m always glad to know when others are crazy about the recipe like I am!
I had to try these right away, and they were just as amazing as you said they would be!!! Thank you for another delicious recipe!!
Thanks for making them so fast after I posted and then taking the time to let me know, Erica!
Have you used some sourdough starter in this recipe at all?
Just saw that someone else has asked this. Thanks!
Have you ever tried these skipping the first rise? I don’t normally rise anything twice, as I find that the second rise is never as good.
I haven’t skipped the first rise, Jennifer – sorry!
These look so good, Mel!! The recipe reminds me of the one for parker house rolls… are they similar in taste/texture? Which do you prefer? Thanks!! I’m excited to try these!
Well I mean obviously they would remind me of parker house rolls since you mentioned it in your post… hahaha. But I would still love to know which you prefer:) are these ones just more fluffy?
Hey Alexandra – they are very similar! But these ones are definitely fluffier (I think the frothy blender mix has something to do with it!)
Is it correct that you use LESS yeast when doubling the recipe? Can you explain?
So for a double batch, if the yeast were doubled straight across, it would be 3 tablespoons, but I only use 2 1/2 tablespoons for a double batch because I’ve found that the full amount (3 tablespoons) gives an overly yeasty taste that I don’t like. Does that help?
Got it!!! Thanks for the tip.
Oooohh, I was going to make your overnight crescent rolls for Thanksgiving (I made them for Easter and we LOVED them) but now this recipe is tempting me!
Those are pretty amazing rolls, too – the advantage to this recipe is that the dough is a little simpler to put together!
You had me at “Aunt Marilyn.” Can’t wait to try!
She’s the best!
Hi Mel,
My apologies, this is a silly question, but for some reason I can’t seem to figure it out even from your detailed instructions and pictures.
The instructions say to swipe each piece of buttered dough back and forth on the half sheet pan before folding in half, however in the picture it appears that they are folded buttered side in.
Thank you,
Christine
Not a silly question! I’m sorry if it’s confusing. Basically, you just want to butter the sheet pan with the bottom of the roll that was dipped in butter. So I use the buttered part of the dough rectangle to brush on the sheet pan and then I fold the rectangle in half (you’re right, they are folded over a buttered side, but there’s also a buttered side on the bottom of the sheet pan). Does that help at all? I’ll try to take a little video next time I make them.
I volunteered to make rolls for this Thanksgiving! I’d been considering the cornmeal crescent rolls (so good!) – but these are looking simpler so they will probably be what I go with! Also I’ve been loving my new sweatshirt! I got the powered by Mel’s kitchen cafe one!
Thanks so much, Anna! I was wearing that same hoodie yesterday (and ahem, today)
Hey, if you’re not going to school or to the office, wear (almost) everything until it’s dirty or stretched out of shape. Weather permitting, of course. This has simplified my life greatly.
Can you post a cinnamon and orange roll t
Recipe that I could use for theses buns?
Thanks for the tip on instant vs active yeast. I didn’t know they required different techniques! That may explain a few mishaps.
Glad that helped, Janet!
Excited to try these! Have you ever put some of your sourdough discard in there? Would you just stir it into the flour with the blender mix? Thanks Mel!
I haven’t tried the sourdough discard in this recipe, but I plan to! I think I’ll add it when I add the blender ingredients (and probably adjust the flour by a bit)
How much sourdough discard would you add?
I would add probably 1-2 cups.
Have you tried it using whole wheat for part of the flour? I’d love to know if I can sub at least half of the white for freshly ground whole wheat. Thanks!
I just added a note to the recipe since a lot of people have this question – I have only ever subbed in two cups of whole wheat flour for two cups of the white flour. It worked great!
Can I use a food processor if I only have a small blender?
Yes, I think so!
Should I use bread flour?
I haven’t tried these with bread flour, only unbleached all-purpose flour, but you could experiment with bread flour.
Do you use all purpose flour? I am definitely making these! They look fabulous!
Thanks!
Same question here, all purpose or self rising. I have searched this post and don’t see either mentioned by name.
I use unbleached all-purpose flour. I’ll edit the recipe to be more clear.
Thank you!
Could you make these bigger so they could be used as a sandwich bun?
Yes, I don’t see why not!
This is the same recipe that my mom is famous for in her neighborhood in Idaho and that I’m now famous for in my neighborhood in UT too! The only difference is ours has 1/2 c sugar instead of 1/3 and we bake at 400 degrees for about 11 minutes. They really are the best rolls ever and make great sweet rolls. I’ve taught 3 Relief Society classes on these over the years and now several ladies in my ward make them too.
That’s awesome, Emily! I think the original recipe Marci gave me had 1/2 cup sugar but they were a little too sweet for my taste.
Do you use all-purpose flour or bread flour? I’m a bread baker but these rolls sound marvelous! My family will be surprised for Thanksgiving this year.
Hi Ruth, I use unbleached all-purpose flour. I haven’t tried these with bread flour.
Do you know if the 1lb brick of yeast you can buy at Costco is active or instant yeast?
If you are making cinnamon rolls do butter the roller dough add cinnamon and sugar roll and cut. Cook for the same amount of time?
Hi Alix, I believe that is active dry yeast from Costco. For cinnamon rolls, I think you just add butter and cinnamon sugar to the rectangle, roll up, cut and bake for about the same amount of time (after they rise).
Are these biscuit-like in texture at all? Or would you say they’re just fluffy like supermarket bread? Do they still have a homemade bread chewiness to them?
They aren’t biscuity at all – definitely super soft and fluffy bread (not overly chewy, just soft)
One can never have too many roll recipes! Different occasions demand a different roll. This one looks like a biscuit and a roll got married. Can’t wait to give it a whirl!
These look great, Mel. I have a very weak blender, but a great, powerful Cuisinart food processor. Can I use that instead?
Yes! That should work great!
Oooooo! Genius! Can’t wait to try! Mel’s kitchen cafe is our go to for Thanksgiving recipes. (And card game ideas 😉 Thank you!!
Never feel bad about sharing too many roll recipes especially if they are this amazing. Can’t wait to try them out!!
Do you butter the crescent rolls before rolling them?
Yes! I left that out on accident. I’ll edit the recipe. Sorry about that!
Do you bake them on convention?
I definitely want to make these for Thanksgiving
I usually bake on standard bake, but you could definitely use convect bake (I’d suggest turning the oven temp down 15 to 25 degrees)
These look and sound fantastic and I want to try them tomorrow! Wondering I should brush the top side with butter before rolling the crescents? Thank you!
Hey Susan, sorry I forgot to include that part! Yes, I brush the circle with butter before cutting into triangles. I’ll edit the recipe!
Do you think these would work if I subbed GF flour in place of the reg flour?
Hi Kimberly, I haven’t tried to make them with gluten free flour and I’m kind of worried about the outcome since often times it’s difficult to sub in gluten free flour 1:1 for yeast bread recipes. Sorry I’m not more help!
I’m wondering the same thing!
I made them tonight with gf flour (cup 4 cup). I halved the recipe. They turned out really good almost biscuit like but fluffy for gf. I added 2 TBS of psyllium husks with 1/3 cup of water and let it sit for about 10 min. I added the psyllium husk mixture when I added the blender mixture to the flour mixture. When the dough rose the first time I put it in a gf flour silpat, wet my hands to press it out and sprinkled gf flour on top then cut with a bench cutter. Bake time was longer. All my kids snarfed them. Next time I want to try them with King Arthur GF flour.
This is amazing, Krissie! Thank you for the detailed comment; I know it will help others who are wondering how they can make them gluten free. You’re amazing!
These look great! Couple questions:
1. What temperature water? Like boiling hot?
2. For the crescent shape, do you need to dunk in butter before baking as well?
Thank you!!!
I just use the hottest that my tap water gets. And thanks for the reminder on the crescent rolls – I forgot to include the part about brushing with butter before rolling up! I’ll edit the recipe.
Well, you’ve convinced me! I’ll definitely be trying these!