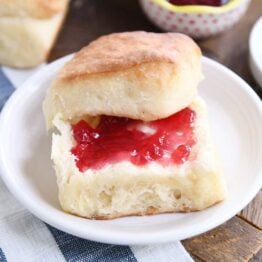
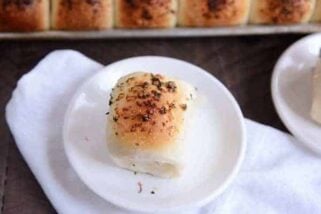
Amazing Easy Fluffy Blender Rolls
These easy fluffy blender rolls are AMAZING. No kneading and no mixer required, the dough is a dream to work with. Best rolls ever!
If a food blogger already has over ten dinner roll recipes in her archives, should she a) keep a new, life changing roll recipe to herself or b) risk the haters’ comments about hyperbole, and post it for the world to make and love?
B. I choose B.
You guys, this roll recipe is amazing. For what they require in effort (spoiler alert: hardly anything), they are easily the fluffiest rolls I have ever made.
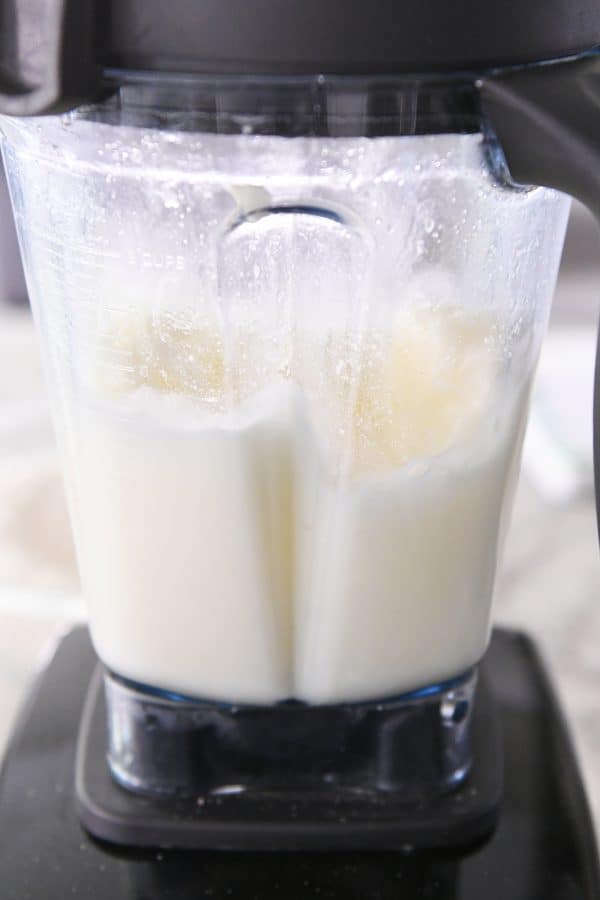
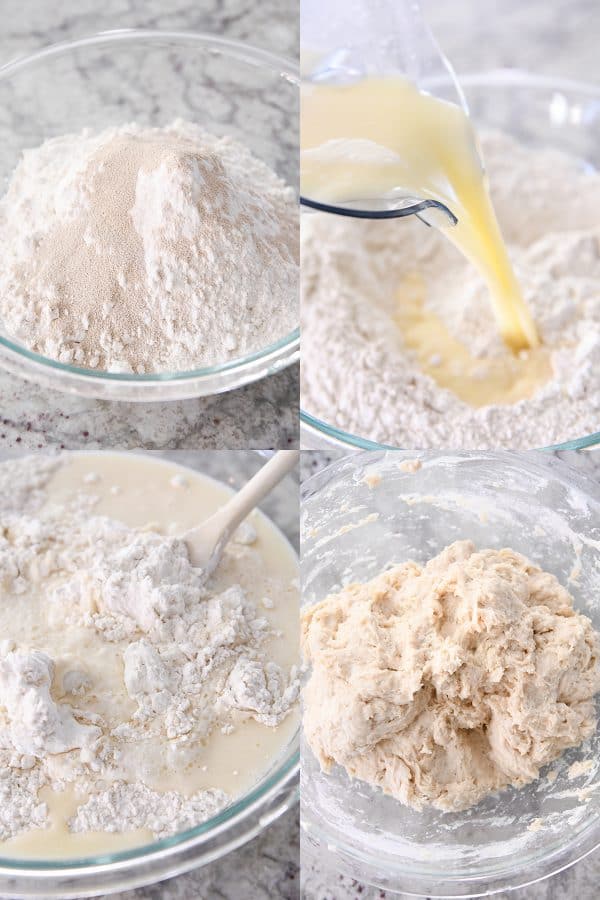
The wet ingredients are quickly mixed together in a blender and everything is stirred together by hand in a big bowl. No kneading. No mixer. It’ll take you 10 minutes tops to make the dough.
Last December, a fantastic reader, Marci T., sent me her recipe for “blender rolls.”
At first glance, the ingredients seemed pretty similar to these Parker House rolls that have been on my site forever. But I was intrigued by both the lack of stand mixer and the addition of a blender.
And I was quickly won over! These easy fluffy blender rolls are extraordinary. I have easily made them over a dozen times this last year, and each time, we can’t get over how soft and fluffy they are.
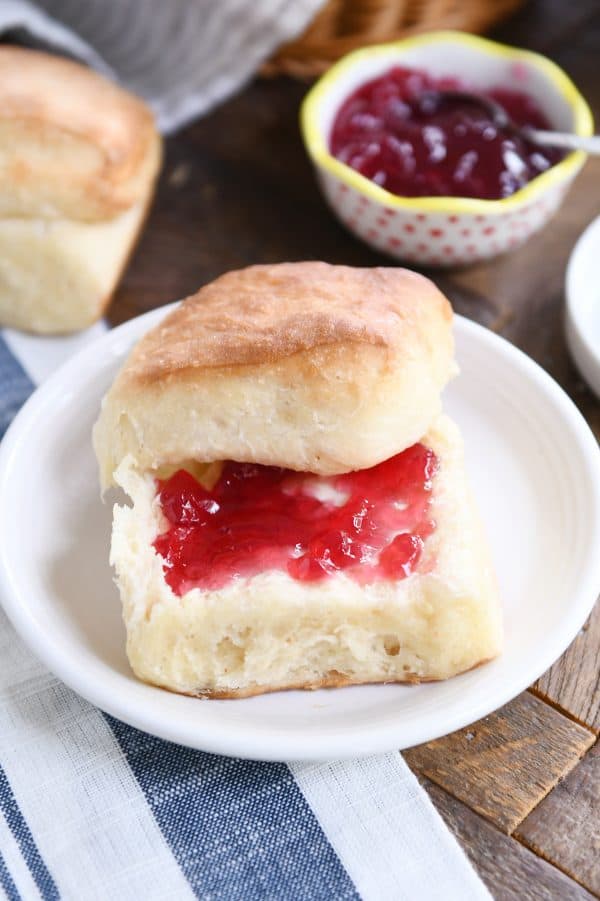
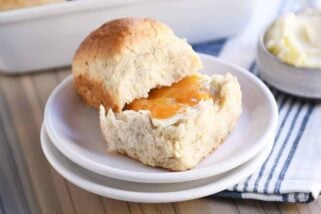
They are definitely going to be the rolls I make this Thanksgiving. (They are perfect for splitting in half and buttering, and I can already tell they will make the most fantastic leftover turkey sandwiches.)
How to Make Blender Dinner Rolls
All ingredients except the flour and yeast go into a blender:
- hot, hot water
- butter (straight from the fridge; don’t even need to cut it into pieces)
- sugar
- salt
- eggs (I add these after the first four ingredients have blended for a few seconds)
I honestly think the blender makes a difference here. Blending these ingredients until they are frothy and well-combined is key to the light and fluffy roll outcome!
The wet ingredients go straight into the flour and yeast and everything gets mixed until no flour streaks remain.
The texture of the dough will be soft, sticky and a little bumpy. Don’t over mix or knead the dough.
Just cover and let rise until puffy and doubled, about 1 1/2 hours depending on how warm and toasty your kitchen is.
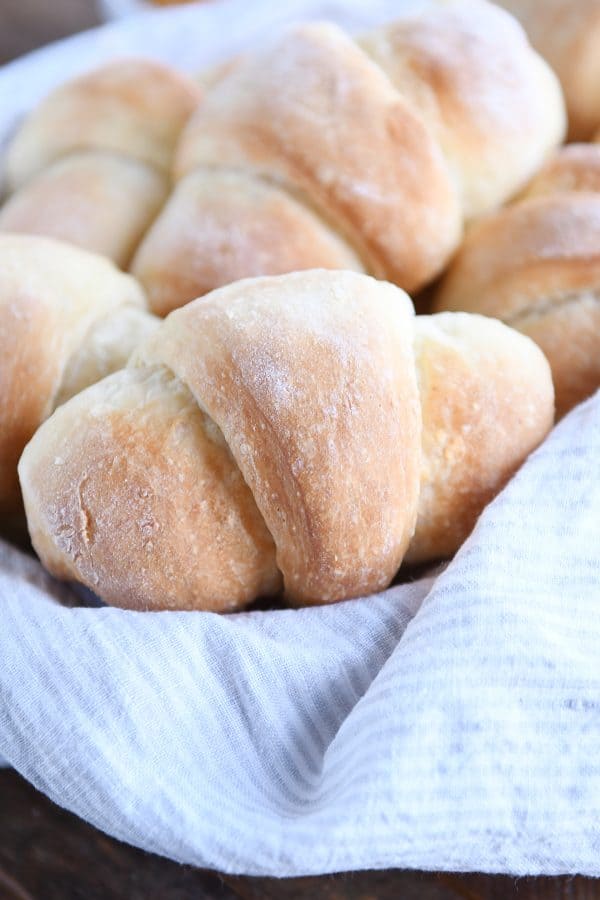
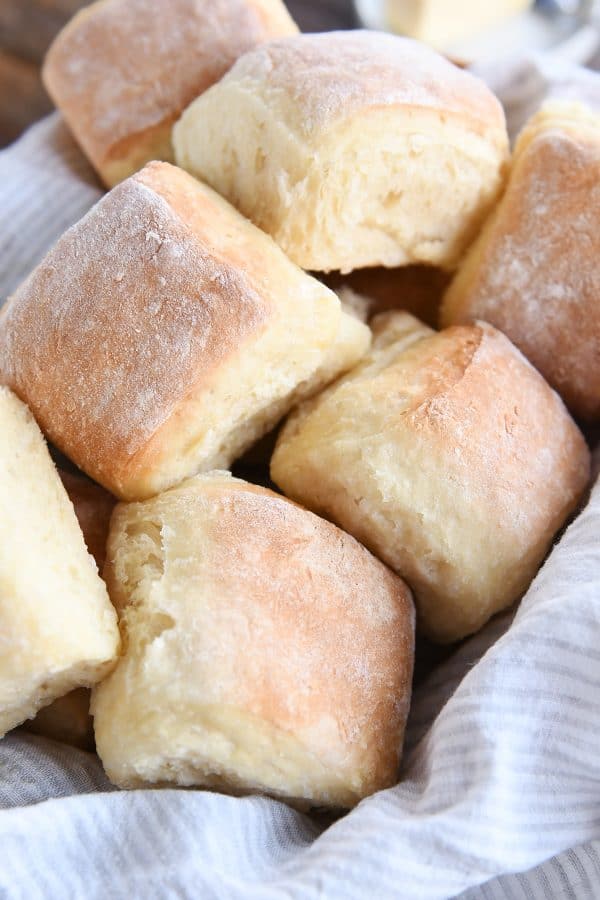
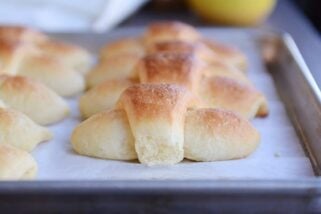
Roll Them Parker House Style
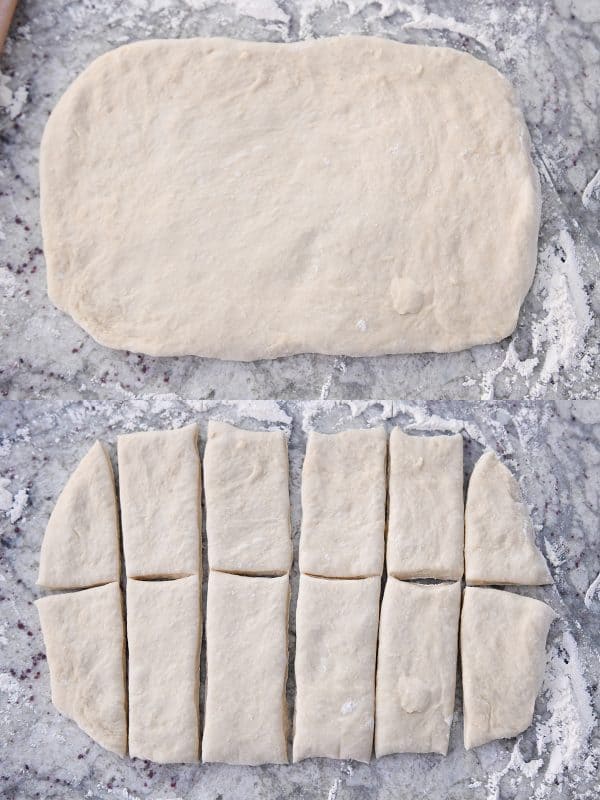
I almost always make these Parker House style (i.e. folded over) but I’m a rebel and instead of cutting them into circles, I take the easy way out and go for rectangles (which makes them square rolls once folded over).
Split the roll dough into two pieces.
The dough is pretty sticky, so on a lightly floured counter, roll each piece into a thick rectangle, about 9X14-inches (the thicker the rectangle, the fluffier the rolls will be – I try for about 1/4-inch thick or slightly thicker).
Cut the rectangle in half lengthwise and then cut each half into six pieces.
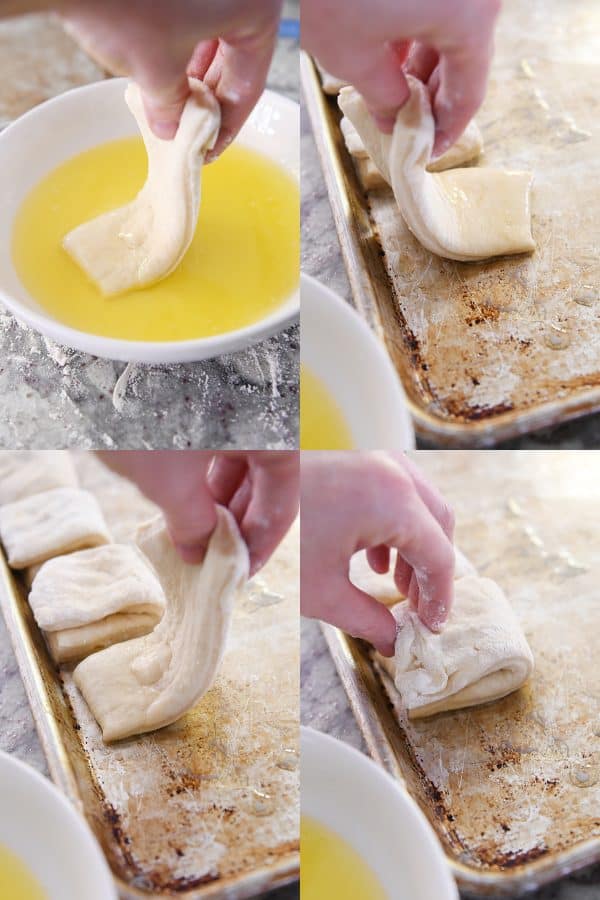
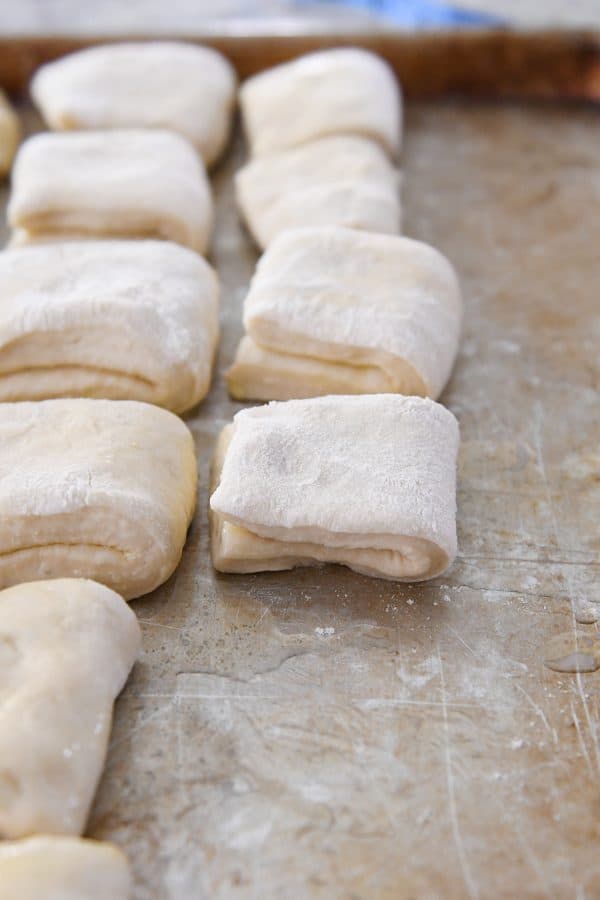
Dip the bottom of each rectangle into butter and then swipe the buttered end back and forth on a half sheet pan and fold in half.
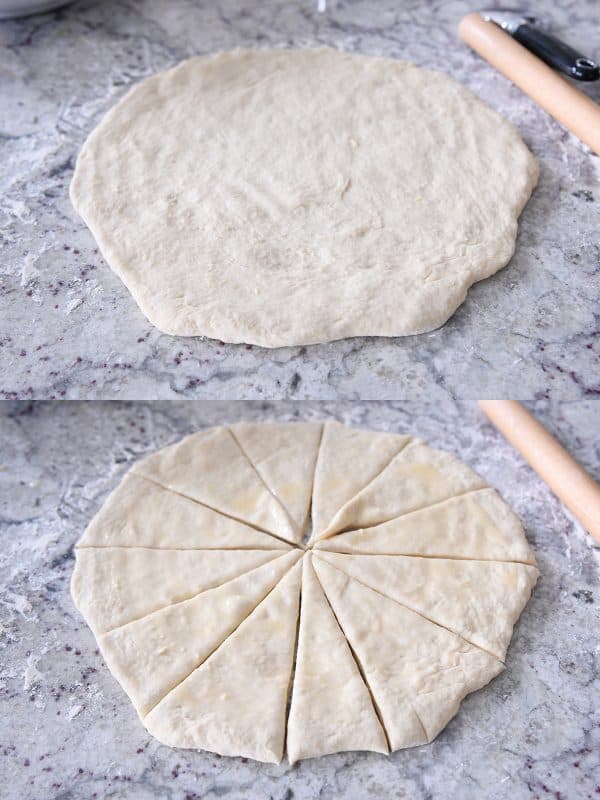
Roll Them Crescent Style
For a bit fancier presentation, you can roll them crescent style.
Again, on a lightly floured counter, split the dough in half and roll each half into a thick circle about 14-inches in diameter.
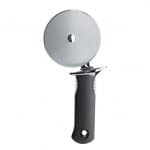
Brush with butter and cut the circle into 12 triangles and roll each up starting with the wide end.
Rise and Bake
Cover the rolls and let rise until noticeably puffy (but not necessarily doubled).
Bake at 375 degrees F for 15-18 minutes until golden.
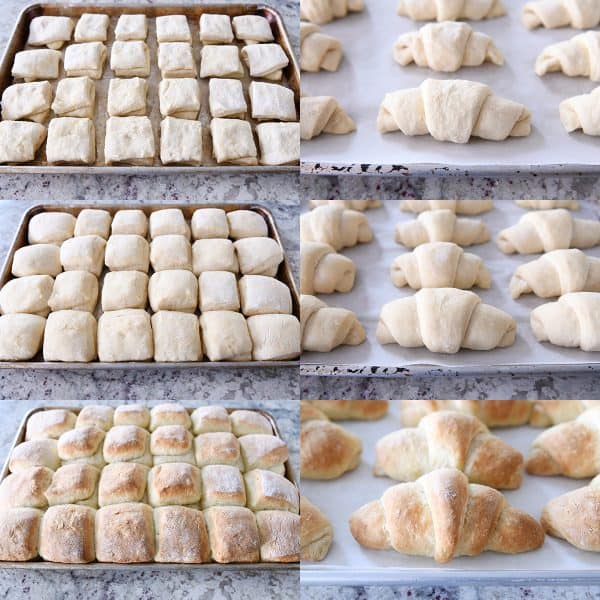
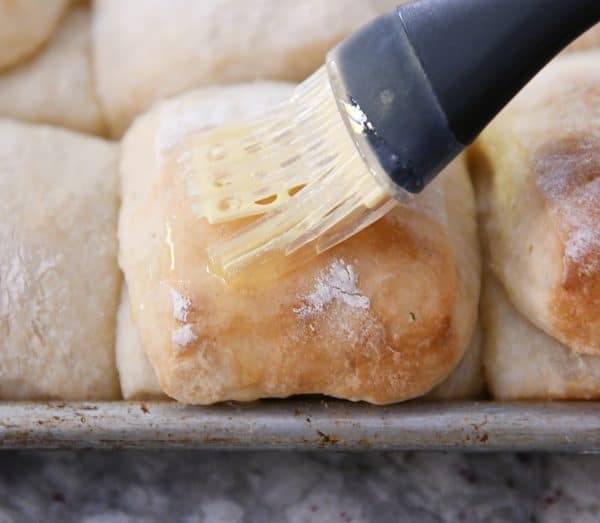
Out of the oven, you can brush the tops with melted butter or leave them with that delightful bakery-style lightly floured top.
How to Get Rolls Perfectly Golden
I hear from a lot of you that your rolls have trouble browning in the oven. They taste great, but they stay kind of pale and pasty in color.
Here are a few tips that might help:
- bake at a higher temperature like 375 or 400 degrees F
- don’t open the oven while baking (it lets out all that critically hot air!); use an oven light to check on them
- place an oven rack a little higher in the oven (bread and rolls tend to brown better above the halfway point)
- add just 1-2 minutes onto the baking time
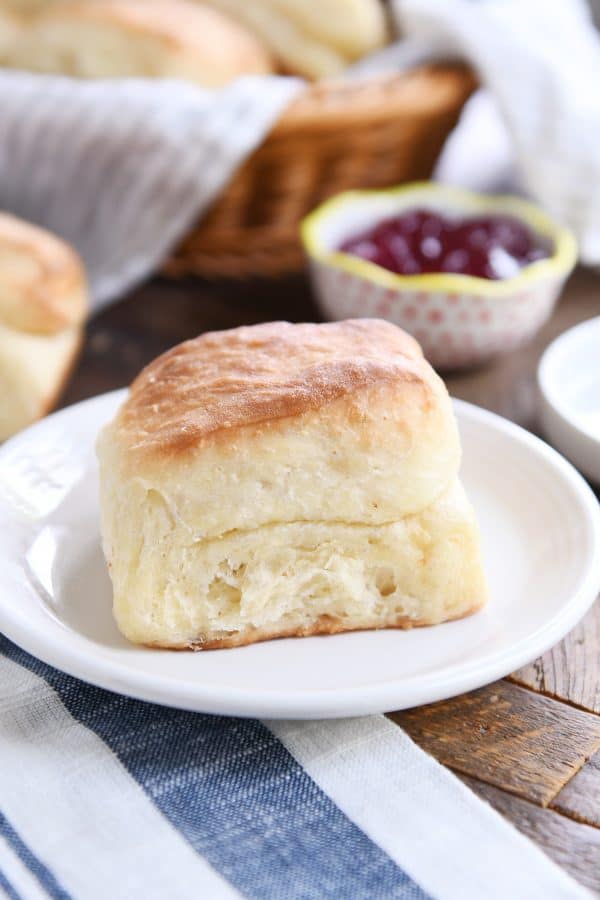
I hope it’s clear from these pictures and my probably-annoying repetition how fluffy and amazing these rolls are.
My Aunt Marilyn, who’s opinion should never be discounted, declared these the best rolls she’s ever had. If that’s not a ringing endorsement, I don’t know what is.
I’ve also heard from Marci (who gave me the recipe) that they make pretty amazing cinnamon rolls (and orange rolls!), too.
Apparently, these easy fluffy blender rolls are the most overachieving, perfect rolls on the planet.
They’re easy enough for roll-making newbies and exciting enough for expert bread makers. I really, really hope you love them!

FAQs for Fluffy Blender Rolls
The baked and cooled rolls freeze great! I haven’t tried freezing the dough or the shaped rolls before baking.
The rolls can be shaped and placed on a sheet pan, covered, and immediately put in the refrigerator (before they rise) for up to 24 hours. They will probably rise a bit in the refrigerator. Take them out to come to room temperature and finish rising and bake as directed.
Here are a few tips that may help your rolls brown better or more evenly: bake at a higher temperature like 375 or 400 degrees F;
don’t open the oven while baking (it lets out all that critically hot air!);
place an oven rack a little higher in the oven (bread and rolls tend to brown better above the halfway point); add 1-2 minutes onto the baking time.
Absolutely! I do it all the time. For a double batch, I double everything straight across except the yeast. I use 2 1/2 tablespoons yeast for a double batch (instead of 3 tablespoons).
Yes! Active dry yeast needs to dissolve/proof in water before adding to the dry ingredients (whereas instant yeast can be added directly to the dry ingredients without proofing). For active dry yeast, add the yeast to the blender after adding the eggs and blend for a few seconds.
I haven’t tried these with 100% whole wheat flour, but I have subbed out two cups of the white flour for whole wheat and it works great. I recommend using white whole wheat flour for a lighter, less dense result (as opposed to red whole wheat flour).
One Year Ago: Chewy Malted Chocolate Chip Cookie Bars
Two Years Ago: Fluffy Honey Oat Dinner Rolls
Three Years Ago: The Best Chicken {or Turkey} Pot Pie
Four Years Ago: Triple Chocolate Fudge Peanut Butter Cookies
Five Years Ago: Amazing Crustless Pumpkin Pie Cupcakes
Six Years Ago: Chocolate Caramel Pecan Pie
Seven Years Ago: Creamy Confetti Corn with Bacon
Eight Years Ago: Chocolate and Coconut Cream Pie Bars
Easy Fluffy Blender Rolls
Ingredients
- 2 ½ cups hot water, not boiling; just hottest water from tap
- ½ cup (113 g) salted butter
- ⅓ cup (71 g) granulated sugar
- 2 teaspoons salt
- 2 large eggs
- 7 cups (994 g) all-purpose flour (see note)
- 1 ½ tablespoons instant yeast (see note for active dry yeast)
- 6 tablespoons butter, melted
Instructions
- To a blender, add the hot water, butter (I just throw the whole stick in there), sugar, and salt. Blend for 10-15 seconds until well-combined. Add the eggs and blend until smooth.
- In a large bowl, whisk together the flour and yeast.
- Pour the wet ingredients over the flour and stir with a spoon (or use your hands) until well-combined and no dry streaks remain. The dough will be sticky and bumpy.
- Cover and let rise until noticeably puffy and doubled, about 1 1/2 to 2 hours.
- Divide the dough in half.
- For folded square rolls, on a lightly floured counter, roll half of the dough into a thick rectangle, about 9X14-inches. Cut in half lengthwise and then cut each half into six rectangle pieces. Dip the bottom of each piece in butter and swipe the buttered end back and forth on a half sheet pan and then fold in half (see pictures in post for a visual). Repeat with remaining dough, spacing the rolls about 1/4-inch apart.
- For crescent rolls, on a lightly floured counter, roll half of the dough into a thick circle, about 14-inches in diameter. Brush with melted butter. With a pizza cutter, cut into 12 equal pieces. Roll each piece up starting with the wide end and place on a parchment-lined half sheet pan. Repeat with remaining dough.
- Cover the rolls and let rise until puffy, about 1 1/2 hours.
- Preheat the oven to 375 degrees F. Bake for 15-18 minutes until golden. If desired, brush tops with melted butter while still warm.
Notes
Recommended Products


Recipe Source: adapted slightly from a MKC reader, Marci T. (thanks so much, Marci!)

These will go down in history. Perfection!!
I make these all the time now, but dipping the entire roll in butter before placing on the baking sheet is the best decision ever. I searched for 8 years to find the perfect roll recipe. So glad the search is over!
These are the perfect roll recipe for weeknights. I made them for the first time tonight and everyone loved them. I was a little skeptical about the blender being involved but they turned out great. I think its the butter-dip that really makes them good. Thanks!
These rocked ! Thanks Mel!!
I cannot even begin to tell you the raves I got for this roll recipe!! I made these Thanksgiving, and they were quickly asked to be made for Christmas dinner. My father-in-law was especially smitten with these as was my husband. Thank you for an easy roll recipe that even this non-yeast bread maker could accomplish!!
Longtime lurker that rarely comments, but I have to say that this dough recipe is outstanding! It also makes fantastic challah bread. Divide the risen dough in half, Divide one half further into 6 stands and braid it, let rise for one hour, brush with egg wash and bake. Best challah I have ever made. Then I took the other half and made cinnamon rolls and put them in the fridge overnight. Pull out in the morning and bake. I have my fourth batch of this rising right now for our bread tonight. My family thinks I am a domestic weekend holiday baking goddess, thanks to you. Ha!
Happy Holidays to your beautiful family. Thank you for all the time and attention and care you give to helping people everywhere be together and share delicious food. God bless.
Amanda! That’s amazing! You ARE a domestic weekend baking goddess! I can’t wait to try this as challah. Thanks for sharing!
Thanks for sharing! What size did you roll out the dough for your cinnamon rolls? (Or Mel – what size would you recommend rolling out half the dough for cinnamon rolls?).
Roughly about 10” x 30” is what I did. Just eyeball it.
A) Amazing! Thank you for sharing.
B) Thanks for the tip in rectangular Parker House rolls – genius!
C) My daughter just cut dairy from her diet, but wanted these rolls again, so I replaced the butter with canola oil with decent results (they did not brown as well), but tasty.
D) I was also feeling VERY lazy, so I whisked everything except the flour in a large bowl, then stirred the flour into that. I let the mess rise, then dropped the dough onto a parchment lined cookie sheet in approximately ‘roll size’ mounds. Heavenly days, no muss, no fuss! The original recipe is the best, but very adaptable (the true sign of a great recipe!). Thanks again!
We made these rolls for Thanksgiving and they turned out great. Call me crazy, but to me they had an aftertaste that was similar to pizza dough. Would this work as a base for pizza?
Definitely worth a try! The dough will be a bit softer than pizza dough, but sounds like a yummy idea.
Thanks for this delicious recipe! I have made them twice, once a week before Thanksgiving to test out the recipe parker house style. My family loved them. I made the crescent style for Thanksgiving and again, PERFECTION! So easy and tasty! I’m making another batch today for Sunday dinner 🙂
Love your recipes!! Thanks again!
Thank you so much, Carla!
I made these for Thanksgiving and they were amazing! Very easy to make and so delicious! My family loved them and my son said they were his favorite part of the meal. This will be my go-to roll recipe now. Thank you!
These are the best rolls I have ever had and the easiest to make. I was skeptical but they are fantastic.
These were great, Mel! They were especially good fresh, but I heated the leftovers up in the microwave for a few seconds and they were almost as good as fresh.
I’ve made 8 batches since you posted these! I even brought them to thanksgiving dinner. Lightest, fluffiest rolls I’ve ever had.
That’s amazing, Lexi!!
I made these rolls Parker House style for our Thanksgiving dinner. They were super easy to make and so delicious! My family was so impressed and thought I had bought them. They were also amazed that they magically separated in the middle for buttering both sides….shhhhh….I didn’t tell them I made them that way. I froze the leftovers and use them for making sausage egg sandwiches. Just so good. Can’t say enough about them and will definitely make them again and again. Made them as written but used bread flour instead of AP.
These might be my new favorite go-to rolls. So easy and delicious!
Made these for thanksgiving COVID 2020 and unlike this year, they came out fabulous. So happy with these and will make them again. I love the idea of making half of them into cinnamon rolls.
What an easy recipe! The blender part was convincing! We don’t have room for a bread maker in our kitchen, but we have a blender, which helped to speed up the dough making.
Everyone thought they were delicious and some of my kids gave them a mention in what they’re thankful for in 2020!! We made the folded kind. We thought they could also be used for buns, since they divide in half so easily! Like for turkey/chicken/tuna salad or maybe pulled pork. Thanks for the delicious recipe, Mel!
These are forgiving rolls! I made them for the second time for Thanksgiving and I forgot the eggs and the dough was a little drier and dotted with weird flour chunks. Haha I went with it and they actually turned out delicious! I would say the correct way is better, but I ate like 6 of these and loved them.
So I made these and they had a nice ride, rolled out without a rolling pin and baked up beautifully. They tasted like……nothing. I’m not sure what happened. The texture was good but just no flavor. I was bummed and ended up making another batch of your cornmeal crescent rolls for Thanksgiving round 2. We did discover that the butter I had out was unsalted even though I only buy salted. I don’t have one box in the fridge that is salted so we don’t know where the unsalted came from. If I had used unsalted when maki the rolls would it have that much of an impact on the taste?
Unfortunately, yes unsalted butter will make a huge difference…it would be like leaving half the salt out of the rolls. Darn! Sorry you didn’t love these!
Mel! These rolls. Oh. My. Made them today for Thanksgiving dinner and they the THE BEST. It only took me 25 years, but I’ve finally found the one- Thank you for sharing!
Yay, yay, yay!!
Ok Ms. Mel,
You have turned me into a bread baking fool! It started with your easy pizza recipe – which I make weekly and my kids enjoy thoroughly; even telling me I make better pizza than any takeout they’ve had. I moved on to your bread recipes – which never fail and are equally delish! So I decided to try your blender rolls for Thanksgiving this year. I must admit the sticky dough made me really nervous. And WOW does it rise! I had doubts about rolling it out, but with a dusting of flour on the counter, the rolling pin and my dough cutter, it worked great! Slicing, dipping, swiping and folding was actually really fun! I shaped and refrigerated overnight and let them sit on the counter for a couple of hours this morning before baking. Oh My Goodness! These were light and fluffy, yet dense and delicious! These will go in my Thanksgiving recipe folder for sure! Your website is my go-to for bread and so many other family-friendly recipes. We are big fans over here!
Angie! Thank you for this comment! I know the sticky dough can seem a little stressful, but I’m glad you persevered, and I’m mostly happy that you loved the rolls!!
Best rolls I’ve ever made and probably the best rolls I’ve ever eaten. Thanks, Mel, and happy Thanksgiving.
Thank you so much, Diane! I hope you had a wonderful Thanksgiving!
I don’t normally try out new recipes for a fancy meal like thanksgiving, but I found these yesterday as I was trying to decide what rolls to start and wishing for something easy. These were amazing and will definitely be making them again!
I let the shaped rolls hang out overnight in my car because the fridge was full and I don’t have an unheated garage. 🙂
I cooked them on parchment to minimize needing to grease the pan and aid with cleanup. I also dipped a few of them in canola oil for my silly husband who doesn’t like the taste of butter.
A+ life choice! <3
These are so easy to make and are delicious!
I made these on Saturday night and they were awesome! I was doing a trial run for thanksgiving because I’ve never made homemade rolls and these made me excited for dinner. I halved the recipe since it’s just my husband and I with our two young girls. I underestimated the size of pan I would need so I made 4 of my rolls into cinnamon sugar rolls by throwing it on in the middle and top. These were good as cinnamon rolls and as soup rolls. I can’t wait to try these tomorrow.
Oooh, love the idea of the cinnamon and sugar version!
What do you think about using whole milk in place of the water?
Definitely worth a try!
After letting the dough rise, and into the step of rolling out half the dough into a rectangle, the dough was so sticky. I couldn’t do anything with it. It just became more sticky and unusable the more I tried to get it rolled out. I had floured my countertop but that did nothing. What am I missing?
How much flour did you use on your counter? It might be that your initial dough needs a bit more flour (that could be a factor of where you live: elevation, humidity).
Mel,
Just wanted to take a moment and tell you I made these rolls today in prep for Thanksgiving. Wow, I don’t think I have ever made a roll so light and fluffy! I ended up using my Bosch….just mixed the flour and yeast a bit, added the wet ingredients from the Vitamix…..and turned it on just enough to pull it together. Let it set to rise and then made the Parker House style rolls, What a great recipe! I’m a long time bread baker…..and have made other rolls,,,,,but these are my new fav. I always enjoy getting your recipes and even the toy list this year…..ordered off that for my sweet little neighbor girl. So THANK YOU and Happy Thanksgiving to you and yours! Lynn from Chandler, AZ
Thank you so much, Lynn! You are the sweetest.
Love these!!! But… what kind of industrial size mixing bowl (and muscles) do you have to double this!?! First time I made these I put a single recipe in my largest 8 qt pot
Ha, yes it’s a good workout. I have an enormous Tupperware bowl I got for our wedding almost 20 years ago and I use that to double.
I am a roll-making -rookie and these were easy and fantastic ! The make-ahead and doubling option are the best! I halved the recipe for my smaller Thanksgiving and I should not have because they were disappearing the minute I took them out of the oven!!!! What is the way to turn these into cinnamon rolls a la Mel ??
Hey Alice! I’d roll out the dough to a rectangle about 1/2-inch thick, spread with butter and then cinnamon and brown sugar and roll them up!
Could you shape these into round balls for traditional rolls?
I think the dough might be a bit too sticky for that.
I’m really new to bread baking and have a question. My dough was extremely wet. I’ve seen recipes that start with a specified amount of flour and then they state to add flour or water to get to the right consistency. Should I have done that with this recipe?
The rolls had a great first rise much faster than what the recipe stated so I think the yeast was ok.. On the tray they spread out to the size of hamburger buns! They were fluffy and light and tasted great, but were a little on the flat side.
Hi Mary, this dough is a little different than traditional roll doughs, but you might want to add another 1/2 cup or so flour to the initial dough mixture. If you live at a different elevation, humidity than me, it might mean you need more flour (and a lot can depend on how we each measure flour – I fluff the flour, scoop in my cup and level off).
Update – I made them a second time on Christmas Day. I live in Florida so it is a MUCH different altitude and humidity level than Idaho. I added another 1/2 cup flour as you suggested and the dough was much easier to deal with. Very fluffy, light and flavorful. I also decided to weigh the flour and it was 1015g. I will definitely make these again. Husband says there the best rolls he’s ever had. So easy and yummy!!
Thanks for the update, Mary Ann!
Thanks for the recipe! I have a quick question before I make them. When it says “Dip the bottom of each rectangle into butter” does that mean like the underside of them or does it mean the front and back of half the piece of dough? I’m looking at the pictures too and can’t quite figure it out. I’m an overthinker but I want to make sure I get it right! Thanks and happy Thanksgiving!!
Sorry for the confusion, Michelle. I dip the front and back of the bottom half of the dough piece in the butter. Does that help?
That answers my question too! Thank you!
Ok, regarding Active Dry Yeast, you say to add it at the end and blend for a couple of seconds. Is this AFTER dissolving it in warm water to activate it? I think so but would like to confirm, thanks!
Nvm, I reread the recipe, I add it to the wet ingredients prior to mixing with the flour.
Hi Mel, I made these rolls yesterday for our Sunday dinner. They are delicious! And so easy!!! They are as easy to make as Bisquick biscuits…really they are that easy. Thanks for making me look like a rock star !
Thanks so much, Jan!
Hi Mel! I’ve made many of your yeast recipes (among dinner, pie, cake, cupcakes, sides… many, many recipes and I love them all!) but this roll recipe was fantastic! Dough, for me, was very sticky so I used oil on my hands and counter top – worked better than flour. Love the tips for the browning – I will do that next time. Thank you again – such a treat right out of the oven, great for breakfast sandwiches, jam, you name it!
Thanks for the review, Shonda! Happy to know you loved these rolls!
Hi! What am I doing wrong…7c of flour doesn’t seem to be 35oz as the recipe indicates. Is that correct?
Sorry, my mistake on the flour conversion! Lovely rolls!
I made these rolls the other day to test out before Thanksgiving and they turned out amazing! I’m used to regular roll dough, so when I had this giant sticky mess I was sure I had screwed up, but they actually turned out in the end! They’re buttery enough to eat plain, but are amazing with jam or as a sandwich.
These rolls are amazing! I made them the day before, shaped them, then refrigerated, and then got them out two hours before I was ready to cook to let them rise. They were super fluffy and everyone loved them!
Kate! Thanks so much for including your make-ahead details!
7 cups of flour ??
I had to try and cut it down for 2 of us, I used 1 /2 cup water to 1 1/2 flour, was way too wet
and had to knead in another 1/2 cup of flour, I know you said don’t do that …
adjusting the rest, got it to where I could roll it out , followed the rest, and they came out a little dense, but just like store bought in taste and texture.. made 12 rolls..
would like a better breakdown of the recipe for smaller batches… to get the fluffy texture, still a winner and go to recipe.
Hi Tom, I’m sorry I can’t foresee every variation for a recipe when I post it, but I applaud you for trying a smaller batch! I think for a small batch, I’d try 2/3 cup water for 2 cups flour (or 1/3 cup water for 1 cup flour) and then adjust the other ingredients accordingly. For 2/3 cup water, 2 cups flour, I’d do 1-2 tablespoons butter, 1/4 teaspoon salt, pinch of sugar, 1 teaspoon yeast and then whisk together an egg and use about 1 tablespoon of the egg mixture. Just a starting place!
Made these to go with some soup and they were DELICIOUS, and so easy to make! I was a little skeptical when I saw how sticky the dough was after mixing the wet and dry ingredients, but after flouring my hands and the counter, they came together great. These really would be the perfect rolls for Thanksgiving leftover sandwiches. Mmmmmm, so good!
I’m glad they worked out for you! Thanks for letting me know!
These look fab! Can I halve the recipe?
Yep!
Hi, I’ve never made rolls before and don’t want a disaster this year for Thanksgiving so I was wondering if these tasted good when made a couple days in advance? Or at least the day before. Or maybe bake them and freeze and have them ready for the big day?
They really are best baked the same day you want to serve them. However they also do quite well being baked, cooled, and frozen and then just defrosted and lightly warmed before serving.
I make your Lion house rolls religiously every Easter and Thanksgiving and Christmas (and I am my family’s designated roll bringer to big family gatherings). I love the Lion house rolls and thought I never needed another roll recipe, but now it is going to be just my immediate family doing Thanksgiving at home. We have done entire thanksgivings before, and knowing how many other dishes we need to make too I am definitely going to be trying these rolls this year! The ten minutes to put together the dough plus all of the rave reviews convinced me.
I am haunting your site putting together our Thanksgiving and holiday food. My husband made your soft molasses cookies yesterday and they were amazing! I mean, let’s be honest, we actually haunt your site year round – every shopping list starts or ends at your site. Thank you for all of your hard work!
Haha, you’re the sweetest. Thanks, Thora!!
So we did make these for Thanksgiving, and then again the day after Thanksgiving because they were so easy and we had already eaten them all (!), and now we are making them again today. They really are so good, and easier than other roll recipes. I have found it does make a difference to weigh out the flour instead of measuring, to ensure the maximum amount of fluffiness to the rolls.
Mel, these are outstanding rolls. I have had a catering business and I have made thousands of roll but these are by far the easiest and best I have made. I made them in a croissant style. They are light and fluffy and so tasty. You do have to allow significant time for them to rise but that is not constricting because you just leave them and go about your work. If you are afraid of working with yeast, this is your recipe to make. Try them. You will not be disappointed. Thank you, Mel!
Thanks for the comment and review, Betty! So, so happy you loved this recipe!
I love to bake and have made dozens of roll recipes over the years. Mine looked just like yours, and were really easy to make. However, the texture was closer to a biscuit, a very fluffy soft biscuit, than a dinner roll. My husband and teen boys loved them, but I don’t think I’ll make this recipe for Thanksgiving. They don’t taste like a traditional roll.
I think you probably didn’t let them proof long enough. This was a slow rise but so worth it in the end.
Thanks for the review, Karalee! I don’t get a biscuit vibe from these rolls, but I can see how they may not fit everyone’s idea of a perfect Thanksgiving roll. 🙂 Thanks for taking the time to let me know.
My family said they reminded them of a soft biscuit too. I think I might have let them raise too long on the second rise.
Also, I’ve noticed that even a few extra minutes of baking can change the texture.
I made these for our Friendsgiving tonight. They were a hit. This dough is really a dream. I will say that the roll size kind if got away from me…they got really big, but so light an fluffy! I’m gonna make them as crescents next time!
Glad you loved the recipe, Heather (but mostly love the idea of your Friendsgiving!)
I decided to try these out since they seemed too good to be true . . . They are amazing! I couldn’t believe how easy it was to make! I have a lot of roll recipes that I love but this is now one of my top 3.
Yay! This made me happy to read…thanks, Lachelle!
These rolls are AMAZING. We have made them twice this week, each style of baking. I think the parker house crescent is the win for us. Bonus, my daughter can do this all by herself which she loves. I don’t have a blender but have had no issues using a food processor. Thank you Mel for yet another family favourite.
I appreciate the review so much, Annie! Super proud of your daughter for stepping in to help!
So easy and so good. I was intrigued, and these are the easiest tools I have ever made. Now to stop eating them, that’s the only problem I have with this recipe. 😉
Hahaha, I hear you on that. 🙂