Easy Twisted Croissant French Bread
This twisted croissant French bread looks fancy, but it is SO easy to make at home and is a total showstopper. So buttery and fluffy and yummy!
Making croissants at home can be an intimidating multi-day, multi-step affair.
But making twisted croissant French bread at home only takes a couple of hours, and the result is a flaky, buttery, twisted croissant-style bread that is literally out of this world delicious.

Very Simple French Bread Dough
The dough we’re using for this recipe is actually adapted from my beloved, popular breadstick recipe.
It is such a simple, foolproof dough and so easy to work with – it is perfect for this croissant bread!
Using any stand mixer of your choice (or making it by hand with a bowl and spoon), mix and knead the dough ingredients until a soft, smooth dough forms.
It’s REALLY important that this dough is not over floured and stiff or you’ll be cursing everyone’s name trying to roll it out. On the flip side, a dough that is too soft and sticky can be problematic, too. Try for a dough that is soft and slightly sticky but easily clears the sides of the bowl. It should leave a light residue on your fingers but not be overly wet and sticky.

Let the dough rise until doubled in size, about an hour.

The Butter Packet
This croissant bread requires making a thin sheet of butter that gets folded and rolled into the bread dough.
To make the butter packet:
- Grab a piece of parchment paper about 16 1/4-inches by 12-inches (doesn’t have to be exact, but should be close to those dimensions). The precut sheets are about this size.
- Fold the two short edges on each side in toward each other about 4 1/2 inches. They will overlap a bit. Crease the edges well.
- Keep those edges folded in and fold the top and bottom edges over about 1 3/4-inches.
- When all the edges are folded in, it will form a little parchment packet with the center rectangle dimensions about 8 1/2-inches by 7-inches.
Don’t stress too much about the folding – these are just guidelines. If the folds are off by a little bit, it’s not going to be a problem as long as the folds completely enclose the center area where the butter will go.
Below is a reference chart with the parchment and dimensions.

Take two sticks of butter at cool room temperature and cut into several big pieces.
Unfold the parchment and place the butter in the center of the parchment. Fold up the packet using the pre-creased folds and flip over so the folded edges are on the bottom.
Use a rolling pin, lightly tap the butter (too much aggression here and the parchment could rip) until it starts to flatten and merge into a thick square.
Continue tapping the butter and eventually transition to using the rolling pin to roll the butter into a thin sheet so it reaches all the edges of the parchment packet using short quick rolls with the pin. It should evenly thick throughout.
Place the butter packet in the fridge to chill while you make the dough.

How to Fold the Croissant French Bread
When the dough has risen and butter has chilled, lightly punch down the dough and turn out onto a lightly floured counter.
Roll the dough into a rectangle about 18-inches by 11- or 12-inches.
Take the butter packet out of the refrigerator, and unfold the parchment (but leave the butter on the parchment paper). Place the butter packet face down on the center of the rolled out bread dough. Peel the parchment carefully off the butter leaving the butter sheet on the dough.
Using the pictures below as a reference, begin by folding one short side of dough about halfway to 2/3 over the butter. Fold the other short side of dough over the butter, overlapping the first folded side by about an inch.
Fold the top and bottom edges over about 1/2- to 1-inch and press to seal and then fold the dough in half lengthwise to form a rectangle loaf.

Rolling, Rolling and More Folding
Roll the thick, folded loaf into a long rectangle about 8-inches by 22-inches. If the dough springs back when rolling, let it rest for 5-10 minutes to let the gluten relax and roll again.

Fold one short edge of the long rectangle into the center (pictures below). Repeat with the other short edge so they meet in the middle. Fold the dough in half (from one of the short sides).
Let the dough rest for 2-3 minutes. This helps relax the gluten so it is easier to keep rolling out.

Roll the folded dough into a 12-inch or 13-inch square. You might see little bubbles on the surface of the dough. Totally normal (don’t deliberately pop them!).
Cut the square into four strips.
Pro Tip: you can cut the dough into even thinner/smaller strips for twisted croissant breadsticks!

Rising and Baking the Croissant French Bread
Place the twisted croissant loaves on a parchment-lined half sheet pan (I place two loaves per sheet pan, spaced a few inches apart).
Cover and let the dough rise until noticeably puffy. This dough can rise slowly in the refrigerator for several hours or overnight. Don’t let it rise in an overly warm spot or the butter will melt before it hits the oven and you won’t get the delicious, flaky, buttery layers.
Bake in a preheated oven until golden. The smells emanating from your oven are going to be incredible. Hot, fresh, buttery, baked bread. Be still, my heart.

Bonus Tip: Brush with Butter
It’s inevitable to have some leaked butter on the sheet pan when you pull the bread from the oven.
This is actually preferable!
Take a pastry brush and brush the butter on the sheet pan over the top of the warm bread.

The Most Incredible Bread Ever
This twisted croissant French bread has become my secret weapon.
I’ve made it dozens of times over the last month for us to enjoy, to serve to company, and to take to friends/neighbors.
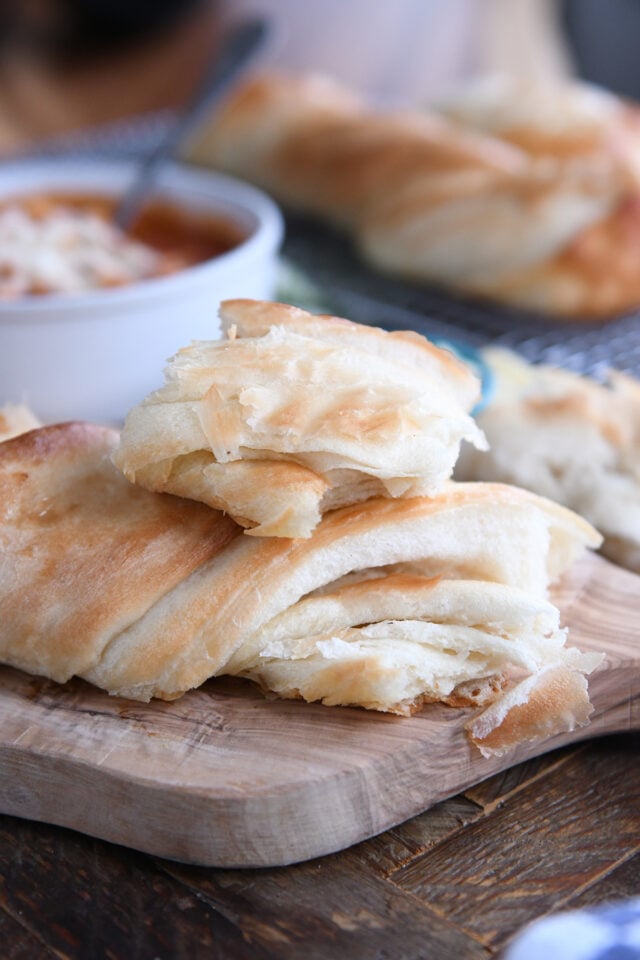
To say it is an absolute showstopper is an understatement. Everyone is bowled over at how deliciously amazing this bread is. It’s soft and fluffy…but also buttery and flaky.
It can be cut into slices…but more often, we tear off pieces and go the all out rustic route.
Served warm, this bread is absolutely decadent and irresistible.
Homemade Croissants vs Croissant French Bread
I have made homemade croissants approximately one time in my life. They were good but super time intensive and honestly, VERY stressful.
This twisted croissant French bread, on the other hand, is made start to finish in a couple of hours, and is so easy and delicious, I don’t think I’ll ever be tempted to make homemade croissants again.
I can’t wait for you to make this! It’s going to change your bread making life!
{Note: See below the recipe for where the inspiration for this bread came from.}
{Second Note: I made a quick how-to video of this bread and posted it over on Instagram for those that like more visual instructions!}

One Year Ago: Swedish Pancakes
Two Years Ago: Easy Yogurt Flatbread
Three Years Ago: Easy Homemade English Muffins {Whole Grain Option – No Mixer Needed!}
Four Years Ago: Super Easy S’Mores Chocolate Pie {or Tart}
Five Years Ago: Incredible Fluffy Overnight Buttermilk Pancakes
Six Years Ago: Chinese Cashew Chicken {30-Minute Meal}
Seven Years Ago: Double Chocolate Quick Bread
Eight Years Ago: Healthier Banana Bread Chocolate Chip Oat Snack Bars
Nine Years Ago: Family Style Shrimp Scampi {20-Minute Meal}
Ten Years Ago: Chocolate Tres Leches Cake

Easy Twisted Croissant French Bread
Ingredients
- 1 cup (227 g) salted butter, cool room temperature
- 2 cups warm water, 105-110 degrees F
- 1 tablesoon instant or active dry yeast
- 2 tablespoons granulated sugar
- 1 1/2 teaspoons salt
- 4 3/4 (675 g) cups all-purpose flour, more or less (see note)
Instructions
- For the butter packet: grab a piece of parchment paper about 16 1/4-inches by 12-inches (doesn't have to be exact, but should be close to those dimensions). Fold the two short edges of the parchment in toward each other about 4 1/2 inches. They will overlap a bit. Crease the edges well.
- Keep those edges folded in and fold the top and bottom edges in about 1 3/4-inches. It should form a little parchment packet when folded with the center rectangle dimensions about 8 1/2-inches by 7-inches. See pictures in the post for a visual.
- Unfold the parchment. Cut the butter into large pieces and place in the center of the parchment. Fold up the packet using the pre-creased folds and flip over so the folded edges are on the bottom.
- Use a rolling pin, lightly tap the butter (too much aggression here and the parchment could rip) until it starts to flatten and merge into a thick square. Continue tapping or use the rolling pin to roll the butter into a thin sheet so it reaches all the edges of the parchment packet and has a relatively even thickness. Place in the fridge to chill while you make the dough.
- For the dough: In the bowl of a stand mixer fitted with the dough hook, add the water, yeast and sugar, and let sit until foamy, 2-3 minutes. Add the salt and flour and mix until a soft dough forms that clears the sides of the bowl. Add more flour, a little at a time, if the dough is sticking to the dough hook or sides of the bowl.
- {It's REALLY important that this dough is not over floured and stiff or it will be hard to roll it out. On the flip side, a dough that is too soft and sticky can be problematic, too. Try for a dough that is soft and slightly sticky but easily clears the sides of the bowl. It should leave a light residue on your fingers but not be overly wet and sticky.}
- Knead for 3-4 minutes until the dough is soft and smooth.
- Cover the bowl or transfer the dough to a lightly greased bowl and cover. Let rise until doubled, about an hour.
- Lightly punch out the dough and turn out onto a lightly floured counter. Roll into a rectangle about 18-inches by 11- or 12-inches.
- Take the butter packet out of the refrigerator, and unfold the parchment (but leave the butter on the parchment paper). Place the butter packet face down on the center of the rolled out bread dough. Peel the parchment carefully off the butter leaving the butter sheet on the dough.
- Work quickly and don't over work the dough during the next couple steps of folding and rolling so the butter doesn't get too soft!
- Fold one short side of dough about halfway to 2/3 over the butter. Fold the other short side of dough over the butter, overlapping the first folded side by about an inch.
- Fold the top and bottom edges over about 1/2- to 1-inch and press to seal.
- Fold the dough in half (from right to left or vice versa) once more.
- Starting in the center, roll the dough out into a long, thin rectangle, about 8-inches by 22-inches. If the dough springs back when rolling, let it rest for 5-10 minutes to let the gluten relax and roll again.
- Fold one short edge of the long rectangle into the center. Repeat with the other short edge so they meet in the middle. Fold the dough in half (from one of the short sides).
- Let the dough rest for 2-3 minutes. Prepare two half sheet pans by lining with parchment paper. Preheat the oven to 375 degrees F (400 degrees F for a darker crust).
- Roll into a 12-inch or 13-inch square. If the dough springs back when rolling, let it rest for 5-10 minutes to let the gluten relax and roll again. Cut the square into four strips.
- Take each strip, twist it 3-4 times and place on the prepared sheet pans (two strips per sheet pan, spaced several inches apart).
- Cover and let rise until noticeably puffy (the dough can rise in the refrigerator overnight or for several hours – when taking out of the refrigerator, if it hasn't risen enough, let it come to room temp and continue rising until nearly doubled). You don't want to let these loaves rise in an overly warm spot or the butter will melt before it hits the oven and you won't get the flaky, buttery layers.
- Bake the loaves until nicely golden, 20-22 minutes.
- Immediately out of the oven, use a pastry brush to brush any leaked butter on the sheet pan over the top of the loaves.
- Serve warm or at room temperature. Bread can be sliced or torn into pieces.
Notes
Recommended Products


Recipe Source: from Mel’s Kitchen Cafe, inspired by @mollyjwilk on Instagram who made a version of this with @thefoodnanny baguette recipe. I simplified by using my easy breadstick recipe (increased the recipe to make four perfect little loaves, and I also fleshed out the instructions with dimensions for the butter packet as well as altering the folding and rolling method a bit with an extra fold in the first set of folding/rolling and brushing the extra butter on the loaves at the end

I finally had a chance to try the croissant bread and it is so delicious! I made a double batch of the dough so I could try half of it with mini cinnamon chips that I had on hand. I haven’t tried the chocolate version yet but the cinnamon chips were a great alternative!
I’m going to have to try this! I’m the resident bread baker in our families thanks to all of your tutorials. Have you ever heard of Kouign Amann? A local bakery sells it so I looked up a video of how it’s made once. Reminds me a lot of this other than you add sugar with the butter.
This bread was so good! My only problem is that the butter leaked out, but this could have to do with the way I folded the dough. It broke through then too. Despite this, it came out buttery and crispy.
I just pulled this out of the oven and the smell is spectacular, the taste is even better. I appreciate your detailed directions. I followed them and it came out wonderful. I also froze two of them on baked? I don’t know if anyone has ever tried that, but I’m gonna see if it’ll work. Thank you for a great recipe.
OH MY GOODNESS! This bread is incredible. Made it Sunday and have spent two days trying to avoid making it again- i’m afraid i will eat all 4 loaves.
FYI- There were only 4 of us for dinner, so i halved everything and it worked beautifully. Made two loaves.
So yummy!!!!!! This!… need to make ASAP! Thank you for this recipe and for simplifying something intimidating. WELL DONE!
I see your dough in an Ankarsrum mixer in your recipe pictures, How do you like the mixer? Would love your 2 cents, please?
I have been eyeing one for a long time and my birthday is next week, my husband is wanting to gift me one, I just need reviews to know if it’s worth the investment. I own a Bosch and have been wanting to add a sifter attachment to it. But with an Ankarsrum I don’t know if a sifter is available, or if with our without that, the mixer alone is worth it.
Good question on the Ankarsrum! (I don’t believe it has a sifter attachment) I like it. I actually keep it on my counter, which is saying something, and I’ve been making most of my bread recipes in it. There is definitely a learning curve to using it. I don’t use the dough hook at all. I mostly only use the dough roller and scraper (you use both of them together). The plastic bowl with whip-type attachments hasn’t worked out great for me – I think I stripped the gears out making basic cookie dough? But it has worked fine for really thin mixes like egg whites or whipped cream. I definitely wouldn’t get the Ank for the plastic bowl set up. It shines definitely in bread making and does a way better job with small batches of dough than the Bosch. If you already own a Bosch, the real value added with the Ank is small batch dough making (I don’t think the Bosch is great at this), but it may not be totally worth the high price tag just for that? I also have a Bosch and still use my Bosch for large batches of cookie dough and for some of my go-to dough recipes that I’ve always used the Bosch for. If I didn’t have any stand mixer, I’m not sure the Ankarsrum would be my first choice – I’m a loyal Bosch fan through and through, although I don’t think there is a perfect stand mixer out there. I wish the Bosch did better at cookie dough (the cookie paddles are ok but break easily and the dough hook doesn’t cream butter very well). And I wish the Ankarsrum had a better solution for cookie dough. I have used the roller/scraper set up in the Ank for cookie dough and it works pretty well, but I think I tend to over mix it.
Thank you so much for your reply and insights. It helped me so much to know what the strengths would be. I ended up getting it and I really really love it! For cookies I also tend to over mix them, but the roller and scraper are awesome tools. I love that I can make whipped cream in the plastic bowl and the lid prevents me from getting a cream facial. All in all I am SO happy with it and this twisted croissant bread…. I need a moment of silence to celebrate how amazing it is.
Thank you for all the recipes and life advice and musings that you share.
Hi, I really want to try this. I just made your french bread roll today!! However, i have a question please. I live in a tropical country where it is 32 deg Celsius all the time. So for the 2nd rise, I’m worried the butter will melt if i let it rise at my room temperature of 32 deg C. Can I let it rise in the fridge slowly and put it in the oven directly to bake it? Thank you very much!
Yes, you can definitely do that!
Thank you! I will try and report back!
This looks amazing! I have one question, ( probably you’re going to cringe), can you make this with frozen dough?
I haven’t tried that to know if the structure of the frozen dough would work with the butter, but it’s worth experimenting. Good luck if you try it!
Mel!!!!!!! Wow you have outdone yourself! I’ve already made this twice and have plans to make it again this week and next for friends having babies. Your directions are so easy to follow—especially the pictures. Thank you!!!
My first time to try a bread like this, and it was amazing! It was easy, and I really appreciated your video on Instagram on how to fold it. I just keep it on repeat while I was making it. I am SO excited you are going to have a chocolate version! Thanks Mel! Amazing bread!
About how long do you suggest to do the second rise?
It depends on the warmth of your kitchen, but I let my bread rise in a fairly cool spot so the butter doesn’t melt, and it rises for right around an hour, maybe a bit longer.
I don’t usually review recipes at all, but this is by far my favorite bread recipe! I made it for some neighbors yesterday and it was so delicious in making it again for my own family for dinner tonight. So easy and so delicious.
This bread is insanely good. Decadent, buttery, and honestly smashing that butter into a sheet was very fun. I sliced it and served it to guests with even more butter, a thinly sliced radish and some flaky, seasoned salt. It was seriously so good. We all were freaking out about it.
I literally just pulled my first go at this out of the oven. All I can say is WOW!!… next level WOW. All the steps in the recipe make it seem intimidating… bit no. Do it!! Do it now.
Your family will rise up and call you blessed.
Would like to try this bread for husbands bday- would it work for your banh mi sandwich?
Because of all the layers and twists, I don’t know how this bread would fare for sandwiches – especially a sturdy sandwich like the banh mi subs. I’d probably recommend against it (as much as it pains me because this bread is so delicious).
AMAZING!! I couldn’t believe I managed to do this! The recipe was so straightforward and the pictures were so helpful. I feel like a freaking baking rockstar.
MAKE THIS RECIPE NOW!
I decided to take a risk and make this with dairy free butter (country crock plant butter cubes) since my son has a dairy allergy. It still turned amazing! I can’t even imagine how good it will be with real butter!
Yum, yum, YUM!!! This is a lovely looking and delicious tasting bread!!
Best bread I’ve made in a very long time and I make Mel’s breads all the time. My teenage boy’s comment, “This is like a croissant, only way better because it isn’t dry.” The buttery goodness and taste is throughout the bread which gave it such a great texture and taste. Is it a croissant? No, but it has some similar steps to give you that buttery taste and some flaky texture without all the work of a croissant. Next time I’m going to add some garlic and herbs to my butter!
Made it twice already and it’s amazing. My kids say it’s their favorite bread now – even better than the pull-apart bread receipe which is SAYING SOMETHING.
I put a little extra salt on one of the loaves when it was hot and buttery out of the oven and it really made it something special.
Oh my!!! This bread is easy to make and delicious to eat! I made it for Sunday dinner and my family raved. You don’t even need to spread any butter on it. It is possibly the best bread/roll I have ever had. Thank you so much Mel! You are the best!!!
The last time I left a review was on Spaghetti Pie like 10 years ago but I just couldn’t leave this page without begging every baby pastry chef and/or baker to make this recipe. Holy moly *chefs kiss*.
Haha, this made me laugh. Thanks, Kirsten!!
Thank you for such clear instructions and such a DELICIOUS recipe!! Start to finish in two hours, and easily the most delicious bread I’ve ever made.
Yay! Thank you!! So happy you loved it.
Have you tried freezing a loaf?
I haven’t, but considering croissants freeze well, I think it should freeze just fine!
Oh my word. This. Bread. I just can’t even. I juuust took it out of the oven all warm and buttery and tried it. I am I bread heaven. So delicious. It was very easy, made it in just a few hours in time to eat with our lasagna. I let my bread machine do the kneading. Only issue was my parchment paper sticking badly to the butter layer. I was going to make a sourdough boule for my child’s teacher for teacher appreciation week, but now she’s getting these buttery babies! Thanks as always Mel!
Thanks for the review, Renee! About the parchment, what brand were you using out of curiosity?
Felt like I was on the Great Bristish Baking Show while prepping my butter packet!! I never question what to do with your recipes, you always provide so much detail which I appreciate SO much. No guess work! The bread was delicious, but I knew it would be!! Thanks Mel, for yet again another amazing recipe!!
Haha, you and me both! Thanks, Sarah!
Thanks Mel for another delicious bread recipe! Thanks to you we have homemade bread more often than store bought in my house. Whoever commented below that this is not easy did not make it. The only reason there are a lot of steps is because you are so great at providing enough instructions so that even the most inexperienced home cooks are successful. Love all your recipes and love reading about your sweet family and your little farm!
Thanks, Amanda! The recipe did end up being long but I was really concerned about providing layers of details to help anyone who wanted to try it. Appreciate you!
I’m not sure why it says to preheat the oven several hours before you bake the bread. Is step #17 correct?
If you are letting the bread rise in the refrigerator then you can preheat the oven closer to when the bread bakes.
This looks amazing and so easy. Can you also use this recipe to make croissant rolls instead of loaves?
I think you could definitely try that!
Hi Mel! I am excited to try this recipe! What caught my eye was the soup in the picture with this bread! Is that recipe available? I use your website about every night for family dinners! Thank you for all you do!
It’s this pressure cooker lasagna soup (I used tri-color rotini): https://www.melskitchencafe.com/pressure-cooker-lasagna-soup/
Hey Mel!! This recipe looks amazing! I often use your website to make my family meals each night!
I can’t wait to try this, but I would love to know the recipe to the soup that is in the picture with this bread! Looks so yummy.
Wowza. So buttery and delicious. Flaky and chewy. Everyone raved about it. I was nervous about the butter packet because the post is a little confusing but the video on Instagram helped me a ton!
I’m so happy to hear it worked out well for you, Leah! Thanks for taking the time to let me know!
Bread is my downfall. I could eat it all day, every day forever. Bless you for sharing this
Same, Christine, Same.
So. Good! My husband couldn’t stop talking about it (he never does that!) I made it as is and it’s perfection!
Yay! So happy to hear this, Kim!
Can you make half of the recipe? Any tips on making that work (size of butter packet, assuming just roll dough to approx half size?
It’s just my husband and I (recent empty nesters LOL)and I am trying to prevent us from eating all 4 loaves in a day!!!
Thanks 🙂
Hi Madeline, that’s a great question! Yes, I think you could make half. I’d make the packet about half as big (so maybe 4 inches by 4 inches) using 1/2 cup butter. And then roll the half batch of dough to a smaller rectangle.
Best thing I have EVER made! I sprinkled two of the loaves with cinnamon/sugar/butter before I twisted them then topped them with glaze. Yum!
Oh wow, YUM! What a great idea!
My sister made this and said it was so delicious I had to try it. So I’m making it today but I have a little family, just me and my husband and two little toddlers. I thought I would try to half the recipe. Would the dimensions of the butter packet change?
Hi Heather, I haven’t halved it myself yet, but yes, I would make the butter packet smaller (maybe 4 inches by 4 inches) and then roll out the half batch of dough to a smaller rectangle since you’ll just be cutting it into two pieces at the end.
Love it! Perfect compliment to a snowy soup dinner night. It was easy and a really big hit. Thank you!
Thanks for letting me know, Britney!
Made this tonight as a splurge (don’t usually use a pound of butter or all white flour in our bread) because I was taking dinner to someone. It was so delicious! I couldn’t stop eating it. Easy to make. I didn’t have have any parchment paper, so I used a gallon zip lock bag (didn’t roll out the whole width) and cut the bag off.
I agree, it is a splurge! But what a fantastic bread to take to someone else. And brilliant thinking on subbing ziploc bag for the parchment!
Easy peasy nice and easy….made this for dinner….buttery and flaky. (590g for 4 3/4c flour per my Alexa (4am grams were not posted)) Sunday I will use this with garlic butter for macaroni.
Thanks for the recipe and for posting during a snowy day in NY.
L❤VE this site as I have prepared so many recipes as I can’t cook Italian everyday so this breaks up the week tremendously and the refrigerator bran muffins and healthy banana bran muffins are in the morning mix…thanks for the great recipes and tips. ☺
Hi…so I got up and started reading my email but already knowing I was going to make buttery cornmeal crescents for dinner because I am making chili….then I saw this email and thought I will make this instead. Could not be easier than what is written (although I think the grams of flour are off as
4 3/4c=590g, I had to do the math as the grams were not there at 4am). This was actually very simple to make with the given instructions and the layers are there. They are so buttery and flaky (no chili for me I will stay in carb overload today!).
Thanks for sharing this fabulous recipe (fyi I will make again for Sunday dinner but will be using garlic butter instead of reg butter as Sundays are macaroni days).
Thanks ☺
I’m glad you liked this bread! Thank you! I use 142 grams of flour per cup in all my recipes/recipe testing (other sources use different amounts – I always recommend using the weights given in a specific recipe as hopefully it’s been tested that way). So the 4 3/4 cups of flour for this recipe is 675 grams (I apologize the weight measure wasn’t on there early this morning!).
Oh goodness no problem on weight amount I can always figure it out. Interesting you use 142g per cup as I always use 120g for flour and I did have to add a bit more flour using 120g in this recipe also when making others I need to add a bit more as well.
When looking at flour weights I notice they jump around from 120 to 160 per cup (makes me feel like I am in school again) based on the density of the product. Thanks for clarifying the dilemma, I imagine that’s why I am not the professional.
Happy cooking!
I’ve made SO many recipes of yours over the years, this is my first time commenting!! I needed an appy idea for a monthly supper I do with several friends (we all bring one course) and the rule is we all try a new-to-us recipe. This is perfect timing! I’ve got it rising in the fridge so I can bake it just before supper.
Thank you SO much for all the pictures. I think having done it once the rolling and folding will be simple next time but it sure was helpful to have the visual aids the first time through. Cant wait to taste it!
I hope you love the end result, Danae!
I made this already and am on the second proof! Maybe I’m missing it, but what temperature do I cook this at?
Also, whenever I make something my family hasn’t had before, they’ll ask if it’s a Mel’s recipe. If not, they automatically complain!!
Sorry! It’s hidden up there in #17. Bake at 375 degrees (or 400 if you want more golden crackle…each oven is a bit different). I’m at the doctor but when I get home I’ll make the baking temp more clear in the instructions!
Did you use 675g of flour? I made this today and I used 590g for 4 3/4c of flour.
Instructions have been updated to say 675 g flour.
I woke up this morning to a snow day, saw your email and started baking. It’s about to go in the oven and I’m already drooling
Mel!
You know I’m one of your biggest fans EVER, but are you drinking too much lemonade these days. I love your recipes but girl, this may be a fabulous recipe, but it is not easy ! I thought after I read step 23, I would have read a disclaimer from you saying “ok, so not so easy, but worth the extra effort “! Just sayin.
Still a loyal fan of yours for so many reasons other then all your great recipes !
Linda T.
Easy is relative, I guess! I just meant “easy” in the sense that it’s far easier than croissants (which I kind of explain up in the post). But yes, I wanted to make the instructions crystal clear so there’s a lot of them!
Thank you so very very much for sharing your wonderful recipes with all of us in this world of feeding our families. This recipe looks so amazing. I can hardly wait for this afternoon to get here when I can pull these out of the oven. I know it will taste so delicious!!
Can’t wait to hear what you think, Sue!
Could you please give weight for flour? Trying to get it right,.
Sorry about that, Bev! Meant to add them when I posted but the late hour made me forget. Just added the weight for butter and flour.
Thanks, Mel! You’re the best!
I saw this recipe before I got out of bed this morning and thought “I have to try that!” So now my bread is rising and butter packet is chilling. I have also made croissants exactly 1 time and while it was satisfying that I COULD, it WAS a lot of work. I’m so excited to try these as a much simpler process with the same flaky, buttery results!
I’m assuming the baked loaves freeze great like you say in the comments of the breadstick recipe this was based off of. Please let me know if that’s not the case.
And I would like to echo my thanks for all your hard work in perfecting these recipes! When I was first married (20 years ago this May!), I didn’t know many recipes and hadn’t cooked a lot – I grew up on a dairy farm with no brothers and was always doing outside work vs. inside. Now, I have passion for baking/cooking for my family and friends (especially freezer meals with 3 active kids and not always time to cook every evening but always wanting to get a homemade meal on the table) and have even my own side business selling freezer meals! Your site is the BEST – both in delicious recipes but also where I don’t have to shop for things that I will only use for one recipe. I ALWAYS tell others about your site and can’t say enough good things about it! Thanks a million Mel!
Hey Jenn, thanks for such a sweet, heartfelt comment. I LOVE hearing more backstory to those of you who end up here – and love that you spent your youth outdoors working hard and have now cultivated an interest in baking/cooking and even have a business revolving around that. AMAZING. You are amazing. Thank you for your kindness. To be honest, I haven’t frozen this bread yet because I’m not kidding when I say it is devoured lightning fast around here, but it should freeze just fine!
Thank you! The pans just came out of the oven…AMAZING!! This is now my go to for light, fluffy, and buttery!! You were right on the kitchen smelling amazing too. Tastes like a croissant but SO much easier to make!! I’m now left feeling like a rock star – AGAIN – because of your recipes!! Thank you!
Wow I am so excited to try this! But the most important variation question is this – how can we make them into *CHOCOLATE* twisted croissant French bread loaves?? After years of struggling to come up with a solid answer, I declared chocolate croissants my favorite food and have never since wavered in my devotion lol.
Haha, that made me laugh, Charlotte. Never waver from that devotion! 🙂 I’ve had the same thought about chocolate. I haven’t tried it so I can’t say for sure how it would work, but I’m hoping someone attempts it and reports back!
Mel, I’ve been thinking about trying to make croissants for a long time but have felt intimidated. Once again, you have made a complicated recipe accessible for us “regular folk” – with a unique twist on tradition. I’m so excited to try this.
I was just telling my husband yesterday that finding your blog has actually been life-changing. I used to always stress over finding good recipes and would so often be disappointed with how the food would turn out. But in the last 6 years, I’ve been following your well-detailed instructions and making your recipes that knock it out of the park every time! I’ve learned so much about cooking and I honestly LOVE to cook and bake because of you. My family loves your recipes and I tell everyone about your blog.
Thank you for all your hard work, testing and tweaking the recipes, giving great instructions and guiding us through each step with pictures and explanations. Your work has brought me so much joy! Many, many thanks!
I can’t wait to try this recipe!!!! Much love to you and your family from ours.
Jill, I echo everything you just said about Mel and her wonderful recipes. I couldn’t have said it better. A gazillion thanks Mel!!
Thank you so much, Kelli! Truly.
Me three, Ladies — I agree wholeheartedly!
I was out with friends recently, and every time cooking came up, I inevitably said something about Mel, and my friends just kept laughing. “Mel, Mel, Mel — it’s always Mel!” But for real, MKC is my first stop for any recipe search and has loads of family favorites.
Definitely looking forward to trying this bread out, Mel. Thank you for the best recipes and foolproof instructions!
Arlene – you are the sweetest! I think you may be one of the most loyal readers over the years, and I sure appreciate you!
Aww, that’s so kind of you to say, Mel! I’m definitely a die-hard MKC fan! I screenshot it and sent it to my othe4 friend who adores you as well, and we were fan-girling over your reply. 😉 😛 😀 Haha, thanks for everything you share with your internet readers. You’re the best!
Jill – my goodness! Thank you for chiming in first thing this morning with such a sincere and absolutely heartwarming comment. It honestly brought tears to my eyes and meant so much to me. It’s hard for me to express how much I care about the content I put out here on the internet. I don’t take it lightly! I know not every recipe will be a success for everyone, but it is highly important to me that the recipes I offer to the world are tested and *nearly* foolproof because I know what it’s like to be a busy wife/mom/woman who needs tried-and-true recipes. Food is a love language for so many of us and can bring so much joy. I’m so grateful to know this space has brought you happiness over the years. That is literally the highest compliment anyone could ever give me. Thank you, thank you.