Easy Rustic Crusty Bread with Tutorial {No Mixer, No Kneading}
This homemade rustic crusty bread is the most delicious bread that will ever come out of your oven! No kneading or a stand mixer required!
This is the bread recipe that can change your life. I’m serious. Just scroll down and read through the comments and then you’ll believe me. Here are a couple comments among hundreds of rave reviews:
One of the best bread recipes I have ever made! A real favorite with my family and excellent for sandwiches. Super easy!
I made this recipe for the first time this past weekend and it turned out perfect! It truly was an incredibly easy recipe to follow.
This is the first bread recipe i’ve ever successfully made! It’s delicious and so easy I used active dry yeast, and the working with yeast tutorial was a huge help! great recipe, Mel.
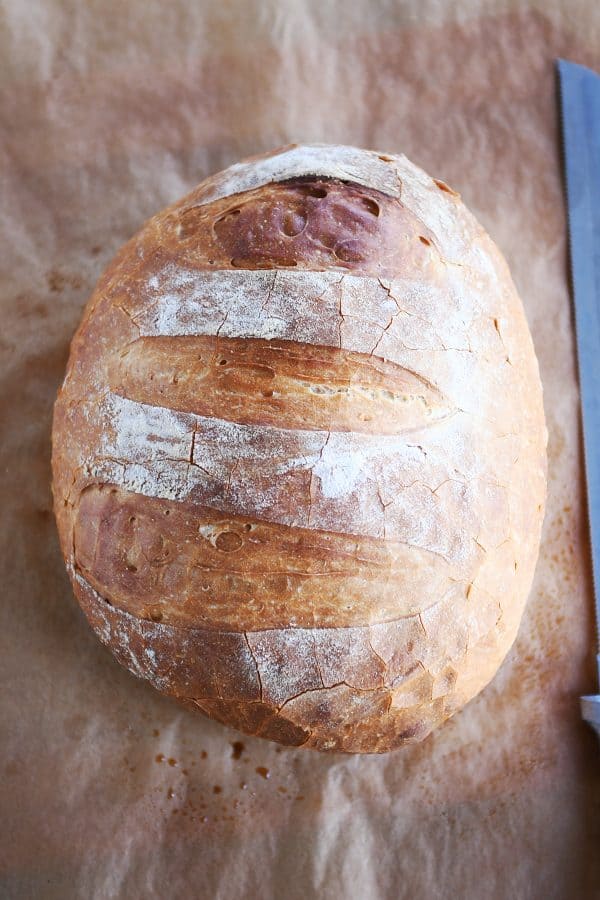
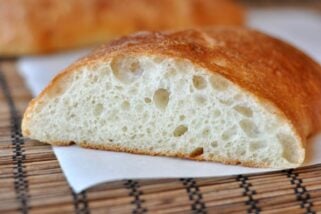
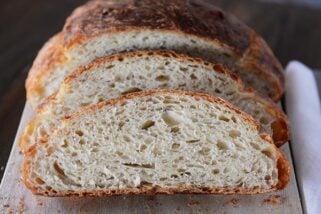
This rustic crusty bread recipe is perfect for beginning and expert bread makers alike. It’s like a perfect loaf you’d get right out of a bakery – for a fraction of the cost. Many artisan-type loaves of bread like this take days to make, but this bread recipe only takes a few hours!
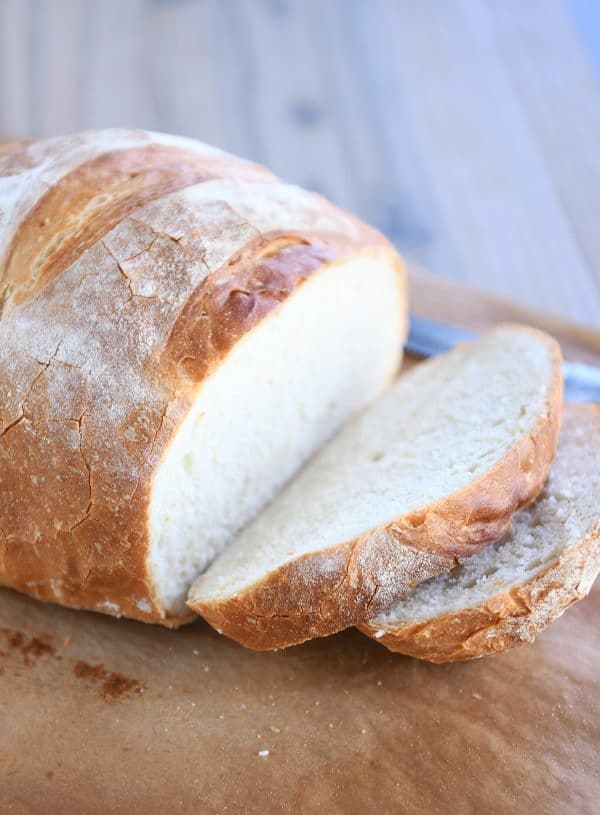
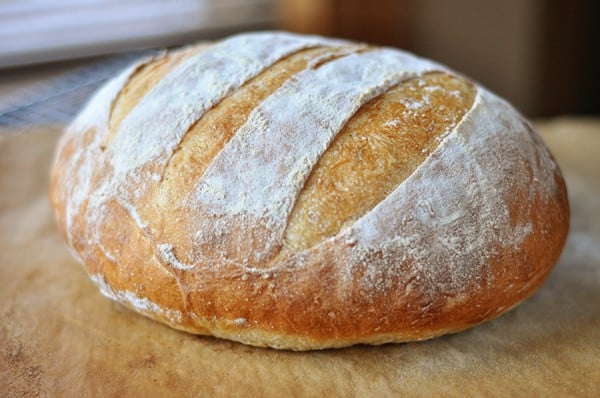
And you won’t believe how easy it is. Not only is it no-knead, but you don’t need a stand mixer, electric mixer or any kind of mixer to make it. Just a bowl and a spoon. From start to finish, it is ready to bake in about 2-3 hours. The crust is golden, thin and crunchy, and the crumb is tender and soft.
It doesn’t have the airy holes of a no-knead type bread, the crumb is tighter and slightly more dense, but it is glorious for paninis, garlic bread or just served plain (think: tear off chunks as you go!) with a wide variety of meals.
The recipe makes between two and four loaves, depending on how big you want to make them. I usually make two bigger loaves out of the batch, and I like to bake up both loaves the same day and pop one in the freezer for easy access next time we get the hankering for delicious, crusty bread.
How to Make Rustic Crusty Bread
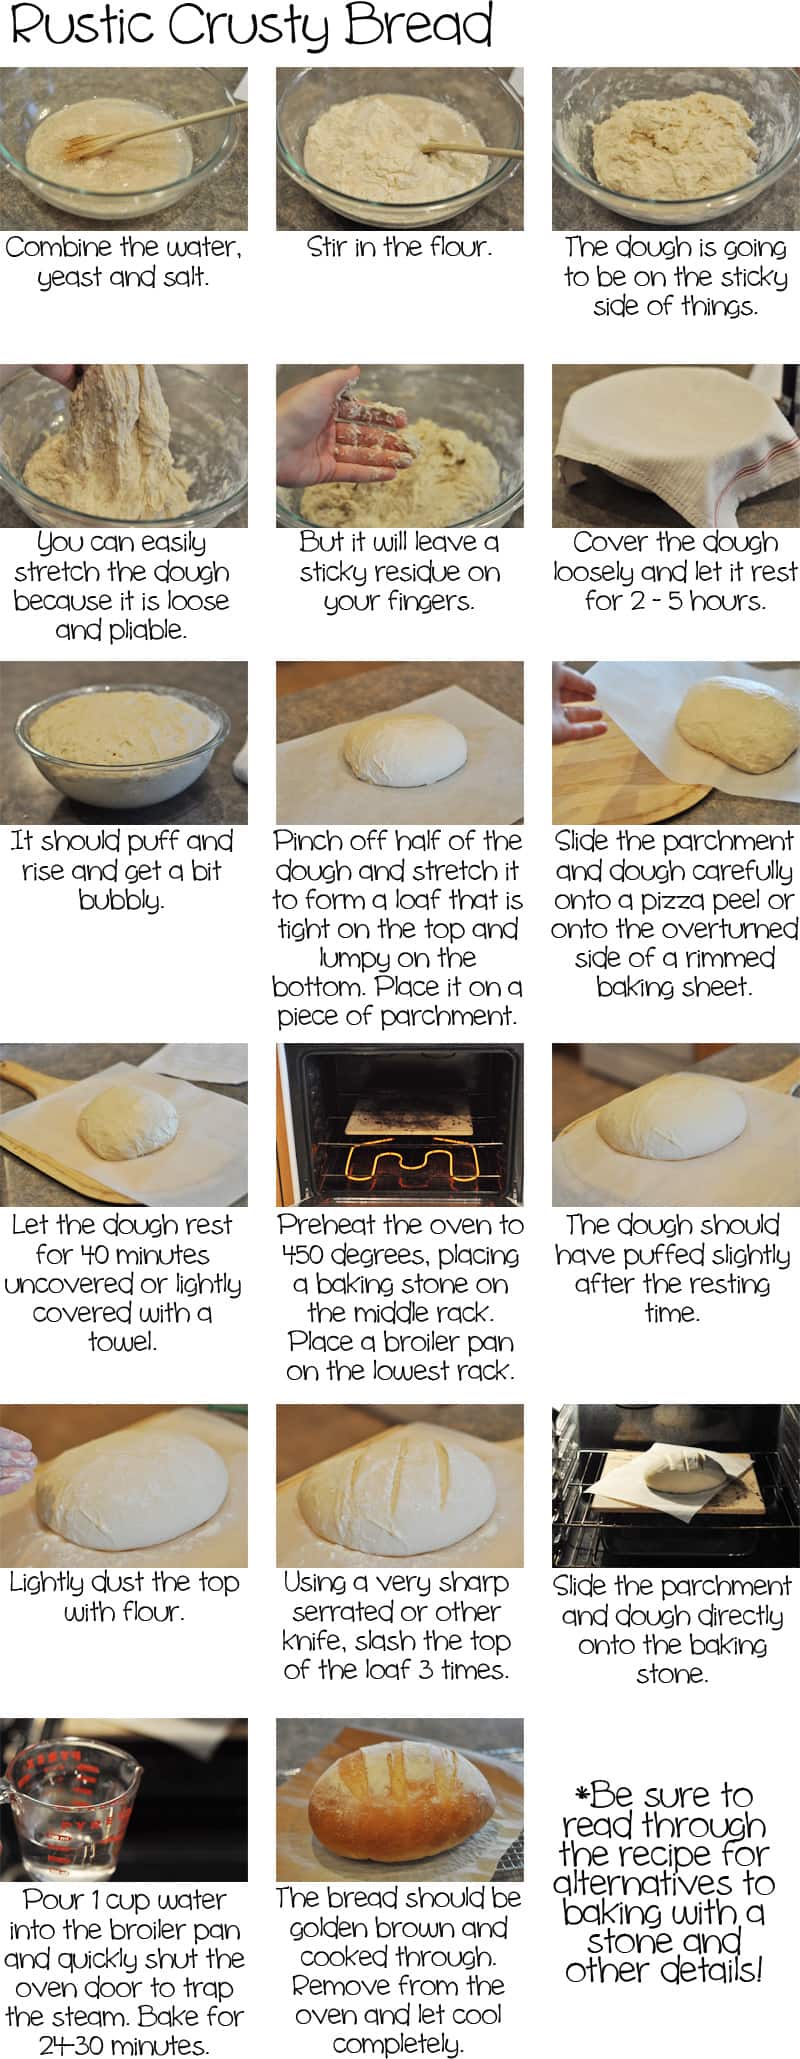
In a large bowl, combine the water, yeast and salt. Give it a little mix. And then add in the flour. Make sure to measure the flour with a light hand (or use the weight measure). You can mix with a spoon or spatula; I have been converted to the wonders of this Danish dough hook {aff. link}, but eventually with this dough, I get in there with my hands and mix it up the rest of the way.
The texture of the dough will be shaggy and much softer and stickier than a traditional kneaded bread dough. Make sure there are no pockets of flour and the dough is well mixed.
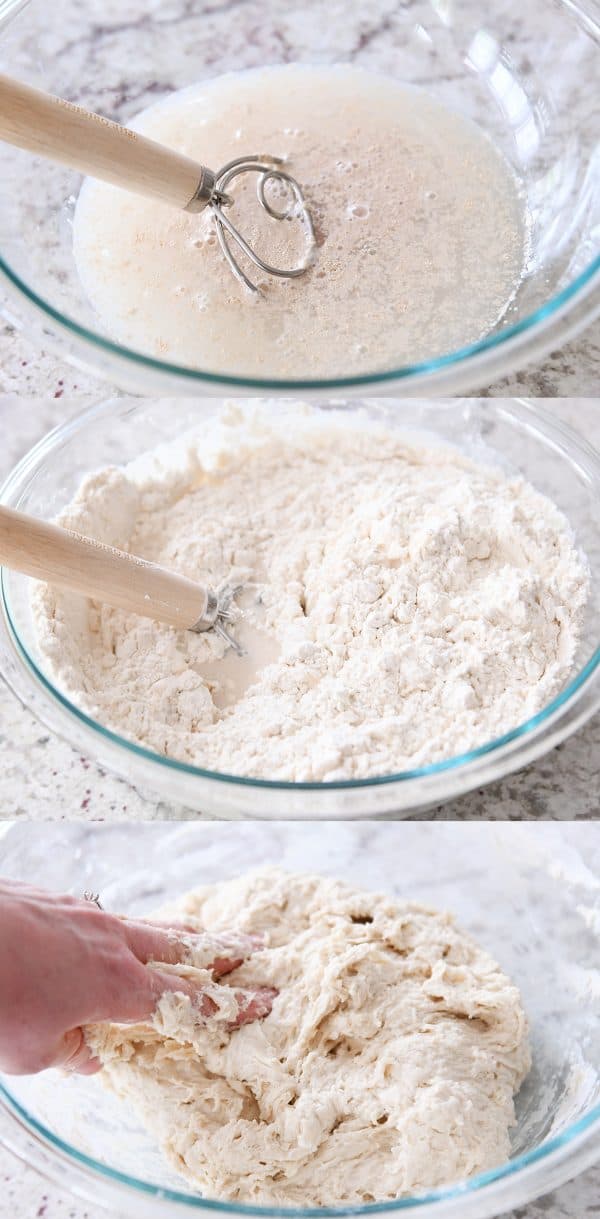
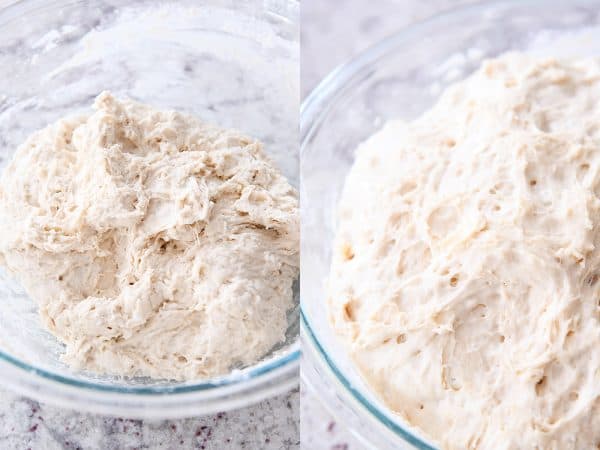
Cover the dough right in the bowl and let it rise until puffy and doubled.
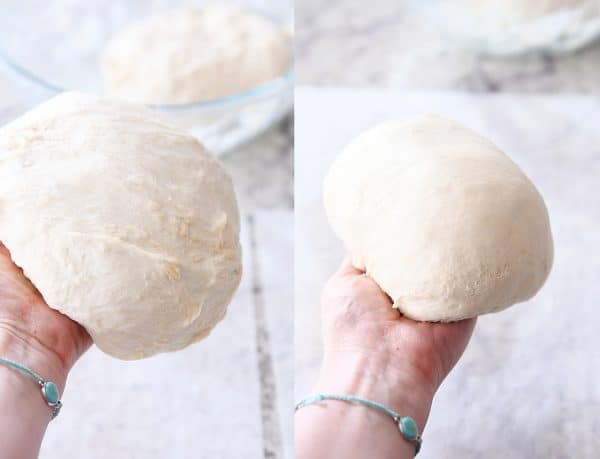
At this point, to shape into loaves, I grease my hands really well with cooking spray and split the dough into two pieces (you can make four smaller loaves out of the batch, if desired). Take one of the pieces and work it in your hands, turning the edges underneath until it’s a relatively tight, smooth loaf. Regrease your hands if the dough is super sticky.
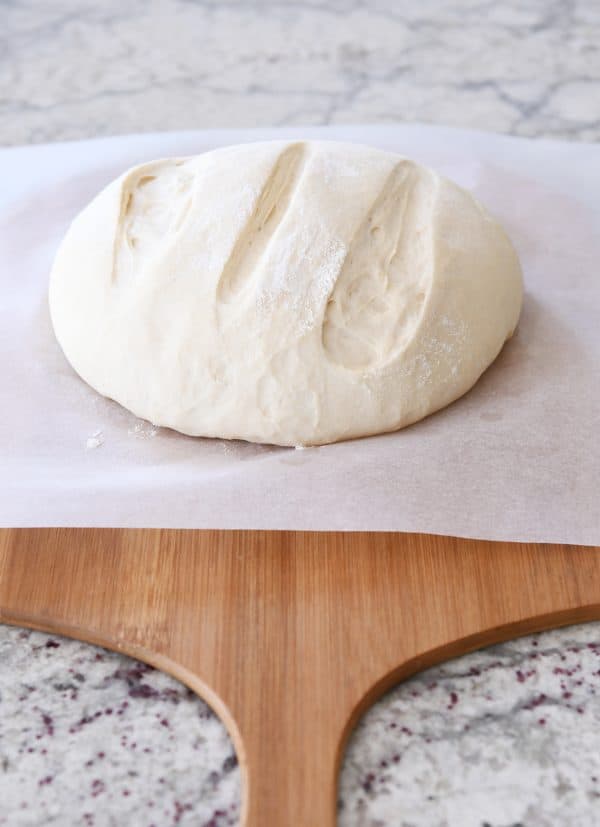
Place each loaf in the center of a piece of parchment paper and dust the top lightly with flour. Using a baker’s lame {aff. link}, razor, or really sharp knife, slash the dough 3-4 times on top, about 1/2-inch deep or so.
When I originally posted this recipe, I waited to slash the dough until after it had risen, but this sometimes causes the dough to deflate completely (especially if you don’t have a really sharp razor or knife), so I’ve started doing the slash action before it rises. Haven’t looked back. Works great and you still get the definitive, pretty “decoration” on top of the loaf as it bakes.
Cover the dough and let it rise until puffy (it won’t necessarily double in size).

Carefully slide the parchment with the loaf on top onto a baking/pizza peel {aff. link}. I suppose now is the time to mention that you want to preheat a baking stone {aff. link} in the oven to 450 degrees F and let it preheat at that temp for 20-30 minutes before baking the bread. If you don’t have a baking stone, you can try preheating an overturned aluminum baking sheet (although it may warp and bend out of shape a little at that temp, so be careful).
I highly recommend both a pizza peel and a baking stone for this recipe. Totally worth it for this bread alone.
Once the baking stone has preheated long enough, carefully slide the parchment and bread onto the baking stone. Note: I have never had parchment paper catch fire in the oven using this recipe (or homemade pizza), but take care that the parchment doesn’t touch the heating element or sides of the oven. Also, I think the thinner/cheaper the parchment paper, the more chance this could happen.
You can put a broiler pan on the bottom of the oven and add 1-2 cups hot water OR you can toss a few ice cubes onto the bottom of the oven right after sliding the bread onto the stone and then quickly (but gently) close the oven door. The steam from the water is going to help create that beautiful crust.

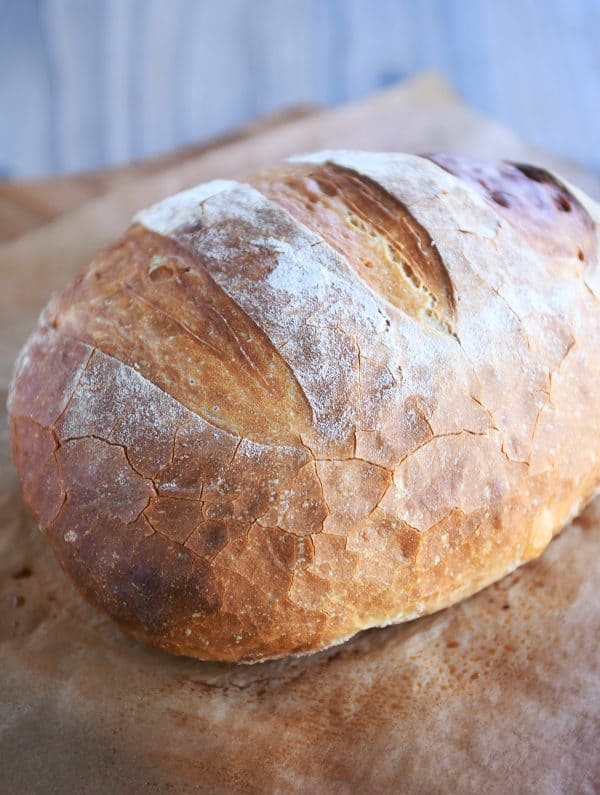
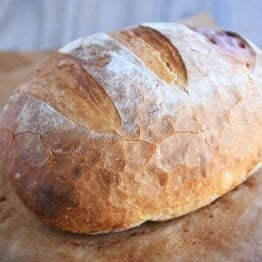
Bake the bread for about 25 minutes, give or take. It’ll puff even more in the oven. Look at that golden crust! Wowser.
This rustic crusty bread is my go-to bread to take to new neighbors, friends in need of a pick-me-up or when I am taking dinner into someone, and I make it several times a month just for our family to enjoy. It really is a life changing recipe.
I hope you’ve been able to see just how easy it is to make! I have no doubt you’ll feel like a total bread making rock start after you make this rustic crusty bread!
Equipment for Rustic Crusty Bread
While this bread doesn’t require a stand mixer, I’ve found the following to be helpful, especially if you want to ensure perfect crusty bread every time! Affiliate links for the products below.
- Baker’s lame (for slashing the bread)
- Parchment paper
- Pizza paddle/peel
- Baking stone
- Best inexpensive, bread knife ever
- Optional: Danish dough whisk
Easy Rustic Crusty Bread
Ingredients
- 3 cups warm water, about 100 degrees
- 1 ½ tablespoons instant yeast
- 1 tablespoon salt, I use coarse, kosher salt
- 6 ½ cups (923 g) unbleached, all-purpose flour, plus more for dusting dough (see note)
Instructions
- In a large bowl mix yeast and salt into 3 cups lukewarm water (about 100 degrees). Stir in flour, mixing until there are no dry patches. Dough will be quite loose. Cover lightly with a kitchen towel but don’t seal the bowl airtight. Let the dough rise at room temperature 2 hours (or up to 5 hours).
- Bake at this point or refrigerate, covered in an airtight container, for as long as two weeks. When ready to bake, cut off a grapefruit-size piece with serrated knife (I have only ever made two loaves out of the batch of dough so I just divide the dough in half to form my first loaf). Turn the dough in your hands to lightly stretch the surface, creating a rounded top and a lumpy bottom. Put the dough on a piece of parchment paper set on a pizza peel or a rimmed baking sheet turned upside down.
- Slashing: you can dust the top of the dough lightly with flour and slash now (before rising) or wait until after the loaf has risen. I’ve found waiting and slashing the dough after rising can sometimes cause the loaf to collapse, so after making this bread for years, my preferred method is to dust the top of the loaf lightly with flour at this step, before rising, and slash the top with a baker’s lame or sharp knife 3-4 times.
- Let the dough rest for 40 minutes for room temperature dough; if you have used the dough out of the refrigerator, let it rest for 1 1/2 hours. Repeat with remaining dough or refrigerate it.
- Place a broiler pan on the bottom rack of the oven (if you don’t have a broiler pan – no worries! Tossing 5-6 ice cubes in the bottom of the oven when you put in the bread works really well, too). Place a baking stone on the middle rack and preheat oven to 450 degrees. Heat the stone at that temperature for 20 minutes before baking.
- After the dough has rested and is ready to bake, if you haven’t already (see step #3), dust the dough lightly with flour, slash the top with serrated or very sharp knife three times.
- Slide the dough (with the parchment paper) onto the baking stone. Pour one cup of hot water into the broiler pan (or toss 5-6 ice cubes in the bottom of the oven) and shut the oven quickly but gently to trap the steam. Bake the bread until well browned, about 24-28 minutes. Cool completely.
Notes
Recommended Products


Recipe Source: adapted from The New York Times via Jeff Hertzberg’s Artisan Bread in Five Minute a Day
Recipe originally published February 2012; updated May 2019 with new pictures, recipe notes, commentary.

Made this twice and the recipe has too much water or not enough flour. Both times when I followed this recipe exactly (I weighed the flour) the risen bread held no shape. I will switch back to my original recipe takes longer but is far and away a better bread.
I have made this bread twice. The taste is wonderful and people thought it looked like a bakery bread which I condidered a compliment! Today is my second time, and it was super sticky, even though I know I measured exactly. I had to flour my hands and work surface before I could shape at all. Your pictures look so much smoother and tighter than I was able to shape my loaves. I aldo had problems with my lame making good cuts the dough was so soft. It wanted to drag and pull through the loaves.
Hi Mandy – a lot will depend on the temperature, humidity and elevation of where you live. If it is that sticky, you can add up to 1/2 cup more flour and it’ll still turn out great.
I tried this recipe a month ago and have started making my family bread with it since then! it is exceptionally successful! Thank you for sharing!
Just made this recipe for the first time…. So fast and for being minimal ingredients and wait time it turned out phenomenal!! The crumb was so light n fluffy and the outside was chewy… Whipped up some honey cinnamon butter and it was devoured in no time… Glad it makes 2 nice size loaves… My new fav and versatile go to bread.. thanx Mel!
Curious, I have a fancy Miele oven with the steam burst, any suggestions if you would recommend the water burst and how’s many?
I’m really unfamiliar with that steam burst function so you’d have to experiment but it certainly sounds promising!
I’ve been making homemade bread for decades. This is my new favorite. My 13-year-old son helped make it for a school project (what might historical bread be like). We baked one loaf one day then a second one the following day. I loved being able to pull the dough out of the fridge. Have you ever mixed in other ingredients like cheese or herbs?
That’s awesome! Yes, I’ve mixed in asiago cubes (small) and rosemary. Delicious!
Are you able to bake this is a Dutch oven?
Yes, I think you definitely could.
You’ve convinced me to try this! What is the purpose of the slashing? Is it for looks only or does it impact the baking of the bread?
It helps the bread rise!
The purpose for slashing is as the dough bakes it has gases escaping and gives it an outlet So it dnt cause a large air bubble in burst out makin ur bread look ugly lol so its a cool/pretty functional purpose 🙂
Hey Mel, I just read through the step-by-step directions, as well as the recipe before I print it off, and noticed the printable recipe doesn’t mention putting the 1-2 cups of hot water in the broiler pan, though it does suggest the ice cubes. Since I know I’ll be working off the printed version, I’ll pencil in adding the water on my copy but thought you’d want to add it to the printable version, too. Looking forward to making this delicious sounding bread!
Thank you, Liz! I’ll get that fixed.
Wow! This was so good. I made one for a neighbor and kept the second one for my family and could not have been more pleasantly surprised at the ease and deliciousness of the bread. Loved it! (My neighbor actually told me I should start a bakery! Making the us rockstars in the kitchen).
Way to go, Carissa!
Hi Mel – can I bake this in a regular bread tin or alternately shape as a longer loaf more of a rectangle shape than the round? Thanks..
Barry
Yes to both!
thanks Mel for responding.. great help.
This might sound like a very dumb question, but with the ice cube method, do you mean literally just put the ice cubes in the bottom of the oven? Like, touching the oven itself?? Sorry if this is a dumb question I was just very confused lol
Yes, that’s what I mean! (Not a dumb question) It’s best to consult your oven’s user manual to make sure they don’t recommend against it (I’ve done it dozens of times with no problem but others have expressed concern because of their particular ovens).
Hi. I’m new to bread making. Mine came teasing very good, good texture, but flat. Like an inch and a half high. What did I do wrong?
Sounds like you might need a bit more flour to help it rise up instead of flattening.
Veeery good
I was looking for a great recipe to share with my blog readers as we actively celebrate the Last Super today! I love how you share your preferred method, but also offer work arounds for those of us who don’t have all the same tools. I look forward to pointing some new readers to you page!
The penultimate photograph of your recipe has a caption, with text, saying “Bake for 2″?”40 minutes”. My question mark refers to a symbol which could be a 4, or a distorted +. Or is it an “H”?
Kindly explain what that symbol is, and what it means.
Bottom line – “Bake for” how many minutes?
Thank you.
Ian Walsh.
I don’t know what symbol you are talking about, sorry, but the bread bakes for 24-28 minutes.
Great recipe and the directions were so easy to follow thank you so much for sharing. I will be experimenting with it and adding herbs and spices. Mine was a little too sticky after first rise so I just added some more flour into my hands as needed,
I’ve been hunting for a great bread recipe for years. This is it. Nice crust, nice crumb. Great for sandwiches and makes a wicked peanut butter toast.
The only thing I did differently was to spray the loaf with water after about 5 minutes in the oven instead of the ice cube/water method. Works just as well without excessive steam.
Thanks for the recipe!
For starters, I’d like to make dough for just one loaf of bread. Could you give me the amount of ingridient for one loaf of bread? Please.
You could try cutting the recipe in half.
Hi!
Can I use bread flour instead of all purpose?
Yes
Do you have similar recipe for 12 grain or a rye bread? Or how could I adjust using those flours?
I’m not sure; I haven’t tried it with those flours so I don’t know. Sorry!
New to baking here. What does “turn the dough mean?
Will using enriched bleach flour make a big difference?
Thank you!!
Different flours can affect the outcome, but bleached flour will probably work fine. By “turn the dough” it means to hold the dough in your hands and form a round shape by folding the edges down toward the bottom.
Have been using this recipe for a bit now and continue to experiment with it. Adding chopped Rosemary, adding garlic, introducing EVOO for additional flavors and this is just a Great Recipe! Thanks Mel, and keep the recipes and tips coming!
Tim
Great additions, Tim! Yum!
HI Mel
I make this bread all the time . It’s perfect every time. It’s our favorite rustic bread
I am wondering if I wanted to add dried fruit and or nuts when would I add them.
Will affect the baking time ?
Thanks
It shouldn’t!
I added raisins and chopped pecans once it finished rising in the shaping stage then followed the rest of the instructions. It turned out amazing what a great versatile recipe . Thanks Mel
The printable recipe has no “list of ingredients” that i saw anywhere? Seems like an important thing to have on a printed recipe.
Hi Jason – what browser are you using? I can see the list of ingredients when I print so I’m not sure why that might be happening for you. Let me know and I can do some more digging.
After the past half hour or so on your wonderful, most obviously filled-with-love-and-loveliness site, mouth watering the entire time, I’ve decided that you could make the talented and creative Martha Stewart seem positively uninspired.
Wow! It’s a pleasure to have come across such a culinary artist showcasing her amazing work. Thank you!
Wow, what a fun and sweet comment. Thanks, Gloria!
I made this bread this afternoon–Fantastic! A crisp outside and as good as it can be crumb! I have baked bread for over 50 years and this has got to be the easiest, best tasting bread recipe I have ever tried. My favorite is a sourdough loaf that I’ve perfected over the years. Now I have two faves! Because I know from experience what adding buttermilk to a bread recipe will do, I exchanged one of the cups of water for buttermilk. However, next time around I will use just water and see if it makes a difference.
Thank you Mel!!!
This was the first bread I’ve ever baked and it defiantly earned all five stars! Thank you so much! I’m currently experimenting two different batches on with Asiago cheese and another with garlic paste, rosemary, and Parmesan. Fingers crossed they are as good as the normal batch.
I make this bread all of the time. Delicious bread and never disappoints.
Hollo, I’m asking for advice 🙂
This is my first time making the recipe, and I’m getting ready to take the bread out of the fridge to bake tomorrow morning. The recipe says that I should let it rest for 1 1/2 hours, but is it fine if I let it rest for more than that??
Thanks!
It really depends on the warmth of your kitchen – you don’t want it to overrise before going into the oven, so keep an eye on that.
I love this bread recipe. Super crunchy on the outside and soft on the inside. It’s delicious!!! I use the ice cube method and a pizza stone. It’s great every time! Thanks for sharing
This bread is very, very heavy and way too ‘crusty’ to cut through.
It’s a good recipe -quick and easy- but the actual bread is way too dense and heavy to enjoy.
It also has an after-taste of yeast/beer, and i hate beer.
Very disappointing after reading reviews.
It took two tries, but I got it right the second time. I had trouble adjusting the dry active yeast (I didn’t let it fully dissolve the first time) and I couldn’t shape it much because it was so sticky. Think I’ll add 1/4 cup more flour next time since it was a tad flatter than I’d like. But huzzah!
Samantha, salt kills yeast, yeast thrives on sugar…..I would use the warm water and yeast. let your yeast proof, you’ll see what I mean as it does this….wait until the have added flour THEN add your salt on top of the flour…..I have NO clue why anyone (the crowd of bakers/chefs?) write any bread recipe to add salt with the yeast…:)… I PROMISE . this WILL work for you…
I love this bread and make it all the time, it’s easy and so good ! Could I add olives to make it into an olive bread? If so when would I add the olives ?
Thanks
Cheryl
You could definitely experiment! You’d probably want to knead them in before shaping into loaves.
I’ve made this bread recipe multiple times. My whole family LOVES it!! Thank you for such a simply, yet delicious bread recipe! 🙂
One of the best bread recipes I have ever made! A real favorite with my family and excellent for sandwiches. Super easy!
Made this recipe today as my first attempt at artisan bread!!! It was delicious, easy and well loved my our family! Thanks for making bread-making a breeze.
Do you happen to have a baker’s percentage of this recipe? It would be really helpful.
So easy and so good. First time I made it with all purpose flour. Today I used half white whole wheat and half all purpose. Both yummy. Today’s crust was a bit chewier.
I have made this recipe several times and I love it so much. Its always a big hit with my family. Its a very simple recipe which it makes it so wonderful for many differant meals. Tonight its broccoli cheese bread bowls. Thank You. P
S i love your cookie recipes too.
Thank you!
Can I use bread flour?
Yes; the resulting bread will be chewier and a bit sturdier in texture.
Hi Mel, I’ve made this recipe before and was wondering is it possible to cut the recipe in half?
Hi Mel,
I seldom leave comments, but I feel that I should on this occasion.
My bread machine broke down a couple of weeks ago after 10 years of making dough, rolls and loaves.
So, I am using this as an opportunity to make loaves and rolls by hand. I have had mixed results so far.
I came across your recipe and method yesterday evening and spent some time reading and thinking. For this first attempt, I departed from your instructions after Step 2.
For my first attempt, starting at 06:45 this morning, I followed step 1 and allowed the mix to rest for just over 2-hours. At 09:00, I transferred the mix to a loaf tin and allowed it to prove for almost an hour in a Halogen Oven on Thaw. The mix rose, so at 10:00 I turned the oven to 225° C for 25 minutes hoping to get a crust. I used an extension ring to create extra space in order to avoid burning.
Half an hour later and a medium brown rough crust looked good. I turned the machine off and removed the tin. The tin has been non-stick in the past, but on this occasion, the bottom of the loaf came away – I will oil the tin before my next attempt.
However, for a first attempt I am more than encouraged. The method is the simplest and most work light method that I have come across so far. The mix stage is straightforward and short, otherwise the two hours is free time and can easily be fitted into many busy schedules.
The crust was the best I have achieved to date. The crumb was soft and springy. The taste for just four ingredients (the same as for French bread) was very good. I have now had a sandwich and toast – good results for both.
I will be adding this method to my collection of recipes of tried and tested favourites. My second attempt will be on Thursday morning using an oiled tin and/or liner.
Thank YOU!
I made this recipe for the first time this past weekend and it turned out perfect! It truly was an incredibly easy recipe to follow. My entire family loved the bread so this will certainly be my go-to recipe from now on. I do have one quick question though. Am I able to freeze the bread after baking in case I make a big batch once a month? Thank you for the recipe!!
Yes, this bread freezes great!
Hi there! Question – do we not knead this dough at all? My dough was still quite sticky after rising for 3 hours. So much so that I wasn’t able to form it into a neat ball like yours and definitely had to peel layers off sticky dough from my fingers. Otherwise, I followed the recipe and instructions exactly. Thanks!
Hi Kelly – this recipe doesn’t require much kneading. It’s possible another 1/4 to 1/2 cup flour might help your dough come together a bit better.
this is the first bread recipe i’ve ever successfully made! it’s delicious and so easy 🙂 i used active dry yeast, and the working with yeast tutorial was a huge help! great recipe, mel.
Yay! I used to bake in high school a lot (mostly out of the box kind of stuff, but I really enjoyed it) and fell out of the habit in college once I became overloaded with working multiple jobs on top of theatre and class responsibilities. I decided recently now that I’ve graduated and work has slowed down to start up the hobby that used to make me happy… Except, real baking! Not out of a box. This recipe was the first one I tried, and it was perfect! So easy to follow. Your detailed instructions were excellent for a beginner, and I appreciate that you gave alternatives for people (young beginners like me) who don’t have fancy baking stones and broiler pans. The bread was such a success. I took a loaf over to a friend’s get-together for them to try (thinking everyone would encouragingly eat a couple slices and then forget about it), and the five of them demolished the entire thing in 30 minutes! It was such a rewarding experience, so thank you for the recipe! I’ll be taking a look at your other recipes to keep learning and growing as a baker. This experience was remarkably encouraging.
Hi Mel,
What’s the difference between this recipe and your Artisan Bread recipe where you bake it in a cast iron pot? Would you say this bread would still be an artisan type bread?
It’s similar except the no-knead bread (baked in a cast iron pot) is an even wetter/looser dough, which means the no-knead bread has those artisan-looking pockets in the crumb after baking. This bread is less artisan-style for that reason. The crumb of this rustic crusty bread is tighter and not as airy/holey.
Can I use self rising flour instead of AP? And if so, do I need to make any adjustments with other ingredients? Thanks.
I’ve never tried that and I don’t know how the leavening already added to self-rising flour will affect the bread, but you can definitely experiment.
Question ?? I have made this bread several times it tastes great, however after the resting time it’s a little sticky and I can’t get it smooth on top. My bread doesn’t look the same as the pictures inside and out. What could I be doing wrong?
If you want a really smooth top, you can add a bit more flour so you can work the dough into a smoother ball.
Add the flour at the very beginning or when I take it out of the bowl
Thanks
I made this bread for Mother’s day and it was a big hit! My MIL thought I got it from the bakery. The only thing I did differently was add an egg wash before I put it in the oven, but that is a personal preference since I like the crusty crust on my bread.