Easy Rustic Crusty Bread with Tutorial {No Mixer, No Kneading}
This homemade rustic crusty bread is the most delicious bread that will ever come out of your oven! No kneading or a stand mixer required!
This is the bread recipe that can change your life. I’m serious. Just scroll down and read through the comments and then you’ll believe me. Here are a couple comments among hundreds of rave reviews:
One of the best bread recipes I have ever made! A real favorite with my family and excellent for sandwiches. Super easy!
I made this recipe for the first time this past weekend and it turned out perfect! It truly was an incredibly easy recipe to follow.
This is the first bread recipe i’ve ever successfully made! It’s delicious and so easy I used active dry yeast, and the working with yeast tutorial was a huge help! great recipe, Mel.
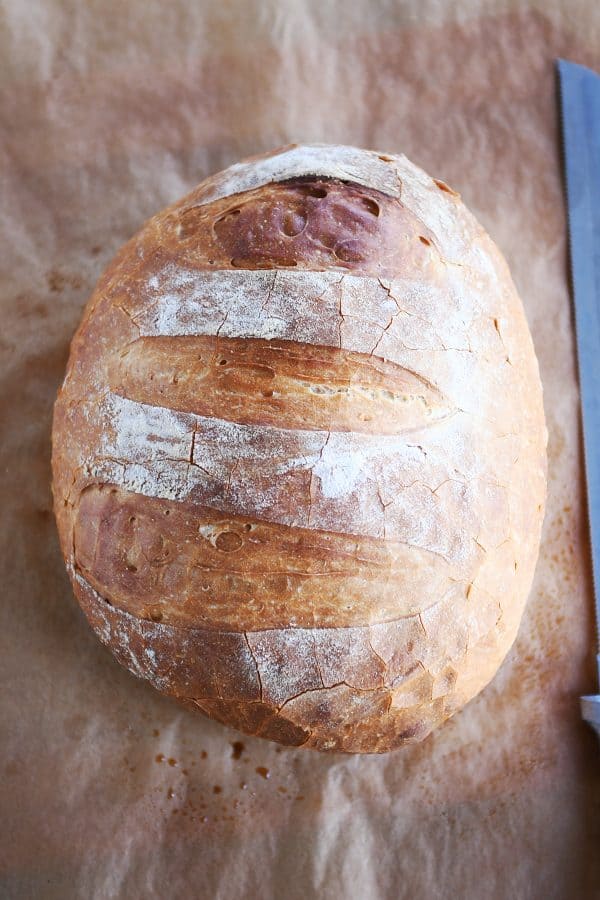
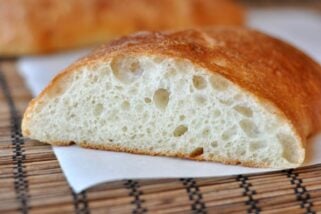
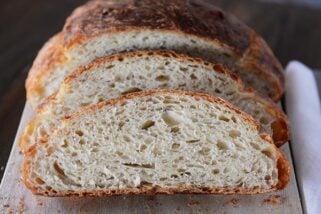
This rustic crusty bread recipe is perfect for beginning and expert bread makers alike. It’s like a perfect loaf you’d get right out of a bakery – for a fraction of the cost. Many artisan-type loaves of bread like this take days to make, but this bread recipe only takes a few hours!
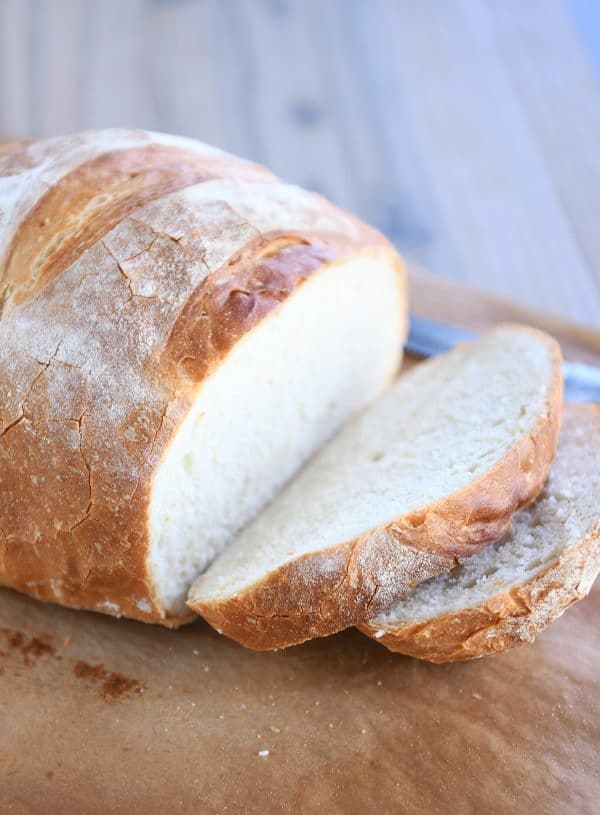
And you won’t believe how easy it is. Not only is it no-knead, but you don’t need a stand mixer, electric mixer or any kind of mixer to make it. Just a bowl and a spoon. From start to finish, it is ready to bake in about 2-3 hours. The crust is golden, thin and crunchy, and the crumb is tender and soft.
It doesn’t have the airy holes of a no-knead type bread, the crumb is tighter and slightly more dense, but it is glorious for paninis, garlic bread or just served plain (think: tear off chunks as you go!) with a wide variety of meals.
The recipe makes between two and four loaves, depending on how big you want to make them. I usually make two bigger loaves out of the batch, and I like to bake up both loaves the same day and pop one in the freezer for easy access next time we get the hankering for delicious, crusty bread.
How to Make Rustic Crusty Bread
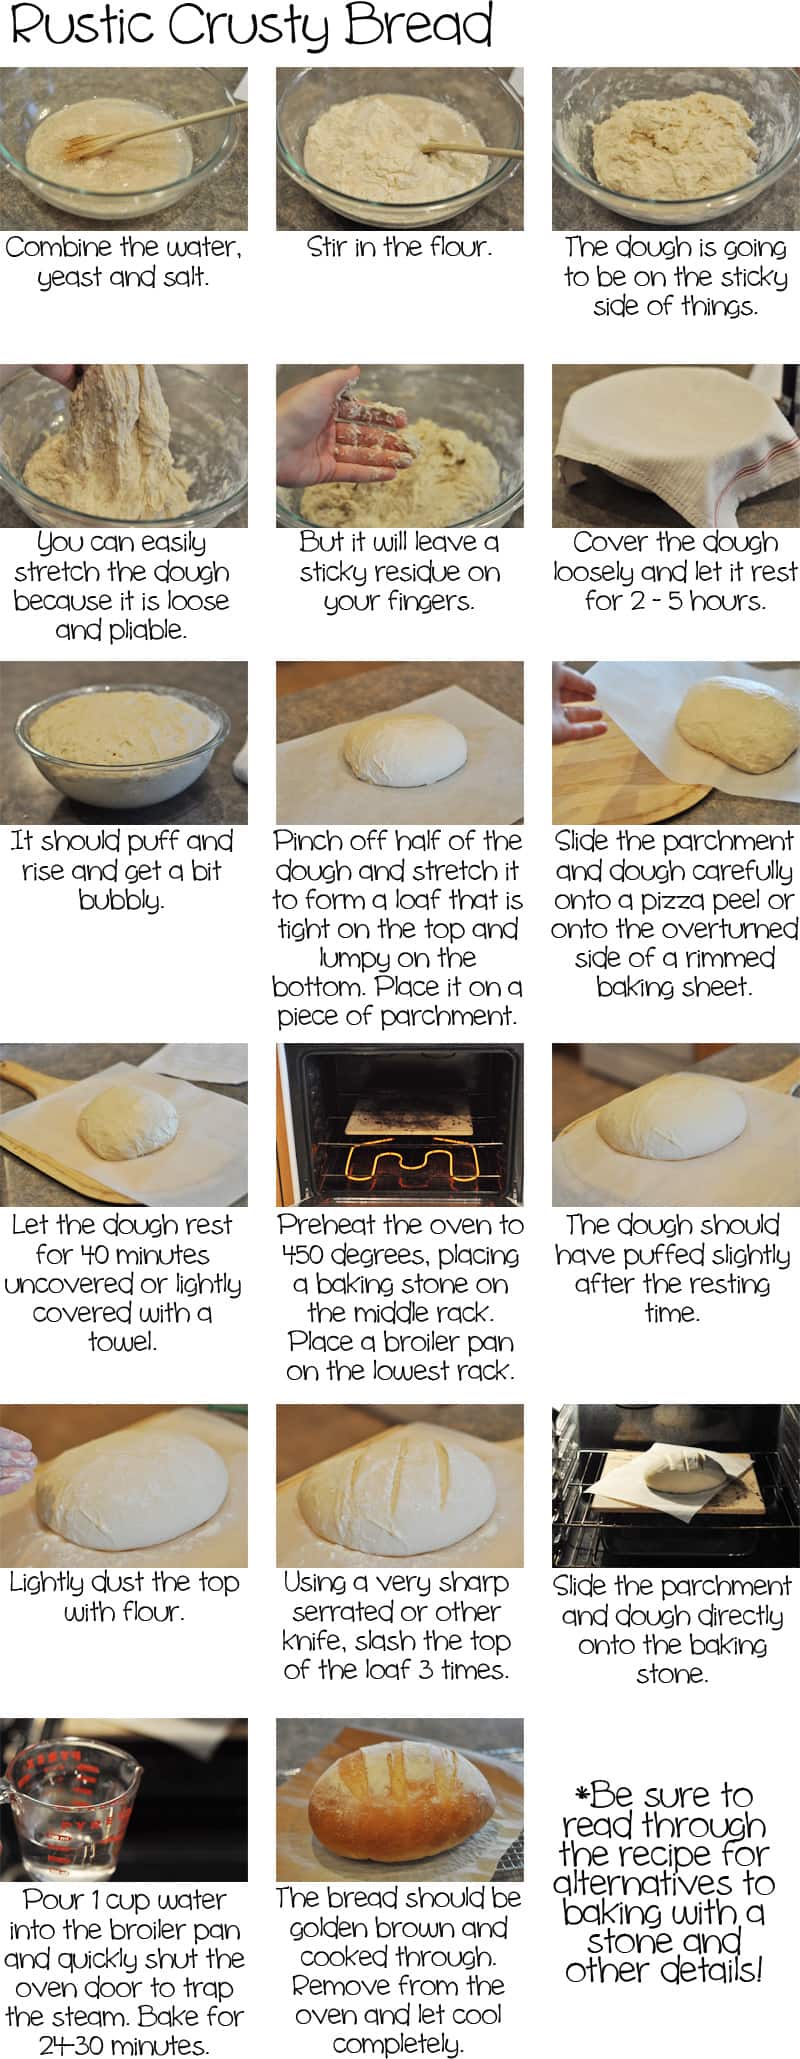
In a large bowl, combine the water, yeast and salt. Give it a little mix. And then add in the flour. Make sure to measure the flour with a light hand (or use the weight measure). You can mix with a spoon or spatula; I have been converted to the wonders of this Danish dough hook {aff. link}, but eventually with this dough, I get in there with my hands and mix it up the rest of the way.
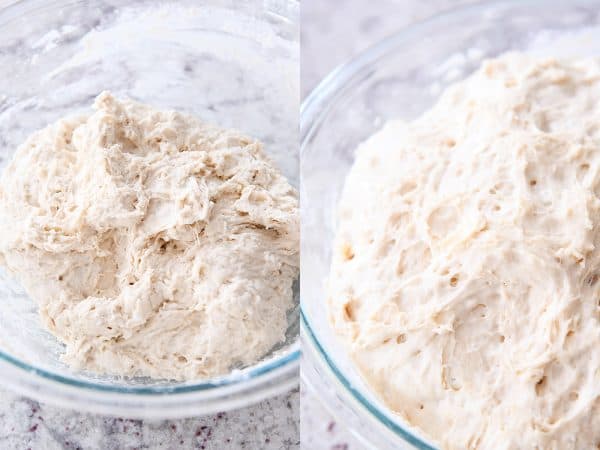
The texture of the dough will be shaggy and much softer and stickier than a traditional kneaded bread dough. Make sure there are no pockets of flour and the dough is well mixed.
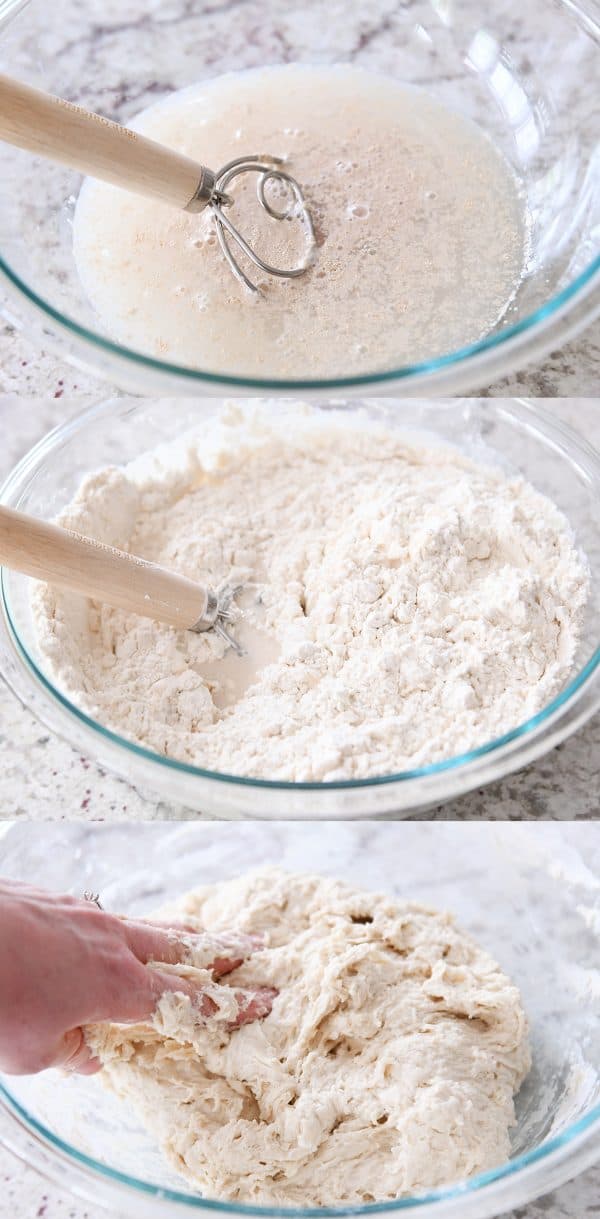
Cover the dough right in the bowl and let it rise until puffy and doubled.
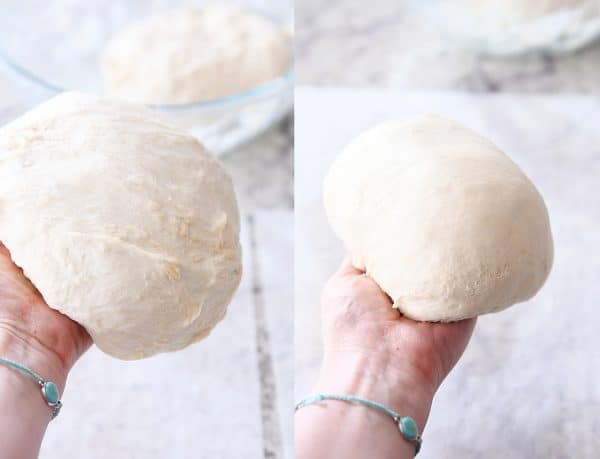
At this point, to shape into loaves, I grease my hands really well with cooking spray and split the dough into two pieces (you can make four smaller loaves out of the batch, if desired). Take one of the pieces and work it in your hands, turning the edges underneath until it’s a relatively tight, smooth loaf. Regrease your hands if the dough is super sticky.
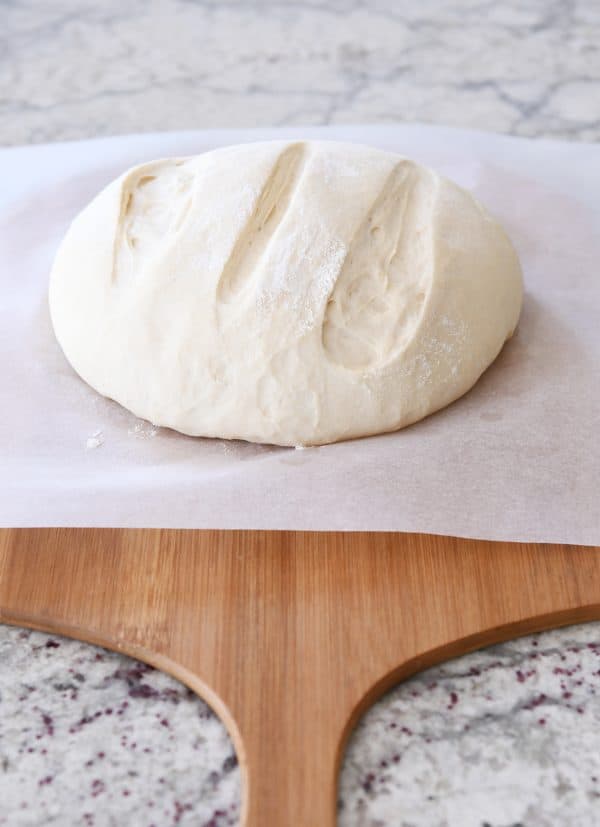
Place each loaf in the center of a piece of parchment paper and dust the top lightly with flour. Using a baker’s lame {aff. link}, razor, or really sharp knife, slash the dough 3-4 times on top, about 1/2-inch deep or so.
When I originally posted this recipe, I waited to slash the dough until after it had risen, but this sometimes causes the dough to deflate completely (especially if you don’t have a really sharp razor or knife), so I’ve started doing the slash action before it rises. Haven’t looked back. Works great and you still get the definitive, pretty “decoration” on top of the loaf as it bakes.
Cover the dough and let it rise until puffy (it won’t necessarily double in size).

Carefully slide the parchment with the loaf on top onto a baking/pizza peel {aff. link}. I suppose now is the time to mention that you want to preheat a baking stone {aff. link} in the oven to 450 degrees F and let it preheat at that temp for 20-30 minutes before baking the bread. If you don’t have a baking stone, you can try preheating an overturned aluminum baking sheet (although it may warp and bend out of shape a little at that temp, so be careful).
I highly recommend both a pizza peel and a baking stone for this recipe. Totally worth it for this bread alone.
Once the baking stone has preheated long enough, carefully slide the parchment and bread onto the baking stone. Note: I have never had parchment paper catch fire in the oven using this recipe (or homemade pizza), but take care that the parchment doesn’t touch the heating element or sides of the oven. Also, I think the thinner/cheaper the parchment paper, the more chance this could happen.
You can put a broiler pan on the bottom of the oven and add 1-2 cups hot water OR you can toss a few ice cubes onto the bottom of the oven right after sliding the bread onto the stone and then quickly (but gently) close the oven door. The steam from the water is going to help create that beautiful crust.

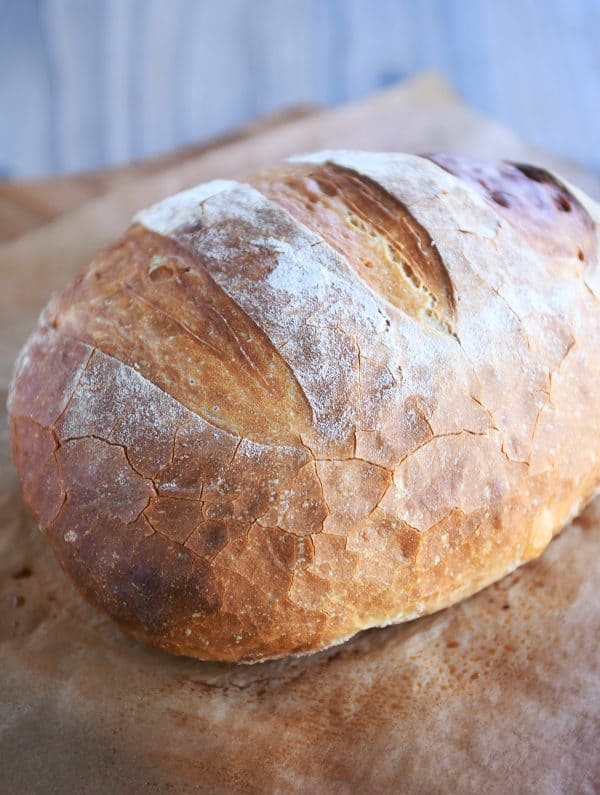
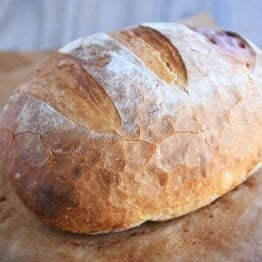
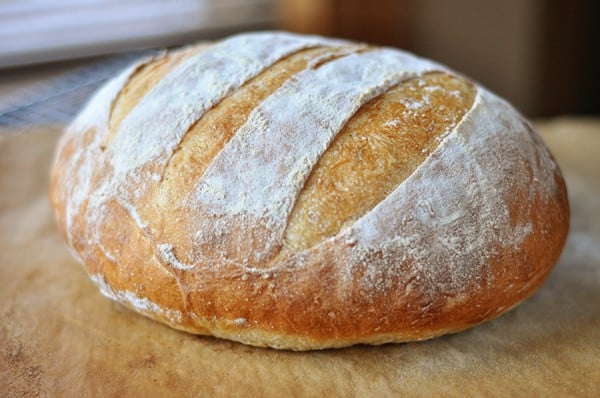
Bake the bread for about 25 minutes, give or take. It’ll puff even more in the oven. Look at that golden crust! Wowser.
This rustic crusty bread is my go-to bread to take to new neighbors, friends in need of a pick-me-up or when I am taking dinner into someone, and I make it several times a month just for our family to enjoy. It really is a life changing recipe.
I hope you’ve been able to see just how easy it is to make! I have no doubt you’ll feel like a total bread making rock start after you make this rustic crusty bread!
Equipment for Rustic Crusty Bread
While this bread doesn’t require a stand mixer, I’ve found the following to be helpful, especially if you want to ensure perfect crusty bread every time! Affiliate links for the products below.
- Baker’s lame (for slashing the bread)
- Parchment paper
- Pizza paddle/peel
- Baking stone
- Best inexpensive, bread knife ever
- Optional: Danish dough whisk
Easy Rustic Crusty Bread
Ingredients
- 3 cups warm water, about 100 degrees
- 1 ½ tablespoons instant yeast
- 1 tablespoon salt, I use coarse, kosher salt
- 6 ½ cups (923 g) unbleached, all-purpose flour, plus more for dusting dough (see note)
Instructions
- In a large bowl mix yeast and salt into 3 cups lukewarm water (about 100 degrees). Stir in flour, mixing until there are no dry patches. Dough will be quite loose. Cover lightly with a kitchen towel but don’t seal the bowl airtight. Let the dough rise at room temperature 2 hours (or up to 5 hours).
- Bake at this point or refrigerate, covered in an airtight container, for as long as two weeks. When ready to bake, cut off a grapefruit-size piece with serrated knife (I have only ever made two loaves out of the batch of dough so I just divide the dough in half to form my first loaf). Turn the dough in your hands to lightly stretch the surface, creating a rounded top and a lumpy bottom. Put the dough on a piece of parchment paper set on a pizza peel or a rimmed baking sheet turned upside down.
- Slashing: you can dust the top of the dough lightly with flour and slash now (before rising) or wait until after the loaf has risen. I’ve found waiting and slashing the dough after rising can sometimes cause the loaf to collapse, so after making this bread for years, my preferred method is to dust the top of the loaf lightly with flour at this step, before rising, and slash the top with a baker’s lame or sharp knife 3-4 times.
- Let the dough rest for 40 minutes for room temperature dough; if you have used the dough out of the refrigerator, let it rest for 1 1/2 hours. Repeat with remaining dough or refrigerate it.
- Place a broiler pan on the bottom rack of the oven (if you don’t have a broiler pan – no worries! Tossing 5-6 ice cubes in the bottom of the oven when you put in the bread works really well, too). Place a baking stone on the middle rack and preheat oven to 450 degrees. Heat the stone at that temperature for 20 minutes before baking.
- After the dough has rested and is ready to bake, if you haven’t already (see step #3), dust the dough lightly with flour, slash the top with serrated or very sharp knife three times.
- Slide the dough (with the parchment paper) onto the baking stone. Pour one cup of hot water into the broiler pan (or toss 5-6 ice cubes in the bottom of the oven) and shut the oven quickly but gently to trap the steam. Bake the bread until well browned, about 24-28 minutes. Cool completely.
Notes
Recommended Products


Recipe Source: adapted from The New York Times via Jeff Hertzberg’s Artisan Bread in Five Minute a Day
Recipe originally published February 2012; updated May 2019 with new pictures, recipe notes, commentary.

I’d really like to get good at this recipe but I’m having some problems. My bread although it does rise it tends to spread out quite a bit. Do I need to add more flour? I do weigh it out. Also if I store it in the refrigerator in an airtight container it gets a bit gray on top which isn’t appetizing. Again what am I doing wrong?
If the dough is spreading out too much you can add a bit more flour (try 1/2 cup or so) OR bake it in a Dutch oven. Are you storing the dough in the refrigerator or the baked bread?
i made this last night, i forgot the salt tho it turned out excellent though and it went well with the salad i made
This has definitely become my family’s favorite bread and the number one request of my baking.
It’s easy and oh so delicious! Got the next batch rising to have with soup tonight and everyone is looking forward to it.
Thanks for posting this great recipe and instructions.
So good! Made it for the first time today and it is a keeper. I kept one loaf and gave one to a friend. Will make another fresh batch tonight. I’m sure our 3 kids will scarf it up. Thank you for this recipe!
This is amazing right out of the oven. I made two loaves and froze the second. How would you recommend I reheat the second loaf to make it warm and crusty again? Thanks for a great recipe!
You can try popping it into a baking stone in the oven for a few minutes.
Does it work if you don’t have instant yeast?
You can try using active dry yeast (proof it in a few tablespoons warm water before using in the recipe).
Not sure where I went wrong, but this dough is so soft, I can’t form it into any kind of a loaf. So sticky I can’t even get the bottom side down. Going to go ahead and bake it like focaccia. Put the second half of the recipe in the refrigerator, and I’ll try to make pizzas later.
Nice simple recipe! The dough was super active during the rise, it kept threatening to overflow my Kitchenaid bowl. I ended up punching it down and giving it a fold each 3o minutes to control the beast, haha. Formed the dough into 2 large boules and baked at 425. My oven gets a bit testy at 450. I just added an extra 5 minutes and cracked the door to let it cook a bit longer with the residual heat. The resulting loaves were wonderfully fluffy and HUGE! Of course with a quick proof time you’re not going to get a deep tangy flavour but the texture was lovely and perfect for sopping up some lentil curry. Thanks for the easy recipe.
I am really enjoying this recipe for a rustic loaf! My dough is never quite as moist but it comes out perfectly. I’ve also made buns with it. Thanks so much!!
Easy and tasty bread! I used about one quarter whole wheat flour and the remaining amount as bread flour. Also, used olive oil to grease my hands. Did not rise as much as i thought it should — next time I will give it more time to rest… Will definitely make again. Great recipe — thanks!
Hello, me again, made another mistake. The parchment paper I used is not oven safe above 420 F. So to any other obvious mistake makers, check that out beforehand.
Can I do this recipe with a sour dough starter? How much would I use?
I haven’t tried that so I’m not sure – sorry!
Excellent bread, really fun to make, got Very excited when the dough doubled in size, don’t know how it tastes yet. MADE A BIG MISTAKE not related to the recipe but wanted to leave a comment just in case someone who also didn’t know sees this: DO NOT put ice in a hot glass pan!!! big explosion, thankfully no injuries, had a freakout anyway. first bread will not turn out because the oven was open for awhile and the heat escaped, not to mention the glass bits. High hopes for second bread. Will maybe bake it tomorrow when I’ve calmed down. Face palm. Good luck everyone.
My bread ended up really flat and dense. I’m pretty sure I activated the yeast right and everything. So, I’m not sure what is wrong. Do you happen to know what happened? The taste of the bread was delicious. Might make again if I know what happened.
Hi Bell, try adding another 1/4 to 1/2 cup flour
Hi Bell, what was the texture and consistency of the dough when you shaped it into a loaf?
the consistency wasn’t super bubbly, but I don’t think it was super dense.
Absolutely amazing! I halved the recipe and also added 1/3 cup chopped Kalamata olives and 1 teaspoon of rosemary during the mix. The olives stayed suspended during the bake no problem. I was so happy to see an amazing bake rise when put on the stone. Crust came out beautiful. My wife and I horfed down half a loaf toot sweet. The only regret was that I didn’t make the full recipe for 2 loaves. Thanks so much.
Great! Easy to make and was delicious!
He, Mel,
I’ve made this recipe now 3 times, and while it always tastes great I end up with a flat round instead of a loaf. At what point would I add the extra half cup of flour? It looked and felt fine after mixing, but handling it was a mess!
You can try adding more flour right at the beginning before the dough rests.
I made this bread and it was delicious but my pizza stone cracked in 4 places while cooking this. I put it in the cold oven and heated like the recipe. I Googled what would make it crack and one of the things said moisture, it must have been from the hot water I added in the pan underneath. Have you experienced this?
I’m sorry to hear that – I haven’t had that happen before!
AWESOME BREAD. I make bread different breads often and this was so easy I plan to make this my new go to bread. My family just loved it. We ate one loaf in one day.
Mel how would you suggest storing the second loaf or leftovers?
The baked loaves freeze great or I store the loaves in bread bags at room temperature. 🙂
If I only have bleached flour, can I use that in this recipe or will it make a noticable difference? I don’t usually buy bleached flour but that was all the store had at the time and I’ve really been wanting to make this bread now that I finally found rapid yeast in store!
Thanks!
It should be fine!
This is one of my new favorite breads! My dough was really sticky, but rather than adding more flour and trying to shape it and slash it, I just let it rise as a blob of dough and baked it on a jelly roll pan instead of transferring to a pizza stone. It didn’t rise as tall, but it was beautiful and had the perfect texture. We ate this up so fast and I’ll be making it regularly again. It tasted so good with your cheese fondue recipe too, by the way! Thanks again, Mel, for another family favorite.
Hello ! I’ve yet to make the bread, as all I have is active dry yeast, and not instant yeast! How would I go about substituting the active dry yeast in? How much water should be used, and how much active dry yeast? Thank you for any help in advance!
Here’s a post with details about using active dry yeast in place of instant yeast https://www.melskitchencafe.com/guide-to-baking-with-yeast/
I’ve made this bread many times now and it’s a favorite. The looseness of the dough throws me each time, but I end up adding more flour after the first rise to get it to shape nicely into an oval. I use a wide and slightly longer-style loaf pan designed for rustic-type breads and bake as directed. I did add a bit of honey this time for sweetness, so we will see how that goes. Great recipe!
At what point can you add herbs and spices? And what are some ideas for different flavors that you have tried?
Have you ever made 1/2 the recipe? We just don’t need this much bread at once.
Thanks!
Yes, you can halve the recipe. And you can knead in herbs and spices after it rises in the bowl OR stir them in when adding the flour.
Great recipe! Question, Can I substitute the white bread flour with other flours? (Rye, whole meal etc). After a healthier, less refined option. Will the same no knead recipe work?
You can definitely experiment! I’d recommend first trying half white flour/half whole wheat (or other type of whole grain flour) and work up from there.
Love the recipe. Easy and delicious. I love baking half the loaf and leaving half the dough in the fridge. Thank you!
This was the first loaf of bread I’ve ever made and I was very nervous but it turned out so soft, chewy and delicious tasting! I couldn’t believe how simple it was.
I really appreciate the details, explanations, and tips. I will definitely be making this bread again and using more of Mel’s recipes in the future.
I have made this bread several times now and it is so sticky and difficult to work with after the rise. I have to flour my hands, the dough, and work area just to try to contain it. It is a good tasting loaf but hard to form into a loaf with any structure.
I made this bread today. I cut the recipe in half because it is just my husband and I. A good thing I did. We would probably eaten the whole thing. It was delicious! The best flavor and so easy. I did bake it in my cast iron dutch oven. Heated it in the 450 oven before I put the dough in. I have made this recipe before and we loved it. I felt like I had put too much flour in before. It was good but felt like I over floured trying to handle the dough. Today I decided I was going to make sure I didn’t do that. I put just a little more water in then the recipe called for. It was very soft. After rising for 4 hours, I floured my hands, picked up the very soft dough in my hands, stretched the top out and down a little, tucked in the bottom and put it on parchment in a bowl for the last 40 minute rise. Removed the dutch oven from the oven and put parchment and all in the dutch oven and covered it with the lid. Bake for 15 minutes ( remember it was just a 3 cup of flour loaf) uncovered and bake 10 more minutes all at 450. Perfect. Crusty. But not so crusty it crumbled all over when I cut it. And the inside was soft, chewy and beautiful holes. We had wonderful bread and salad for supper. Warm bread. Let it cool 15 minutes and then took 2 slices off. It was delicious. All we could do, to not eat more. Thank you so much for the recipes and all the time you put into the recipes and making videos. You are the best. Thank you.
Hi Mel, I have made this bread on several occasions and it is outstanding! I am looking to make crusty buns for chicken Parmesan sandwiches and and wondered if I could use this same recipe and make mini loaves and use as buns? What do you think? Thinking each loaf would make 4 or 6 large buns? Do you think this would work and how long would I bake for? Or if you don’t think this will work, do you have an easy crusty role recipe you cold recommend. Thanking you in advance.
I think it’s a great idea!
I searched for a easys recipe and this is the hardest thing I have very made. the writter’s writing is too hard to understand and I am never going to use this again.
Oh my gosh! This bread is amazing. I’ve already made it twice this week, and it’s gone in 2 days. It’s come out perfectly both times. This will be my new go-to bread recipe.
I have never been able to make bread, this recipe turned out beautifully! Thank you!!! Can you add jalapeños and cheese to this recipe?
Yes, it works really well with add-ins!
I have made about 30 loaves during this quarantine we are in! I have baked loaves as the recipe directs, and I have added a million ingredients to make it “stuffed bread”. Cheeses, spices, meats, and veggies! I just press the balled dough flattish and place the fillings on top and jelly roll it in. Works like a charm and I’ve been feeding my neighborhood.
Thank you for a wonderful recipe!
So easy and so beautiful! Almost too pretty to eat but my family and I gobbled it up. Thank you for the wonderful post- I will make again and again!
Can I use bread flour instead of all purpose flour
Yes
I tried to this recipe everything was fine until I tried to make balls is was so sticky I couldn’t form the balls I sprayed enough cooking spray in both of my hands but it was impossible to make them what did I do wrong?
You can try adding another 1/4 to 1/2 cup flour if the dough is too sticky.
My dough was so sticky after rising. I ended up adding more flour. I live in Denver so I wonder if that is part of my problem. The bread tastes good but is pretty dense. I used about 1/3 bread flour and 2/3 unbleached flour. I’ll try it again.
Mel,
I made this and it turned out great! Thank you! At what point would you add herbs, cheese or olives?
Hi Michael, I’d knead any add-ins into the bread right before shaping it into loaves.
Turned out beautiful, not sure how people had problems! No knead, tasty, easy, bread! Will be making more.
Mine looked like your photos in the mixing bowl. But NOTHING like yours when you made them unto loaves. I followed your recipe and I was very disappointed.
Can you give me a bake time if I made this into bread bowls please. I have made the big rounds and live the taste and simplicity of this
For bread bowls, I’d suggest 15-18 minutes.
It was wayyyyyyy too wet after letting it rise for three hours I ended up adding more flour and kneading it for about 10 min until it seemed like the right consistency, shaped it let it rise another two hours on the tray and then baked it. It was very good after all that extra work
Sorry, i meant sugar**:)
I wondered the same thing but I used salt and it worked.
Aren’t we suppose to use suger instead of salt to activate the yeast?
I made this for fondue night a few weeks ago and everyone loved it! I decided to try it for grilled cheese sandwiches tonight and it did not disappoint! They were so good especially dipped in tomato soup to soften up the crust a bit. Heaven in my mouth!
Dough was too loose, i ended up with an almost flat bread
Mine was also a very wet dough (and I added a bit of olive oil, so it got wetter), and when shaping it, I had doubts about whether it would be flat, but it rose well and was delicious!
If it can help:
Water temperature is really important.
I didn’t punch the air out after first rise, only shaped into boules, as described (stretched 4-6 times each loaf).
The 40 min resting (if your kitchen is cool/cold, leave it longer)
You can also add a bit more flour if too wet (as read here up to half a cup)
It’s worth retrying, this bread was outstanding!
Good luck!
Hi Mel, Can I add honey or sugar to this recipe? If so, how much should I add?
I’m sure you could..if you are wanting to add it for sweetness, you’ll have to experiment with amounts (I like this bread without any honey or sugar so I haven’t tried it).
Mel,
I made this and it turned out great! Thank you! At what point would you add herbs, cheese or olives?
I deleted all of my other crusty bread recipes after I made this twice. I have the stand mixer and all that fancy stuff – didnt need any of it. I seasoned my flour with garlic powder and italian seasonings and made this for spaghetti night. Delicious and easy. I made a 2nd small loaf for a New Orleans sandwich known as a muffaletta that I have been craving for weeks , off the charts , it was the perfect bread, this is my go-to recipe from now on. Thanks for sharing.
This was the worst bread recipe I’ve ever used. I’ve made bread for years and I’m really disappointed.
The dough is so sticky and watery after 5 hours of resting that it is impossible top manipulate with my hands, never mind form into a round shape.
Such a waste of baking goods.
You must have used too much water. Or not enough flour. I just made two batches of this recipe and all four loafs turned out great. I thought it was the easiest recipe that I’ve used.
Excellent recipe! I know there are bread snobs who hate no knead, but I’m sorry, this tastes just as good as kneaded bread I’m also surprised by some of the poor reviews…kinda like the cookie mug cake Your step by step instructions are clear and perfect. I did find the flavor just ok using the same day method. The next day method it was much better (which is to be expected). I experimented throwing in some sourdough starter and did the overnight method and it was perfect. So delicious! I thought I’d need to adjust the flour, but I used the exact amount (always measure!) and it was perfect, and I live in a humid climate. This is the perfect recipe for my boys to start their bread making. So easy & delicious! Thanks!
Hi I made this bread a few times and love this reciepe. I did however use about 2 more cups of flour because it was like working with pudding.
I had the opposite problem from some posters….this was dry….and it did not rise. I followed the directions exactly but there is a lot of flour (6 1/2 cups) and not enough water. It was a disappointment….
How would the times be adjusted to have this bake in a dutch oven? Thanks!
You could compare it to this recipe and see what adjustments to make: https://www.melskitchencafe.com/crusty-artisan-bread/
My husband absolutely loves bread and found this recipe and I tried it today. I was a little skeptical as the dough was so sticky and I couldn’t shape the loaf but I persevered and the end result was amazing. The bread was absolutely delicious and my entire family loved it. Next time I will use some more flour to help shape the loaf because it was so sticky. I will also use a razor blade for the slashes as my sharp knife didn’t do the job.