The Best Homemade Glazed Donuts
I have tried a million homemade donut recipes, so believe me when I say: these really are the best homemade glazed donuts on the planet. They are so delicious! TONS of step-by-step pictures and tips and tricks for foolproof homemade donuts!
As promised, finally (!!), here is the recipe you’ve been waiting for. The best homemade glazed donuts on the planet. And that is literally one thousand percent no exaggeration.
I posted about these babies on my Instagram stories a couple of weeks ago when my daughter and I made them, and I couldn’t believe how many of you went crazy. Some of you even demanded the recipe be posted within the hour.
Listen, I can’t blame you. I really can’t.
It took me a few weeks longer than an hour to get this recipe posted, but I promise it is worth the wait. I’ve made so many homemade donut recipes in the past, and after making this recipe dozens of times, my family and I agree: it is definitely the best homemade donut recipe ever.
What makes these homemade donuts better than the other 1,583 recipes out there?
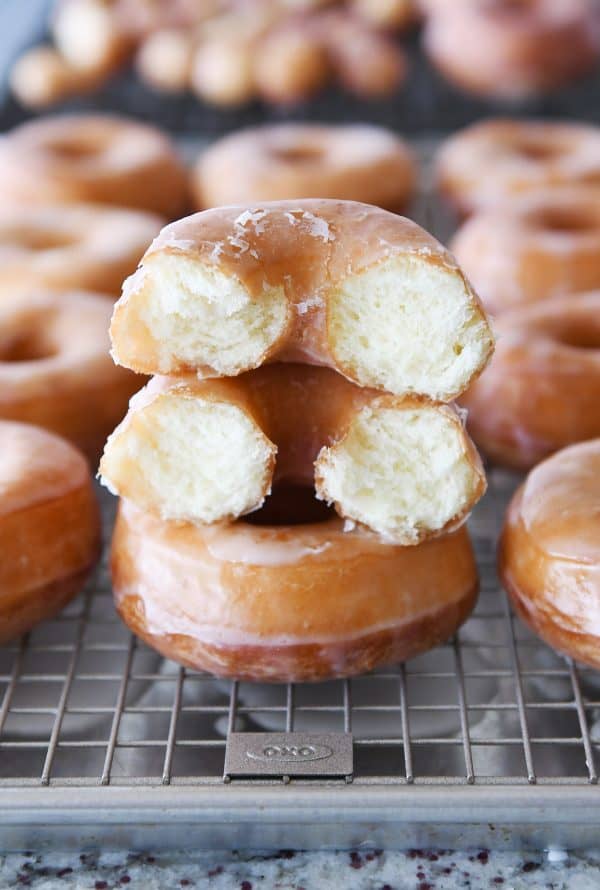
They are light and fluffy and totally melt-in-your-mouth delicious.
I’ve made a lot of homemade donut recipes that are fluffy and thick, but they have a chewy, bready quality that is more reminiscent of a bagel than a donut. Others have been bland and dense…or just mediocre. And let me tell you, no one wants to go to all the work of homemade donuts just for a mediocre result!
These donuts are buttery soft with an ethereal squishy factor (yes, that’s a thing) that makes them next-level amazing.
Granted, homemade donuts aren’t necessarily an every day type of recipe, but once you have this tried-and-true recipe in your back pocket, there’s a certain peace that will descend on your life just knowing it’s there when you need it.
My handsome taste testers agree. Homemade donuts are where it’s at.

Because I want to ensure 100% complete foolproof success, I’m including tons of tips and tricks in this post to make these homemade donuts easy and absolutely perfect.
You will feel like a rock star, I promise.
Ok, let’s get started.
Making Homemade Donut Dough
I highly recommend an electric stand mixer for this homemade donut dough. I don’t think the same result can be achieved through hand mixing, unfortunately.
I’m using a Bosch mixer {aff. link} that has a center drive shaft. I haven’t made the dough in my Kitchen Aid (because I use my Bosch for almost all things dough-related), but it should convert just fine to another type of stand mixer.
Into the mixer, add the flour, sugar, yeast, eggs and milk.
A couple of notes:
- it’s important to use cold or room temp milk (not warm milk) – when you add the butter in a later step, the colder dough allows a rustic “laminating” effect that gives an amazing texture to the donuts
- I use instant yeast in the recipe – see the notes below the recipe to use active dry yeast
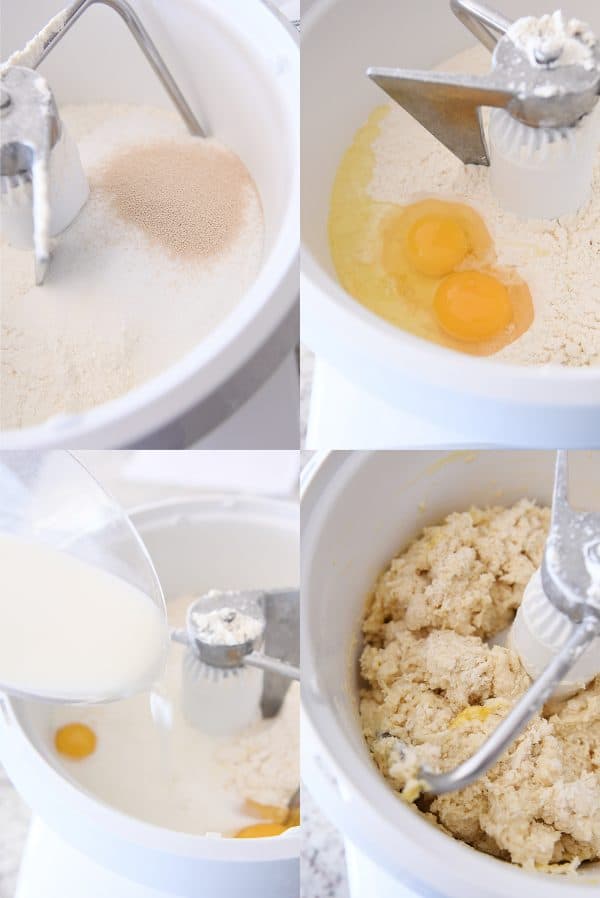
The dough will come together in kind of a shaggy mess. After it comes together, add the salt.
Continue mixing until the dough smooths out a bit. It will be on the thicker, stodgier side of things. That’s ok!
Add the butter a piece at a time
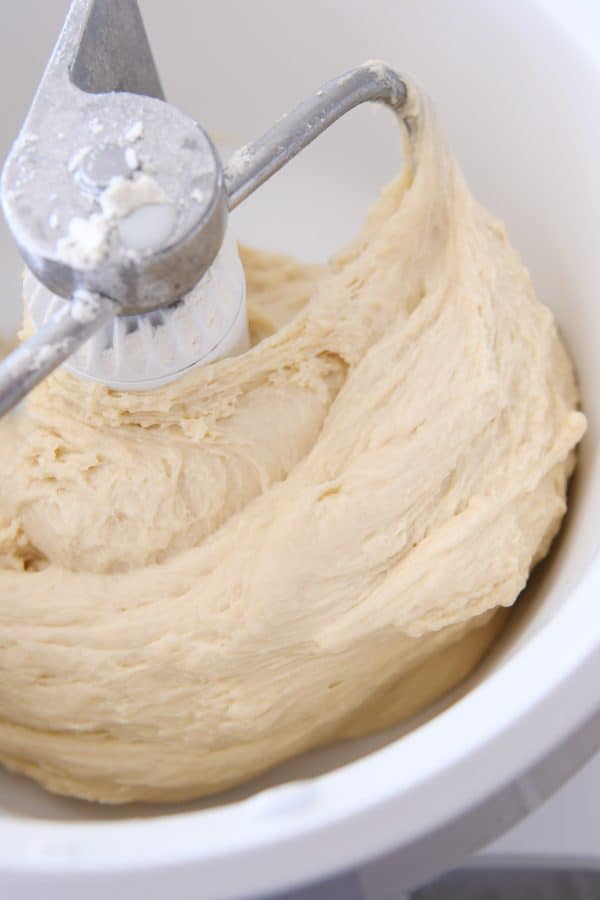
With the mixer running, add the softened butter a piece at a time. Almost instantly, you’ll notice the dough softening and stretching out as it mixes.
Once all the butter is added, the dough will be very soft. Very, very soft. You might be worried it’s too soft. It’s not, I promise.
Continue mixing/kneading on medium low or medium speed for 10-12 minutes. Scrape down the sides of the bowl, if needed. As the dough mixes, it will start to come together into a more solid (but still soft) mass of dough.
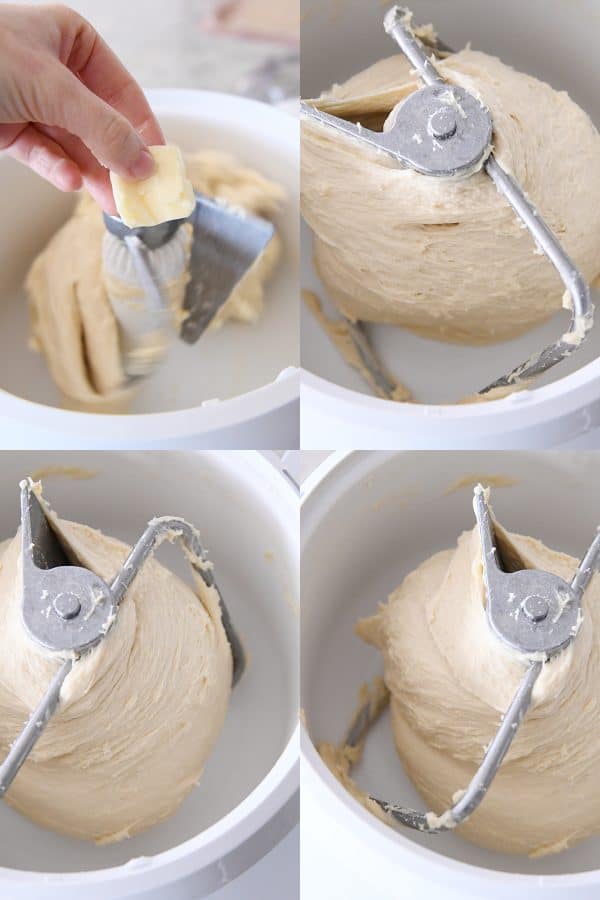
It’s ok if the dough clings to the middle of the mixer (in a Bosch). In a Kitchen Aid, it might be sticking to the bottom and sides of the bowl.
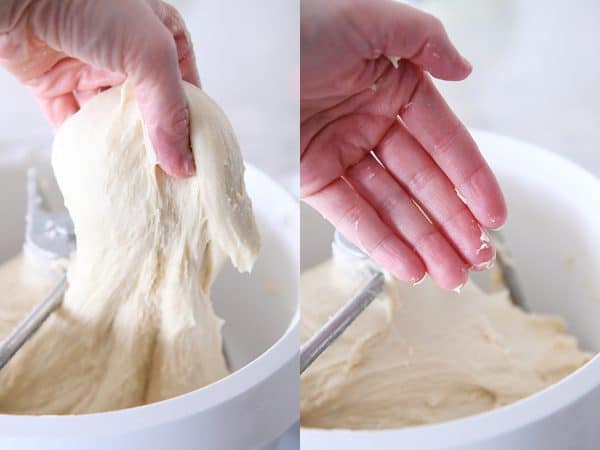
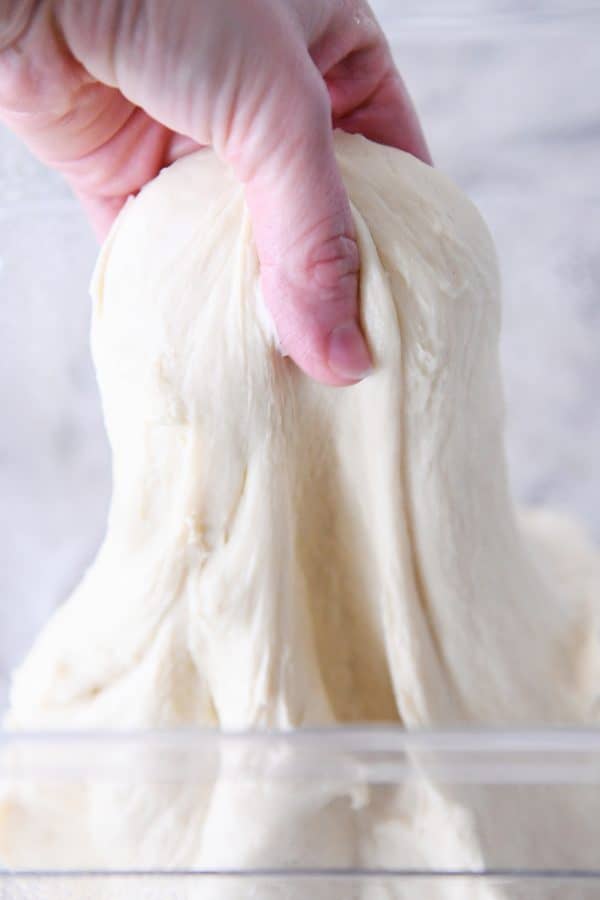
You’ll know the dough is done mixing if, when you stop the mixer, you can grab a handful of dough and pull it up into a silky, stretchy ribbon. When you let it go, there shouldn’t be a whole lot of residue on your fingers.
Even though the dough may not have fully cleared the sides or middle of the bowl, you’ll know it is done mixing if it is very smooth and very soft, but not overly sticky.
When to add more flour
Resist the urge, if at all possible, to add more flour to the dough.
I know I’m being a broken record right now, but even if the dough hasn’t fully cleared the sides, bottom or middle of the bowl, if it has kneaded for 10-12 minutes and doesn’t leave a lot of residue on your fingers, it’s good to go! As it rests in the refrigerator, it sturdies up a whole lot more.
Only add more flour (1/4 cup or so) if the dough is extremely wet and coats your hands and fingers in a sticky mess.
Homemade donut dough is amazing
I can’t get over the texture of this dough.
It is absolutely luscious. And it’s a total dream to work with because it is so soft and smooth.
Pile the dough into a lightly greased container, cover, and put it in the refrigerator for at least 8-12 hours (and up to 24 hours).
The cold rise is important. I’ve tried rising and frying the donuts same day, and I do not recommend. The texture of the donuts is worlds better when allowed to rest overnight in the refrigerator.
Let’s all agree to not seek the path of least resistance. We can persevere together through the longer wait knowing that the best donuts in the world come to those who are patient.
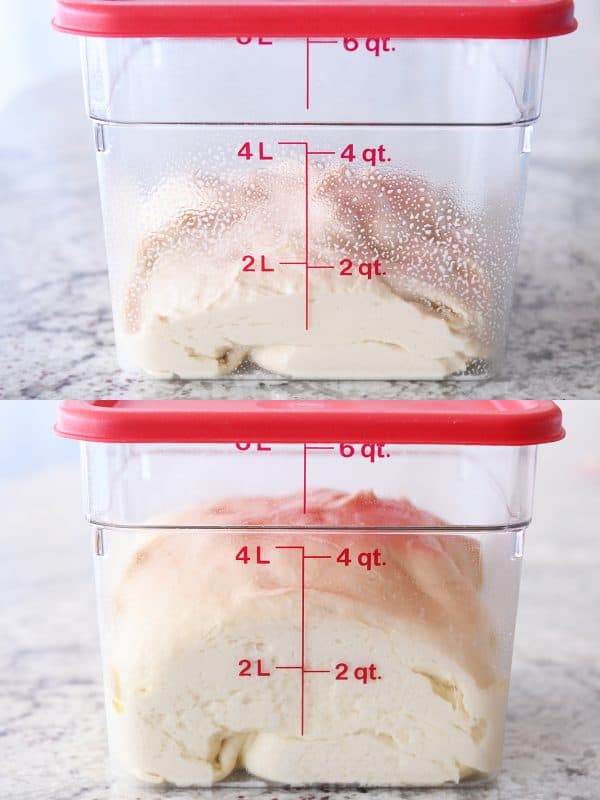
The dough will rise noticeably in the refrigerator.
The best part? The homemade donut dough rolls out like a dream straight from the refrigerator.
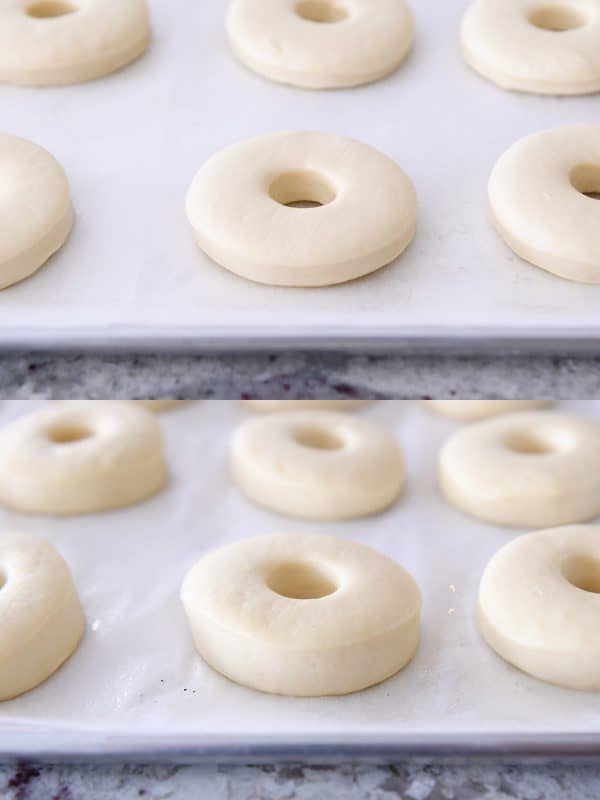
Roll it out to about 1/4-inch thick or maybe just slightly thicker. It’s not rocket science.

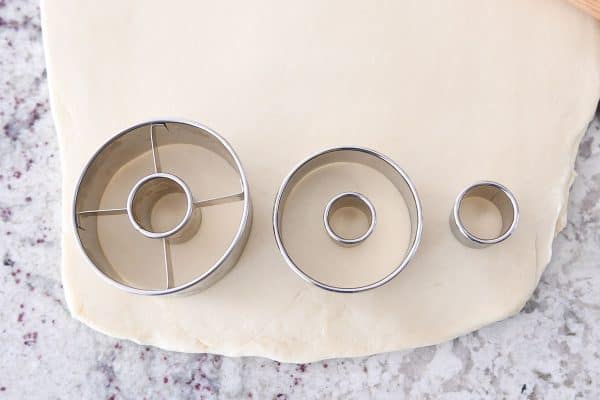
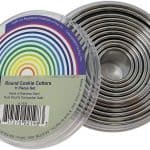
The best tools for cutting out donuts
There are a lot of options out there when it comes to donut cutters. My personal preference is to use a set of varying-sized round cutters {aff. link} so that the excess dough can be cut into donut holes.
The donut cutters (like the one pictured below on the far left) with the donut hole center attached {aff. link} are great, but a) they’re a bit larger than I like my donuts to be overall and b) the donut hole center doesn’t detach which makes cutting extra donut holes a little tricky.
My recommendation is to use a 3-inch round donut cutter and a separate 3/4- or 1-inch donut hole center.
Cut the donuts as close together as you can to maximize the donut dough.
Rerolled donut dough just isn’t the same (I’ll show and tell you why in a second).
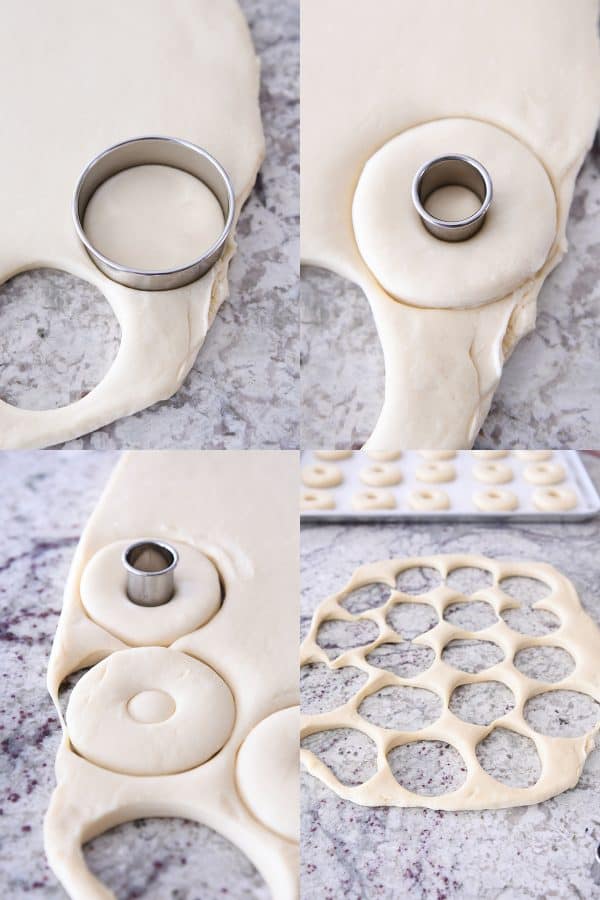
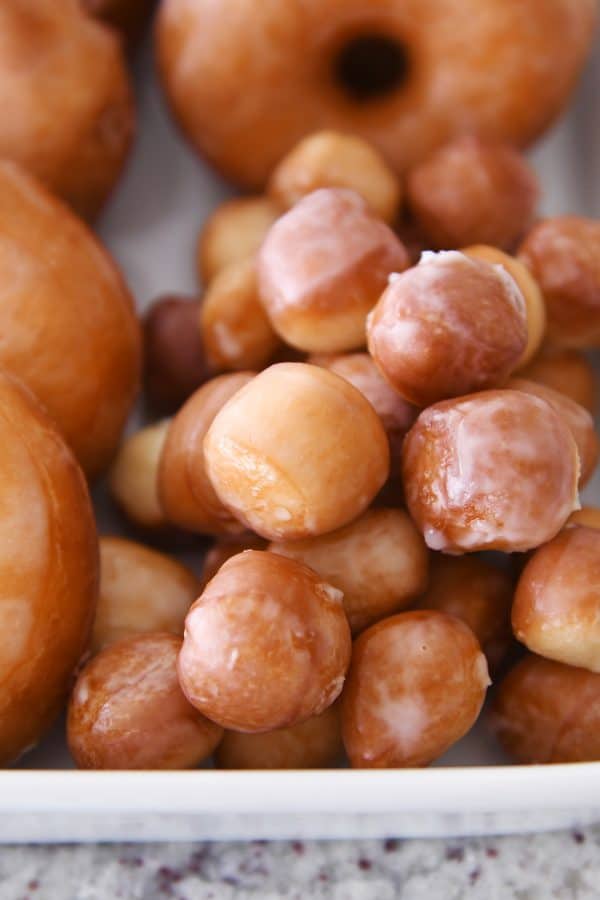
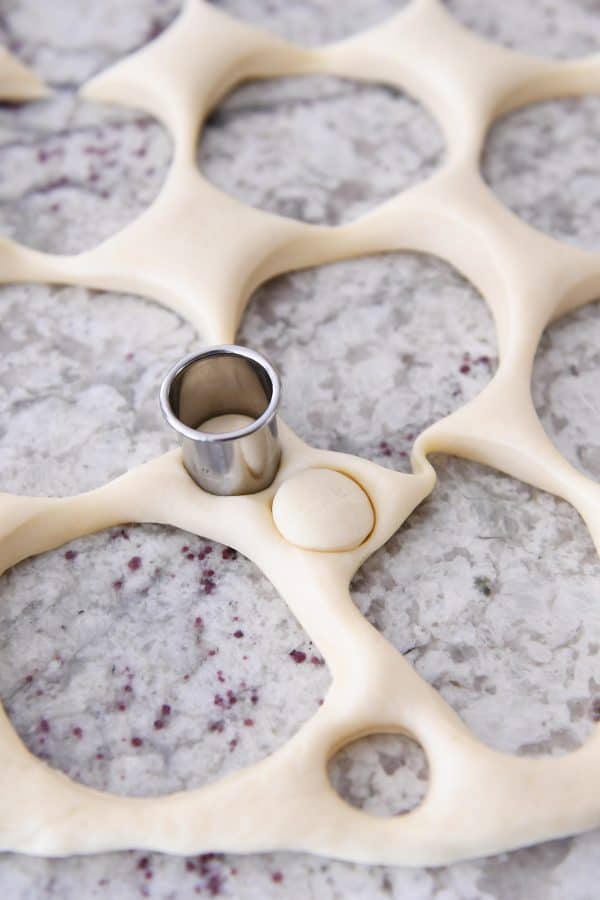
When all of the larger donuts have been cut, I like to go through the leftover dough and cut as many donut holes as I can get out of the remaining dough.
Our family is strictly divided between those that prefer large and in charge donuts vs those that go for the donut holes all day long.
Either way, I never have enough donut holes. #teenagers So I try to get as many as I can out of the dough. They are cute and totally irresistible.
Should you reroll donut dough?
Once you can’t possibly cut any more donuts or donut holes out of the dough, you have a couple choices:
- toss the remaining dough (this makes me sad)
- cut the dough into wrangly little rustic strips and fry those babies up
- gather the dough into a mass of scraps and reroll
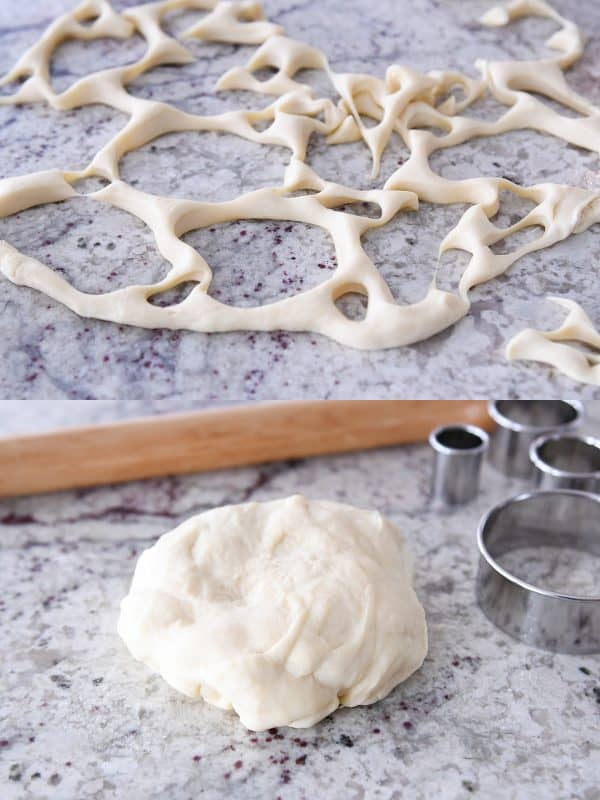
If you decide to reroll the dough, I have two main recommendations for you.
FIRST, once the dough has been gathered together, let it rest for 15-20 minutes before rerolling. This relaxes the gluten in the dough, which means the dough will be less likely to spring back as you roll it out. And if you’ve had that happen, you know how irritating it is.
SECOND, lower your expectations for donuts that are produced from a rerolled batch of dough. They will never be quite as awesome as the ones rolled from the first go-round.
You can see from the picture below that no matter how lovingly you reroll the dough, the donuts are bumpier, lumpier and not quite as pretty.

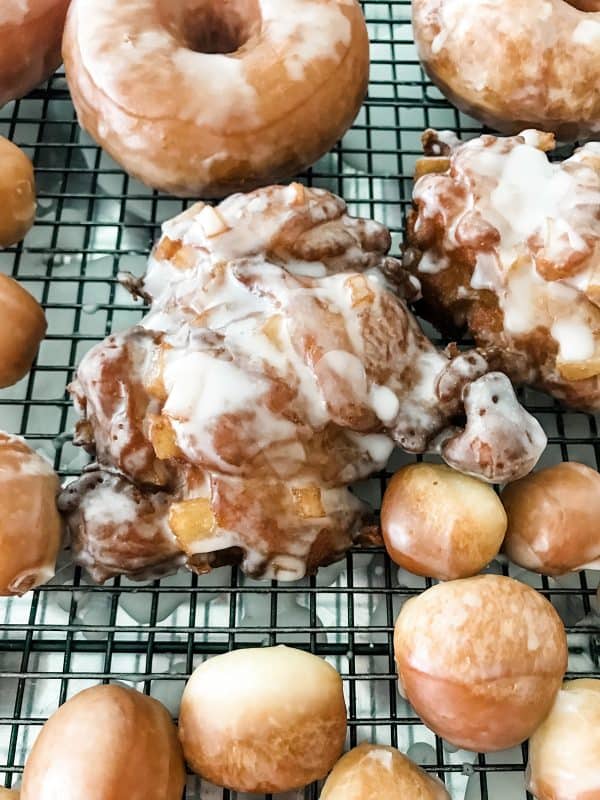
Make Apple Fritters from the Donut Scraps
UPDATE: so many of you let me know here and on social media that the only way to go with donut scraps (say no to rerolling!) is to make apple fritters out of them.
I had to try! Especially after my cousin-in-law Tami reported back with her exact process. They turned out AMAZING! Several of my kids said they liked them even better than the actual donuts.
Here’s my apple fritter process:
- cut out all the regular donuts like normal
- don’t cut out any extra donut holes from the scraps
- chop all the scraps into small little nubbins with bench scraper, probably 1/2-inch pieces or a little smaller
- finely chop about 2 large apples (right around 2 cups chopped apples) and toss with a squeeze of lemon juice, 1/3 cup brown sugar and 1 1/2 teaspoons cinnamon
- toss all the dough pieces and apples together in a bowl
- scoop out small handfuls of dough and apples (it’s going to seem weird, like it will never stick together) and gently form it into balls, set them on a greased baking sheet, and press gently to flatten into a thick disc-shape
- let the fritters rise and puff a bit
- fry the fritters last (since little bits of apples invariably fall out into the oil – spoiler alert: those little bits are super tasty)
- glaze with powdered sugar on one side after they cool
Ok, back to the regular (delicious) donuts!
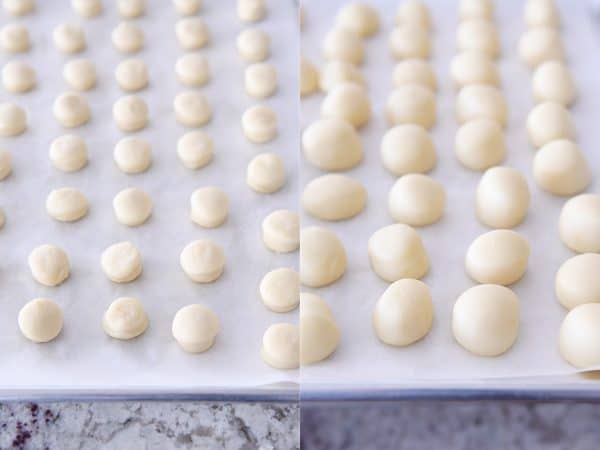
Let all the cut out donuts and donuts hole rest and rise on greased parchment-lined baking sheets until noticeably puffy.
I’m not sure if you need to go for a full out double, but they should look pretty darn fat and happy.
How to cook homemade donuts
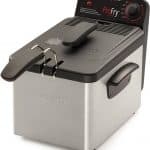
Heat about 2-3 inches of vegetable oil in a heavy pot on the stove (or in an electric deep fryer according to manufacturer directions) until the oil reaches between 350 and 360 degrees F.
*The electric deep fryer I have is a Hamilton Beach model that’s no longer available, but below in the recipe card, I’ve linked to a similar model.
The more slowly the oil heats up, the better so the donuts will cook evenly without burning.
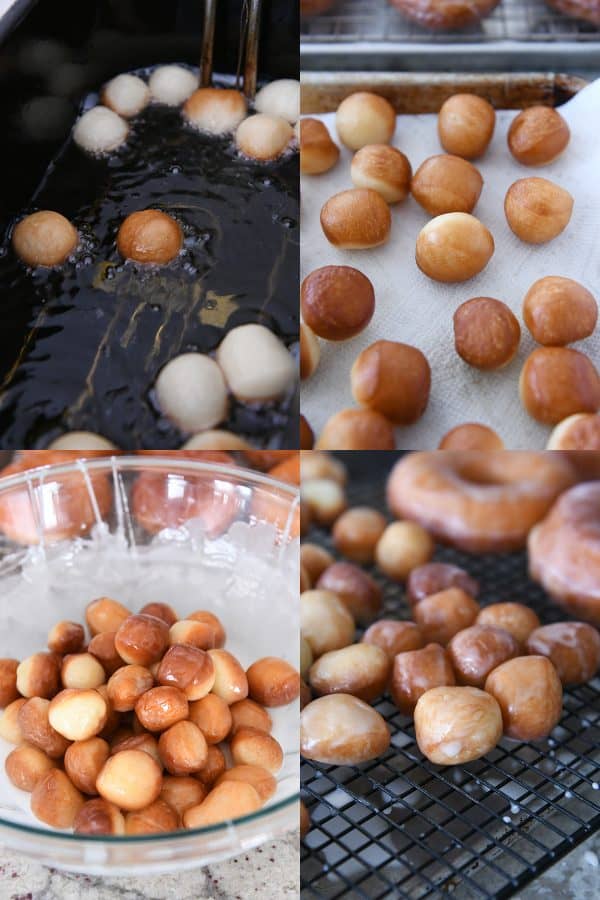
The donuts will be very soft after rising. Gently pick them up off the baking sheets so they don’t stretch too much, and lower them carefully but quickly into the hot oil.
Cook for about 60-90 seconds per side until golden. I use kitchen tongs for flipping and removing.
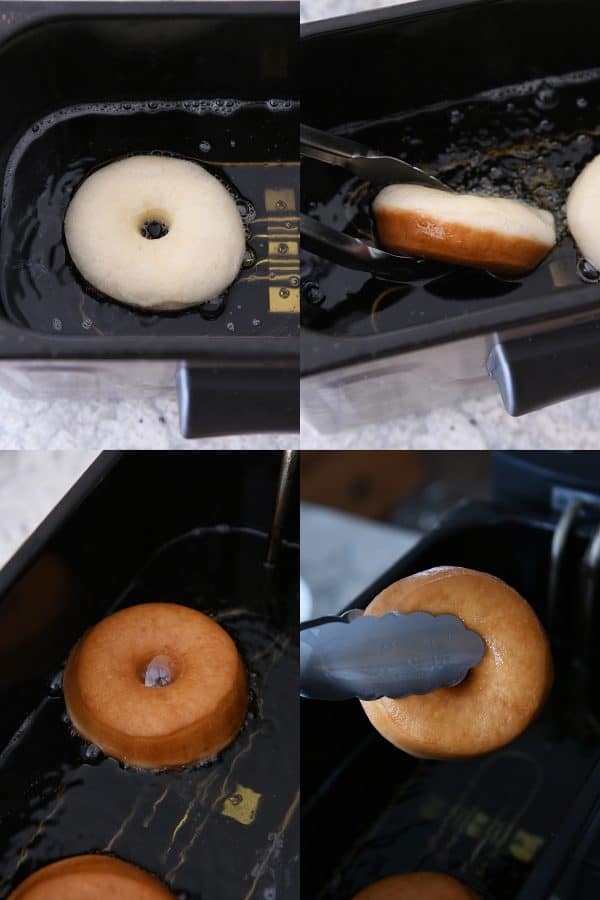
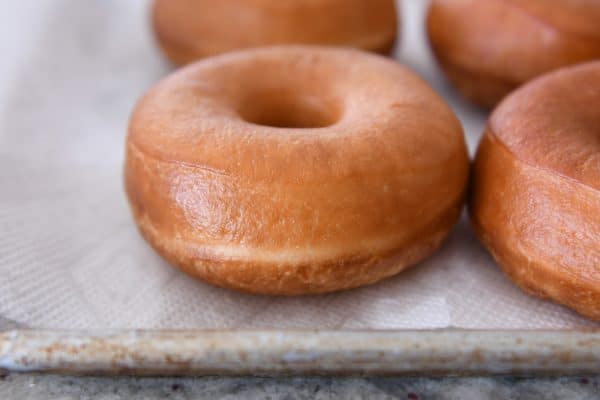
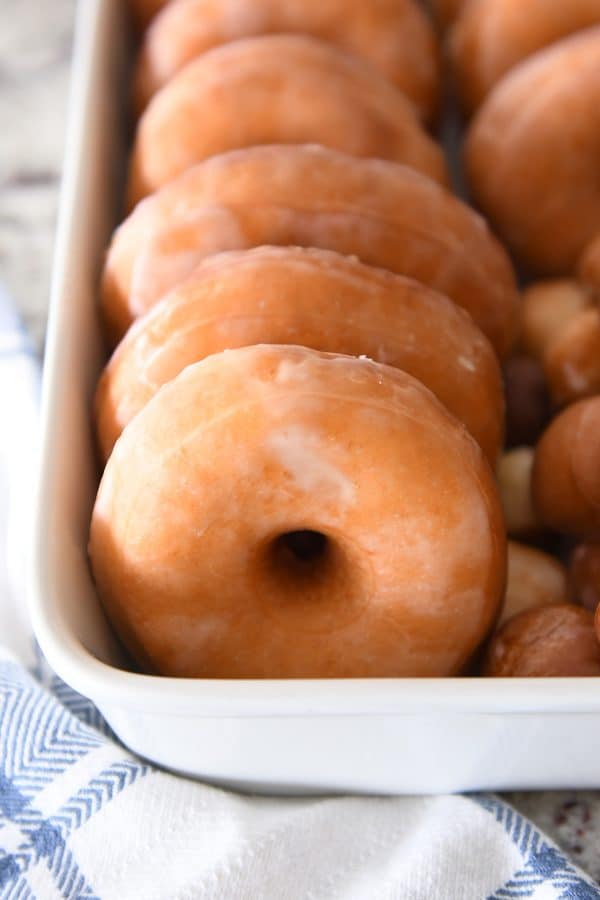
Transfer the donuts to a paper towel-lined baking sheet and let them cool until just warm before glazing.
If they are piping hot, all that essential and delicious glaze will slide right off.
Sidenote: you can see that my donuts have a tiny little line-ridge at the top. It happens every single time I make them, and I think it’s related to the cooking spray used on the pans as the donuts rise. Also, the bottoms of my donuts are always slightly more bumpy and rustic looking than the tops. Again, I think it’s related to possibly the cooking spray and how the donuts rise. And I don’t even bother stressing about it. If the donuts are puffy and fluffy and soft and luscious, I don’t fuss about the looks at all.
The same goes for the donut holes. Let them rise until puffy and pretty much doubled in size.
And then carefully drop the donut holes in the hot oil.
Can I vent for a sec about donut holes?
I’m going to be very honest here. Cooking donut holes is the bane of my existence.
Yes, they’re cute. Yes, they’re highly sought after. Yes, you can get glares from angsty teenagers for talking bad about them (the donut holes, not the teenagers).
But they’re a pain to fry. Some of them turn over just fine, while others just bob, golden side down in the hot oil refusing to bathe their white bellies in the blistering bubbles.
I’ve tried every trick in the book to get donut holes to cook evenly, and I’ve given up. The truth is, no one in my family cares that some of them have lily white undersides. They’re still delicious.
So basically, don’t stress. I’ve learned that donut holes just have a mind of their own, and we’re NOT going to let their stubborn tendencies ruin our day.
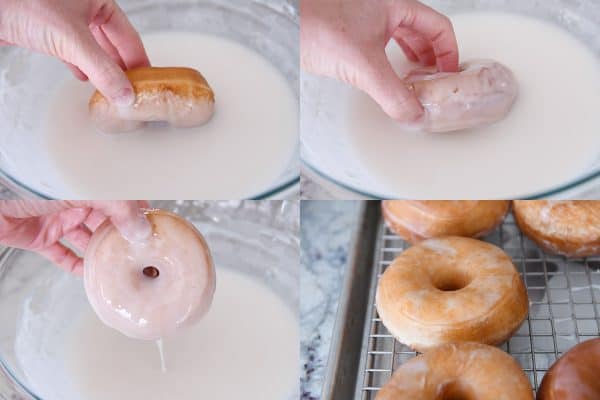
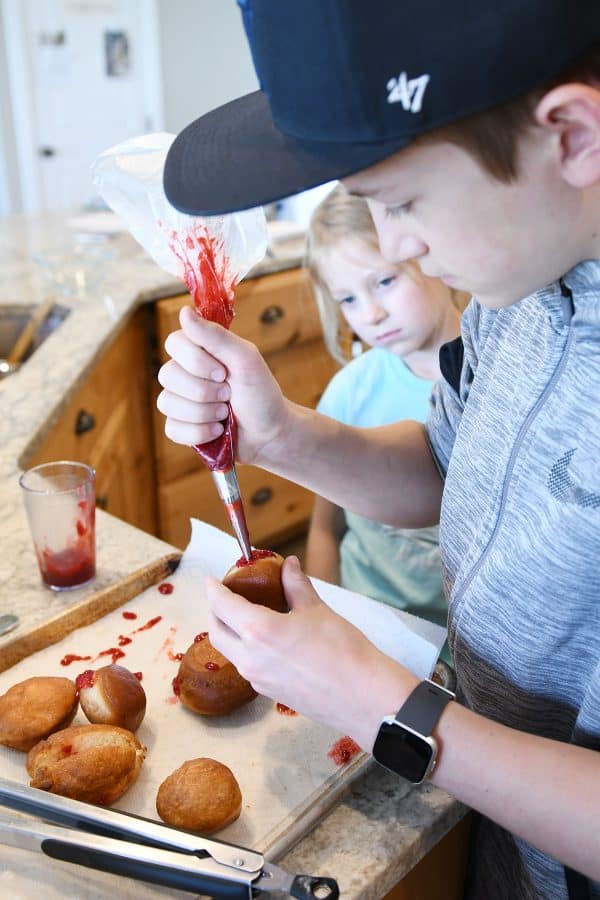
Glazing donut holes
When it comes to glazing donut holes, forget the one-by-one pampered treatment.
I toss them all in the bowl with the glaze until evenly covered and then transfer them to a wire rack.
So there you have it!
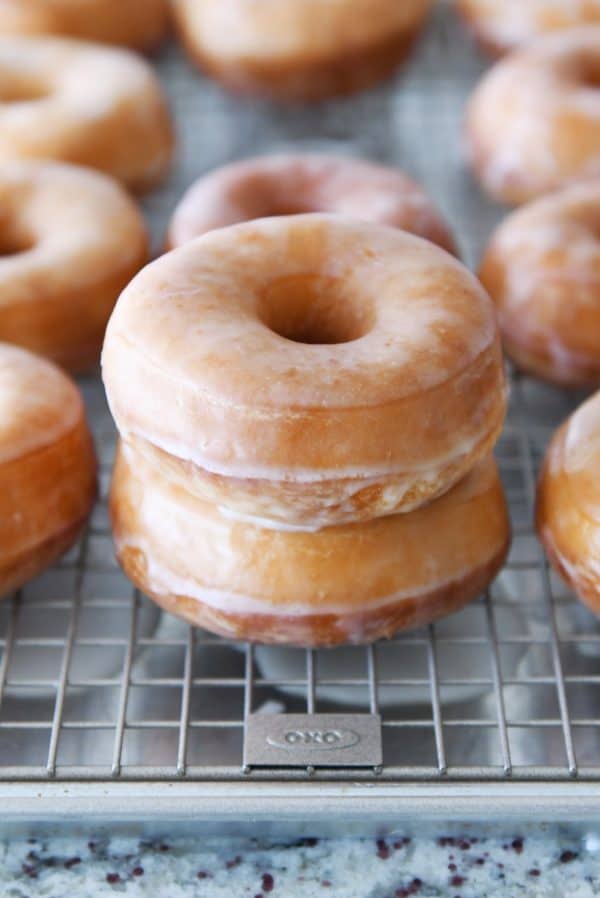
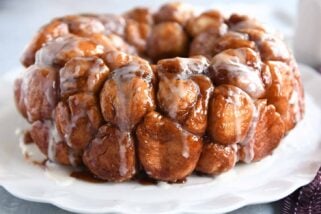
Homemade donuts. And not just any homemade donuts. The BEST homemade glazed donuts on the planet.
Other than some day possibly posting a spudnut (potato donut) recipe like the ones my mom made all the time growing up, I can’t see myself ever relying on another homemade donut recipe.
These are my family’s favorite donuts.
They beg for them (my daughter just had a birthday and wanted a cake made out of stacked homemade donuts instead of a birthday cake), and my 14-year old has started asking for a portion of the dough so he can perfect The Perfect Jelly Donut. He’s close. My floor is also very sticky.
Let me know any questions you might have!
I’m happy to troubleshoot issues or comments or concerns (except for the ones that tell me donuts aren’t healthy – noted!). 🙂
Feel free to experiment with different glazes and frostings. Chocolate frosted donut with sprinkles, I’m looking at you!
Most of all, have fun with the homemade donut making process.
If your donuts don’t come out looking picture perfect, that means you are doing just fine! Perfection is highly annoying anyway. And it just means you have a reason to make them again…and again…and again!
One Year Ago: Amazing Instant Pot Creamy “Baked” Ziti
Two Years Ago: Double Chocolate Salted Caramel Muffins
Three Years Ago: Instant Pot Indian Vegetable Rice
Four Years Ago: Amazing Cinnamon Chip Scones {Best Basic Scone Recipe}
Five Years Ago: Amazing Key Lime Cheesecake
Six Years Ago: Oatmeal Peanut Butter Chocolate Chip Bars
Seven Years Ago: Creamy Tuscan Pasta Sauce {Quick 20-Minute Dinner}
Eight Years Ago: Crab and Goat Cheese Ravioli

The Best Homemade Glazed Donuts
Ingredients
Donuts:
- 7 cups (994 g) all-purpose flour (see updated note!)
- ¾ cup (159 g) granulated sugar
- 1 ½ teaspoons instant yeast (see note for active dry yeast)
- 2 cups cold milk, I use 2%
- 2 large eggs
- 1 ½ teaspoons salt
- ¾ cup (170 g) salted butter, cut into tablespoon-size pieces and softened to room temp
- 2 to 3 quarts vegetable oil, for frying
Glaze:
- 6 cups (684 g) powdered sugar
- ¾ cup hot water (see note)
- ¼ teaspoon vanilla extract
- Pinch salt
Instructions
- In the bowl of an electric stand mixer fitted with the dough hook, add the flour (see note!), sugar, yeast, milk, eggs and mix until combined. The dough will look a little shaggy, that’s ok. Add the salt and continue mixing until well combined and the texture looks fairly smooth, 2-3 minutes. Let rest for 5 minutes.
- With the mixer running on medium low, add the butter a piece at a time until all the butter has been added and is incorporated into the dough. The dough will have softened considerably and may be sticking to the middle or sides of the bowl. Scrape down the middle and sides as needed.
- Knead the dough on medium speed for 10-12 minutes. Start the kneading time after the last of the butter has been added. The dough will be very sticky but as it kneads, it should come together better. Scrape down the sides of the bowl if needed.
- You’ll know the dough is done mixing if you can pull up a handful and it stretches easily. It will be very soft. And it may even be sticking to the sides or middle a bit (depending on the mixer you have), but it shouldn’t leave very much residue on your fingers when you pull a handful up. If it is wet and sticky, add 1/4 cup more flour and mix for a few more minutes (resist the urge to add this flour if at all possible unless your dough is a sticky mess).
- Transfer the dough to a greased container. Cover and refrigerate for at least 8 hours or up to 24 hours. The dough should double in the refrigerator. UPDATE: a lot of you have reported back that your dough didn’t rise much in the refrigerator overnight, but the donuts still turned out amazing – so if your dough doesn’t rise, don’t give up. Also, place your container of dough on a middle rack where it might not be as cold.
- Immediately out of the refrigerator, roll the chilled dough on a lightly greased countertop to about 1/4-inch thick (or slightly thicker). It should be about a 12X16-inch rectangle. Line half sheet pans with parchment paper and lightly grease the parchment.
- Cut the donuts and donut holes with a 3-inch donut cutter (with a 1-inch center) and place them on the prepared pans. Cut any excess dough into donut holes. Reroll scraps, if desired (donuts will be bumpier and not quite as tender – it helps to let the combined rerolled scraps rest for 15-20 minutes before rerolling to relax the gluten so the dough doesn’t spring back while rolling).
- Let the donuts rise, uncovered, until noticeably puffy. I warm my oven to 140 degrees. Turn it off and place the sheet pans of donuts inside to rise for 20 minutes or so. On the counter, it may take 1-2 hours for the donuts to rise.
- Place a double layer of paper towels on a half sheet pan.
- Heat oil in a heavy pot to at least 2-inches deep or in an electric deep fryer following the manufacturers directions to 350 degrees F (or 365 degrees for darker donuts).
- Gently pick up the puffy donuts so they don’t stretch and quickly place them in the hot oil (the bottoms of the risen donuts will be very soft from rising on the greased parchment; the donuts fry best with less air bubbles if they are placed in the oil SOFT SIDE UP). Don’t overcrowd the pot or the oil temperature will fall too quickly.
- Cook the donuts until golden brown on the bottom, about 1 to 1 1/2 minutes. Flip with tongs and continue cooking for another minute or so until golden. Lift the donuts out of the oil with the tongs, drain any excess oil, and transfer the cooked donuts to the paper towel lined baking sheet. (Donut holes should cook in about half the time)
- Let the oil come back to temperature before adding subsequent batches of donuts or donut holes.
- Prepare the glaze by whisking all the ingredients together until smooth. See the note below for thinning out the glaze. Place a wire cooling rack over a half sheet pan.
- Let the donuts cool until just warm to the touch before dipping fully in the glaze (if the donuts are too warm, the glaze will drip almost completely off). Place the glazed donuts on the wire rack so excess glaze can drip on the sheet pan below.
- For donut holes, I toss a couple dozen of them in the glaze at the same time, roll them around with my hands until evenly coated, and then transfer them to the wire rack.
- Once the glaze is set on the donuts, they can be transferred to a plate or other serving dish. The donuts are best served fresh but can be reheated the next day – a quick 12-15 second zap in the microwave has them tasting *mostly* fresh.
Notes


Recipe Source: from Mel’s Kitchen Cafe (inspiration from many sources such as The Bread Ahead Cookbook – aff. link – America’s Test Kitchen, and many recipes found online)
Disclaimer: I am a participant in the Amazon Services LLC Associates Program, an affiliate advertising program designed to provide a means for me to earn fees by linking to Amazon.com and affiliated sites. As an Amazon Associate I earn from qualifying purchases.


I feel like a donut rock star today. Thank you for your clear, easy to follow directions. They turned out perfect. The suggestion from a reader to mix the scraps up with cinnamon sugar and apples is brilliant. Super delicious.
Thanks for convincing me to try that, Tami!
when I first started making dough, it was not soft and sticky. Even after adding the butter. It was so tough. I ended up adding quite a bit more milk before it became the consistency of your pictures. Any idea what I did wrong? I am still making them and crossing my fingers they turn out.
Hey Jordan – sorry to hear that. How did you measure the flour? It sounds like the dough might have been a bit over floured.
Mine did this too! I didn’t didn’t use as much flour as the recipe calls for. It was so tough my Kitchenaid was over heating. So I’m not sure what to do! I had to throw mine out. It didn’t rise any overnight either.
Mine did this too! I had to stop my kitchenaid mixer and finish by hand 🙁 the dough has only been in the fridge 11 hours and it is still dense and hard and doesn’t look like it rose much overnight 🙁 hoping if I leave it in the fridge for another 8 hours or so it will rise more… then I will let it rise at room temp. I measured the flour accurately. I maybe I didn’t let the dough rest long enough before adding butter? I’ll be so sad if this doesn’t work, all that flour that was so hard to find right now wasted eek!
Sue, Tiffany and Michele – I’m so sorry to hear this! It’s honestly really baffling to me because the dough is so soft and smooth (almost verging on sticky) when I make it…I’ve made this recipe dozens of times. I’m using a Bosch mixer and not a Kitchen Aid mixer, but I don’t think that should be the issue. Do you mind sharing where you live? Are you at high elevation? I’m wondering if that might have something to do with it. Also, what size Kitchen Aid mixers are you using? I hate it when recipes don’t work – sorry this one has been troublesome.
I halved the recipe and allowed more rest time before adding the butter, kneaded for 14 minutes and the dough is much nicer this time…I’ll update tomorrow :). First batch tastes fine, just more dense than what it likely should be! I live on the south west coast of BC Canada on the Sunshine Coast.
Update: using the kitchen aid mixer 1/2 the recipe is a must! I split the recipe up into two batches, they both came out perfectly following the rest of the instructions to a T! Soooo soft and fluffy! I wish I could post a picture 🙂
Thanks for the update, Tiffany!
I was going to suggest you 1/2 the recipe. It sounds like the batch may have been too large for your KitchenAid. Also wanted to point out when mixing doughs with the KitchenAid one shouldn’t go higher than the 2 setting as the KitchenAid motor will be compromised (this is per KitchenAid’s recommendation)
Me too. Twice. I was cooking with my 5 year old daughter, so I thought maybe she put in too much flour. But the second time I measured 7 cups twice in a separate bowl just to make sure we got the flour right and it was super dry-nothing like a dough. I’ve made dozens of your recipes without any problems-but this one was a fail for me. I only read your recipe. I did not read the preamble-so If there are tips in the preamble, consider putting it in the recipe.
Same here 🙁
The dough is tough and dense and has been in my fridge for 14 hours already. It literally caused my kitchen aid to start burning up and my motor smelled so bad! I’ve had my kitchen aid for 15 years and never had a problem before! I was super careful about adding flour too. I think I might try to halve the recipe, but the kitchen aid really can’t handle this recipe as it is written. So bummed!
Can you bake them? We were going to use a different recipe to cook them, but we can’t find it.
You could definitely try but I don’t think they would have the same texture (they’d definitely be more “bready” in texture).
Can you make this 24 hours ahead of time? Or will the dough be a weird consistency after rising that long?
It’ll be fine! I wouldn’t let it rise any longer than 36-48 hours though.
WOW. I made these last night for my family – each of my five kids said, “These are the best doughnuts you have ever made!” The glaze tasted a little powdered sugary last night, but this morning the glaze tastes fine. If I can figure out the glaze, this recipe gives Krispy Kreme a run for their money! Thanks for being my go-to blog for any recipe I need! Love this recipe!
Thanks so much, Melissa! You could try adding half warm milk for half of the hot water for a creamier/less powder sugary tasting glaze.
Yay!!!! These donuts are awesome and my family is thrilled :). Thank you! Has anyone perfected maple frosting to mimic the maple bars frosting?
So happy to hear that, Rachel! I need to perfect a maple frosting. I’m hopeful it’s as simple as making the glaze slightly thicker and adding maple extract?
I make a powdered sugar glaze for cinnamon rolls and coffee cakes and always add maple extract and instant coffee to taste. Start small (1/2 tsp or so of each) and stir and add until you hit a flavor combination you love. Am planning to do the same to these donuts this weekend – can’t wait to try them!
These were, hands down, the best glazed donuts I’ve ever eaten. Thank you! (My kids said, “I donut know if I’ve had a better donut!” ) 🙂
Jana! This makes me so happy! You have no idea. Thank you for letting me know! Haha, your kids…
Hi Mel,
First, your food is wonderful. Your blog is my first go-to for any recipe. Thank you for sharing your talent!
Second, can the donut dough refrigerate for longer than one night (2, maybe 3)?
The longest I’ve let it go is a full 24 hours, but I’m guessing it’s probably good for a couple of days (probably no longer than two).
So so so good!!! Thank you for all your tips. They were very easy and delicious. New family favorite.
Thank you, Becky! So thrilled you made them so quickly – thanks for taking the time to let me know.
Seriously the BEST donuts!!
Yay! Thank you!
Do you have a good recipe for chocolate glaze?
These look
I’m making the donuts today and I’ll experiment with chocolate glazes and update the recipe!
These look so good! I want To make them for my daughter’s baptism this Saturday. Would they still be good if I make Them the night before? Should I wait To glaze them in the morning?! Thanks!
I think donuts are best fresh as can be – but having said that, we’ve eaten leftovers the next day and they’re still tasty. We like to warm them up slightly before eating. I think I would glaze them when you make them (not the next morning).
I just made a batch of doughnuts last week and now I’m anxious to try your recipe. It looks delicious! If I had my choice of any dessert or a yeast doughnut, I would take the doughnut every time!
One tip I used to get the doughnuts into the oil without stretching them too much is to cut little squares of waxed paper about the size of the cut doughnut while the dough is rising. and set aside. Once you have cut out the doughnuts, place each one on a square of the waxed paper to let them rise the last time. All you have to do is pick up a square of the paper with the doughnut and turn the doughnut out into the grease without touching it for frying. It’s a little more effort but saves the shape of the doughnut.
Thank you so much for this tip!
Looking for a sponsored link for that dough container…
Yes. I was curious about were to get that container too.
Hi Nikki and Ashley, I bought mine at a restaurant supply store here locally a long time ago. They’re quite a bit more expensive on Amazon! Yikes. The ones I have are similar to these ones – just as a point of reference. But if you scroll down to the bottom of this thread, several other people have included ideas/links on where to get them more affordably.
Orson Gygi sells them. Its a store in SLC, UT and you can shop online.
What kind of vegetable oil do you use?
I use the vegetable oil from Costco.
I’m sorry but I didn’t notice a guesstamant on how many donuts this recipe makes. Just curious approx. how many did you make not using the scraps.
It makes about 20 donuts (without rerolling the dough)
Don’t roll your dough twice, that dough is what is used to make apple fritters! Just add diced apples tossed in cinnamon and sugar to the dough. Delicious!!
Great idea!
We tried the apple fritters with the leftover dough. DIVINE BRILLIANT SO YUMMY. I liked them better than the doughnuts. Thank you for the wonderful suggestion.
Okay, you convinced me. Got to make these! But we are stuck at home and can’t have a party or eat this many ourselves! If I were to halve the recipe, any best guess as to how much yeast to use? I know yeast is one of those ingredients that doesn’t double, etc., easily.
I would use 3/4 teaspoon for a half batch. I think that should be fine!
These look amazing! I am wondering though…can you air fry them??
I’m not sure – sorry! I don’t own an air fryer so I haven’t tried.
Is it really 1.5 tsp yeast and not TBS? That’s 7 cups of flour, the ratio feels off to me.
Yes, it’s 1 1/2 teaspoons. It seems low but it’s the perfect amount for that overnight rise.
Hi and thank you for sharing!
I only have one question if I don’t have a stand mixer, can I nead the dough by hand?
Hi Adriana, unfortunately, I think this would be a hard dough to make by hand due to the kneading time (and adding the butter piece by piece).
I am SO excited! I just ordered a Bosch for my 14 year old bread making boy. (His name is Jackson.) It is supposed to arrive on Thursday. I know what we are going to make first! Yummy!!
How awesome is that?? What a lucky kid – and so cool that he loves to make bread!
Can you use this same recipe with an air fryer?
I don’t own an air fryer, so I’m not sure. Sorry!
I need to try these asap! Just wondering how you dispose of all the oil? Thanks!
Hi Lindy, I keep the oil (either in the deep fryer, well covered) or in an empty jug and reuse it once or twice before disposing of it. When I am ready to throw it out, I let it cool completely and pour it into a container with a lid (like a milk carton) and put it in the trash can.
Just a note…our local recycling/trash center has a place to dispose of oil. We use ours a few times, store in the original jug then take to recycling center.
Great! I’ll look in my area!
HOLY YUM!!!! I am going to attempt to make these with almond milk since we’ve got some people in our family that can’t tolerate cows milk.
Also. Have you ever tried these with wild yeast? I may also give that a whirl.
Thank you for sharing!!!
Haven’t tried with wild yeast – good luck if you do!
Can you let us know how the almond milk worked? I also tend to use almond milk instead of cows milk . Thanks!
FINALLY! this was the last recipe your site truly needed. Now I never ever need to go anywhere else for any kind of recipe
Haha…if there’s any other recipes I need to add, let me know! I love a good challenge/project.
My good friend hosts a donut party every Halloween. She makes something like 10-12 dozen donuts every year. Just wanted to offer a tip I learned from her: use an electric skillet to fry your donuts. Just make sure it’s deep enough for a couple of inches of oil.
Thanks, Amanda – that’s what my mom always used, too!
Mel, I’m so excited to try these! I showed my husband along with the fact the recipe is from”Mel” and he can’t wait for me to get it done! I’ve made your funeral cheesy potatoes so many times I know it by heart but we call them “crack potatoes” because they are so good and addicting! These donuts I’m sure will be just as good! Thanks for your tried and true recipes! Carol
You are so sweet and positive, Carol – THANK YOU!
Do you save the oil (mark the container) to use again for donuts or what?
Yes, I reuse the oil once or twice before tossing.
So excited to try these. I already stirred them together and rising in the fridge for tomorrow. Now I have to be creative and find something small enough to cut the center hole in the donuts since I don’t have a biscuit cutter that small.
Do you have large piping tips? Is so, you can use that!
Genius! Thank you for this comment.
I’m excited! Let me know how they turn out! You could fry them as full rounds and glaze them like that. Not a traditional “holey” donut, but hey, would still be yummy. (Or cut and cook in thinner strips, maybe?) or call a neighbor and see if they have a small cutter. 🙂
I’ve used a clean medicine cup with good results for the center hole! Look around for any tiny cup!
Great ideas, you guys!
What are your thoughts on peanut oil? I made doughnuts with vegetable oil but didn’t like the taste of the oil so I want to try frying in peanut oil.
I always fry with peanut oil. For me, the flavor is better and it doesn’t stink up my house like vegetable oil can.
Yes, peanut oil works great for frying!
Heavens to Mercotroid! I have been craving donuts something bad. It’s not even like I seek them out on a regular basis! I just want a classic Long John with maple glaze or a simple old fashioned. We have a local regional chain with fancy doughnuts and obnoxious names, they’ve even been doing porch delivery! But I like simple. Do I really need to find out if I can successfully make doughnuts? lol Albeit thankfully not instant gratification. So that helps. lol
I don’t seek them out either, Andrea, but man, I crave them bad sometimes (and I agree, simple all the way)
Does anyone know if this dough recipe will work well in an air fryer? I know the store-bought refrigerated biscuit dough donuts work well in there!
I don’t own an air fryer, so I don’t know – if someone tries it, I’d love to know how it worked out!
Oh my gosh! I was craving homemade doughnuts and decided to check your website to see if you had one. Lo and behold! You posted this glorious recipe! So excited to try this! Thanks.
Yay!
We have a potato donut recipe we make every year in the fall but I am excited to try yours. I use a tuna can with both ends cut out then use the small donut hole cutter for the inside. Works great! We also use the end of a round wooden spoon to flip them in the oil. Then they don’t get squished with the tongs. Our favorite glaze is using maple extract or almond extract. I also use some melted butter in the glaze. Almond flavoring is amazing! Thanks for the recipe!!
Thanks for the tips, Colleen!
Do you have a link to that red lidded dough rising container? I looked on amazon and your favorite things list…I’m happy to use an affiliate link! 🙂
Hi Emily! I bought mine at a restaurant supply store here locally a long time ago. They’re quite a bit more expensive on Amazon! Yikes. The ones I have are similar to these ones.
King Arthur Flour also sells some nice ones by mail.
Good to know – thanks, Beth!
This website called Restaurant Supply has them for $4.99 and the lid for $1.99… I don’t know what the shipping is though…
Just checked out that website. It would be over $19 to shop one container and lid, fyi.
So excited for this recipe! I made some homemade donuts a couple of weeks ago and was so excited when you posted that you were going to share a recipe for them! Can’t wait to make them.
Thanks, Sarah!
Thanks, thanks, thanks for this recipe Mel! I’ll be making them soon. It’s getting colder here so this is just what will get me through this quarantine! And omg your kids are so grown up, and they cook so much, love that! Have a great week.
Thank you so much, Paula!
I love donuts and will try this recipe. However, spudnuts have always been the best! When I was a little girl, my grandparents lived on Pearl street which was right behind the train depot in Boise. Across the street from my grandparent’s home was a house with an unattached garage. The owner of that house converted his home into a spudnut shop. When he was making those donuts, the neighborhood smelled wonderful! One time when we were outside playing, he brought over a bag of donuts for us. All I can say is YUMMY !
Oh wow, what a GREAT memory!! Spudnuts are amazing. My mom made them all the time growing up, and I’ll definitely post about those some day!
Hi Mel, thank you for posting this donut recipe, I am definitely going to make it very soon. Yes I look forward of seeing your Spudnuts recipe soon
Thanks, Norma!
Thank you for taking the time to perfect this recipe. My hubby and boys love donuts. I think I’m going to attempt making them with whole wheat flour sometime this week.
Let me know how it goes!
We are a spudnut family. We make them every Halloween. One trick we use to glaze our doughnuts is to use a wooden spoon handle to slide through the hole to flip them, then after both sides are glazed we keep them on the spoon, rest the spoon on the sides of the bowl (so the doughnut is suspended over the glaze in the bowl) and let the excess glaze drip back into the bowl. (We usually have two wooden spoons so one is flipping and one has lots of dripping doughnuts on it.) Happy doughnut making!
Cool idea and trick with the wooden spoon, Jessica! Thanks for sharing!
Does the day percentage of milk make a difference?? We are making these next weekend for sure
Hey Bryn, I always use 2% – that’s what the recipe is tested with (I’ll add that info to the recipe). I’m guessing any type of milk would work, although I hesitate to recommend skim. I think the dough needs some milkfat.
Thank you for your reply. We always have skim and almond milk on hand so I always make sure to check. Donuts are certainly a good justification to add 2% to our pick up order! Hope you (and all your readers) are doing well.
Thanks, Bryn! You, too!
Yum. I already have an amazing donut recipe, I mug need to make both and compare them!
I want to live with you!
haha. Trust me, you don’t! I’m grumpy today.
These look so delicious! Thanks for posting! We always go out for donuts after church and now I want to continue the tradition quarantine style with homemade donuts. Question- I only have a handheld mixer will that work okay?
Hey Jana, honestly, I’m not sure. I want to say yes, because homemade donuts should be accessible to all! 🙂 But this recipe will probably be best with a stand mixer because it requires a longer kneading time.
My husband loves chocolate glazed donuts. Do you happen to have a good recipe for a chocolate glaze?
I don’t have a perfect one yet (mostly we do glazed donuts, but I need to experiment with a chocolate glaze!). I did a quick google search and this one from epicurious looks promising! https://www.epicurious.com/recipes/food/views/chocolate-glaze-51157030
Mel, you are amazing. This looks so fun and yummy!!
Thanks, Amy! 🙂
These look so delicious! I made some doughnuts over the weekend, using the Cook’s Illustrated recipe, which has a lot in common with your recipe (cold rise in the fridge overnight, etc.). I put my doughnut scraps in a container in the fridge overnight and rolled them out the next morning with no problems whatsoever, so I thought I’d share that tip, if you or your readers would like to give it a try. (Plus, that meant fresh doughnuts BOTH days of the weekend, which gave me Rock Star Mom status, if only briefly!)
Awesome, Jen! Thanks for mentioning that!
Oh boy, these look good! Before I even attempt to make these, I have a question I’d rather know the answer to before getting mid-way through. In the making of the dough part, you say if it has kneaded for 10-12 minutes and doesn’t leave a lot of residue on your fingers, it’s good to go, and to only add more flour if the dough is extremely wet and coats your hands and fingers. So, let’s say you DO have to add more flour (as has been my predicament in the past, with non-donut recipes). At that point, after adding flour, do you continue to mix the dough for another 10-12 minutes? Or until the desired consistency is reached? Or…? This “don’t have a ton of confidence working with yeast” girl appreciates your help. 🙂
Great question, Danelle! If you have to add more flour at that point and it’s less than 1/2 cup, no you don’t need to knead for another 10-12 minutes. Just mix until the dough comes together, probably 1-3 minutes.
Thank you for this reply, this has happened to me also and I’m never sure how long I need to knead after the added flour! Thanks Mel! 🙂 And thanks Danelle for asking the question!
Thanks so much for the info!
We have a tradition of making donuts in snow days. I’ll have to try this one next time, if I can predict the snow day ahead of time in order to refrigerate the dough! (And if they even send us back to school in the fall!) On second thought, we might have to just try making them now.
I like that last idea best! 🙂
I am so excited to give this a try!! They look so delicious. I have a request for one other kind of doughnut recipe. Since we moved away from Utah about 10 years ago, from time to time I just crave a chocolate Dunford doughnut. I had a pretty good copycat at a grocery store when we lived in Montana, but now in Fargo I can’t find anything even half as good. Please post a chocolate cake doughnut in the future! I have tried a few different recipes but I just havent had any luck. Always dry chocolate doughtnuts. No good.
I’ll keep that on my to-try radar!