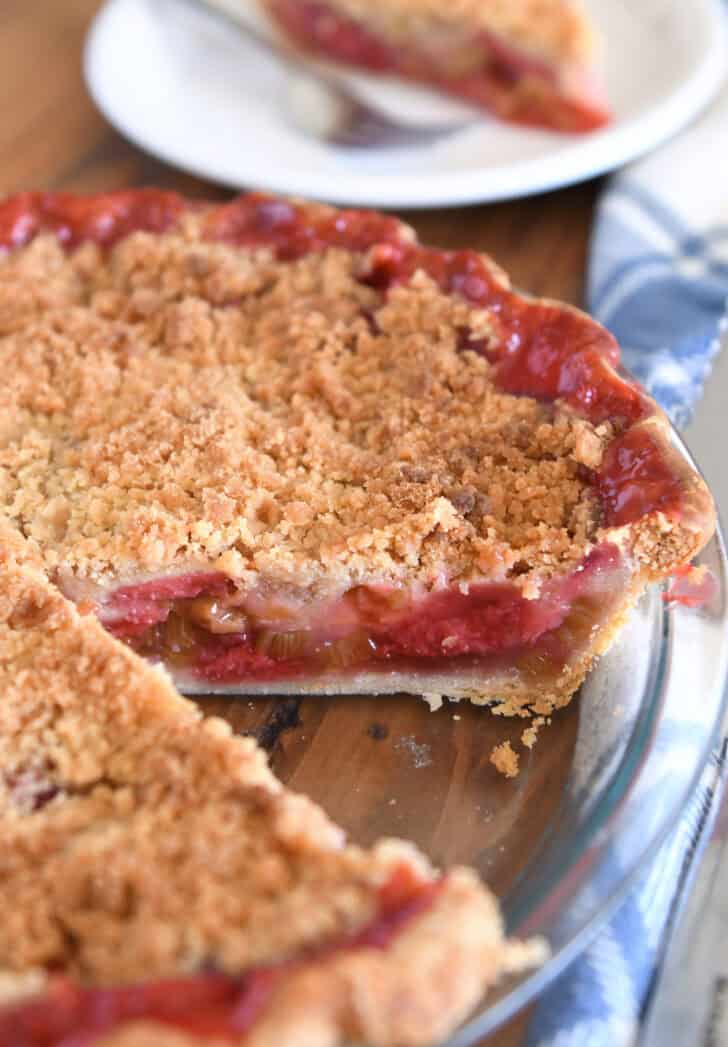
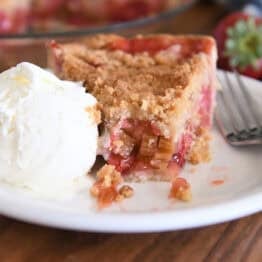
Strawberry Rhubarb Pie
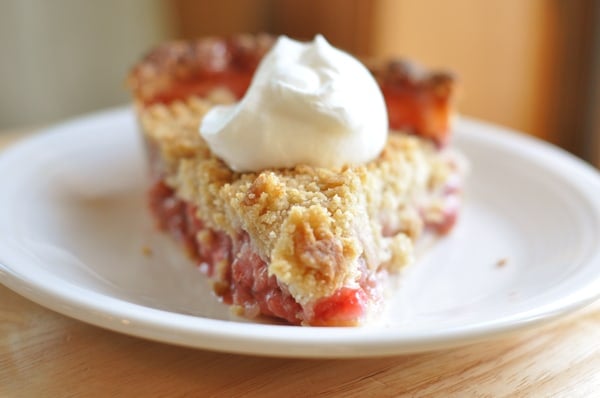
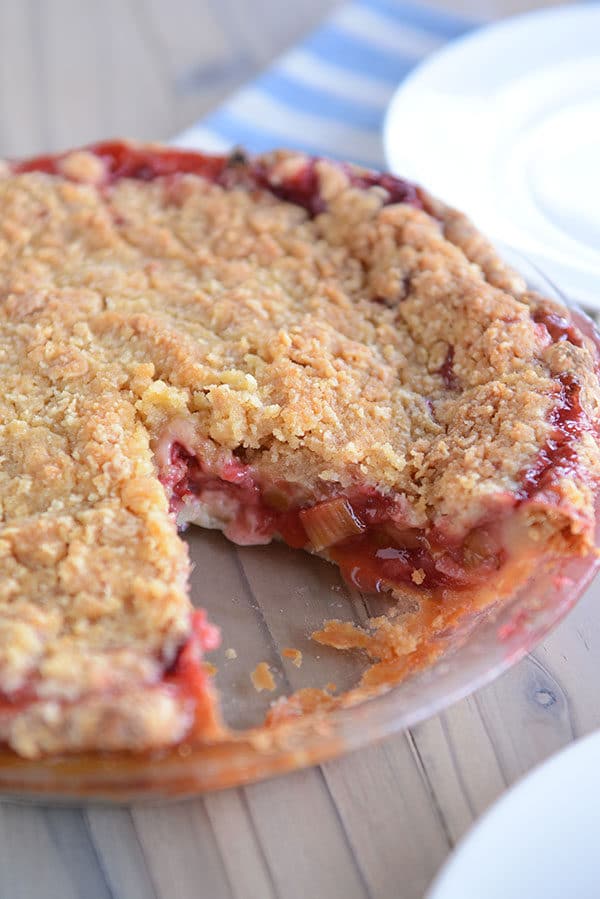
This best-ever strawberry rhubarb pie is filled to brimming with juicy, sweet strawberries, tart rhubarb, and the most delectable streusel topping. It’s my favorite summer pie!
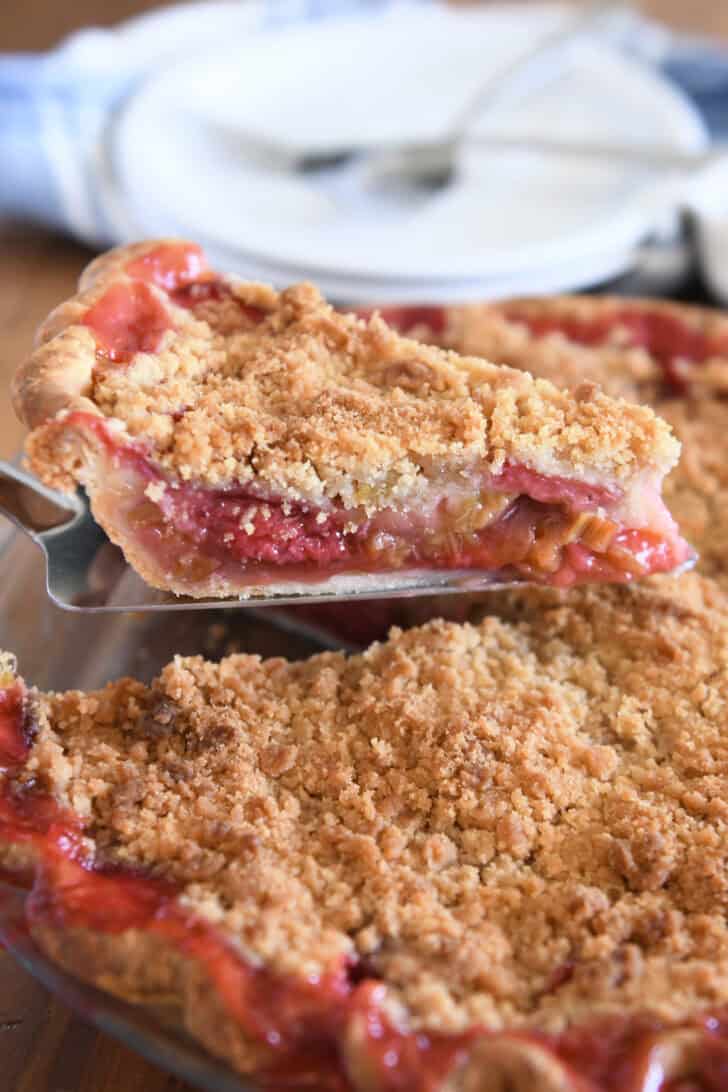
This pie has over 500 5-star reviews! The sweet-tart filling and sweet buttery streusel is truly a winning combination. Try a slice with a scoop of vanilla ice cream and prepare to declare it your new favorite dessert!
How to Make Strawberry Rhubarb Pie
Strawberry rhubarb pie is one of the easiest pies you can make. The filling doesn’t require any baking.
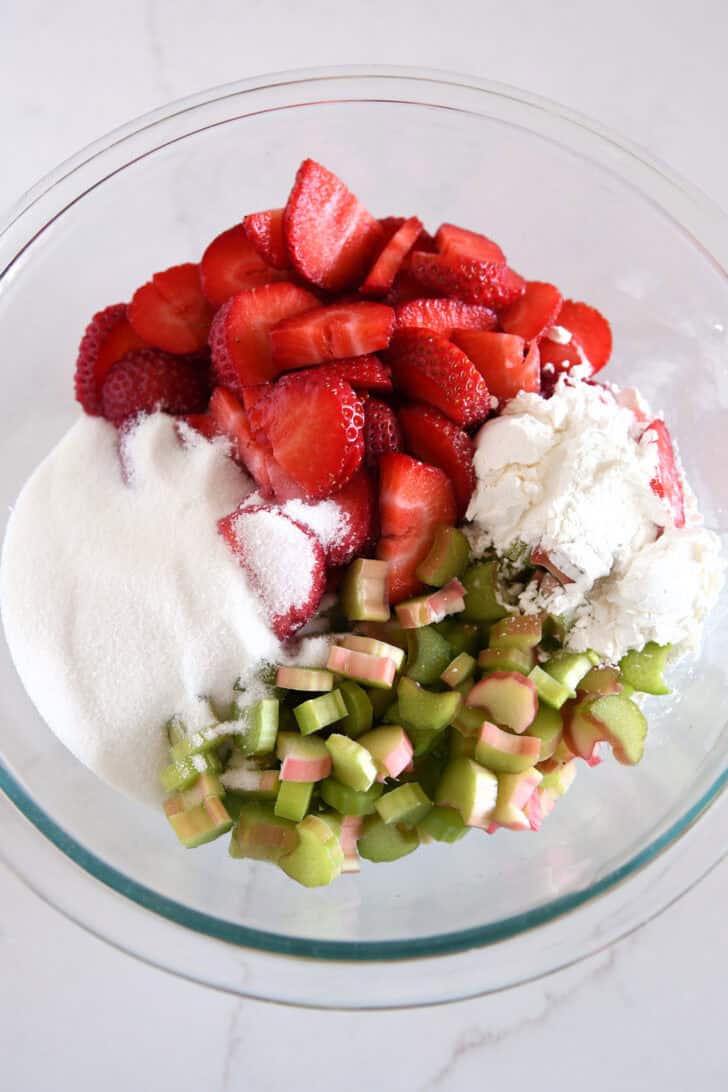
Simply stir together:
- chopped fresh strawberries
- diced fresh rhubarb (any variety)
- cornstarch
- granulated sugar
Make sure to stir the filling together until there are no pockets of dry cornstarch or sugar. The mixture will look wet and shiny.
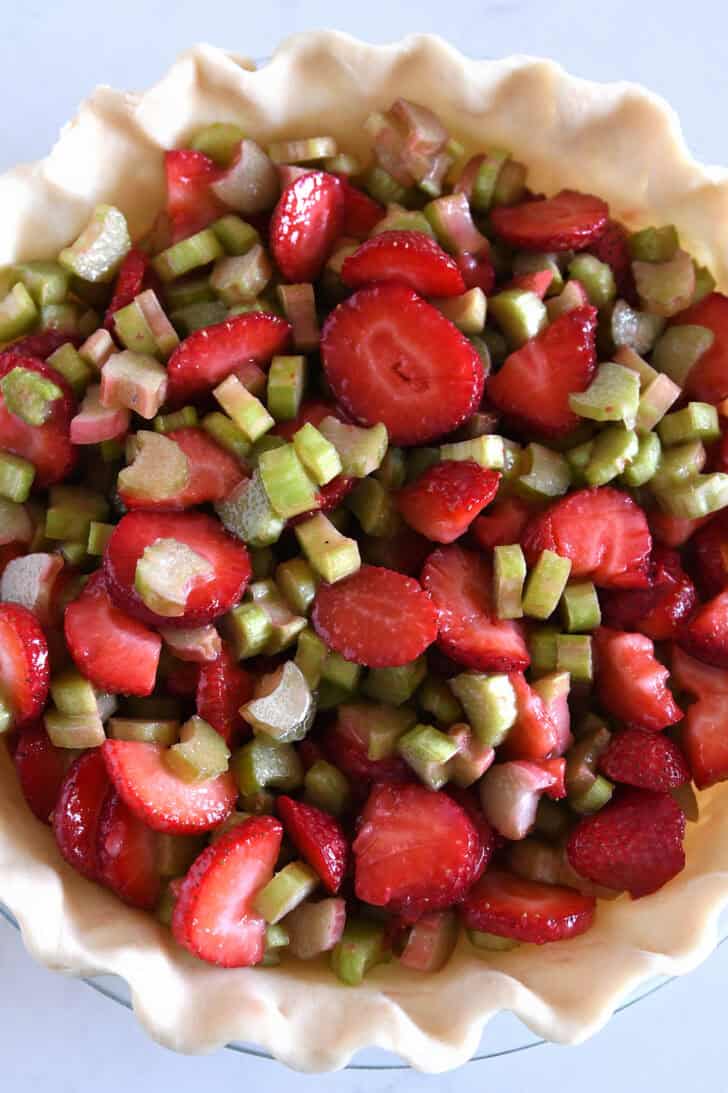
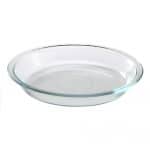
Place the fruit filling in an unbaked pie shell fit and crimped in a 9-inch pie plate.
The Streusel on Top
This glorious pie is made even better thanks to the buttery, sweet streusel on top of the pie.
It couldn’t be easier! Cut together butter, brown sugar and flour until the mixture is crumbly and the butter is in pea-size pieces.
Spread the streusel evenly over the top of the unbaked pie.


A Few Key Tips for This Pie
While this tasty summer pie is undeniably straight forward to make, there are a few tips that will help ensure that it turns out perfect every time.
- Dice the rhubarb 1/4-inch thick so it cooks evenly and softens perfectly while baking.
- Use the ripest strawberries you can find, but make sure they are still firm and not soft and mushy.
- Bake the pie long enough (in fact, bake it a few minutes longer than you might think). This is the most important tip! If the pie isn’t baked long enough, it won’t thicken and gel properly. Bake until the bubbles of filling popping at the surface are thick and syrupy.
Pro Tip: if the streusel and/or crust are browning too quickly but the pie still needs time in the oven, tent the top of the pie with foil or use pie crust shields for the edges and continue baking the pie.
Best Pie Crust for Strawberry Rhubarb Pie
Any favorite unbaked pie crust recipe (storebought or homemade) will work well for this strawberry rhubarb pie.
Here are the three pie crust recipes I alternate between when making pie:
Each of the above pie crust recipes are terrific for this pie…or any other pie!

15 Years of Rave Reviews
This pie is exceptional! It has been our family’s favorite for decades, and so many of you have been loving it for years, too.
⭐️⭐️⭐️⭐️⭐️ This is absolutely the best strawberry rhubarb pie! 5 stars plus more! -Cathy
⭐️⭐️⭐️⭐️⭐️ This might be the best strawberry rhubarb pie I have ever had. Thanks for this deliciousness!! -Elaine
⭐️⭐️⭐️⭐️⭐️ I’ve never been a pie lover but made this for my husband today for Father’s Day. I’m in love. This recipe was delicious. Thank you so much! -Meryl
⭐️⭐️⭐️⭐️⭐️ This is such a great recipe and has quickly become a HUGE family favorite. In fact, after finding it online about a week ago, I’ve made it every day but 2 in the past 2 weeks!! LOL The only change I made was to add a bit of cinnamon to the streusel topping. Thank you so much for sharing it! -Jeannie
Strawberry Rhubarb Pie
Ingredients
- Single crust pie dough (see note)
Filling:
- 2 ¾ to 3 cups (340-455 g) diced rhubarb about 1/4-inch thick, about 5-6 medium stalks
- 2 cups (about 455 g) sliced strawberries
- ⅔ cup (141 g) granulated sugar
- 3 tablespoons (28 g) cornstarch
Streusel Topping:
- 1 cup (142 g) all-purpose flour
- ½ cup (106 g) brown sugar
- ½ cup (113 g) cold butter, cut into tablespoon-size pieces
Instructions
- Preheat the oven to 375 degrees F. Lin a large rimmed baking sheet with foil and set aside.
- For the filling, in a large bowl, combine the rhubarb, strawberries, sugar and cornstarch. Mix well; the mixture will start to thicken and become syrupy as it is stirred. Set aside.
- Roll out the pie crust to 12 inches and place in a 9-inch pie plate, easing the pie crust into the edges of the pie plate without stretching. Trim, leaving a 1/2-inch border. Tuck the overhanging pie crust underneath so it is even with the edge of the pie plate. Flute the edges.
- Scrape the strawberry rhubarb mixture evenly in the pie shell.
- For the streusel, combine the flour and brown sugar in a medium bowl. Add the butter and use a pastry blender or two knives to cut it into the flour mixture until crumbly.
- Sprinkle the streusel topping evenly over the top of the pie filling.
- Place the pie on the prepared baking baking sheet (to catch any drips), and bake for 65 to 75 minutes, until the streusel is golden and the filling has thick (not runny) bubbles popping at the edges. Cover the pie crust edges with a pie crust shield or tent the top with foil to prevent over browning, if needed. It's important to bake the pie fully so it sets properly.
- Let the pie cool completely to allow the filling to thicken. Serve with a scoop of vanilla ice cream or sweetened, whipped cream, if desired.
Notes
Recommended Products
Recipe Source: Mel’s Kitchen Cafe
Recipe originally published May 2010; updated in May 2017 and again in March 2025 with new photos, commentary and recipe notes.
—————————————-
Update: this pie crust recipe (below) was included in the original post for Strawberry Rhubarb Pie seven years ago. Over the years, I’ve come to rely on this no-fail pie crust as my favorite, go-to pie crust, but I’ll leave the following recipe listed in this post in case anyone still uses it (don’t want anyone panicking over a lost recipe!).
No-Chill All-Butter Pie Crust
adapted slightly from Jen K.
*Note: this pie crust makes for a sweeter-than-normal pie crust. If you want more of a traditional pie crust, since they aren’t known for being overly sweet, decrease the sugar by half.
*Makes 2 pie crusts (for 2 single pies or 1 double crust pie)
1 cup (2 sticks) very cold butter (I cut my butter into about 16 small pieces, put them on a plate and place the plate in the freezer for about 15 minutes before using in the recipe)
2 cups all-purpose flour
1/4 cup sugar
1/4 teaspoon salt
1/4 cup very cold water, plus an additional tablespoon or two if needed
In a food processor or stand mixer fitted with the paddle attachment (or in a large bowl, if mixing the dough by hand), combine the flour, sugar, and salt. Mix for a second or two to blend. Add the butter and, on low speed (or by hand with two knives or a pastry cutter), work the mixture until it is crumbly and the largest pieces of butter are no bigger than a pea. The butter should remain cold and firm. If the butter is becoming too soft, refrigerate the mixture for a 10-15 before continuing. Once the butter/flour mixture resembles large coarse crumbs, on low speed (or tossing with a fork, if mixing by hand), sprinkle the 1/4 cup cold water evenly over the flour mixture, and mix just until it pulls together in a shaggy mass. Add a tablespoon of cold water additionally at a time if the dough isn’t pulling together well. The object isn’t to have a smooth, tight ball of dough – the dough should still have loose pieces of flour here and there but should just start coming together when the water is mixed in.
Dump the dough out onto a work surface. Using your hands, pull the dough together and gently press it into a large ball. It should start joining more cohesively and forming more of a dough-like consistency. Separate the dough in to two pieces. Set one piece aside and gently cover while working with the other.
Using a lightly floured work surface (a roul’pat works great here!), begin rolling from the center of the dough outward. Stop the pressure 1/4 inch from the edge of the dough. Lift the dough and turn by a quarter and repeat the rolling until the dough is at least 12 inches in diameter. The lifting and turning is important because this will let you know if the dough is sticking and if more flour is needed on your work surface.
Carefully fold the dough into quarters and place in the pie dish (or roll up on your rolling pin and gently unroll in the pie dish). Ease the dough into the bottom and up the sides of the pie dish without stretching (if the dough is stretched to fit the pie plate, it will shrink while baking). Using kitchen shears or a sharp knife, trim the excess dough around the edge of the pie plate so that there is still about 1/4 to 1/2-inch hanging over the edge of the pie plate. Fold this excess under the edge of the pie to form an extra thick edge on top of the pie plate rim. Flute the edges with your fingers. Cover the pie plate loosely with plastic wrap and refrigerate for at least 15 minutes or up to overnight before filling and baking. Repeat with the second half of the pie dough.
OH MY, THIS PIE! I have the goal to make every recipe in Mel’s cookbook and I’m not going to lie, this recipe was the recipe (and really the only recipe) I was super…not excited….to make because like, rhubarb?? Only old people like rhubarb, right?? WRONG! Despite being young(er) than the average “old person”, I have to confess that I am now a fan of rhubarb, at least in this recipe! Dare I even say that strawberry rhubarb pie might be in my top 3 favorite pie flavors now?! Absolutely DELICIOUS!
I was going to take it to a YW/YM activity tonight because I didn’t think I’d be able to eat it all on my own, let alone like it enough to eat it…I’m definitely second guessing that decision now!
Thanks for changing my life with this recipe, Mel!
*Happy Tears*
Haha, this comment was THE BEST, Kayli! First of all, I’m so so happy this pie converted you over to the land of loving rhubarb. Oldie taste buds unite! 😉 Second of all, I can’t believe you are making every recipe in my cookbook. What an honor. You are a rock star!
This is the best pie I’ve ever made and ever eaten!!! I used the no-fail pie crust and it made the best, flakiest pie crust! I will. Be making this over and over again!!!
Laura, I’m so thrilled you loved this. Way to go!!!
I made this and took to work. My friends loved it, and so did I. I used a frozen pillsbury crust. My only change was to add a little grated orange zest. The crumb topping was delish too. I baked for 75 min. I covered the top w foil at 30 min. Delicious!
Orange zest – what a delicious idea!
Beyond delish!!!! I added some orange zest to strawberry/rhubarb mixture, used a frozen crust and tented either foil after 30 min. It was a big hit with my friends at work. Outstanding recipe!
First made this pie a couple of days ago, and it turned out great! Followed recipe as is except used a brand name pie crust (I hate making pie crust!}, and added a little cinnamon to the topping. It was delicious and well balanced. Will make again.
Foil on the pan is necessary for the spills, but it came out looking just like your picture. Thanks for this and many other excellent recipes.
Thanks for the comment, Faith – I’m really happy this pie worked out well for you!