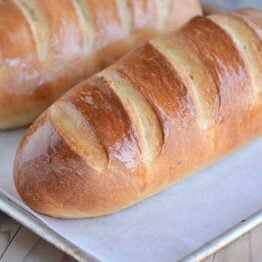
Easy Homemade French Bread
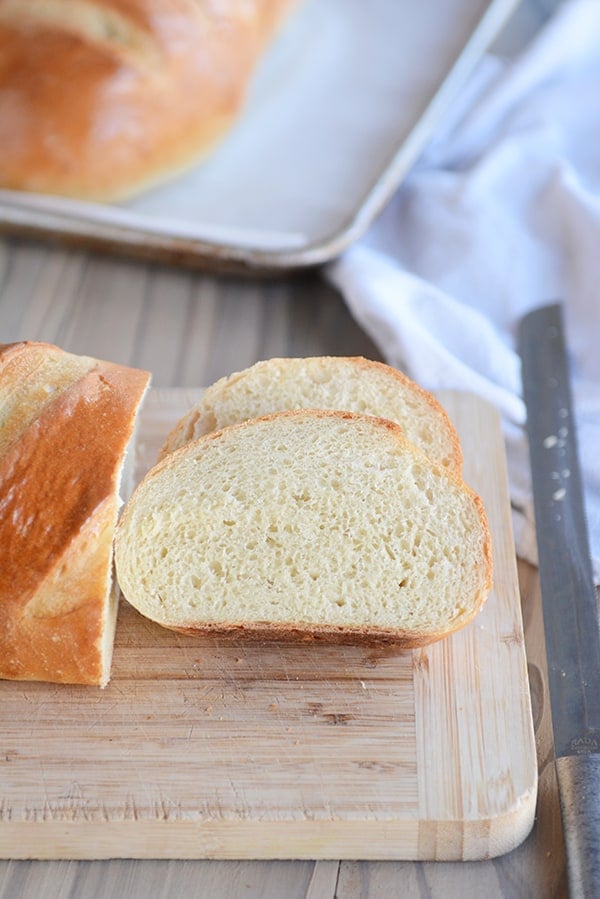
Homemade French bread has never been easier! This simple recipe produces a light and fluffy loaf of French bread that will rival any bakery!
This easy homemade French bread is so simple and perfect for a bread making beginner.
But as you can see from all the comments below, it’s just as valued by expert bread makers, too!
Making French Bread Dough
This straightforward bread dough can be made in a stand mixer or by hand.
- Warm water
- Yeast (instant or active dry yeast)
- Bit of sugar and oil
- Salt
- Flour (all-purpose or bread flour)
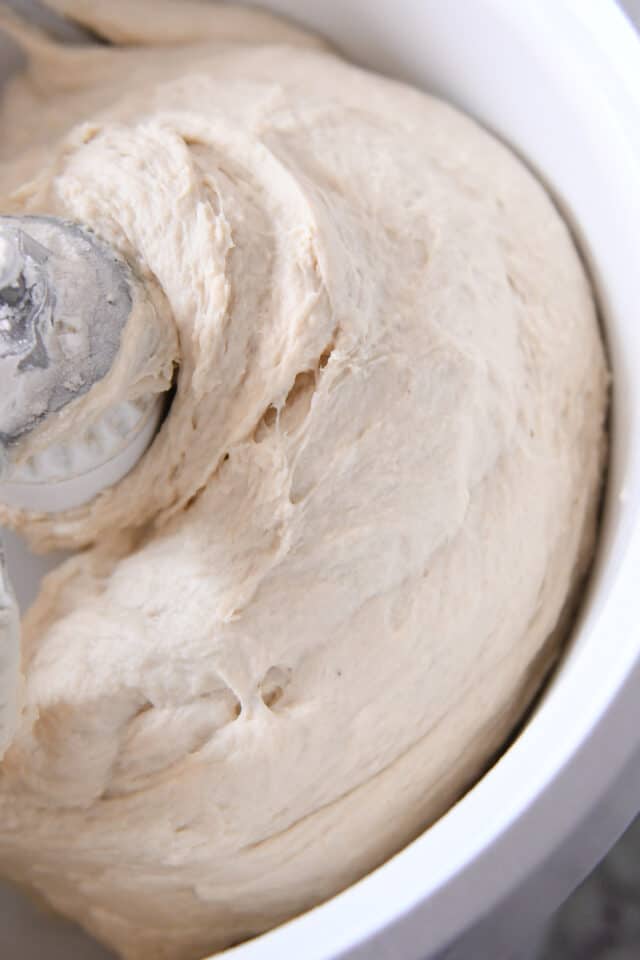
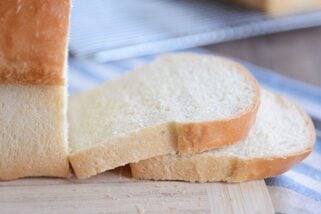
At the start, the dough will look shaggy and rough.

But as it kneads, it will become soft and smooth.
The most important part of this dough (and other yeast doughs) is to judge the amount of flour by the look and feel of the dough rather than the exact amount of flour called for in the recipe.
Factors such as humidity, elevation, room temperature, how we each measure flour, and more can affect the amount of flour added. So don’t stress about precise flour measurements and continuously feel the dough to achieve a soft dough that is slightly tacky but doesn’t leave a lot of residue on your fingers.
Too little flour and the dough will be a mess to handle. Additionally, the bread won’t hold its shape as it rises and bakes.
Too much flour and the dough won’t rise well and the bread will be tough and dense.
Two Methods for Dough Rising
In the recipe, there are two methods to letting the dough rise:
- Leave the dough in the mixer, cover with a lid or towel, and let the dough rest for 10 minutes. Stir it down by turning on the mixer for 10 seconds or so. Repeat the “rest and stir down” cycle five more times.
- Transfer the dough to a lightly greased bowl and cover with a towel or greased plastic wrap. Let the dough rise until doubled, about an hour or so, depending on the warmth of your kitchen.
I alternate between the two methods depending on my mood. The 10-minute increment rising method is unique to this original French bread recipe. The idea is that allowing the dough to rise this way produces a lighter crumb.
But the more traditional rising method also results in a delicious, fluffy loaf.
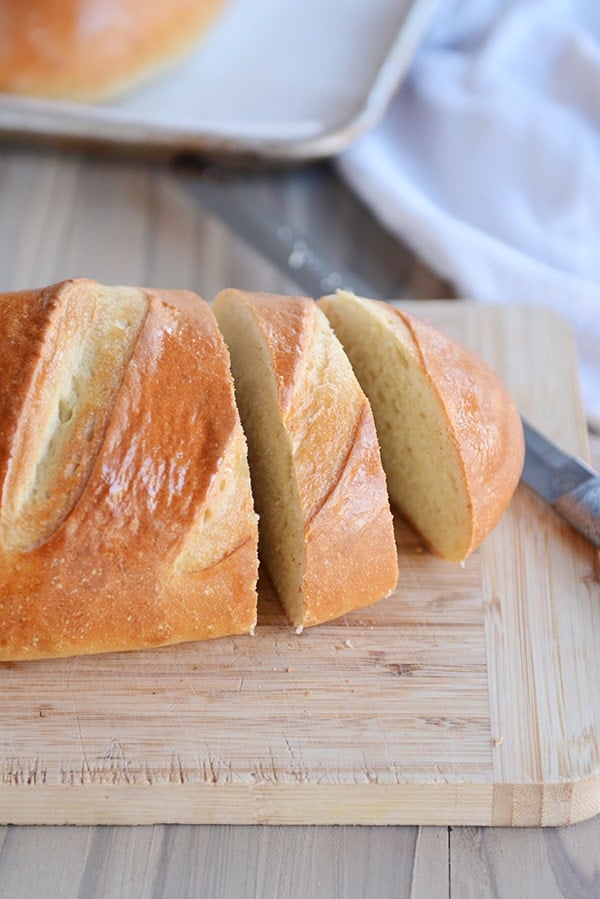
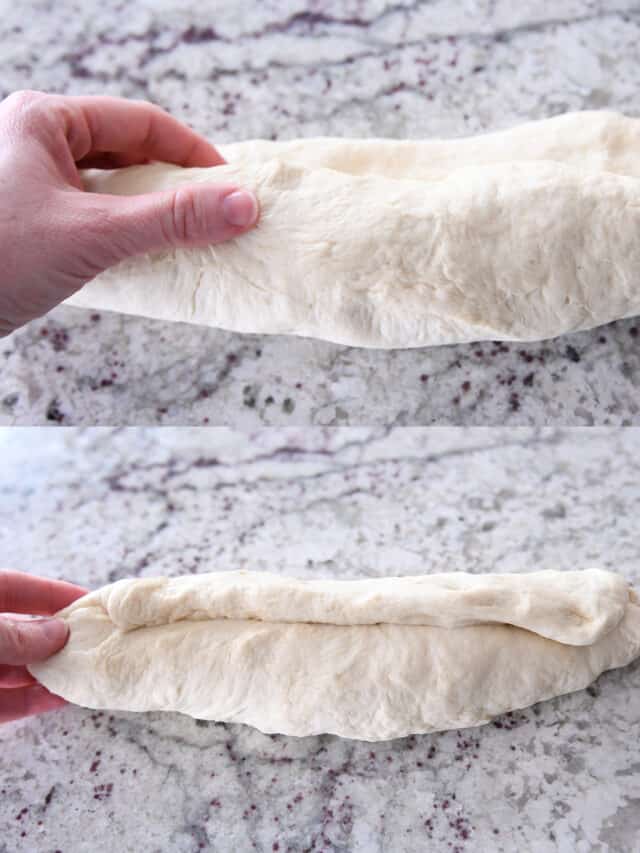
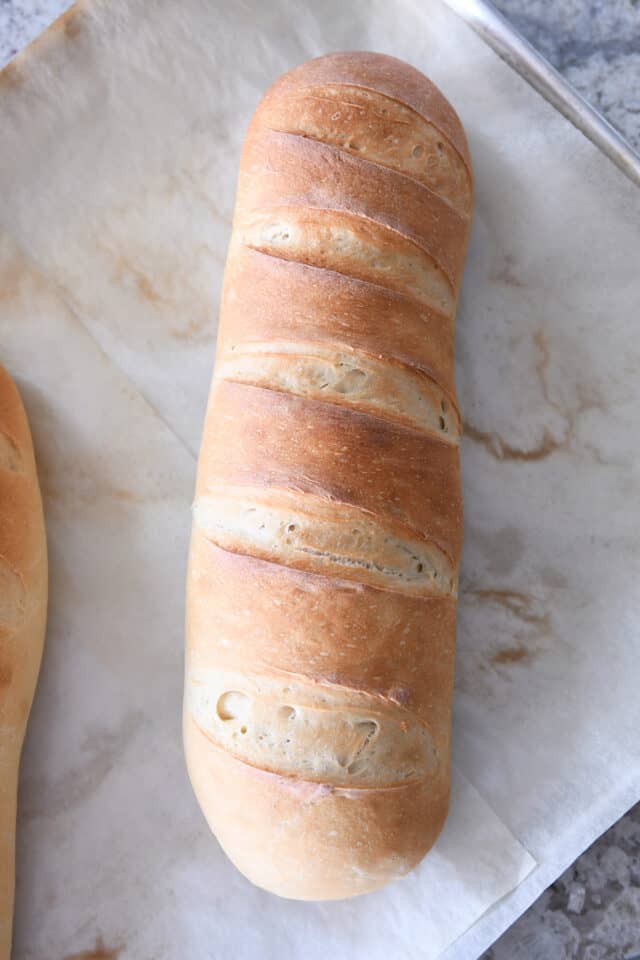
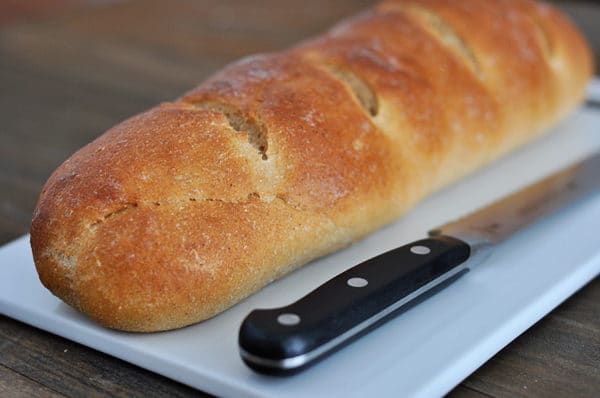
How to Shape French Bread Loaves
The question I get asked the most about this easy homemade French bread is how to shape the loaves.
The loaves can really be made any size or shape; I usually end up making 12-inch loaves, but if they end up being a bit thinner or chubbier, it’s no big deal!
Press each portion of dough into a flat rectangle and fold the bottom edge up and over the dough, pressing the seam flat with your hand.
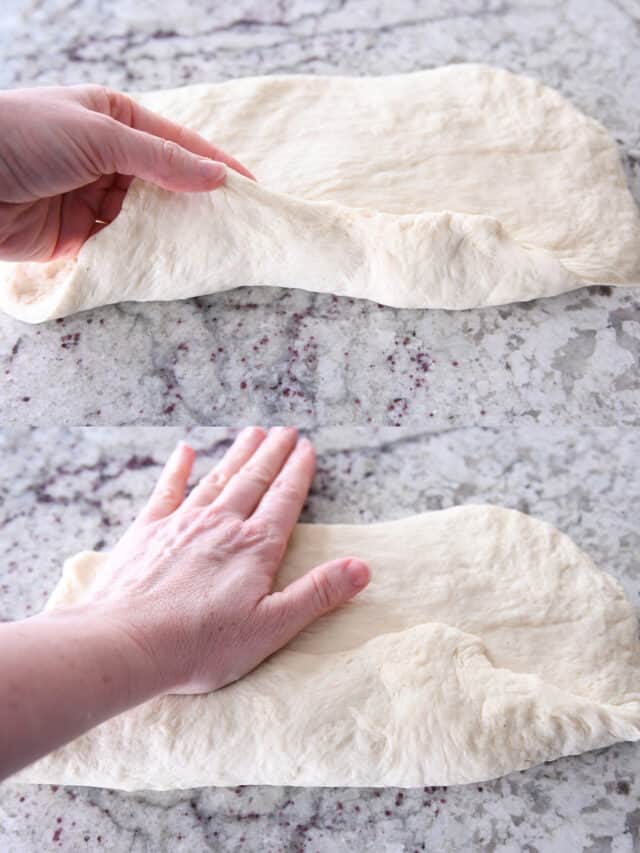
Then, roll the dough up again to meet the top edge.
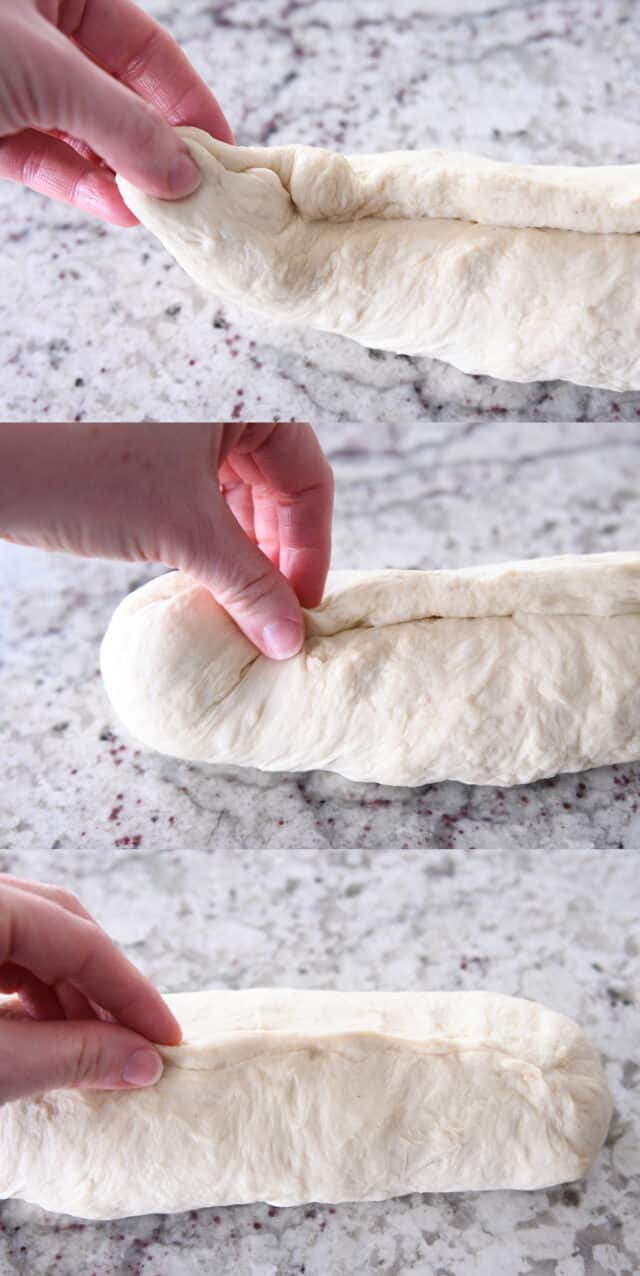
Fold the top edge over and press or pinch lightly.
Take the end of the bread dough and fold it up and over an inch or two to give an even thickness all the way down the loaf.
Pinch to seal the end. Repeat on the other end of the dough.
Then, deliberately and thoroughly pinch and seal the entire length of the loaf.
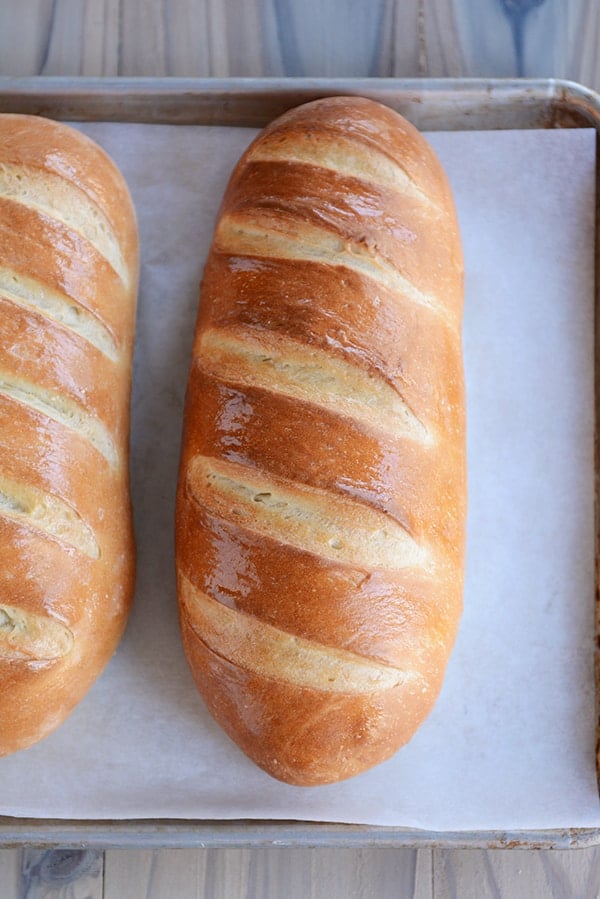
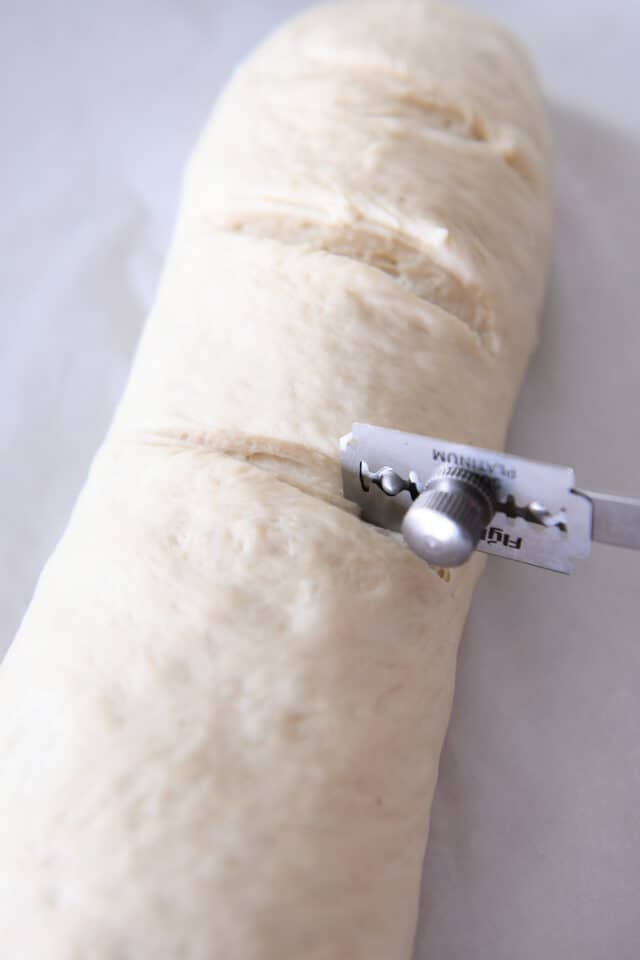
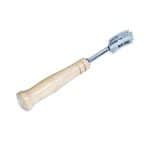
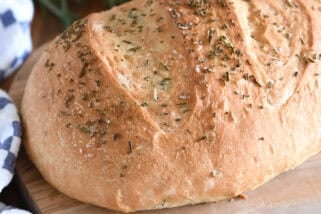
How to Score the French Bread Dough
Scoring the bread dough (in my house, also called: slashing or gashing) helps the dough rise better AND prevents it from cracking in unexpected places while baking.
Using a bread lame for this task is extremely helpful. A bread lame is a long stick or utensil with a razor blade on the end. The razor is used to make thin cuts in the dough.
If you don’t have a bread lame, using a clean, sharp razor blade or an extremely sharp kitchen knife can work. Be aware that if the knife isn’t sharp enough, it’ll likely deflate the dough.
The bread loaves can be scored before or after the final rise. I prefer to do the slashing and gashing before they rise as I’ve had one too many loaves of risen bread deflate at the first touch of the razor, and there is nothing so soul crushing as when that happens.
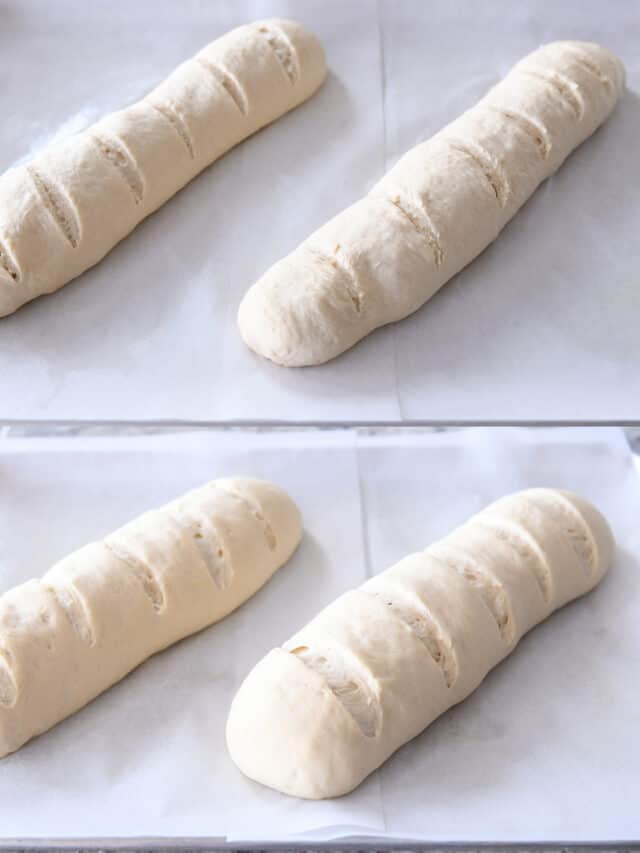
Let the bread loaves rise until noticeably puffy before baking.
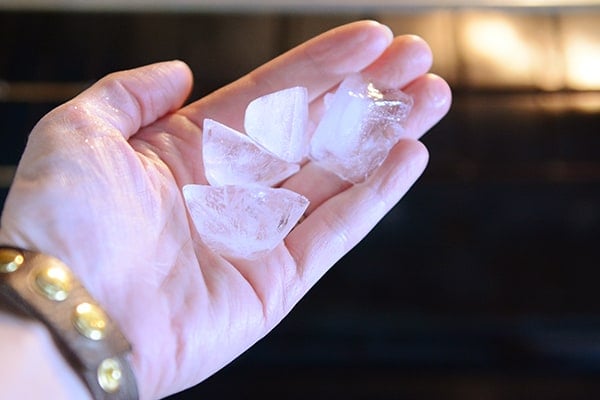
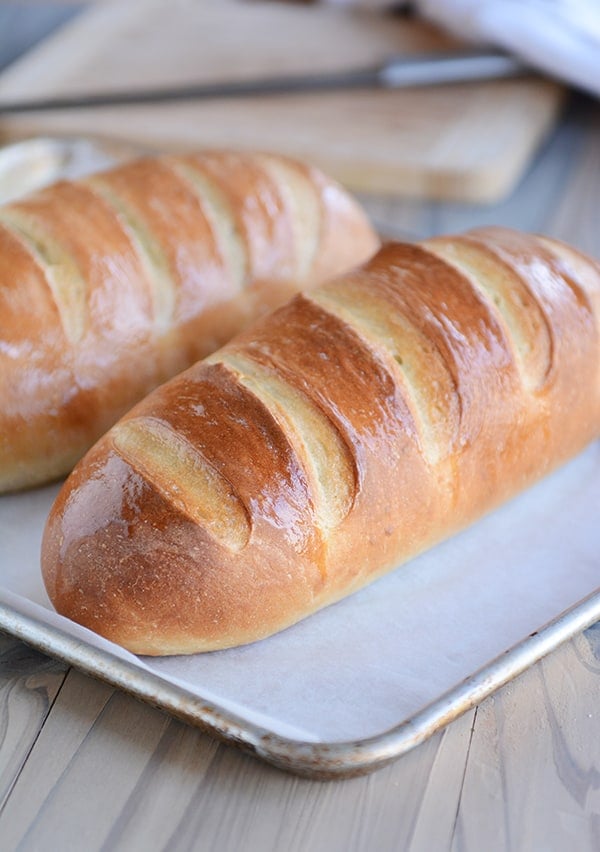
Easy Hack for Crusty French Bread
For a delicious golden crust, immediately before putting the bread in the oven, toss 3-4 ice cubes onto the bottom of the oven. Add the bread and quickly (but gently!) close the oven door.
The steam as the ice cubes hit the toasty bottom of the oven will lightly crisp up the outer crust as the bread bakes.
Important Note! Please consult your oven’s manual for details or caution on putting ice/water on the bottom of the oven floor – I’ve never had a problem, but everyone should do their own research and use their own best judgment (also take care not to toss the ice cubes on the glass oven door as it could crack).
If you are struggling to get a deeper golden crust on the French bread, try:
- Increasing the oven temperature by 25 degrees and/or
- Moving the oven rack up one position (I find my bread browns the best in the middle or upper middle area of my oven)
Whole Wheat French Bread
As noted in the recipe, French bread works quite well using whole wheat flour. I’ve found the best results are when using white whole wheat flour (red whole wheat flour makes a denser, heavier loaf).
I recommend subbing in half whole wheat flour to start and then adding more whole wheat flour as you continue to make subsequent batches of bread.
If using whole wheat flour, add a 2-3 minutes to the kneading time to help develop the gluten (also, adding a couple tablespoons of vital wheat gluten/gluten flour can also help the whole wheat bread bake up light and fluffy).
Helpful Tip: If you’ve struggled with your bread flattening out while baking instead of holding the perfect shape, you might try these French bread pans {aff. link}. I have them and LOVE them. I don’t use them every time I make this bread, but I do pull them out quite often (I also use them for this rosemary bread).
Perfect Homemade French Bread
With over 2,500 5-star reviews, this homemade French bread has become a favorite for so many of you.
Hundreds of you have let me know that you have been intimidated by homemade bread until you found this recipe! It is easy, foolproof, and will make you feel like a bread making rock star.
Helena says: Finally, after 5 failed bread attempts using other places recipes, this is THE recipe to use! Happy dance! Thank you for sharing this awesome recipe! Delicious bread!
Valerie writes: Such a fantastic, easy recipe. The “hands on” time is minimal and it comes out perfect every time. Thanks for sharing a recipe that’s become my “to do” dinner bread!
Nichole says: Followed instructions exactly! First time making any sort of bread ever. The bread turned out perfect!!!!
Pia commented: Hands down my go-to bread recipe. Today’s edition is 1/3 dark rye flour, with Italian herbs and caraway seeds mixed in and sprinkled with everything bagel topping. Yum! Best bread recipe ever, and so easily customizable!
FAQs for Homemade French Bread
Yes! Halve all the ingredients straight across – just keep an eye on the amount of flour and judge the final amount by the look and feel of the dough.
Yes, it freezes great (after baking and cooling).
Moving an oven rack up or down can help. In my oven, the bread browns best in the upper half of the oven. Also, you can try increasing the oven temp by 25 degrees.
Absolutely! You can mix the ingredients in a bowl with a spatula or spoon and knead by hand.
I always use the same amount interchangeably. Recently, I’ve heard that active dry yeast doesn’t need to be proofed in liquid first, but I always still do when using active dry yeast (no need to proof with instant yeast).
Yes, just keep an eye on baking time – smaller loaves may need less baking time.
One Year Ago: Harvest Pasta Sauce {Trader Joe’s Copycat}
Two Years Ago: Peanut Butter Cup Cheesecake with Chocolate Cookie Crust
Three Years Ago: Easy Homemade Egg Noodles {Step-by-Step Pictures Include Food Processor Method or By Hand}
Four Years Ago: Black Bean and Butternut Enchilada Skillet
Five Years Ago: Chocolate Chip Peanut Butter and Oatmeal Cookies
Easy Homemade French Bread
Ingredients
- 2 ¼ cups warm water, 110-115 degrees F
- 2 tablespoons granulated sugar
- 1 tablespoon instant or active dry yeast
- 2 ¼ teaspoons salt (see note)
- 2 tablespoons olive oil, canola oil, vegetable oil or avocado oil
- 5 ½ – 6 cups (781 – 852 g) all-purpose flour or bread flour (see note)
Instructions
- In the bowl of an electric stand mixer fitted with the dough hook, combine the water sugar and yeast. If using active dry yeast, let the mixture bubble and foam before proceeding (this can take 3-5 minutes). If using instant yeast, proceed with the recipe (no need to let the yeast activate).
- Add the salt, oil and 3 cups of flour and mix. Add in 2 1/2 to 3 more cups of flour gradually. The dough should clear the sides of the bowl and form a soft ball that doesn't leave a lot of dough residue on your fingers.
- Knead for 2-3 minutes until the dough is smooth. If the dough starts to cling to the sides of the bowl (or the center column if using a Bosch or other mixer with a center), add 1/4 cup of flour at a time until a sturdy but soft ball of dough forms.
- Rising Method 1: Leave the dough in the mixer, cover with a lid or towel, and let the dough rest for 10 minutes. Stir it down by turning on the mixer for 10 seconds or so. Repeat the "rest and stir down" cycle five more times.
- Rising Method 2: Instead of letting the dough rest for 10 minute spurts and then stirring it down, transfer the dough to a lightly greased bowl and cover with a towel or greased plastic wrap. Let the dough rise until doubled, about an hour or so, depending on the warmth of your kitchen.
- Turn the dough onto a lightly greased surface and divide in half. Pat each section into a thick rectangle, 9X13-inches or thereabouts (doesn't have to be exact). Roll the dough up starting from the long edge, pressing out any air bubbles or seams with the heel of your hand, and pinch the edge to seal. Arrange seam side down on a large baking sheet lined with parchment paper (I use separate baking sheets for each loaf).
- With a bread lame, razor blade or VERY sharp knife, cut several gashes at an angle on the top each loaf (you can wait to score the bread until after it rises, but it can easily deflate if the razor/knife isn't sharp enough).
- Cover the loaves with greased plastic wrap or a kitchen towel, and let rise until noticeably puffy and nearly doubled in size, about an hour.
- Preheat the oven to 375 degrees F and make sure an oven rack is in the center position. If you find your bread isn't browning as much as you like, preheat the oven to 400 or 425 degrees and/or move the oven rack up one position (watch carefully so the bread, especially the bottom, doesn't burn).
- Optional: for an extra golden, crisp crust, place the loaves in the preheated oven and immediately toss 3-4 ice cubes on the bottom of the oven. Close the oven door quickly but gently. (See note below!)
- Bake the loaves for 25-30 minutes until golden and baked through.
- If desired, brush melted butter over the hot loaves (this softens the crust a bit, so if you want a crispier crust, don't butter the top).
Notes


Recipe Source: adapted slightly from The Sister’s Cafe

Hello! I loved this recipe
I wanted to know if you had any advice about adding ingredients like cinnamon/brown sugar, garlic butter filling, or shreddedcheese
Hi Jenny, I think this bread dough is really adaptable to add-ins. For chopped add-ins like cheese, I’d add them in the last few minutes of kneading. Otherwise, for paste-type fillings, like cinnamon or garlic-butter, you could try rolling the dough into a thick rectangle, spreading on the filling and rolling up (either baking on a sheet pan like normal or maybe using a loaf pan). That’s just a starting point, but hopefully that helps!
I have had this recipe for a while, but we tend to eat whole grain breads, so haven’t used it until today. I have a wonderful garlic bread recipe using French bread and didn’t want to shop for just the one thing. I halved the recipe and let my bread machine make the dough through the first rise. I then divided it into two smaller loaves, scored it, did the second rise, and baked them for about 20 minutes. Oh, boy, is this a wonderful recipe. I can hardly wait to try it as the garlic bread that I am making tomorrow. I am sure it will be stellar.
I appreciate the time and effort the poster went into creating this post. But, I followed the recipe exactly, and ended up with two hard logs. I’ve made artisan bread many times before. Never tried this method. And I’m just sayin.. it didn’t work out so well for me.
Sooo good!! I did rest longer than called for. Overall I am very happy with this bread. It’s my favorite bread recipe so far.
It’m about to bake it so I will post again but none of the comments I saw stated which riding method they used and am curious about the results with method 2 because that is what I am trying
It will be my first time trying this method
It would be nice if you had a metric conversion. Also, a button to change the quantity… 0.5 to make half the recipe and 2x, 3x. Many of the websites do that and those are the recipes I gravitate toward. I would have made your bread, but didn’t want to do the conversions.
I’ve been using this recipe for about 6 years now. My wife will only request this bread, she loves it that much. It’s really easy to make and comes out great every time. I made small adjustments to my oven temp and rack location to achieve a better “brown” on top. I make this bread so often, I know the recipe by heart
I have attempted this bread two times now. The first time I used half whole-wheat and half all-purpose flour. The loaves turned out flat and more dense than your typical french bread (which I know is due to the wheat flour). I wanted to give the recipe another chance and used regular bread flour. My loaves still turned out flatter than your typical french bread. I am not sure what I’m doing wrong. My guess is that I’m not adding enough flour. However, based on how the recipe is written, I am only adding enough flour so that it clears the bowl and doesn’t stick on my fingers. I personally think I’m adding too much flour every time, but it still turns out flatter than what the pictures show. SO…any tips would be helpful! Despite the flatter bread, it still tastes good and is AMAZING in Mel’s Overnight Creme Brulee French Toast Bake!
Hi Kayli, if the dough is clearing the sides of the bowl and isn’t overly sticky, try shaping the loaves, letting them rest for 10 to 15 minutes and then reshaping and letting rise. That often helps when I have the same issue. Otherwise you can try adding a bit more flour to the dough and see if that helps
Made this recipe twice this week! First time as two loaves and second as hoagie sized baguettes for Philly cheesesteaks. This is my new go to French bread recipe. Easy and delicious!
I love this recipe, so does my husband and I’ve turned into a cheese French bread loaf, it’s amazing and it never fails.
There is nothing French about that bread. Could you just call it the American bastardisation of French bread?
There is also no bread in France called ‘French bread’
Honestly shameful for a ‘baker’ to write this bollocks.
Hi Sam.
You seem like you need a nap.
That aside, if you knew anything about American cuisine, you would know that French bread is what we here in the USA call this style of bread. Do you also rant about French fries on cooking blogs because they’re not French?
Also, why would you call bread in France “French bread”? We don’t do that here, either. There’s no “American bread.” What a weird thing to be mad about. Hope your day gets better.
Sam, what a great idea! I think I shall rename this French bread to your suggested title. THANK YOU.
Absolutely the best French bread recipe! This recipe can be “tweaked” to add herbs as well. The kneed x rest technique can’t be beat. I’m a retired husband who cooks & bakes with 18 years Food Science background. Trust me, you need not look further for a better French Bread recipe!
I needed something I can make in an afternoon to use for garlic bread, and this recipe was perfect. The bread came out wonderful and was easy to prepare.
I want to thank Mel for the help with this recipe. I just had to slow down and give the yeast a chance. Bread came out perfectly tastes great. Thanks Mel.
Stephen Thomas
Honestly this was the first recipe I found wanting to make French bread and I haven’t bothered to look for another, 12/10.
I’ve been making this bread awhile now.
We eat it a lot. I switched to jar yeast and the first rise is great but the rise in the oven not so much. What can I do? I’m thinking of more yeast or shorter rising time . What do you think?
Thanks
Stephen Thomas
Hi Stephen, is the yeast in the jar active dry yeast or instant/rapid-rise yeast?
Excellent simple recipe. Have made several times and given to friends who love it. I did experiment with different types of flour but bread flour seems to be the best.
Thank you for sharing.
It’s easy and very good. Fast also.
Can I hand mix instead of using a mixer?
Yes, this dough can be mixed and kneaded by hand.
This is normally my go to bread recipe but the auto play ads that i cant seem to turn off Ill never visit this page agin. How obnoxious!
I’ll look into the ads as they shouldn’t be auto-playing without the option to turn off. I understand ads can be annoying, however, they are also why I’m able to provide recipes 100% for free and still maintain my blog as a business. Printing out the recipe for safe keeping may be a great option to avoid any obnoxiousness. 🙂
It’s red star instant yeast quick rise.
Stephen, what is the texture or consistency of the dough? It could be that adding a little extra flour will help the loaves hold their shape so they rise up instead of flatten in the oven. The type of yeast you indicated you are using should allow the dough to rise quite well.
Thanks Mel I’ll give it a try.
Made this bread today. So easy and absolutely delicious!!!
I made this bread, first time ever making any bread, and it was great! Apparently I over-proofed one loaf because I only had room in my oven for one loaf at a time! It just kept growing 😬 So it looks a little flat but it tastes good. The other loaf I par baked it and its shaped more like bread than the other except pale. So thank you for the recipe! I’m sure I will improve in my bread baking lol
Hi! I’m just getting ready to finish and put the bread in the oven. I wondered if I could partially bake one loaf and finish it later? Like a “take and bake”? If so, how long to bake and rebake?
I’ve made this bread for many years. Was tracing where I got it from, found your website. My thanks are long overdue. I make four loaves from this recipe, wife and I love it. Will be trying the whole wheat version. Many thanks again.
Appreciate knowing that – thanks, Rick!
Winner!!! I have made a lot of different breads, this recipe is a KEEPER! I really liked the different rising method of ten minutes rests and mixes. I tend to be impatient waiting for bread to rise. This felt easier than waiting and never getting to touch it. The loaves are massive and cooling beautifully. I doubted the 375 temp but I still ended up dealing a little foil on the top towards the end of the bake. Thanks for a great recipe and clear instructions
how hot should be the oven? Do we need to pre-heat the oven?
Yes, in step #9 it indicates to preheat the oven to 375 degrees F.
I haven’t baked it yet but I was wondering if I could make rounds instead of loafs if it would still work?
Yes, that should work just fine.
Delicious and easy to make.
Since this is the first time I tried making this bread a rating is inappropriate. For some reason the yeast didn’t foam at all. It wasn’t very old. Eventually the dough rose but it took a couple of hours in a 95° oven. The bread tasted good but turned out a bit heavy, which wasn’t too surprising given the long time to raise I think I’ll follow the instructions on the yeast packet instead of the recipe’s method next time. The water temperature wasn’t the problem because I tracked it with an accurate thermometer.
If your yeast didn’t foam, then there’s a problem with it. Your water cannot be below 105 degrees F or over 115 degrees F. If it’s below 105 it won’t activate the yeast. If it’s over 115 degrees it’ll kill it and it won’t rise. Use a thermometer to check the water temperature. I find 110 degree F is the sweet spot for breads. Also, add your sugar to the yeast, BEFORE you add the water. The sugar will motivate the yeast to become active. If it doesn’t, then you have a bad batch of yeast. Which happens once in a while. Also, your flour is important. The amount of gluten in it is affects your bread. I have several different flours for different things I bake.
Instead of French Bread, I got French crackers. The directions for preparing the yeast were significantly different than the instructions on the yeast packet, which was fairly new. If I try this recipe again, I will definitely use the yeast instructions on the packet and not follow these in the recipe.
Thank you!! My first time and it came out perfect! Oh so good!! My grandson and I are loving this…again, ThankYou!!
Hi Mel, I’ve been using this recipe for about 8 years now. My wife insists I use this recipe ONLY! I use a lame and a French Bread pan, both great improvements. I’m using about 2/3 tsp salt w/ bread flour. Doing the first rise in the steel mixing bowl in an oven w/ the light on(80deg f) also, 4 ice cubes when baking makes a nice crust. I recently changed ovens and my new oven takes 30 minutes up from 25.
Helpful comment, Karl – thank you!
First bread recipe that I was successful at! Flavor is great.
I’ve made this countless times. If you use Lily brand flour, is soft white flour, I think it makes a better loaf. Hard to mess this one up. I also ad seasonings for fun.
Please HELP!!
I’ve made several different recipes of French bread, including this one, over the past 4 days. They have all turned out pasty and white with a hard crust. The dough looks stringy and almost like it has slight craters in it before it goes into the oven. This is not my first time to bake bread, it usually turns out perfect! But the past 4 days and 11 try’s, it always flops!
Any suggestions you have would be much appreciated!
Hi Karen – are you using a mixer or making the bread dough by hand? Is the bread rising well? What is the texture of the bread dough before you shape into loaves? Is it thick and stodgy? Thin and sticky? Is it easy to shape into loaves? Let me know and I’ll help troubleshoot.
I love this recipe so simple to make.
Hi! I saw you mention you use 1 tbsp of salt in the notes but use 2 1/4 tsp in the recipe? Is it possible you mixed up the yeast and salt in the recipe?
No, the recipe ingredients aren’t mixed up. The note states that the original recipe had 1 tablespoon of salt but over the years, I’ve dialed that back to 2 1/4 teaspoons. I keep yeast in a quart-size jar in my freezer, and I measure out 1 tablespoon yeast for this recipe (but it can be made with a packet of yeast, which measures 2 1/4 teaspoons – it might take a bit longer to rise).
Saw Rae’s comment. I made mine by kneading the dough in a bread machine kneading cycle. I always do the kneading in the machine, and I only let the machine bake it once, the week after I bought it.
Scaled it down to 1/3 and made a loaf. Came out great. Thank you.
Can this be made in a bread machine with the dough function?
I don’t have a bread machine…so I haven’t tried it…but as long as the quantity of dough fits in the machine, it should work fine.
I started baking oven bread 2 weeks ago and this recipe was not only the best I’ve baked so far but was a hit with the family over New Year’s Eve dinner. Thank you so much!
I have made this French bread before and it was delicious. I can’t remember whether I used all purpose flour or bread flour. Which flour would you recommend?
Also, I have made Julia Child’s French bread and Renee’s soft French bread and I like your recipe better. Could you use King Arthur Sir Lancelot flour in your French bread recipe?
Hi Kevin, I’m glad you like this recipe – thanks for letting me know! I haven’t used the King Arthur Flour which you mentioned, so I’m sorry I don’t have firsthand experience whether it will work in this recipe. I make this bread equally with all-purpose flour or bread flour, depending on what I have on hand. Bread flour makes a slightly fluffier, chewier bread.
Turned out beautiful – made it in my new Bosch mixer ( love this machine). Super easy will be serving with my lasagna and salad tonight for guests.
Turned out beautiful – made it in my new Bosch mixer ( love this machine). Super easy will be serving with my lasagna and salad tonight for guests.
Love this recipe, the hands on method honestly worked best. Considering this is my first time getting the texture and crust of French bread love this recipe! Recommend as a roll recipe as well, fluffy, soft,the best quality
In a bread!
What a great and easy recipe. I used both methods as far as kneading. Also used bread flour and I halved the oil with vegetable and olive oil. And it turned out nice and fluffy on the inside, I used the ice trick and got a real nice crunch on outside.
Thank you for sharing.
I have just 1 question, what is the best way to store the bread? Right now I have it on a rack covered with a towel
Hi Julie, I usually store the bread in a bag (sealed with a bread tie or clasp) at room temperature. The crust will inevitably soften a bit – but if it is stored uncovered it does dry out a bit.
Loved so many times..
This time I added everything topping!
I made it and my Mom said it tastes like my great grandmas. 10/10 would recommend this recipe to others. Thank you.