Crusty Artisan No-Knead Bread {Made Even Easier + Step-by-Step Tutorial}
Get this recipe for the popular no-knead bread complete with extra tips and step-by-step pictures to make the process even easier!
I know it’s Halloween and all, and most of you are probably out roaming the streets dressed like witches and ghosts and chubby pumpkins, but I have bread on the brain.
And in my world, bread wins out over candy any day (except for the dark chocolate kitkats that may make it home in my kids’ loot, of course), so today I want to chat just for a minute about bread.

Like, the best, most delicious bread ever. That kind of bread.
Years and years ago in another place and lifetime (i.e. the first month I ever blogged), I posted about the famous no-knead bread that was taking the world by storm (from Jim Lahey published by the New York Times).
It’s a fabulous recipe and I hope every single one of you have experienced it. But if not, now’s the time, methinks.
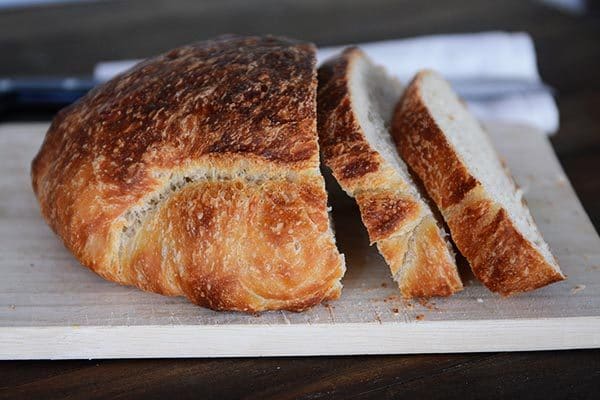
The crusty, artisan, extremely simple bread has been made countless times in our house since then. But I have to admit, I’ve started cutting corners over the years.
The original recipe is easy as can be, but I didn’t like the mess of splatting the bread onto a flour-dusted towel or counter (the last thing I need is extra laundry or more sweeping).
And the whole “flip the bread upside down in the pot” totally stressed me out.
Even though the bread turned out, I realized for my emotional health and well-being I needed to stop flinging the dough around like a madwoman.
Enter one of my favorite kitchen tools: parchment paper. (And in the interest of full disclosure, I never would have thought of this except that my really smart Aunt Marilyn tipped me off.)
Instead of transferring the dough and using flour or cornmeal or anything else prone to ending up on the floor, the entire shaping and rising and baking process happens on an unassuming sheet of parchment paper and it has revolutionized an already revolutionary recipe (along with measuring my flour a little differently so the dough is waaaay less sticky and maddening to work with).
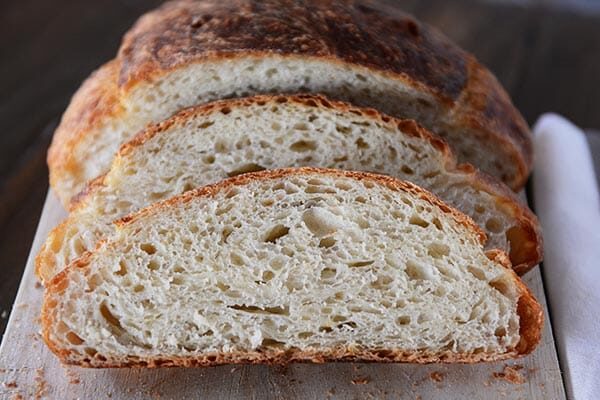
I am not exaggerating when I say I make this bread several times a month because it hardly requires any brain cells and yet manages to be so amazingly delicious.
And because I can’t leave you totally hanging, I included a step-by-step picture tutorial below the recipe. Just to ease any lingering fears (seriously, fears be gone…you need to make this).
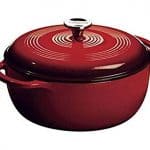
This recipe is best baked in one of those enamel cast iron pots (I have a pretty old Mario Batali version which works great; Le Creuset is another obvious, popular brand) but there are lots of tips online for using other types of pots.
I’ve given a few tips in the notes of the recipe – but please, please, please, for all that is good and breakable, make sure that whatever you use is heatproof to 450 degrees. Ok? Thanks.
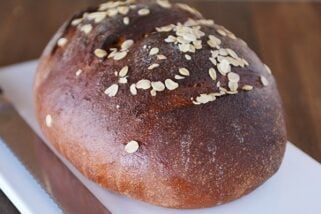
Oh, and one last note. This bread is fabulous with a variety of add-ins: asiago cheese, rosemary and cranberries, herbs and lemon zest, on and on. Options = endless.
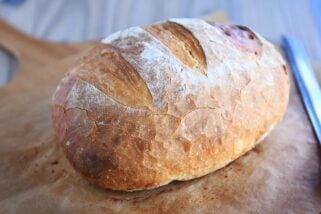
It’s straight out of the bread basket at a fancy-shmancy restaurant, except that it’s coming from your kitchen.
One Year Ago: Black Bean and Butternut Enchilada Skillet
Two Years Ago: Chocolate Chip Peanut Butter and Oatmeal Cookies
Three Years Ago: Pumpkin Cookies with Caramel Frosting
Crusty Artisan No-Knead Bread
Ingredients
- 3 ⅓ cups (473 g) unbleached all-purpose flour
- ¼ teaspoon instant yeast
- 1 ½ teaspoons salt
- 1 ½ cups room temperature water
Instructions
- In a medium bowl, combine all the ingredients and mix until the dough is combined and has a shaggy, sticky texture (it’s easiest to just get in there with your hands and do the job).
- Cover the bowl with lightly greased plastic wrap and let it sit at room temperature for 12-18 hours. It will get puffy and bubble.
- Scrape down the sides of the dough and let it gentle deflate. Turn it out onto a lightly greased piece of parchment paper and using your hands (lightly grease them if the dough is sticking too much) pat it into a thick oblong shape.
- Fold one of the long edges to the middle. Fold the other long edge over the top, forming a thick log. Take one short end and fold it in toward the middle and repeat with the other short end – basically like folding up a blanket or towel.
- Carefully and quickly flip the mound of dough over so the seams are on the bottom. Cover with lightly greased plastic wrap and let rise until puffy and doubled, about 2 hours.
- About 30-45 minutes before the dough is ready, heat the oven to 450 degrees. Place a 6- to 8-quart heavy cast iron pot (like the popular enamel covered ones) in the oven as it heats and let it stay there for 30-45 minutes.
- When the dough is ready, remove the pot from the oven and take off the lid. Lift up the corners of the parchment paper and set the bread and parchment paper right into the pot. Cover with the lid and return to the oven to bake for 30 minutes.
- Remove the lid from the pot and bake for another 10-15 minutes until the top of the loaf is browned and lovely.
- Carefully grab the corners of the parchment paper and remove the bread to a wire rack to cool completely.
Notes
Recommended Products


Recipe Source: adapted from one I posted in January 2008 from the famous Jim Lahey recipe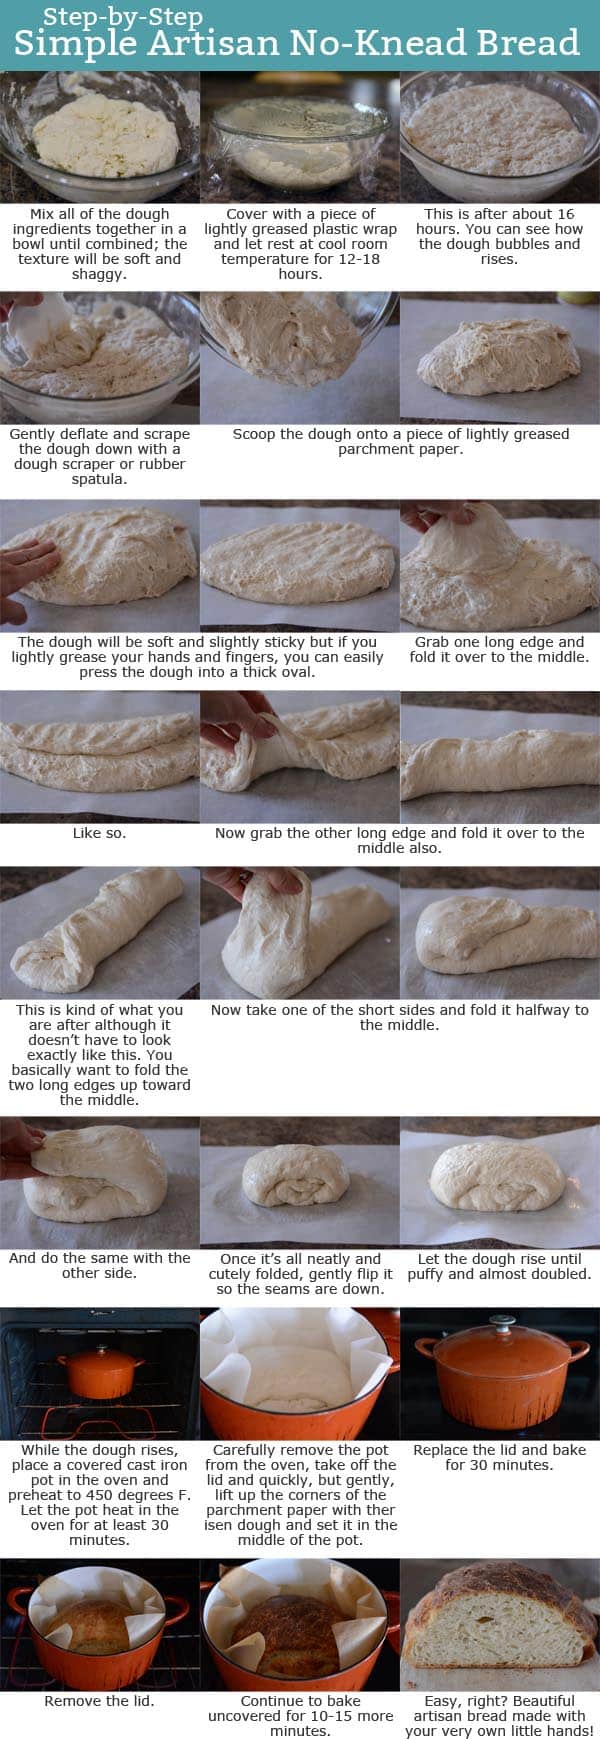


Hi Mel! I only have one pot. Could I double this recipe and put the second loaf of dough in the pot as soon as the first loaf is done and then bake as directed without preheating again? Thanks!
Do I have to bake it on a pot?
That’s the only way I’ve ever baked it – the pot helps keep the bread’s round shape since the dough is very soft.
I’ve made this bread now twice and my third batch is now rising. I can’t make it fast enough — the family loves it. I did have to add an extra tablespoon or so of flour to each batch because it was slightly too runny. That little extra was just enough to help it hold its shape! Thanks for this easy, fun, delicious recipe! Perfect for a busy, on-the-go family like ours.
This was horrible while not new to baking I am new to bread making. I read this recipe 5 times before attempting. After letting the dough rise for 15 hours I excitedly oiled my parchment paper and turned out the dough. It fell into a runny mess. After spending nearly 20 minutes trying to mold it into submission, I grabbed the bowl of my stand mixer scraped about 80% of the dough into it (the rest stuck to the parchment) and tried to knead it in my mixer. It looked okay until I tried to dump it onto a second oiled piece of paper. I went to put my mixing bowl in the sink and came back to an oblong mess! I covered it with oiled wrap and looked at it. It is horrible. I am going to let it rise while I grab a cocktail, sit and reflect on my decision to try this.
**update** it’s been 3 hours its still a mess. I am throwing it out and using the “not so ridiculous” method of making bread; hopefully I’ll have some to take to celebrate my Father-in-law’s 79 birthday. If not it’s to the store, and never back to this recipe again. At least I’ve got another cocktail, my favorite new show on T.V. hopefully it will take away the horrors of this now 17 1/2 hours of misery.
Why did you just give up? Why not just keep on & see what happened? I have made this bread 40+ times & yes sometimes it is really goopy & you just don’t think it will work but I continue on & bake it & it ALWAYS comes out great, no matter what (except the time I forgot salt!) This is not like traditional kneaded dough – you are not kneading it to build up the elasticity. But it will rise in the oven & turn out delicious.
I want to thank you for showing us pictures of what this dough looks like during the process. I’ve failed several times in trying this no-knead method. I followed the instructions to the letter and ended up with a soupy runny mess each time. Although I am not new to baking yeast breads, this method eludes me–far too much water, or too long a rise, or too weak a flour-I don’t know, but each time a very runny mess. Seeing these photos inspires me to work towards a mix that produces this consistency and maybe tweaking the recipe to get mine looking and feeling the same. These pictures are the key for me-Thank you!
I hope you have a no knead bread success, Marianne!
Just made your bread and it was wonderful! I just bought a new metal knob for my cast oven cover and now I can make the bread without worrying about the knob. Your directions were so easy to follow. The family ate the entire loaf for dinner! Thanks for sharing the recipe!
I am new to bread baking. Loved your crusty bread recipe. I was wondering what are measurements for garlic, thyme, cheddar cheese etc. Those ingredients sound so good in bread. It seems maybe 1 teaspoon each?
It’s really up to personal preference but that would be a good place to start (with maybe a cup or two of small cubed or shredded cheese).
I always use 2-1/4 tsp instant yeast for this recipe, as we love a yeasty bread flavor. Turns out perfect every time. Thanks!
Hey there, can’t wait to try this recipe! If I double it, do I then take half of the dough at a time after the first rise to bake? Or can I just bake it all together? And would the bake time change?
I would suggest making two loaves if you double the recipe – just based on the size of the loaves.
Thank you so much for responding! I have the dough prepared in a double batch and will be baking tomorrow, so this is perfect timing 🙂 Love your blog. I have made your yellow cake three times and I have made countless batches of your Aunt Marilyn’s quinoa muffins 🙂 Can’t wait to taste this bread!
Thank you so much for responding, and so quickly! I have the dough prepared in a double batch and will be baking tomorrow, so your response is very helpful 🙂 Love your site. I have made your yellow cake three times and I have made countless batches of your Aunt Marilyn’s quinoa muffins, all with wonderful success! Can’t wait to taste this bread 🙂
Thank you. I have been hesitant to try these types of breads due to my own self-inflicted fear of them. But SUCCESS! Thank you so much for the step by step pictures. I feel like you virtually hold my hand on those things I’m eager but fearful of trying…and then I make it through successfully due to your amazingness and I feel like a rockstar in the kitchen. My family thinks I’m a rockstar now, too!
Thank you, Marek – you ARE a rockstar!
Just stumbled upon your website a few days ago and am loving it! I have made the flat-bread and I plan on trying the french bread rolls. I made this crusty artisan bread today and it turned out great! I am new to bread baking and have tried many recipes, but not much success with no-knead recipes until this one. My husband says this is the best bread I have made so far! The dough is very sticky though and I can hardly fold it. After I folded it I had to use the parchment paper to flip the dough onto another piece of parchment paper so the seams were down since it was way too sticky/soft to pick up with my hands to flip it over. While the folded dough was rising I had to put a “barrier” around it so it would rise up and not outward. Is this normal? Also, have you tried a whole wheat version?
It is a pretty sticky dough so I think that’s pretty normal. You might try adding just a couple more tablespoons of flour if it’s a nightmare to work with. I have made a whole wheat version (subbing white whole wheat flour for the all-purpose) and it’s delicious but not quite as light in texture as the all white flour recipe.
I’ll have to try that! Also, I want to make this around my work schedule. I know you can refrigerate dough, but at what point would you suggest I refrigerate, after the 12-18 hour rise, or after mixing it up and letting it rise a couple of hours? And when I’m ready to shape it, should I warm it up in the counter a bit before I shape it or go ahead and shape the cold dough? Like I said, I’m new at this, so any advice is appreciated 🙂
You can refrigerate it after it’s rested at room temp for 12-18 hours (gently deflate it and then refrigerate). It can be refrigerated for several days. It will need a longer rising time out of the refrigerator after it’s shaped into a round shape since it will be chilled but otherwise, it should work great.
watch the youtube video Jenny can cook, gives a demo. when you take it out of bowl put on flour surface and use a scraper and fold over a couple of times. works great
Thanks so much for your tutorial pictures. I have been making a slight variation of this bread–it’s the same except I do not let it rise the next day, just scoop it out of the bowl onto a floured surface and let it rest while the oven and baking pan are heating (30 min, 450 degF), and it turns out great. I also use a Pyrex loaf pan, because I want loaf-shaped bread, and another loaf pan inverted as the lid (the “lid” is metal, but I doubt that matters). The loaf rises above the level of the loaf pan while baking, which is why I use an inverted loaf pan for the lid to give it room. So… I was wondering if there is an advantage to letting it rise again? My bread always comes out with a nice crust and stretchy with holes on the inside, much like what your picture looks like. Thanks!
I like that second rise for the light texture but if you are already enjoying the result the way you make it, no need to change!
I made the bread yesterday. Family loved!!! The only concern is that I can’t take the paper from the bottom of the bread. I think I will need to grease the paper a little moe next time. Overall it is a perfect bread. Thank you!
Finally got brave and tried this bread out tonight with some chicken soup. Oh my goodness, it was delightful! My dough was super sticky and it looked nothing like your pictures during the folding on the parchment steps, but it turned out fantastic after being cooked in my trusty Lodge Dutch oven (size 12 – you know the kind with legs that you usually cook with outside on charcoal – worked great). Love your blog! Thanks for all the great food you’ve introduced me and my family to!
I made 2 loaves of this bread over Christmas. I followed directions exactly, and the first loaf looked perfect but was burned black on the bottom. So I turned the temp down 50 degrees for the second loaf and it was the same way. They were still delicious, but I had to slice the burnt bottom off both loaves. My oven is not abnormally hot, and it wasn’t on the bottom rack. My Dutch oven is a food network brand. Any idea what I could be doing wrong?
Hmmm, I’m not sure, Mary. I’ve never had that happen – I’m not familiar with that brand of Dutch oven but I’m wondering if it has a thinner base than other models.
I use a good network dutch ovens at 450° and the bottom is perfect.
Mel, I forgot to ask a question in my comments above. The crust on my bread was not crispy at all. Could that be because I didn’t preheat my Dutch oven? The texture of the bread was otherwise fabulous, and I don’t think anyone cared about the top, but I’m still curious. Thanks for your help.
Yes, I’m pretty sure not preheating the pot will make a pretty big difference on the crispness of the crust.
This bread is super! My dough wouldn’t hold a nice shape for the rise, so I picked up the parchment paper and set it into a medium sized saucepan instead. This way I ended up with a nice, circular loaf. Also, I was nervous about putting my new Lodge Dutch oven into the oven with nothing in it. So, I took another reader’s advice and placed the bread dough into the Dutch oven, then put the duo into the oven and started the preheat. It worked great!
I served the bread with cheese fondue for our New Year’s Eve dinner. Everyone loved it. Thanks so much!
I have a question about yeast. I bought the Active Dry Yeast instead of the Instant Yeast, which I could not find in my grocery store. Can I change the Instant Yeast called for in the recipe for the Active Dry Yeast I already have and if so, how much should I use. And is it true in the directions that if you use the Instant Yeast you only use 1/4 tsp for a whole loaf of bread? I am SO anxious to try this bread, it looks delicious.
Usually active dry yeast needs to be proofed in a bit of water until it’s bubbly and foamy before using, as opposed to instant yeast which can be thrown in with all the ingredients. So you could try proofing the yeast in the water (you’ll want to use slightly warmer water probably) before adding the flour and salt. And yes, the yeast amount is correct. Good luck if you try it!
I just had to report that after getting a new enamel-clad cast iron pot for Christmas, I made two loaves to take to dinner with friends last night. 1 was plain, and to the other I added parmesan, fresh rosemary, and garlic bread seasoning (dry). Both were awesome, but the parmesan-herb was the favorite. The crispiness of the crust and the chew-factor were fab, and the perfect compliment to soup. Thanks for the detailed pics and descriptions!
thank you for reposting with the great pictures! I look forward to making it soon.
Just took two of these babies out of the oven and they turned out so perfectly! Thanks again for another no-fail recipe. Also, I got an email saying that zip-list will no longer have a recipe saving function, which is a total bummer. Do you have any recommendations for a similar service?
Hey Jared – I know, it’s a bummer about Ziplist. I’ve heard there’s a new service called Whisk that I’m looking into. I’ll keep everyone updated. Also, there’s a mobile app called Paprika others have recommended (that’s not something I install on my end, it would be individual). I heard that if you create an account over at epicurious.com you’ll still be able to access your recipes, FYI.
I bought the app…Plan To Eat, super easy to use. It was on sale when I found it. Check it out . Thanks Mel for the great recipes.
You always seem to know what I’m in the mood for, or it could be I get in the mood after seeing your pictures.
Is it ok to let the dough rise even longer? I’m a total yeast newbie, and want to make the dough today for baking tomorrow after work (roughly 24 hours after, not the 12-16 you suggest). Any help or ideas would be great! Thank you!
I haven’t tried it but I’m pretty sure this dough can be refrigerated for up to five or six days (I think I read that in the Artisan Bread 5-Minutes a Day).
I made this bread today (and it turned out DELICIOUS!) along with your Summer Garden Vegetable Soup (one of our faves, we make it all year round because we love it too much to only have it during the summer!). During dinner, my husband and I were discussing our favorite meals, and I discovered that over 80% of the meals I make regularly came from you! We make it a point to try at least one new recipe every week (and have for over 3 years–we were both victims of our mothers only having ~7 dinner recipes as kids and didn’t get to try many new foods, and we keep discovering all these new things we love!) and so it’s definitely saying something that such a high percentage of the ones we kept come from you. Thank you so much for all the amazing recipes!!
Thanks, Lisa! That means a lot!
Hi Mel. I tried this bread and it was fantastic. We ate it with soup and made sandwiches from it. My kids loved it. However, I have a cheaper enamel coated dutch oven and the preheating process discolored the inside of it. It didn’t seem to affect it’s performance however, because I used it to make soup in last night. Maybe it’s time for a dutch oven upgrade!
We made this to have with soup for dinner, and it was really wonderful bread..just takes some planning (I.e., start it the night before). Thank you for such a great recipe!
Mel, I have a problem. 🙁 I’ve wanted to try this type of bread for years, and seeing it here made me finally try it. I even bought a replacement metal knob for my Lodge dutch oven so I could do it. The bread looks gorgeous, and I’m sure tastes great (it’s cooling now)- but it ruined my pot. After heating the empty pot for 30 minutes, I took it out of the oven, and the enamel had chipped off the underside of the lid in multiple spots. I’m so sad, and I don’t know if Lodge will replace it, since apparently their instructions say to not heat the pot empty (I didn’t know that). A Google search told me that with Lodge enamel-coated dutch ovens in particular, you can’t preheat them empty or this will happen! Too late now. I’m going to keep researching this, but I thought maybe there should be a note in your post to help prevent this for others. Thanks.
I’m so sorry to hear that, Michelle! Thanks for commenting so that others can know this might happen. I know that other brands (Le Creuset and the brand I have, M Batali) can be heated empty; I wasn’t aware other brands were different. I’ll make a note in the recipe.
I just mixed up the dough — which has me wondering about the flour — do you go by weight or measurement? I hedged and went in between the two. Can’t wait to try it tomorrow! The ingredients are VERY similar to my pizza dough which sits out rising all day.
Hi Stacey – I always use weight measurements if they are given in the recipe. The weight measure and cup measure shouldn’t be that far off (at least based on how I measure the flour which is to fluff it first, then scoop in the cup and level it off). Hope the bread works out well!
Just made this today (well, started last night), and it got a 10 on the bread score according to my husband (and me). Best bread we’ve had in a long time! I look forward to trying the whole wheat version.
Does anyone know if this bread freezes well after it’s made? I love the idea of how little work goes into this while still getting something great, but my main goal is to find recipes that can be froze and stored for later.
Yes, this bread freezes great!
Hi, Mel. Thanks for your tips. Can you tell me if the difference between all purpose and
unbleached flour is just cosmetic? Would they be interchangeable here?
My mom makes this with almost all whole wheat and no honey and loves it. We love the all white version. I have quadrupled this batch and baked it in my 12 quart cast iron Dutch oven for a large crowd and it works beautifully. Just be aware it is. HEAVY and the legs on the Dutch oven make getting it in and out of the oven a bit tricky with the oven rack but be careful and pay attention and it works perfectly. And was a huge crowd pleaser.
For anyone interested in more of a whole wheat version, my Aunt Marilyn just chimed in with this tip: for whole wheat, replace one cup of the white flour with whole wheat flour + 2 tablespoons honey and add to the water before mixing (along with the yeast and salt).
This prompted me to finally order a replacement knob for my dutch oven. Mine just came with a plastic one, and I’ve been meaning to order a stainless one so I could try out these artisan bread recipes. I’ll be trying out this recipe ASAP! 🙂
I’ve always wanted to make this version of no knead bread but haven’t yet, due to not having one of those cast iron pots! The slow cooker insert is a great idea, I may have to finally try it!
I, too, use parchment paper for this recipe, as well as the extra flour. So much easier! Instead of using plastic wrap to cover the dough, I turn the large bowl that it was mixed in over on top of the dough after it is shaped on the parchment paper. Works great and don’t have to waste/mess with greased plastic wrap!
Mel, a quick question for you: Which bread do you prefer for fondue – the rustic crusty bread listed in the fondue recipe or this one? I’ve never made the rustic crusty bread but will definitely make it if you think it is a better fondue bread! (I’ve never made fondue, either, but thanks to you I am going to give it a try.)
Love the tip about the bowl, Jen – thanks for sharing that! And for fondue I prefer the Rustic Crusty Bread – this bread tends to not hold up so well on a fondue fork thanks to all the airy (beautiful) little holes.
I’m giving you a big squeezing hug right now! You have saved me from an entire day of making rolls for a soup dinner tomorrow night. Crusty bread and soup, the perfect combo! Thank you for the best recipes ever! You’re going to make me a rock star tomorrow night!
Love it, Laurel! I’m making this for soup tonight, too. 🙂
We have been making this crusty bread in my family for a long time. Love it! We just ate it last week with a yummy pot of potato soup. My kids love the crunchy crust! I use my dutch oven with a lid and it works great.
**Just a note to those who don’t like the high temps… my mom doesn’t like to put her dough into a burning hot pan, so after it has mostly raised, she puts it into the pan and into the cold oven and turns it on and lets it heat up and start baking together. It takes longer to bake, obviously. She said it turns out just as good. Just thought I’d share.
Thanks for the awesome recipes, Mel!! I love parchment paper for this bread and homemade pizza.. a life-saver!!!
I wonder…what would happen if you just baked it on a preheated pizza stone?
Hi Julie – good question; I haven’t tried it but this bread dough is pretty sticky and soft and I’m not sure it would hold it’s shape on a pizza stone like other freeform bread loaves. I think it would probably spread out and bake up very unloaf-like.
It might work, I think. However, if you are nervous, or curious, check out the book “Artisan Bread in 5 minutes a day” at your local library. Or, google it and you should find the authors’ website. I have the book and really liked the results when I tried the sandwich bread. Their method mixes the dough and either bakes it or stores it in the frig. They use a pizza stone for baking and don’t cover the bread as it bakes. Obviously, the 5 minutes doesn’t include rising or baking time. But they do include lots of pictures and instructions. They also have lots of variations.
Using parchment paper is genius! Thanks for sharing this recipe with your photos – makes it so much easier to visualize the process!
I have an aluminum dutch oven and a good stainless steel ( Wolfgang Puck) stockpot that is the same width around as a dutch oven but taller. Would either one of these work and which one?
Hmmm, good question, Faith. I’ve never tried an aluminum or stainless pan and I’m not sure how the thinner sides and bottom will do. As long as the pots are heatproof to 450 degrees, it’s definitely worth a try. I’d probably go for the stainless pot but check the bread often as it might burn more easily.
Thank you so much for the step-by-step photos! They really help. And I definitely
plan to try the parchment paper trick.
Wondering if I can use my old corning ware pot (it has a lid)? Does the bread need a deep pot? Looks really terrific and I want to try it.
How deep is your pot, Sharon? I’d say give it a try! The bread probably needs a good 8-inches and even if the pot is more shallow, the bread will still bake well, it just might be flatter on top if it reaches the top of the pot while baking.
Mel- your bread recipes ROCK! Your tutorials are awesome, too. Happy Halloween!
I’ve always used parchment paper for this recipe, too! Way too scary trying to plop wet dough into my smallish Le Creuset. Just say no to burns. 🙂
I’ve been eyeing an awesome dutch oven at Sams for weeks. I keep telling I NEED it, I just don’t know what I need it for. Well here ya go. Now I have a reason to get it LOL I love making rustic bread so anything to make it faster is a bonus.
I have a cast iron Dutch oven without the enamel. Anyone know if this will work?
Hi Ellen, that should work just fine (does it have a lid?).
I use a Lodge Cast iron…WITH lid 🙂 ! (see link in my comment above) The nice thing about the cast iron is the lid handle is cast iron also. Some “enamel” DO’s lid handles are not rated for high temps. I had to replace my enamel DO lid handle with a Le Crueset lid handle.
Love the tip about using Parchment! I’ve realized it’s great for so many things, like lining a cookie sheet if you don’t have a Silpat.
Anyways, this bread looks amazing- definitely restaurant quality!
I had been using a 3 qt enamel dutch oven and it worked (still works in my motorhome!) great, but I wanted something a bit deeper for the occasional frying. This Lodge 5 quart DO is all of $32.37 on Amazon. http://www.amazon.com/gp/product/B00063RWYI/ref=oh_aui_search_detailpage?ie=UTF8&psc=1
One of my favorite variations is a multi-grain mix – same method as above including parchment!
60 grams KA Med Rye (about 1/2 cup)
80 grams WheatMT WWW (about 3/4 cups)
260 grams MTWheat (about 2 cups white)
1/4 cup steel cut oats
3/4 tsp salt (I use celtic gray salt)
1 yeast (SAF instant)
1 1/2 – 1/3/4 cup warm water
I’m in love with artisan breads. I’ve just recently made bread in a Dutch oven for the first time. So fun! And simple too…. Looks amazing!
Have a beautiful weekend!
I really want to make this bread sometime soon and I love your add-in ideas. Have you ever done this particular bread recipe with whole wheat flour?