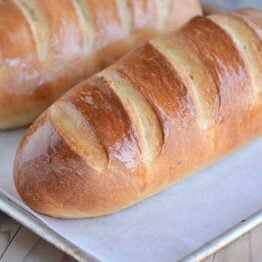
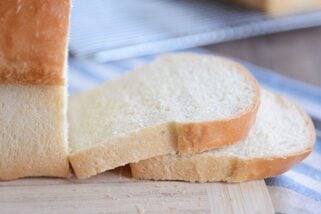
Easy Homemade French Bread
Homemade French bread has never been easier! This simple recipe produces a light and fluffy loaf of French bread that will rival any bakery!
This easy homemade French bread is so simple and perfect for a bread making beginner.
But as you can see from all the comments below, it’s just as valued by expert bread makers, too!

Making French Bread Dough
This straightforward bread dough can be made in a stand mixer or by hand.
- Warm water
- Yeast (instant or active dry yeast)
- Bit of sugar and oil
- Salt
- Flour (all-purpose or bread flour)
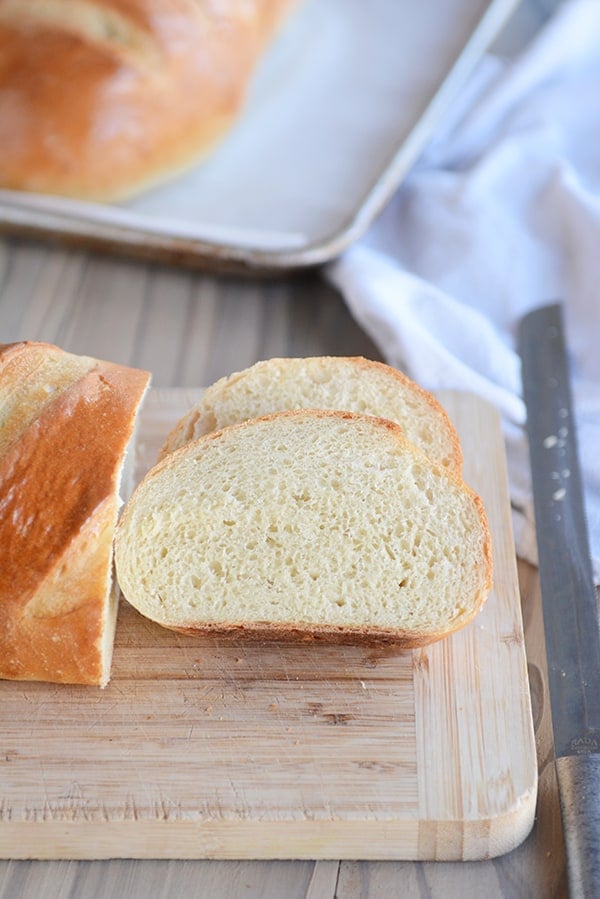
At the start, the dough will look shaggy and rough.

But as it kneads, it will become soft and smooth.
The most important part of this dough (and other yeast doughs) is to judge the amount of flour by the look and feel of the dough rather than the exact amount of flour called for in the recipe.
Factors such as humidity, elevation, room temperature, how we each measure flour, and more can affect the amount of flour added. So don’t stress about precise flour measurements and continuously feel the dough to achieve a soft dough that is slightly tacky but doesn’t leave a lot of residue on your fingers.
Too little flour and the dough will be a mess to handle. Additionally, the bread won’t hold its shape as it rises and bakes.
Too much flour and the dough won’t rise well and the bread will be tough and dense.

Two Methods for Dough Rising
In the recipe, there are two methods to letting the dough rise:
- Leave the dough in the mixer, cover with a lid or towel, and let the dough rest for 10 minutes. Stir it down by turning on the mixer for 10 seconds or so. Repeat the “rest and stir down” cycle five more times.
- Transfer the dough to a lightly greased bowl and cover with a towel or greased plastic wrap. Let the dough rise until doubled, about an hour or so, depending on the warmth of your kitchen.
I alternate between the two methods depending on my mood. The 10-minute increment rising method is unique to this original French bread recipe. The idea is that allowing the dough to rise this way produces a lighter crumb.
But the more traditional rising method also results in a delicious, fluffy loaf.
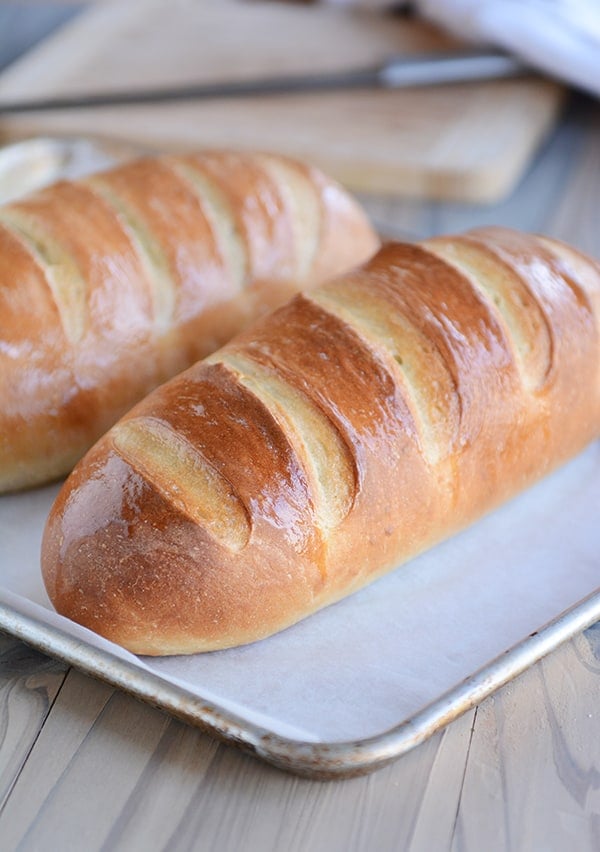
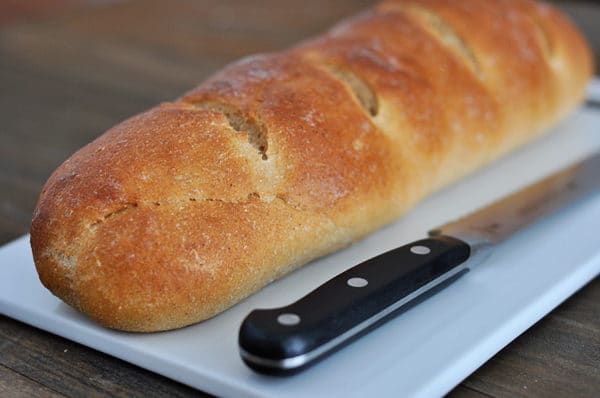
How to Shape French Bread Loaves
The question I get asked the most about this easy homemade French bread is how to shape the loaves.
The loaves can really be made any size or shape; I usually end up making 12-inch loaves, but if they end up being a bit thinner or chubbier, it’s no big deal!
Press each portion of dough into a flat rectangle and fold the bottom edge up and over the dough, pressing the seam flat with your hand.

Then, roll the dough up again to meet the top edge.
Fold the top edge over and press or pinch lightly.

Take the end of the bread dough and fold it up and over an inch or two to give an even thickness all the way down the loaf.
Pinch to seal the end. Repeat on the other end of the dough.
Then, deliberately and thoroughly pinch and seal the entire length of the loaf.

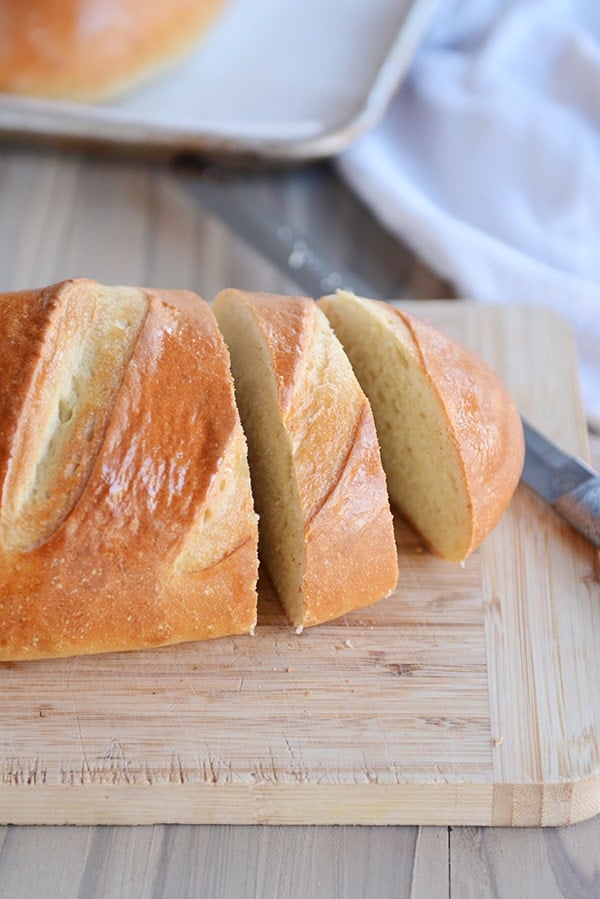
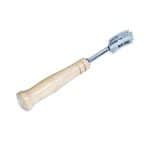
How to Score the French Bread Dough
Scoring the bread dough (in my house, also called: slashing or gashing) helps the dough rise better AND prevents it from cracking in unexpected places while baking.
Using a bread lame for this task is extremely helpful. A bread lame is a long stick or utensil with a razor blade on the end. The razor is used to make thin cuts in the dough.
If you don’t have a bread lame, using a clean, sharp razor blade or an extremely sharp kitchen knife can work. Be aware that if the knife isn’t sharp enough, it’ll likely deflate the dough.
The bread loaves can be scored before or after the final rise. I prefer to do the slashing and gashing before they rise as I’ve had one too many loaves of risen bread deflate at the first touch of the razor, and there is nothing so soul crushing as when that happens.

Let the bread loaves rise until noticeably puffy before baking.

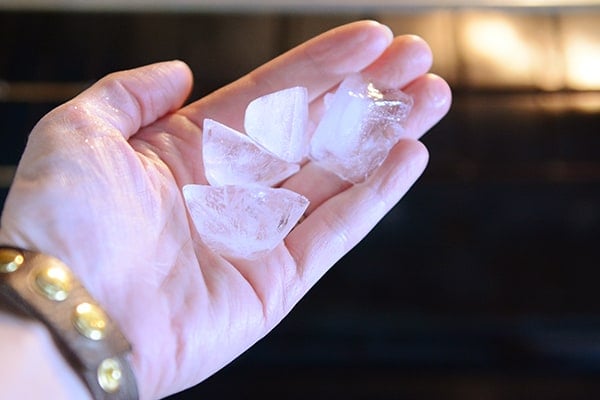
Easy Hack for Crusty French Bread
For a delicious golden crust, immediately before putting the bread in the oven, toss 3-4 ice cubes onto the bottom of the oven. Add the bread and quickly (but gently!) close the oven door.
The steam as the ice cubes hit the toasty bottom of the oven will lightly crisp up the outer crust as the bread bakes.
Important Note! Please consult your oven’s manual for details or caution on putting ice/water on the bottom of the oven floor – I’ve never had a problem, but everyone should do their own research and use their own best judgment (also take care not to toss the ice cubes on the glass oven door as it could crack).
If you are struggling to get a deeper golden crust on the French bread, try:
- Increasing the oven temperature by 25 degrees and/or
- Moving the oven rack up one position (I find my bread browns the best in the middle or upper middle area of my oven)
Whole Wheat French Bread
As noted in the recipe, French bread works quite well using whole wheat flour. I’ve found the best results are when using white whole wheat flour (red whole wheat flour makes a denser, heavier loaf).
I recommend subbing in half whole wheat flour to start and then adding more whole wheat flour as you continue to make subsequent batches of bread.
If using whole wheat flour, add a 2-3 minutes to the kneading time to help develop the gluten (also, adding a couple tablespoons of vital wheat gluten/gluten flour can also help the whole wheat bread bake up light and fluffy).

Helpful Tip: If you’ve struggled with your bread flattening out while baking instead of holding the perfect shape, you might try these French bread pans {aff. link}. I have them and LOVE them. I don’t use them every time I make this bread, but I do pull them out quite often (I also use them for this rosemary bread).
Perfect Homemade French Bread
With over 2,500 5-star reviews, this homemade French bread has become a favorite for so many of you.
Hundreds of you have let me know that you have been intimidated by homemade bread until you found this recipe! It is easy, foolproof, and will make you feel like a bread making rock star.
Helena says: Finally, after 5 failed bread attempts using other places recipes, this is THE recipe to use! Happy dance! Thank you for sharing this awesome recipe! Delicious bread!
Valerie writes: Such a fantastic, easy recipe. The “hands on” time is minimal and it comes out perfect every time. Thanks for sharing a recipe that’s become my “to do” dinner bread!
Nichole says: Followed instructions exactly! First time making any sort of bread ever. The bread turned out perfect!!!!
Pia commented: Hands down my go-to bread recipe. Today’s edition is 1/3 dark rye flour, with Italian herbs and caraway seeds mixed in and sprinkled with everything bagel topping. Yum! Best bread recipe ever, and so easily customizable!
FAQs for Homemade French Bread
Yes! Halve all the ingredients straight across – just keep an eye on the amount of flour and judge the final amount by the look and feel of the dough.
Yes, it freezes great (after baking and cooling).
Moving an oven rack up or down can help. In my oven, the bread browns best in the upper half of the oven. Also, you can try increasing the oven temp by 25 degrees.
Absolutely! You can mix the ingredients in a bowl with a spatula or spoon and knead by hand.
I always use the same amount interchangeably. Recently, I’ve heard that active dry yeast doesn’t need to be proofed in liquid first, but I always still do when using active dry yeast (no need to proof with instant yeast).
Yes, just keep an eye on baking time – smaller loaves may need less baking time.
One Year Ago: Harvest Pasta Sauce {Trader Joe’s Copycat}
Two Years Ago: Peanut Butter Cup Cheesecake with Chocolate Cookie Crust
Three Years Ago: Easy Homemade Egg Noodles {Step-by-Step Pictures Include Food Processor Method or By Hand}
Four Years Ago: Black Bean and Butternut Enchilada Skillet
Five Years Ago: Chocolate Chip Peanut Butter and Oatmeal Cookies
Easy Homemade French Bread
Ingredients
- 2 ¼ cups warm water, 110-115 degrees F
- 2 tablespoons granulated sugar
- 1 tablespoon instant or active dry yeast
- 2 ¼ teaspoons salt (see note)
- 2 tablespoons olive oil, canola oil, vegetable oil or avocado oil
- 5 ½ – 6 cups (781 – 852 g) all-purpose flour or bread flour (see note)
Instructions
- In the bowl of an electric stand mixer fitted with the dough hook, combine the water sugar and yeast. If using active dry yeast, let the mixture bubble and foam before proceeding (this can take 3-5 minutes). If using instant yeast, proceed with the recipe (no need to let the yeast activate).
- Add the salt, oil and 3 cups of flour and mix. Add in 2 1/2 to 3 more cups of flour gradually. The dough should clear the sides of the bowl and form a soft ball that doesn't leave a lot of dough residue on your fingers.
- Knead for 2-3 minutes until the dough is smooth. If the dough starts to cling to the sides of the bowl (or the center column if using a Bosch or other mixer with a center), add 1/4 cup of flour at a time until a sturdy but soft ball of dough forms.
- Rising Method 1: Leave the dough in the mixer, cover with a lid or towel, and let the dough rest for 10 minutes. Stir it down by turning on the mixer for 10 seconds or so. Repeat the "rest and stir down" cycle five more times.
- Rising Method 2: Instead of letting the dough rest for 10 minute spurts and then stirring it down, transfer the dough to a lightly greased bowl and cover with a towel or greased plastic wrap. Let the dough rise until doubled, about an hour or so, depending on the warmth of your kitchen.
- Turn the dough onto a lightly greased surface and divide in half. Pat each section into a thick rectangle, 9X13-inches or thereabouts (doesn't have to be exact). Roll the dough up starting from the long edge, pressing out any air bubbles or seams with the heel of your hand, and pinch the edge to seal. Arrange seam side down on a large baking sheet lined with parchment paper (I use separate baking sheets for each loaf).
- With a bread lame, razor blade or VERY sharp knife, cut several gashes at an angle on the top each loaf (you can wait to score the bread until after it rises, but it can easily deflate if the razor/knife isn't sharp enough).
- Cover the loaves with greased plastic wrap or a kitchen towel, and let rise until noticeably puffy and nearly doubled in size, about an hour.
- Preheat the oven to 375 degrees F and make sure an oven rack is in the center position. If you find your bread isn't browning as much as you like, preheat the oven to 400 or 425 degrees and/or move the oven rack up one position (watch carefully so the bread, especially the bottom, doesn't burn).
- Optional: for an extra golden, crisp crust, place the loaves in the preheated oven and immediately toss 3-4 ice cubes on the bottom of the oven. Close the oven door quickly but gently. (See note below!)
- Bake the loaves for 25-30 minutes until golden and baked through.
- If desired, brush melted butter over the hot loaves (this softens the crust a bit, so if you want a crispier crust, don't butter the top).
Notes


Recipe Source: adapted slightly from The Sister’s Cafe


Hi Mel, another question for you. Would this bread recipe work for a pizza dough?
Hi Paula, I haven’t used this for pizza dough, but you could definitely try!
Hi Mel, another question for you. Would this bread recipe work for a pizza dough? By the way this is my go to French bread recipe. So good
Thank you for this recipe, my family loves it! I’ve only been baking for six months and this is the first FB recipe that turns out well for me, meaning it rises well, light and not dense, and the crust is slightly chewy. I only used 1 teaspoon of salt and ended up using all 6 cups of flour, which was added in slowly as instructed.
I mixed the dough in my KitchenAid stand mixer, but it never turned into a “sturdy but soft ball”. The dough was still sticking to the mixing bowl after 9 minutes of mixing, so I took it out to proof. After 1.5 hour of proofing (it doubled in size) and shaping, compared to your pictures, my loaves seem less sturdy and don’t hold their shape as well. For baking, I placed the loaves on opposite sides of the baking pan with a 13×4 loaf pan in between to help keep the shape up. Any suggestions for improvement?
Hi Dawn, sounds like another 1/4 to 1/3 cup flour could help the structure of your loaves.
not easy
Could I make one big loaf instead of two smaller ones?
Sure!
This is a great recipe. I’ll make it many times throughout the year.
Awesome recipe. Never fails!
My family loved it!!!
I’m struggling a bit with this. I’ve made it twice now, but it turns out denser than I’d like. I’m looking for a super fluffy, light and soft bread like I buy at the grocery store, this feels heavy out of the oven.
I do all AP flour and use instant yeast. 65% hydration seems to be right for my setup. I use my Kitchen Aid stand mixer and knead for ~7 mins until soft, supple and passes a windowpane. I bulk ferment for around 1.5 hrs until good and doubled then shape and proof for ~1 hr until puffy and seemingly doubled (and poke test for good measure). The gluten structure seems good, so I’m not sure what’s going on here. Maybe I could up the hydration to 70%? Or, proof another 15 mins? My house tends to be a little cool (~70F).
Any help would be greatly appreciated.
Hi Kyle, this bread is likely to be a bit heavier than the ultra-fluffy, squishy grocery store French bread (if we’re thinking of the same bread). But it should still be fluffy and not dense. Increasing the hydration might help, as well as increasing the rising time by a bit. Is the bread rising well? Do you feel like the dough might be over floured at all?
I love this recipe have made it several times. I just don’t remember if I used bleached or unbleached flour which is better?
I always use unbleached all-purpose flour.
My wife made lasagna and asked me to make the bread– Yikes. She got out the Peasant Bread recipe but i thought I’d go for it and try the French bread. I made it in our Bosch mixer and just followed the recipe and it came out perfect.
Thank you!
Way to go, Kevin!
Came out delicious
Have you ever made your crème brûlée French toast with this bread? I want to make the French toast but I think French bread in Canada will not match what you use.
Yes, it works great!
My first and only recipe comment on the internet. This recipes makes fantastic bread! Light and airy crumb with a crispy yet soft crust. My family thinks this bread is store bought. I love that the recipe makes 2 loaves. I freeze one and we eat the other. Easy and delicious recipe!
OMG, OMG, OMG! I made bread! My loaves came out beautiful, fluffy and delicious on my first try! I guess I’m a baker now- thank you for this fabulous recipe with easy-to-follow instructions! Next, I’m going to experiment with organic, unbleached flour.
This bread is so delicious!! One question – my bread keeps coming out a little bit doughy still at 30 minutes. It’s light but not super airy, tastes great, and is perfectly golden brown (used ice cubes). My inclination is I need to cook it a little longer, but it’s so nicely browned that I don’t want to burn it by cooking it longer. Could this be caused by something else?
I think if it’s still doughy, adding 5 to 6 minutes baking time should do the trick.
If I’m making this the day before wanting to bake, at what point do I put it in the fridge?
You can refrigerate the dough before shaping into loaves and then shape, rise and bake the next day or you can shape into loaves and refrigerate to bake the next day.
Could you sub in some sourdough discard in this recipe?
I bet you could! I usually decrease the liquid by 1/2 cup and flour by 1/2 cup for every 1 cup of sourdough discard I use.
This bread turned out perfect! It was soft on the inside and had a crusty exterior. Excellent recipe that I will come back to again and again.
Used a lot more flour to get consistency right, maybe it was the unbleached bread flour causing this. Turned out kinda flat but very soft and very good. Will definitely use this for smaller sub sandwich loafs in the future, just need a loaf tray to help get more height.
Love it! Easy, and tastes great!
Much like another review I kept adding flour because the dough was too tacky to handle, ended up close to 7 cups. Loafs ended up flattening after 2nd raise. Turned out great though, except bake time took 35 minutes.
I just made homemade bread by myself for the first time!!! Is it perfectly shaped? No. Is it delicious fluffy bread? YES! This recipe is SO easy and the perfect recipe to break in my new Kitchenaid Mixer! 5 Stars!
I messed something up but it still came out great. I never got it to stop being sticky and believe me, I tried. I kept adding flour and kept the mixer going on and on and I was afraid of either too much flour or too much mixing or both so eventually I just quit and put it into a greased bowl to rise. It stuck to the mixing bowl of my KitchenAid, the bowl literally hanging from it as I tried to get it out. Stuck to my hands, it was a mess.
After an hour it rose just fine and then it stuck to the greased wax paper I turned it out on. I managed to make two wonky looking loaves and it rose again just fine. Baked fine too. Maybe a little flatter than I’d like but honestly it was pretty light and had a lovely crust. It was delicious! Served it with kale and sausage soup and it was perfect. My kind of recipe.
Absolutely delicious…turned out exactly like the picture. Instead of ice placed a dish with water underneath the bread in oven while baking!!!
Can I use half bread flour and half all purpose?
Yes
Love it. Great recipe! I’m going to use this again. I feel like my first batch came out a little dense though. Any suggestions?
A few suggestions: try kneading for a few minutes longer and/or increasing the rising time and/or making sure the dough is soft and supple and not over floured.
Good recipe but the amount of ads and pop ups mean I’ll never come here again. Out of fricking control!!!
Hey Rusty, sorry you didn’t have a great experience on my site (sadly, I don’t think you’ll see my response). I do try to minimize the ads (and there shouldn’t be pop ups)…I’ll definitely take a look at my ad settings to see if some improvements can be made. I run far less ads than many other bloggers and less than what my ad management company recommends, but I understand they can be annoying. Unfortunately the ads are a necessary evil for me to continue providing free content. It’s always a delicate balance! Thanks for your feedback.
What does stirring down the dough mean when using an electric mixer?
Turn the mixer on and let it deflate/mix the dough for a few seconds.
Love this bread recipe! It was my first, and it’s still my favorite one.
Can I let my dough rise in my oven using my bread rising button?
I’m not familiar with that oven setting, but if it’s similar to a proofing function (super low heat), it should work fine.
is it possible to make this in a toaster oven? a lot of the breads i create in my toaster oven do not seem to thoroughly cook in the middle, however im not sure if that is the fault of me, or the oven. please let me know
Hi there, I’m afraid I don’t know as I don’t own a toaster oven and haven’t tried it myself. I’m sorry I’m not more help. Hopefully others can comment and help out if they have experience with a toaster oven.
This recipe is delicious!! Could I make bread bowls with this?
Yes, it makes delicious bread bowls. I usually add about 1/4 cup more flour if making bread bowls so they are sturdy enough.
The best bread recipe I’ve used! So simple yet delicious. My flour had ~1/6 whole wheat and it gave it just a touch more of heartiness yet so soft. Smeared garlic butter on it. Great stuff!
I’ve made this recipe twice and it’s given me a great loaf each time! This recipe is great for the food processor too if you really want to be minimal effort! I felt like I unlocked a secret when I read about folding the dough versus just stretching it out into a log. Wonderful texture and great flavor. Thanks so much for posting this!
I can’t even make it through the recipe due to all the ads and pop ups. Too much talk and not down to specifics. Could be good other wise
There’s a handy “jump to recipe” button at the top of the page that will get you right to the recipe and past all the talk. 🙂
The perfect loaf every time. I’ve made this at least once a week turns out perfect. I’ve added pepperoni, cheese and oregano delicious!! Add sugar, raisins and cinnamon wonderful! I won’t be loosing this recipe! Ever!!
I literally know your recipe by heart because i have made it so many times!!!. My family and I love it!
Love this recipe! Super easy recipe and the bread turned out perfect! Multi use bread… great for soup but also perfect for slicing and toasting. I will use this recipe regularly in my home!
Can this dough be made ahead and baked off the next day?
Yes, you can refrigerate the dough overnight.
I do not have a stand mixer ( it is somewhere in the Gulf of Mexico due to hurricane Ian 9/28/22 , 10 foot water surge took 95% of our belongings) so.. how can I make this French bread without a stand mixer? I only have an inexpensive hand mixer now. I love your site❤️
Hi, JuJu – sorry to hear about your mixer and other belongings! This bread can be mixed up by hand in a bowl with a wooden spoon or silicone spatula, and then it can be kneaded on a lightly floured countertop. Lots of people have reported that making it by hand has worked very well!
Thank you
This is definitely a forgiving recipe and we love it! Thank you!
I wanna make this bread for tonight and seen the adjustment to the salt, did that affect the taste, im assuming it does, if so by how much
THE best French bread I have ever tasted!!
Tried it for the first time tonight.
Absolutely delicious and beautiful bread!
I’m at an elevation of about 2,000’ and it Turned out perfectly!!
I wish I tried this sooner. I will never buy store bought french bread again. And I will also make sure our freezer is stocked constantly!
Delicious bread first time making bread easy to follow and make
This is, hands down, the best french bread recipe I have ever tried! I’ve used this recipe several times without chaning a thing and it has come out perfectly every single time!
LOVE this recipe! Rising great for me every time and is so amazingly light and fluffy inside! I ate a whole loaf last night to myself – oops haha
Sorry just made it …so flat …maybe I’ll buy the French pan?
I had a friend who told me to just wrap three small glass jars in parchment to make a “divider” of sorts down the middle of the pan, then it acts as a wall between them like a French loaf pan! I haven’t tried it, but she says it works every time.
This has been my “go to bread” for 2 years now. Everyone loves this wonderful french bread! Thank you