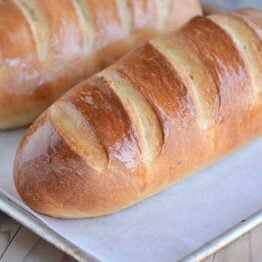
Easy Homemade French Bread
Homemade French bread has never been easier! This simple recipe produces a light and fluffy loaf of French bread that will rival any bakery!
This easy homemade French bread is so simple and perfect for a bread making beginner.
But as you can see from all the comments below, it’s just as valued by expert bread makers, too!

Making French Bread Dough
This straightforward bread dough can be made in a stand mixer or by hand.
- Warm water
- Yeast (instant or active dry yeast)
- Bit of sugar and oil
- Salt
- Flour (all-purpose or bread flour)
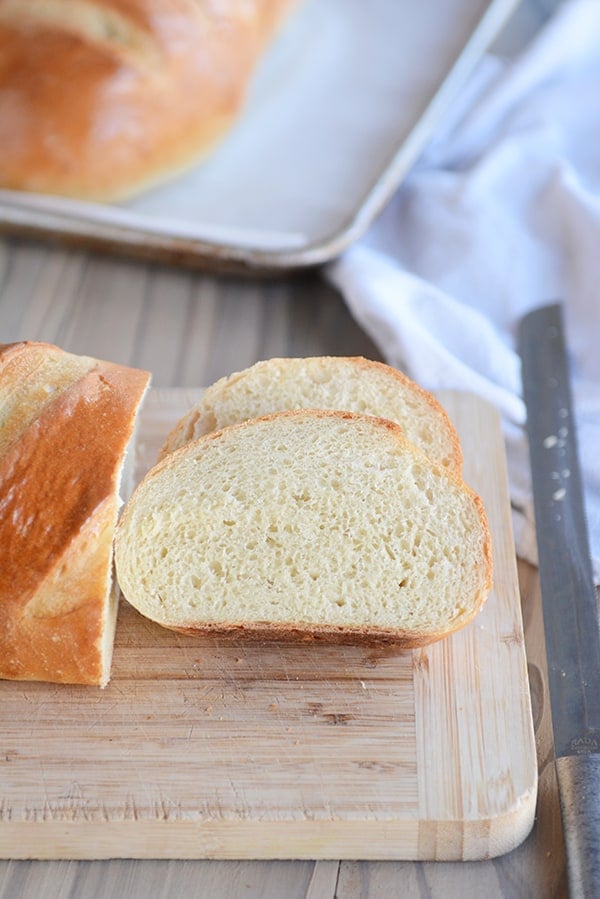
At the start, the dough will look shaggy and rough.

But as it kneads, it will become soft and smooth.
The most important part of this dough (and other yeast doughs) is to judge the amount of flour by the look and feel of the dough rather than the exact amount of flour called for in the recipe.
Factors such as humidity, elevation, room temperature, how we each measure flour, and more can affect the amount of flour added. So don’t stress about precise flour measurements and continuously feel the dough to achieve a soft dough that is slightly tacky but doesn’t leave a lot of residue on your fingers.
Too little flour and the dough will be a mess to handle. Additionally, the bread won’t hold its shape as it rises and bakes.
Too much flour and the dough won’t rise well and the bread will be tough and dense.

Two Methods for Dough Rising
In the recipe, there are two methods to letting the dough rise:
- Leave the dough in the mixer, cover with a lid or towel, and let the dough rest for 10 minutes. Stir it down by turning on the mixer for 10 seconds or so. Repeat the “rest and stir down” cycle five more times.
- Transfer the dough to a lightly greased bowl and cover with a towel or greased plastic wrap. Let the dough rise until doubled, about an hour or so, depending on the warmth of your kitchen.
I alternate between the two methods depending on my mood. The 10-minute increment rising method is unique to this original French bread recipe. The idea is that allowing the dough to rise this way produces a lighter crumb.
But the more traditional rising method also results in a delicious, fluffy loaf.
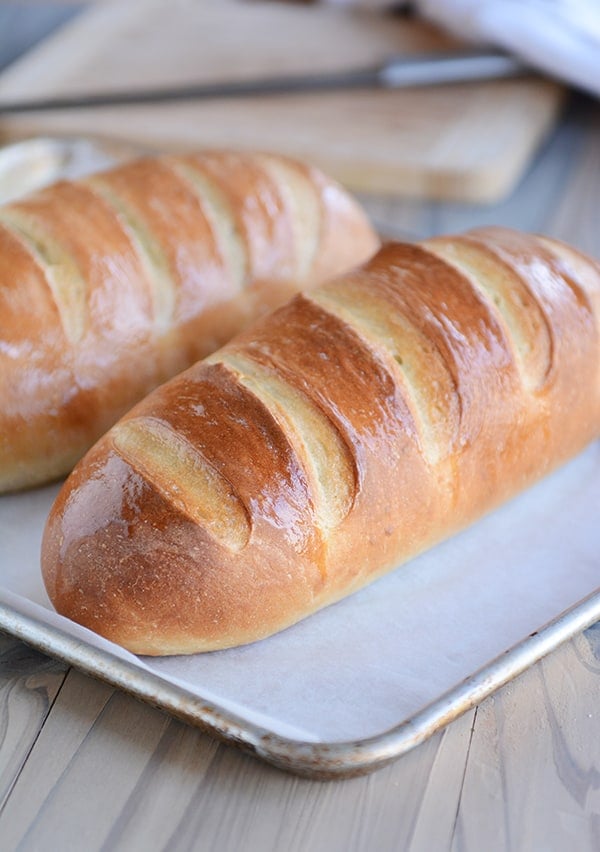
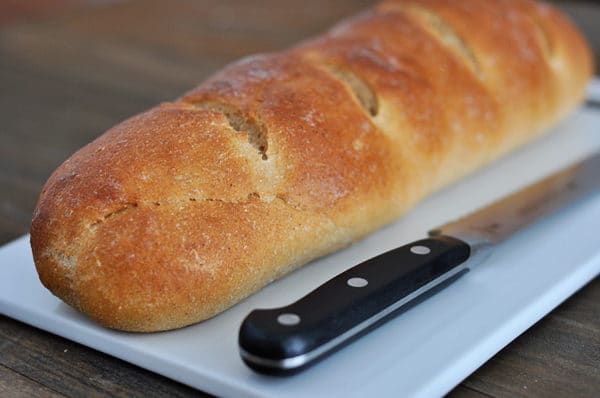
How to Shape French Bread Loaves
The question I get asked the most about this easy homemade French bread is how to shape the loaves.
The loaves can really be made any size or shape; I usually end up making 12-inch loaves, but if they end up being a bit thinner or chubbier, it’s no big deal!
Press each portion of dough into a flat rectangle and fold the bottom edge up and over the dough, pressing the seam flat with your hand.

Then, roll the dough up again to meet the top edge.
Fold the top edge over and press or pinch lightly.

Take the end of the bread dough and fold it up and over an inch or two to give an even thickness all the way down the loaf.
Pinch to seal the end. Repeat on the other end of the dough.
Then, deliberately and thoroughly pinch and seal the entire length of the loaf.

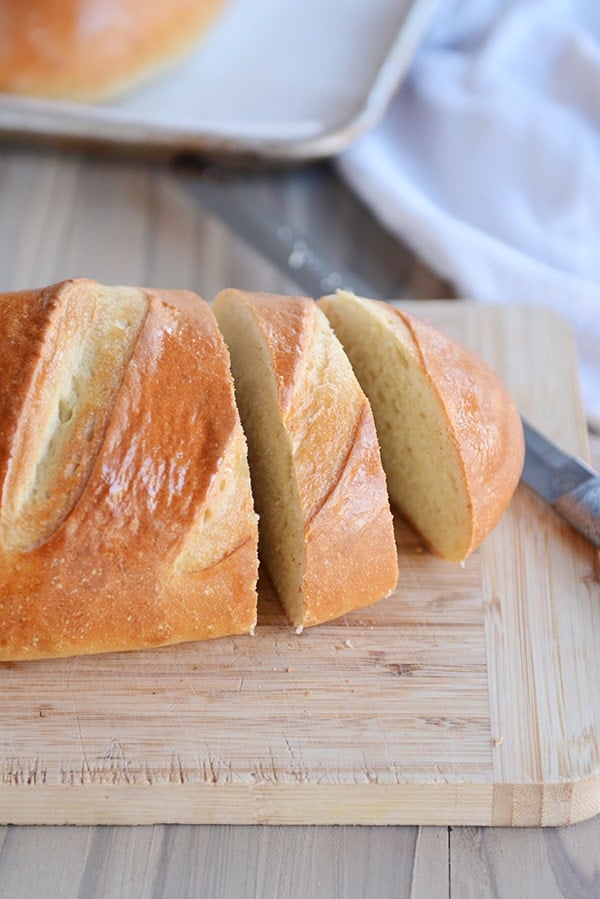
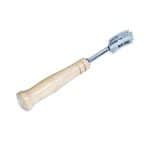
How to Score the French Bread Dough
Scoring the bread dough (in my house, also called: slashing or gashing) helps the dough rise better AND prevents it from cracking in unexpected places while baking.
Using a bread lame for this task is extremely helpful. A bread lame is a long stick or utensil with a razor blade on the end. The razor is used to make thin cuts in the dough.
If you don’t have a bread lame, using a clean, sharp razor blade or an extremely sharp kitchen knife can work. Be aware that if the knife isn’t sharp enough, it’ll likely deflate the dough.
The bread loaves can be scored before or after the final rise. I prefer to do the slashing and gashing before they rise as I’ve had one too many loaves of risen bread deflate at the first touch of the razor, and there is nothing so soul crushing as when that happens.

Let the bread loaves rise until noticeably puffy before baking.

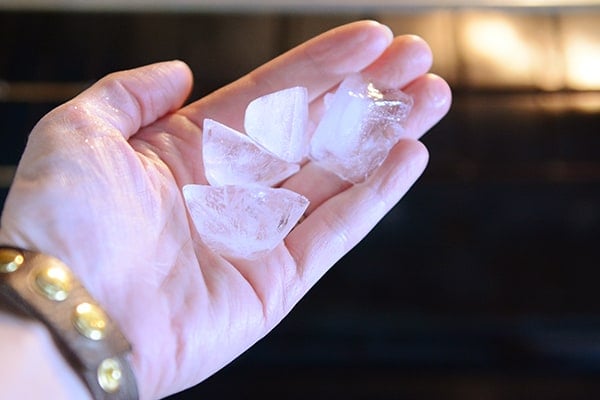
Easy Hack for Crusty French Bread
For a delicious golden crust, immediately before putting the bread in the oven, toss 3-4 ice cubes onto the bottom of the oven. Add the bread and quickly (but gently!) close the oven door.
The steam as the ice cubes hit the toasty bottom of the oven will lightly crisp up the outer crust as the bread bakes.
Important Note! Please consult your oven’s manual for details or caution on putting ice/water on the bottom of the oven floor – I’ve never had a problem, but everyone should do their own research and use their own best judgment (also take care not to toss the ice cubes on the glass oven door as it could crack).
If you are struggling to get a deeper golden crust on the French bread, try:
- Increasing the oven temperature by 25 degrees and/or
- Moving the oven rack up one position (I find my bread browns the best in the middle or upper middle area of my oven)
Whole Wheat French Bread
As noted in the recipe, French bread works quite well using whole wheat flour. I’ve found the best results are when using white whole wheat flour (red whole wheat flour makes a denser, heavier loaf).
I recommend subbing in half whole wheat flour to start and then adding more whole wheat flour as you continue to make subsequent batches of bread.
If using whole wheat flour, add a 2-3 minutes to the kneading time to help develop the gluten (also, adding a couple tablespoons of vital wheat gluten/gluten flour can also help the whole wheat bread bake up light and fluffy).

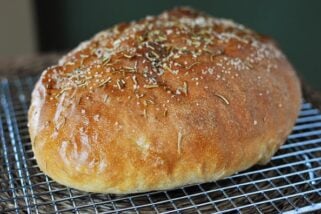
Helpful Tip: If you’ve struggled with your bread flattening out while baking instead of holding the perfect shape, you might try these French bread pans {aff. link}. I have them and LOVE them. I don’t use them every time I make this bread, but I do pull them out quite often (I also use them for this rosemary bread).
Perfect Homemade French Bread
With over 2,500 5-star reviews, this homemade French bread has become a favorite for so many of you.
Hundreds of you have let me know that you have been intimidated by homemade bread until you found this recipe! It is easy, foolproof, and will make you feel like a bread making rock star.
Helena says: Finally, after 5 failed bread attempts using other places recipes, this is THE recipe to use! Happy dance! Thank you for sharing this awesome recipe! Delicious bread!
Valerie writes: Such a fantastic, easy recipe. The “hands on” time is minimal and it comes out perfect every time. Thanks for sharing a recipe that’s become my “to do” dinner bread!
Nichole says: Followed instructions exactly! First time making any sort of bread ever. The bread turned out perfect!!!!
Pia commented: Hands down my go-to bread recipe. Today’s edition is 1/3 dark rye flour, with Italian herbs and caraway seeds mixed in and sprinkled with everything bagel topping. Yum! Best bread recipe ever, and so easily customizable!
FAQs for Homemade French Bread
Yes! Halve all the ingredients straight across – just keep an eye on the amount of flour and judge the final amount by the look and feel of the dough.
Yes, it freezes great (after baking and cooling).
Moving an oven rack up or down can help. In my oven, the bread browns best in the upper half of the oven. Also, you can try increasing the oven temp by 25 degrees.
Absolutely! You can mix the ingredients in a bowl with a spatula or spoon and knead by hand.
I always use the same amount interchangeably. Recently, I’ve heard that active dry yeast doesn’t need to be proofed in liquid first, but I always still do when using active dry yeast (no need to proof with instant yeast).
Yes, just keep an eye on baking time – smaller loaves may need less baking time.
One Year Ago: Harvest Pasta Sauce {Trader Joe’s Copycat}
Two Years Ago: Peanut Butter Cup Cheesecake with Chocolate Cookie Crust
Three Years Ago: Easy Homemade Egg Noodles {Step-by-Step Pictures Include Food Processor Method or By Hand}
Four Years Ago: Black Bean and Butternut Enchilada Skillet
Five Years Ago: Chocolate Chip Peanut Butter and Oatmeal Cookies
Easy Homemade French Bread
Ingredients
- 2 ¼ cups warm water, 110-115 degrees F
- 2 tablespoons granulated sugar
- 1 tablespoon instant or active dry yeast
- 2 ¼ teaspoons salt (see note)
- 2 tablespoons olive oil, canola oil, vegetable oil or avocado oil
- 5 ½ – 6 cups (781 – 852 g) all-purpose flour or bread flour (see note)
Instructions
- In the bowl of an electric stand mixer fitted with the dough hook, combine the water sugar and yeast. If using active dry yeast, let the mixture bubble and foam before proceeding (this can take 3-5 minutes). If using instant yeast, proceed with the recipe (no need to let the yeast activate).
- Add the salt, oil and 3 cups of flour and mix. Add in 2 1/2 to 3 more cups of flour gradually. The dough should clear the sides of the bowl and form a soft ball that doesn't leave a lot of dough residue on your fingers.
- Knead for 2-3 minutes until the dough is smooth. If the dough starts to cling to the sides of the bowl (or the center column if using a Bosch or other mixer with a center), add 1/4 cup of flour at a time until a sturdy but soft ball of dough forms.
- Rising Method 1: Leave the dough in the mixer, cover with a lid or towel, and let the dough rest for 10 minutes. Stir it down by turning on the mixer for 10 seconds or so. Repeat the "rest and stir down" cycle five more times.
- Rising Method 2: Instead of letting the dough rest for 10 minute spurts and then stirring it down, transfer the dough to a lightly greased bowl and cover with a towel or greased plastic wrap. Let the dough rise until doubled, about an hour or so, depending on the warmth of your kitchen.
- Turn the dough onto a lightly greased surface and divide in half. Pat each section into a thick rectangle, 9X13-inches or thereabouts (doesn't have to be exact). Roll the dough up starting from the long edge, pressing out any air bubbles or seams with the heel of your hand, and pinch the edge to seal. Arrange seam side down on a large baking sheet lined with parchment paper (I use separate baking sheets for each loaf).
- With a bread lame, razor blade or VERY sharp knife, cut several gashes at an angle on the top each loaf (you can wait to score the bread until after it rises, but it can easily deflate if the razor/knife isn't sharp enough).
- Cover the loaves with greased plastic wrap or a kitchen towel, and let rise until noticeably puffy and nearly doubled in size, about an hour.
- Preheat the oven to 375 degrees F and make sure an oven rack is in the center position. If you find your bread isn't browning as much as you like, preheat the oven to 400 or 425 degrees and/or move the oven rack up one position (watch carefully so the bread, especially the bottom, doesn't burn).
- Optional: for an extra golden, crisp crust, place the loaves in the preheated oven and immediately toss 3-4 ice cubes on the bottom of the oven. Close the oven door quickly but gently. (See note below!)
- Bake the loaves for 25-30 minutes until golden and baked through.
- If desired, brush melted butter over the hot loaves (this softens the crust a bit, so if you want a crispier crust, don't butter the top).
Notes


Recipe Source: adapted slightly from The Sister’s Cafe


Hi there! If I were to convection bake this bread (still individually) about what temp or time should I do it at? New to bread baking and wanted to try one regular and one convection. Thanks! Super excited about this recipe!
I usually set my convection oven to 25 degrees lower than a recipe that uses a standard oven temperature.
Hi Mel, thanks for this recipe, which I truly would love to make. I’d like to know whether I could half this recipe and whether the resultant bread would be the same, please? Thanks Mel and much appreciated.
Yes, the recipe can definitely be halved! Turns out great.
We are new to making bread, but we tried this recipe and loved it so much we are on our third batch in three weeks! I want to add the following:
1) we used a package of active yeast, which is 2 1/4 teaspoon yeast, but it worked perfectly.
2) the second time we made it, we brushed it with an egg white wash and it browned and crisped a bit more.
THANK you for the wonderful easy recipe, my family never wants store bought French Bread again!
My bread is not golden brown and I did try the steam. What can I do to get the golden color?
Sometimes, moving the oven rack to a higher position makes all the difference.
I made this exactly as stated. I did not have an electric bowl mixer but went old school. It came out fantastic and my husband loved it. I will be making it again.
Thank you Mel for all these wonderful recipes with clear cut instructions! I just bought a kitchen aid mixer and cannot wait to use it. I was curious though for your bread recipes, have you ever tried baking the bread directly on a baking steel? And if so would the baking time/temperature be any different?
Thank you.
I haven’t – sorry I’m not more help!
Hi I’m attempting to make this recipe now but I only have one pack of instant yeast instead of a full tablespoon. Would it still rise?
One packet is 2 1/4 teaspoons so it should be ok.
Thank you my bread turned out perfectly!
My first attempt and it was amazing, didn’t go with the ice trick, but still was on point.
I’ve made this recipe twice already. It came out amazing both times! So easy to follow and delicious!
Love this recipe! It is foolproof and comes out great each time! Thank you for sharing
It was good! However, I used the amount of salt recommended in the recipe before I read that the recipe originally called for 1 tbsp of salt and this recipe cut pack a little. Personally, I think I’ll actually add more than 1 tbsp. I think it needed more salt and flavor.
It was good! However, I used the amount of salt recommended in the recipe after I read that the recipe originally called for 1 tbsp of salt and this recipe cut pack a little. Personally, I think I’ll actually add more than 1 tbsp. I think it needed more salt and flavor.
First time making French bread, used my kitchenaid mixer… really happy with this recipe. It was a little dense, just a touch… but great taste, crispy crust… and it made A LOT of bread.
Hey Mel! This is the 4th or 5th time I have made this recipe. I have gotten different rising results each tine. All have been fine but different. I always opted to let it rise in the bowl slightly greased and covered. Then I split the dough and made two different loaves. Should I split the dough first, roll it out then let it rise as a loaf? Have you ever tried that? Just curious about results.
The loaf should rise as well – so I think I’m confused about what you are asking. I’ve never skipped the first rise (where it rises as one big mass or rises for 10 minute increments in the mixer), so I don’t know how it would work to only let it rise once shaped into a loaf?
The amount of time it takes to rise in the proof stages depends on how warm the water was when you used it as well as how warm the room is while proofing. The warmer it is, the faster it will rise.
You should allow your dough to rise twice.
Hi there!
Looking forward to trying this recipe. Wondering if it can be baked in a cast-iron dutch oven as a boule instead of shaping into loaves. Any thoughts? Would I need to change the cooking times?
Thanks!
I haven’t tried it, but I think it’s definitely worth a try! If the cast iron pot is preheated in the oven, it’s hard to know what the exact baking time will be. I’m guessing it will be about the same.
The bread spread out like a pancake. Will not be making this recipe again. Very disappointing!
You must have done something incorrectly as this is a pretty flawless recipe as attested to by all of
The great reviews. Try again?
You probably need to bake it in a baguette pan or add a little more flour next time. It is really a good recipe if done correctly.
I agree with Cheryl. You must have missed a step. You should try again. It really is fantastic.
Your methods to measure the flour and water may be off a bit making the dough too wet.
You are supposed to add flour while mixing until a “sturdy but soft” ball of dough forms. That’s why is states 5 1/2 to 6 cups flour and not an exact amount.
Very simple recipe to memorize so I’ve made it my go to recipe when I want to wip up some great bread…… family and friends love it and so do I
Thanksff
Brad
I’m not all that experienced with making bread, and this recipe turned it perfect!! Thank you! And it was super fun to throw the ice cubes in the oven. 🙂
I really wanna make this, but I’m having trouble understanding how you shape the loafs.
I have gluten and wheat allergy do you do any free from bread recipes?
Hi April, unfortunately, I don’t have many gluten-free yeast bread type recipes. I would suggest glutenfreeonashoestring.com – her recipes are wildly tested and she has a lot of bread recipes!
Delicious! Mine was huge so I didn’t want one to keep rising while the other baked. So I baked them together and they turned out just great! Did 30 minutes and that was right no; I do not have convection. I do have a extra large sheet pan than has no rims so they both fit on the pan and on the same shelf in the oven. Yum! And yes—EASY!
Turned out great and I even messed up on the amount of salt but it was still delishous.
Followed recipe exactly with all purpose flour. Worked perfectly!
This recipe is amazing!! I have now made this recipe a total of three times and it was my first yeast bread I’ve ever made and every time it turns out better than the last. My boyfriend goes crazy for this bread and always asks if I’m making more on the weekends. Also to note I made this “the old fashioned way” aka with a wooden spoon and still it turns out great.
It seems like I have to use a lot more flour than called for to get my dough to form a ball while in the mixer (more than s cup more than recipe calls for). And then it is still very sticky when I go to flatten and roll it. Could I be doing something wrong?
The exact amount of flour is dependent on a lot of variables (elevation, humidity, temperature in your kitchen, how we each measure ingredients, etc) so don’t stress if you have to add more flour. As long as the dough is soft and smooth without being overly stiff, it should be fine.
Can I split into 4 small loaves? Would you recommend any adjustment to the baking time?
Yes! I would bake for about 5-6 minutes less (and add more if you need it).
Mine was also still very, very sticky. I tried it out for the first time yesterday and I kept on putting more and more flour, hoping that it would get less sticky. Today, I tried it again and it was getting sticky again. Kept putting flour, then finally decided to take it out and knead it, adding more flour as I kneaded. Worked a lot better. Hoping the second time’s the charm.
Flawless recipe. My first attempt at making bread was a total success. Don’t get fancy with any deviations, just follow exactly…..and now I digress…..
I placed a ramekin on the floor of my oven when I started the preheating. That is where I threw my ice cubes when the loaf went in and it worked perfectly.
My loaf was a little on the fat side so I recommend going the full 30 minutes.
And don’t forget the melted butter once you pull it out of the oven. It is often the over looked finishing touch that attracts you to the best loaf in the bin at the store.
Just sensational and if you have a standing mixer….it does 90% of the work. You just need a few hours, just don’t be in a hurry.
Can’t wait to try your french bread & lots of other receipes! Thank you for sharing!
It seems like I have to use a lot more flour than called for to get my dough to form a ball while in the mixer (more than s cup more than recipe calls for). And then it is still very sticky when I go to flatten and roll it. Could I be doing something wrong?
Thanks for your advice earlier! Next question: Have you tried making smaller loaves from this same recipe? I am trying to make 3 loaves, but smaller sized, but I am not sure how long to bake them for. Thanks!
I have made this recipe multiple times and it is amazing – the last two times I split the dough into 4 loaves and baked for the same amount of time using the ice cube method in my oven set for convection baking. Absolutely delicious french bread.
Yes, you can make any size of loaf with this recipe. For smaller loaves, just watch the baking time – you can probably take 5 or so minutes off the baking time.
I’m making this as I write. Nothing better than homemade bread. 🙂 I’m curious, what does the 10 minute wait, mix and repeat 5x accomplish? I’ve never heard of this method. Thanks for posting the recipe!
It’s just an alternate form of rising – helps develop a fluffy, light texture in the bread!
I made this once and the flavor and crust turned out great! I felt like mine was a little dense. Not as many air bubbles. Did I knead it too long? Also, I don’t need 2 loads at one time. Am I able to make and freeze half? If so when do I freeze it? Before the 1st rest or before the 2nd rest? Thanks for this wonderful recipe!
Yes, you can freeze half (or make half the recipe at a time). I’ve never frozen the bread dough prebaked but I have frozen the baked loaves a lot, and they freeze great. I don’t think kneading too long would be an issue – could be the bread needs less flour OR more kneading time so it isn’t as dense (to develop the gluten).
This bread is fabulous! Easy to make and delicious. However, my bread isn’t looking as golden brown and pretty as yours. It is blonde–even using the ice cube trick– and a bit lumpy looking. Any suggestions?
Hi Meridith – sometimes moving an oven rack up or down in the oven is the trick to good browning. In my oven, it tends to be in the upper half of the oven that my bread browns the best.
I made this last night. It was my first time making bread at home. I didn’t slice it deep enough so it didn’t look as pretty as yours but it was still delicious. We had it warm with butter last night, then had French bread pizzas for lunch and now I have a French toast casserole in the fridge waiting to be popped on the oven in the morning. I call this a success! Thank you for the recipe!
I tried yesterday. It was the BEST plain bread recipe EVER! The one and only one successful one. Thank you so much. Just to share i only have 1 cup of bread flour and i topped up the rest with the normal plain flour. I was worried at first. I spent more time kneading the bread though. Pls share the recipe with your loved ones.
I made this bread for the first time and WOW!! My family loved it!! I used all purpose flour and 1 packet of active dry yeast. I also added the ice to the oven when baking and the crust was firm and the inside so soft. This will be my GoTo recipe for homemade bread. Thank you!!
So good and so easy for this beginner to try!!! Didn’t have a stand mixer so I kneaded it by hand, family was happy and so were my neighbors who got the extra loaf 😉
I unfortunately don’t have a stand up mixer, is there a way I can still make this bread?
Yes, you can mix the ingredients in a bowl with a spatula or spoon and knead by hand. Others have tried that if you read through the comments!
Ten stars! Best I’ve ever made and I’ve been looking for awhile! I used bread flour but added 1 tablespoon wheat gluten because I like it chewy! It was so easy. I’m giving my neighbor a loaf but will have to make more tomorrow because the two of us will finish it off. I’ve read that putting the dough in the fridge overnight makes bread taste better so I may experiment with that. Thank you!
Hi Mel! I’ve made your bread about five times now! I love it. During this horrible pandemic It’s been very therapeutic for me to make something so comforting and so delicious. I follow your recipe exactly… even down to the ice cubes in the bottom of the oven! Thank you for such a great recipe.
Recently found this recipe and have since made it several times. This became an immediate family favorite for grilled veggie sandwiches, French toast, pasta night, and so many other occasions. I have also found it to be the perfect bread for croutons and stuffing cubes, after it gets a little stale. As others have noted, it is technically an Italian bread, which is what I wanted!
So my dough looked really good. I shaped my loaves and put them in a warm place rise. I came back an hour later and they were wide and very flat. Did I over rise them? My dough wasnt sticky at all. I’d love to try this again and get it right, but I dont want to waste my precious yeast!
Hi Maralee, if that happens again, you can reshape the loaves and let them rise again and they should bake up just fine. Otherwise, next time, it sounds like even if your dough wasn’t sticky, it might need a bit more flour so the structure will help the dough rise up instead of out. Another thing to try to do is roll or shape a very tight loaf.
Hey Mel ! It’s my first time using yeast and i had a couple questions ! Is it one tablespoon for either instant / dry active yeast, are the measurements the same regardless of the yeast ? I read that the instant is more concentrated compared to the dry active.
Thank You ! Can’t wait to try this recipe.
I always use the same amount interchangeably, but I know some people use 1/4 less if using instant yeast vs active dry yeast.
Hi Mel,
Thanks for the recipe; tried bread baking my second time and it’d turned out perfectly! My first time with a different recipe was a disaster as I’d read the instructions wrong and had killed the yeast with too hot water. My family lived the bread and devoured it within minutes. One question I have is how to reduce the yeasty flavor from the bread? Any suggestions?
Thanks again for sharing this great recipe!
You can try reducing the yeast and see how it goes, but that may affect rise times and texture of the bread.
This is a fantastic recipe. I have made it with 100% wholewheat, and half wholewheat and AP flour, it just gets better with each try. I really want to try it with dark rye flour- would you have any advice on that?
I haven’t tried this bread with dark rye flour, so I’m sorry I’m not more help, Dee! My recommendation when using new, heartier flours in bread is to start with 50% white flour and 50% of the wheat (or rye flour) in this case.
Followed instructions to a “t”. Used half whole wheat flour and half bread flour. It’s ok. I’ve baked a ton of bread and this was “meh”…
I made these and it was really good! Except the log that was waiting while the first is baking list it’s size any thoughts?
Hi Nathan – if your kitchen is really warm and that second loaf has the potential to overrise, pop it in the refrigerator to hang out until it has its turn to bake.
This recipe always turns out perfectly.
This recipe is so good. Crust is crispy but not hard and inside is so soft and fluffy
Just used this recipe to make rolls for po’boys. Excellent.
I did not look up the bottom of the oven concerns and just used this cool mini loaf pan I bought many years ago an only used them one time. This was a perfect use for the ice, I assume any oven safe pan that fit would serve the purpose, but this worked perfectly. I also went with an individual loaf for the sandwich and I finally got to use my bread couche I have had in the cabinet for years. Definitely recommended.
I also do not have a stand mixer and feel I actually make better bread by hand, just keep them floured and cool.
Thank you for this great starter recipe.
Made this using the leave in the bowl method – which is so easy! And I used the ice cubes. Why have I never heard of these tricks before? Bread turned out lovely, the perfect thing for to smear a little rhubarb ginger jam on. Yum!
Hi, I’m super excited to try this. i’ve been working on bread making of late (like many others) and I have a question. I don’t see any kneading or mention of it. The 10 second spurts on the mixer is all that’s needed? with limited ingredients, I want to be sure I’m doing the correct method before diving in! Thanks!
In step #2 it says to knead the bread for 2-3 minutes. 🙂
I have never made French bread before-just always banana or zucchini or nut breads and I was very hesitant to make this but I followed the directions (and I do not have a stand alone mixer) and it was easy and AMAZING!!! I am so excited that I found your website and this amazing recipe. Thank you!!
2nd time making this recipe. Both times were great. I did by hand both times because I was to lazy to pull out the stand mixer. I think I may need more flour ( I used 5 1/2 cups but I notice when I’m rolling into the loaf shape, it’s a bit soft and therefore doesn’t roll up tightly which makes mine rise more wide. It was also Rai y and dreary out and I know moisturize can affect the baking process. Any tips?
If the bread is rising out instead of up, then yes, you probably need a bit more flour.
Never had made bread before but made these for the first time a couple of weeks ago and my family loved it! It was delicious.
However, I made it again last night and these ones came out even better!! This time I really took my time with adding flour. I think last time I added a little more than necessary.
Obsessed with this recipe! Crispy outside but beautiful soft pillowy inside!
Thanks for the recipe!!
Never had made bread before but made these for the first time a couple of weeks ago and my family loved it! It was delicious.
However, I made it again last night and these ones came out even better!! This time I really took my time with adding flour. I think last time I added a little more than necessary.
Obsessed with this recipe! Crispy outside but beautiful soft pillowy inside! Love it! Thanks for the recipe!!