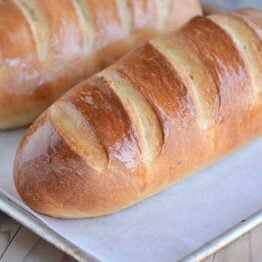
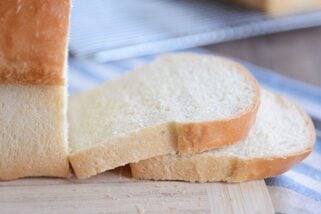
Easy Homemade French Bread
Homemade French bread has never been easier! This simple recipe produces a light and fluffy loaf of French bread that will rival any bakery!
This easy homemade French bread is so simple and perfect for a bread making beginner.
But as you can see from all the comments below, it’s just as valued by expert bread makers, too!

Making French Bread Dough
This straightforward bread dough can be made in a stand mixer or by hand.
- Warm water
- Yeast (instant or active dry yeast)
- Bit of sugar and oil
- Salt
- Flour (all-purpose or bread flour)
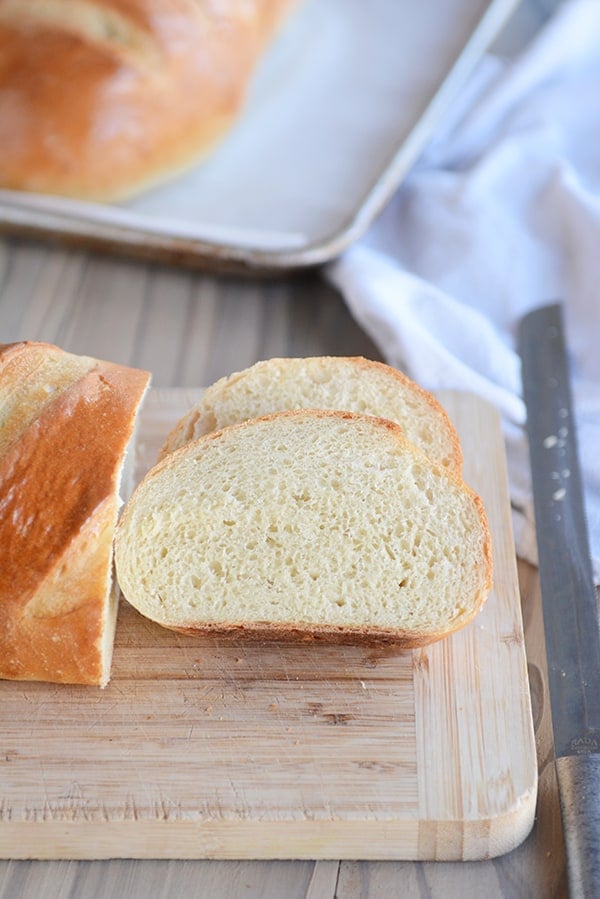
At the start, the dough will look shaggy and rough.

But as it kneads, it will become soft and smooth.
The most important part of this dough (and other yeast doughs) is to judge the amount of flour by the look and feel of the dough rather than the exact amount of flour called for in the recipe.
Factors such as humidity, elevation, room temperature, how we each measure flour, and more can affect the amount of flour added. So don’t stress about precise flour measurements and continuously feel the dough to achieve a soft dough that is slightly tacky but doesn’t leave a lot of residue on your fingers.
Too little flour and the dough will be a mess to handle. Additionally, the bread won’t hold its shape as it rises and bakes.
Too much flour and the dough won’t rise well and the bread will be tough and dense.

Two Methods for Dough Rising
In the recipe, there are two methods to letting the dough rise:
- Leave the dough in the mixer, cover with a lid or towel, and let the dough rest for 10 minutes. Stir it down by turning on the mixer for 10 seconds or so. Repeat the “rest and stir down” cycle five more times.
- Transfer the dough to a lightly greased bowl and cover with a towel or greased plastic wrap. Let the dough rise until doubled, about an hour or so, depending on the warmth of your kitchen.
I alternate between the two methods depending on my mood. The 10-minute increment rising method is unique to this original French bread recipe. The idea is that allowing the dough to rise this way produces a lighter crumb.
But the more traditional rising method also results in a delicious, fluffy loaf.
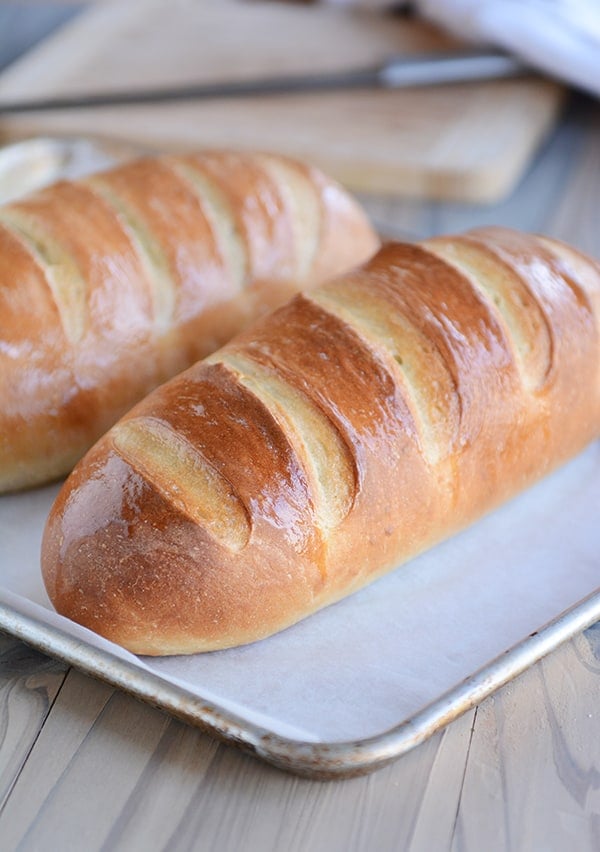
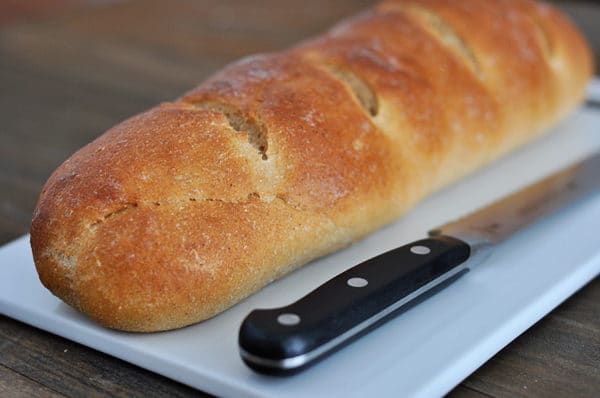
How to Shape French Bread Loaves
The question I get asked the most about this easy homemade French bread is how to shape the loaves.
The loaves can really be made any size or shape; I usually end up making 12-inch loaves, but if they end up being a bit thinner or chubbier, it’s no big deal!
Press each portion of dough into a flat rectangle and fold the bottom edge up and over the dough, pressing the seam flat with your hand.

Then, roll the dough up again to meet the top edge.
Fold the top edge over and press or pinch lightly.

Take the end of the bread dough and fold it up and over an inch or two to give an even thickness all the way down the loaf.
Pinch to seal the end. Repeat on the other end of the dough.
Then, deliberately and thoroughly pinch and seal the entire length of the loaf.

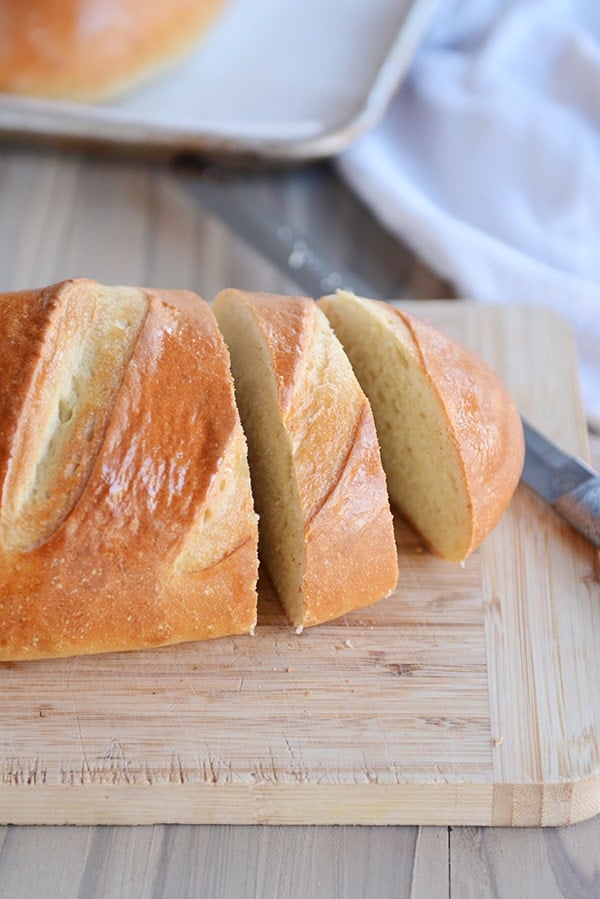
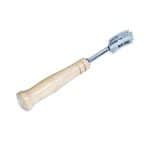
How to Score the French Bread Dough
Scoring the bread dough (in my house, also called: slashing or gashing) helps the dough rise better AND prevents it from cracking in unexpected places while baking.
Using a bread lame for this task is extremely helpful. A bread lame is a long stick or utensil with a razor blade on the end. The razor is used to make thin cuts in the dough.
If you don’t have a bread lame, using a clean, sharp razor blade or an extremely sharp kitchen knife can work. Be aware that if the knife isn’t sharp enough, it’ll likely deflate the dough.
The bread loaves can be scored before or after the final rise. I prefer to do the slashing and gashing before they rise as I’ve had one too many loaves of risen bread deflate at the first touch of the razor, and there is nothing so soul crushing as when that happens.

Let the bread loaves rise until noticeably puffy before baking.

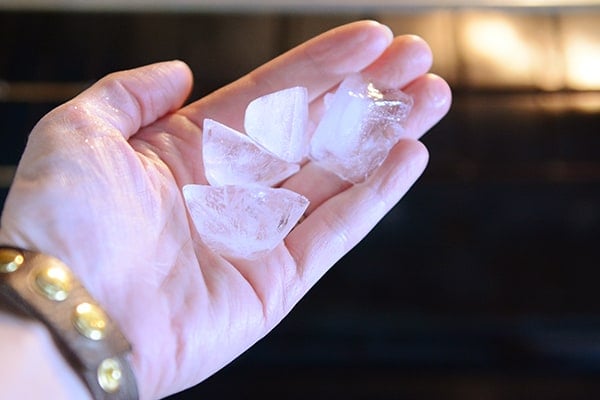
Easy Hack for Crusty French Bread
For a delicious golden crust, immediately before putting the bread in the oven, toss 3-4 ice cubes onto the bottom of the oven. Add the bread and quickly (but gently!) close the oven door.
The steam as the ice cubes hit the toasty bottom of the oven will lightly crisp up the outer crust as the bread bakes.
Important Note! Please consult your oven’s manual for details or caution on putting ice/water on the bottom of the oven floor – I’ve never had a problem, but everyone should do their own research and use their own best judgment (also take care not to toss the ice cubes on the glass oven door as it could crack).
If you are struggling to get a deeper golden crust on the French bread, try:
- Increasing the oven temperature by 25 degrees and/or
- Moving the oven rack up one position (I find my bread browns the best in the middle or upper middle area of my oven)
Whole Wheat French Bread
As noted in the recipe, French bread works quite well using whole wheat flour. I’ve found the best results are when using white whole wheat flour (red whole wheat flour makes a denser, heavier loaf).
I recommend subbing in half whole wheat flour to start and then adding more whole wheat flour as you continue to make subsequent batches of bread.
If using whole wheat flour, add a 2-3 minutes to the kneading time to help develop the gluten (also, adding a couple tablespoons of vital wheat gluten/gluten flour can also help the whole wheat bread bake up light and fluffy).

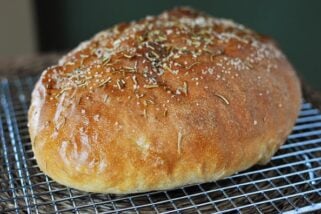
Helpful Tip: If you’ve struggled with your bread flattening out while baking instead of holding the perfect shape, you might try these French bread pans {aff. link}. I have them and LOVE them. I don’t use them every time I make this bread, but I do pull them out quite often (I also use them for this rosemary bread).
Perfect Homemade French Bread
With over 2,500 5-star reviews, this homemade French bread has become a favorite for so many of you.
Hundreds of you have let me know that you have been intimidated by homemade bread until you found this recipe! It is easy, foolproof, and will make you feel like a bread making rock star.
Helena says: Finally, after 5 failed bread attempts using other places recipes, this is THE recipe to use! Happy dance! Thank you for sharing this awesome recipe! Delicious bread!
Valerie writes: Such a fantastic, easy recipe. The “hands on” time is minimal and it comes out perfect every time. Thanks for sharing a recipe that’s become my “to do” dinner bread!
Nichole says: Followed instructions exactly! First time making any sort of bread ever. The bread turned out perfect!!!!
Pia commented: Hands down my go-to bread recipe. Today’s edition is 1/3 dark rye flour, with Italian herbs and caraway seeds mixed in and sprinkled with everything bagel topping. Yum! Best bread recipe ever, and so easily customizable!
FAQs for Homemade French Bread
Yes! Halve all the ingredients straight across – just keep an eye on the amount of flour and judge the final amount by the look and feel of the dough.
Yes, it freezes great (after baking and cooling).
Moving an oven rack up or down can help. In my oven, the bread browns best in the upper half of the oven. Also, you can try increasing the oven temp by 25 degrees.
Absolutely! You can mix the ingredients in a bowl with a spatula or spoon and knead by hand.
I always use the same amount interchangeably. Recently, I’ve heard that active dry yeast doesn’t need to be proofed in liquid first, but I always still do when using active dry yeast (no need to proof with instant yeast).
Yes, just keep an eye on baking time – smaller loaves may need less baking time.
One Year Ago: Harvest Pasta Sauce {Trader Joe’s Copycat}
Two Years Ago: Peanut Butter Cup Cheesecake with Chocolate Cookie Crust
Three Years Ago: Easy Homemade Egg Noodles {Step-by-Step Pictures Include Food Processor Method or By Hand}
Four Years Ago: Black Bean and Butternut Enchilada Skillet
Five Years Ago: Chocolate Chip Peanut Butter and Oatmeal Cookies
Easy Homemade French Bread
Ingredients
- 2 ¼ cups warm water, 110-115 degrees F
- 2 tablespoons granulated sugar
- 1 tablespoon instant or active dry yeast
- 2 ¼ teaspoons salt (see note)
- 2 tablespoons olive oil, canola oil, vegetable oil or avocado oil
- 5 ½ – 6 cups (781 – 852 g) all-purpose flour or bread flour (see note)
Instructions
- In the bowl of an electric stand mixer fitted with the dough hook, combine the water sugar and yeast. If using active dry yeast, let the mixture bubble and foam before proceeding (this can take 3-5 minutes). If using instant yeast, proceed with the recipe (no need to let the yeast activate).
- Add the salt, oil and 3 cups of flour and mix. Add in 2 1/2 to 3 more cups of flour gradually. The dough should clear the sides of the bowl and form a soft ball that doesn't leave a lot of dough residue on your fingers.
- Knead for 2-3 minutes until the dough is smooth. If the dough starts to cling to the sides of the bowl (or the center column if using a Bosch or other mixer with a center), add 1/4 cup of flour at a time until a sturdy but soft ball of dough forms.
- Rising Method 1: Leave the dough in the mixer, cover with a lid or towel, and let the dough rest for 10 minutes. Stir it down by turning on the mixer for 10 seconds or so. Repeat the "rest and stir down" cycle five more times.
- Rising Method 2: Instead of letting the dough rest for 10 minute spurts and then stirring it down, transfer the dough to a lightly greased bowl and cover with a towel or greased plastic wrap. Let the dough rise until doubled, about an hour or so, depending on the warmth of your kitchen.
- Turn the dough onto a lightly greased surface and divide in half. Pat each section into a thick rectangle, 9X13-inches or thereabouts (doesn't have to be exact). Roll the dough up starting from the long edge, pressing out any air bubbles or seams with the heel of your hand, and pinch the edge to seal. Arrange seam side down on a large baking sheet lined with parchment paper (I use separate baking sheets for each loaf).
- With a bread lame, razor blade or VERY sharp knife, cut several gashes at an angle on the top each loaf (you can wait to score the bread until after it rises, but it can easily deflate if the razor/knife isn't sharp enough).
- Cover the loaves with greased plastic wrap or a kitchen towel, and let rise until noticeably puffy and nearly doubled in size, about an hour.
- Preheat the oven to 375 degrees F and make sure an oven rack is in the center position. If you find your bread isn't browning as much as you like, preheat the oven to 400 or 425 degrees and/or move the oven rack up one position (watch carefully so the bread, especially the bottom, doesn't burn).
- Optional: for an extra golden, crisp crust, place the loaves in the preheated oven and immediately toss 3-4 ice cubes on the bottom of the oven. Close the oven door quickly but gently. (See note below!)
- Bake the loaves for 25-30 minutes until golden and baked through.
- If desired, brush melted butter over the hot loaves (this softens the crust a bit, so if you want a crispier crust, don't butter the top).
Notes


Recipe Source: adapted slightly from The Sister’s Cafe


I really liked the ease of this bread recipe. When searching for a good recipe ,I also looked at the pics, and yours looked lovely. However, I found my bread looked nothing like yours ! It was dull looking ,not golden and shiny. Tasted good ,but I was after that nice shiny golden crust. I did my own searching and found the egg white and water glaze ,Viola!! Now it looked more like yours. It was disappointing that you did not give out that information with your recipe. I know to get that crust that a glaze was needed. Bread tastes great!!
Mine came out like that, but the melted-butter wash will fix that up quick- it enhances the color and the shine!
The amount of time I’ve made this bread is ridiculously high. I love it and while I make changes (add more flour since my dough is always wet) I make round loaves, brush oil on the bottom and top, bake at 425 they always turn out perfect and I love it!!!
Hosnetly my favorite recipe!! A useful thing I learnt from a.frined is to get a spray bottle with water put the loaf in the oven and spray and much water as you can on the loaf it will help the get the crust, instead of the icecubes.
Do you think you could make this a day ahead a refrigerate it before it does the second rise?
Usually bread dough like this does well being refrigerated so I think that should work.
I made this recipe but added chopped fresh Rosemary. It was beautiful and DELICIOUS!
This bread is incredible, classic restaurant and bakery style. If you rated this poorly or it turned out bad it is because you failed to follow the instructions properly.
I have tried several bread recipes during the pandemic and this is by far the absolute best recipe! It was SO good! From now on it will be the only bread recipe I use!
Oh, That was good idea. About to make it for a third time, but with our new baguette pans. The directions are easy and even the ugliest outcome is delicious! Thank you for sharing!
I’ve messed up at least 2 different ways each time I make this, including using a packet of yeast instead of 1 tbsp and waaaaay overproofing because I forget about it for hours (life with toddlers). The bread is somehow still perfect every time. I never thought a yeast bread recipe could be described as “forgiving” but this one is practically a saint. I attribute 5+ miracles, and counting.
Easy to make, looks great, tastes even better. Two loaves don’t last more than an hour with the five of us!
Dough sunk in oven. Tasted great but was very flat.
I have made this recipe a number of times and it always turns out perfect! We love it at our house. I read the salt measurement wrong and have only been putting in 3/4 teaspoon haha. Still delicious! Mine are never as prettily rounded as yours. How do you get yours so evenly rounded? Thanks for an awesome recipe!
Hi Judy, it’s probably the way I shape the loaves. How do you shape yours?
Just about to make your Easy Salsa recipe, and got “lost” looking at different recipes in your posts!
A question about this French Bread recipe…have you, or do you know anyone who has tried a gluten-free version of this? I really need to stay away from wheat-based products (as I just finished a box of Mini Wheats!!), and bread is the most difficult item to “replace”.
I have a great recipe for regular bread, but when it comes to specialty breads, it gets more difficult!
Any direction would be much appreciated!
Hi Patti, unfortunately, bread like this doesn’t often translate well to gluten free without a whole truckload of changes. You’d probably be better off googling a tried and true gluten free french bread recipe.
One of my most go to recipes!!! Thanks for sharing your gifts!!
Can you make a video for making the French bread. I would love to make it, but I feel intimidated.
Trie this recipe for the first time yesterday,and the result?Perfect.Thanks for the best recipe so far.Cheerz!
I followed this recipe except cutting it in half for one loaf.
The rise time was a good bit shorter, both times of quick i attributed to a warm kitchen.
But …..the color was not there on the top…i baked it at 375 for whay ended up being 33 munutes. I was afraid to bake it any longer sp i took it out and buttered the top.
Oh and i did put the ice cubes in the oven bottom.
Any idea why the top didn’t brown?
It’s usually an issue with specific ovens as each individual oven will vary in specific temperatures as well as other factors related to baking. You can try increasing oven temp to 400 degrees and moving an oven rack a bit higher in the oven – both of those things can help the bread develop a nice golden crust.
Hi Mel,
I have made this Frenchbread 3 times now, and it has come out perfect each time. I use the rising method #1. I think doing it that way must build structure into the dough, similar to stretch and fold when you make sourdough. I put my 2 loaves about an inch apart on my baking stone, and then throw the 3 ice cubes into the bottom of the oven. I also spritz the loaves good with water about 4 or 5 times during baking. It makes the crust come out really light and crisp, and the bread inside is soft and perfect. I think next time I use this recipe to make dinner rolls.
This was so easy and came out awesome. I’ve struggled with other recipes coming out doughy in the middle. This recipe and instructions were perfect. Used it for garlic bread with spaghetti and Italian sandwiches the next day.
My only issue was that I ate way to much.
Fantastic recipe! I cut it in half and only made one loaf to go with my boeuf bourguignon dinner last night. So good…
Hello. The loaves seem pretty large in my baguette pan. Could I make 4 smaller ones instead of the 2 large ones? If so, how long should I bake them for? Thanks!
Yes, that should work just fine. Watch the baking time closely – maybe 10 minutes less depending on size and shape of loaves.
So Great! Perfect directions! my whole family loves it!
Thank you.
No doubt this recipe tastes good but French bread doesn’t have anything other than flour, water, salt, and yeast. Oil and sugar make it no longer french
I have made both this French bread and also your French bread rolls and both were delicious. My question is can I bake the bread in regular loaf pans? I’d like to use it more as sandwich bread.
Yes, I think so!
I made this bread. Super easy method using rising method 2. My family loves it. When the quarantine started back in may my husband bought 2lbs. Yes…that isn’t a typo I said TWO Pounds of yeast. We’ve got a lot of baking to do Lucy. Glad I found this recipe.
Hi Mel,
Would it be okay to let it rise more than an hour the first or second rise? Also, can I use regular honey since I don’t have any raw honey?
Yes, regular honey will work. The rising time depends on the temperature of your kitchen and other factors. You don’t want to let it over rise or it will affect the texture, shape, and taste of the bread.
I loved this recipe but my crust didn’t come out as pretty and golden as these pictures not sure if it’s because I used APflour instead of bread or if because I didn’t have enough ice but still solid result!
My electric Stand Mixer is broken. Can I make this without it/by hand?
Yep, per Mel “this dough can be made by hand using a large bowl and a wooden spoon the good old-fashioned way!“
Hi Mel!
This French bread recipe is simply the best!! The recipe is simple, instructions are clear, which probably explain why it’s always a success! I’ve been sharing it around with friends and it’s a hit for them too!
On a personal note, I started baking breads during the quarantine (from March to June in my part of Canada), and thanks to you, I gain self confidence in baking! I now bake every Saturday or Sunday for the whole week and your French breads are always on our menu.
Thanks for the great recipe!
Forgot to ask – what happens if you omit the slashing? Does that affect it when baking?
It might affect the rise in the oven, but overall, it probably won’t make a huge difference except in the way the bread looks.
Currently have the dough rising! I can’t wait. Instead of using ice cubes (hubby doesn’t think I should lol), would a pan of hot water in the oven work? And is it okay to bake one loaf at a time? My oven is super old and horrible and when I try and bake to baking sheets at a time, ultimately, one of them will burn
Hi!
I put the ice cubes the first time, and I omit them now. Hubby says it tastes better (crunchier dough), without the ice cubes. The melted butter – after baking – is a must.
I also bake one loaf at a time, no worries. Keep same baking time.
Good luck!
Yes, you can bake one loaf at a time…and a pan of hot water will work, too! 🙂
which method of riseing do you think is best and do you prefere a p or bread flour
Could I use the bread machine to make the dough, then continue on manually by hand to form and shape?
Can definitely try (I don’t own a bread machine so I haven’t tried it myself).
This bread tastes great but out of the 5 times I have made it, it always flattens out right before putting it in the oven. I proof the bread in the oven both times, heating it to 150 and turning it off (my house is cold). I put my timer on and wait the full hour. But after its been shaped during the second proof, it flattens out, especially after I score it and before I put it in the oven. Any ideas?
Hi Monica, try scoring the bread before it rises (as explained in step #5 of the recipe). That should help!
It could also be that your yeast is dying. Yeast only can survive while proofing around 120 degrees Fahrenheit at most. You might try letting your oven warm to just over a hundred degrees and see if that helps make them more fluffy, before you bake them. Happy baking!
I made this for the first time tonight. It was incredibly easy, very delicious and came out exactly like the picture. I followed the directions as written, but used a very sharp knife instead of a lame. My family devoured the first loaf and I’m saving the second one for tomorrow. I will definitely be making this again. Thank you Mel!
Followed the recipe exactly. Turned out great! So simple and delicious.
I’m making this bread et praying it turns out as my great grandson love garlic bread! I used rapid rise yeast as that was all I had!
I give this recipe 5 stars.
I’ve been feeding an active sourdough culture that’s been “alive” on my counter for almost 4 years. For those of us in that game we’re always looking for how we can incorporate the starter in recipes. Typically they include adding our starter to the base, then the recipes venture from there.
What I love about this recipe is that its quick and easy. Do I get the entire flavor profile by not adding some starter, or by not mixing then refrigerating for the cold ferment? Probably not. But my 8 year olds couldnt give a rip about your flavor profiles.
I made the whole recipe (2 batards). We kept one and gave one away. The neighbors ate the one we gave away in one sitting.
I make this bread often! When I first started making it I would make it once a week. It is a no fail french bread recipie. Only one I make now. It is SOooooo good! Thank you!
So I have made this twice. First effort was with the full ingredient list but the dough was just to big for my french bread pan. This time tried to make a 2/3rd recipe. Better fit on the pans but when I touch the raised loafs they seem to loose all their “air”. Did I do something wrong or is there a way to make the dough a little more “stiff”?
Love the taste regardless.
How would you make this bread using a bread maker even if only for the mixing?
I don’t see why you couldn’t use your breadmachine to mix and go thru the first rise……anybody???
For a stiffer dough, you can definitely add more flour! (But also try not to let the loaves over rise – they can also collapse if they’ve risen too long).
Did this again, but this time reduced the second raise to 40 minutes (seemed more than enough) and added a little extra flour. Results were perfect. No loss of lift and loafs came out just right. Also used a little egg wash before baking. Gave a nice shiny finish.
Over rising is true..trust me.. I’ve done it! Do the touch rule.. if once pushed on and dough returns… need more time rising. If after touching it stays down.. done rising!! Hope that helped!
I read the comments and saw that I could cut this recipe in half so that’s what I did because there’s only two of us. This bread baked up beautifully and looked just like the picture. I thought it was on the sweet side but that’s because I never put sugar in my French bread. The bread is delicious! I will definitely use this recipe again and next time I’ll omit the sugar.
The yeast needs the sugar, it feeds it and makes it active. I’d be careful omitting completely.
Thank you for this easy and delicious recipe. I have made this at least 10 times and my 12 year old grand daughter has also made it- always perfect. Thank you
I made this as instructed and it tastes great, however, mine wasn’t shiny nor did it have a nice crunchy crust as it came out of the oven. It just looked very sad and matte. Crust was kind of soft when pulled out of the oven. Kept it for 30 mins, I did add the ice cubes.
I had the same problem.
Mel???
LB – much of the end result (crust and color) will depend on your oven. You can try increasing the temperature by 25 degrees, moving an oven rack up higher in the oven, or using an egg wash prior to baking.
If I halve all of the ingredients, will that be ok to yield one loaf? Thanks!
Yep!
Can you make this dough ahead?
How far ahead are you wanting to make it?
I let the dough rise the first rise. Rolled out my loaves. And put one loaf in the fridge. Tomorrow I plan on letting it do the second rise and bake. I’m hooping this will work well.
So I have made this recipe so many times – it is my go to. Never had a problem with it.
Last night I made it and I guess too little flour as during second rise it would not hold a shape.
Today I remade and used the 6 cups of flour. Dough rose beautifully during second rise – but sank when I sliced with a lame.
Any advice on what caused this so I can avoid in the future?
Thank you.
If it’s turned out a lot of times for you, it’s hard for me to know exactly since I’m not there in the kitchen with you. Was it humid and rainy the last few times it hasn’t worked out? Sometimes making bread on rainy/humid days can cause the bread to turn out differently.
Hi,
Thank you for replying. No it wasn’t really any different than normal. I tried again today and though they rose better they’re still spreading. My normal loaves look like your picture but the ones today look more like flattened American footballs. The crumb is normal and they taste great – just frustrating that my loaves which normally look amazing look very much homemade 🙁
Loved this recipie i’m 13 and it’s my first time making bread. It turned out amazing and my whole family was impressed! I added a tablespoon of salt due to the comments and will add less next time. I used the 10 min and mix method as well as the ice cube tip. I cooked the loaves on seperate pans with parchment paper for 30 min and they looked great as well.
i have made this recioe with great success several times. I have started making cinnamon swirl bread with one of the two loaves and we just love it. I roll it out to 18 x 8 inches, sprinkle a mix of brown sugar Truvia and cinnamon on it, add some chopped nuts and dried cranberries and roll it up. Bake it in a loaf pan right alongside the other regular loaf. ❤
After baking, how long should I wait before cutting in?
I like to let the loaf cool completely, otherwise the texture can be a little gummy if it’s warm (but that doesn’t stop us from digging in when it’s hot and fresh from the oven)
This recipe didn’t work for me at all. The formed dough spread like crazy when rising and was almost completely tasteless upon baking. Another commenter suggested using the full 1 tbsp of salt and I agree. I think I’ll be sticking with other recipes that have clearer instructions and use weight measurements.
I used the full tbsp of salt, kneaded it by hand, and added a little more flour as I kneaded it, it came out perfect. Also, i added ice on a tray at the bottom of my oven, and repeated this again halfway through the bake.
Timing is always an issue for me. My goal is to have a freshly baked, warm loaf for the dinner table. Is it possible to make the dough, rise, shape the loaves and let them rise — and then refrigerate them to (like Cryo-sleep) and bake them to come out just as dinner is ready?
You can definitely experiment with this timing – my recommendation would be to put the loaves in the refrigerator prior to letting them rise otherwise, depending on how long they are in the fridge, they might over rise.
Love this recipe. I have made it multiple times. The only problem is that there are only two of us . I don’t want to cut the recipe in half just in case it’s doesn’t come out correctly. What is the best storage method for the remaining bread? I live in a very humid climate.
Hi Barbara – this recipe actually works great cut in half. But if you still want to make the full amount you could freeze the other loaf (or store well-covered at room temp).
I had the same problem.
Mel???
It fed my family of 8 quite easily, but I’ve also eaten both loaves on my own because it’s so tasty!
It makes me sad to see any ratings on here besides 16 stars. This was by far the easiest bread I have ever made. I tried it last week and it came out picture perfect. My wife thought I bought it from the local bakery. I’ve since made it 10 more times for friends and family. We have done it strict to this recipe and I feel like I could sell it at our local farmers market. Try brushing an egg on it before baking and using the ice cubes… nothing more beautiful!
how many people does this serve ?
It fed my family of 8 quite easily, but I’ve also eaten both loaves on my own because it’s so tasty!
How would you make this recipe in a high altitude. Would you cut down the rise time?
You can try googling high altitude adjustments for baking bread…a lot depends on the exact elevation. I’ve heard cutting down the yeast a bit and increasing the flour amount can help, but I don’t live at high altitude so I can’t say for sure.
Ok, thank you!