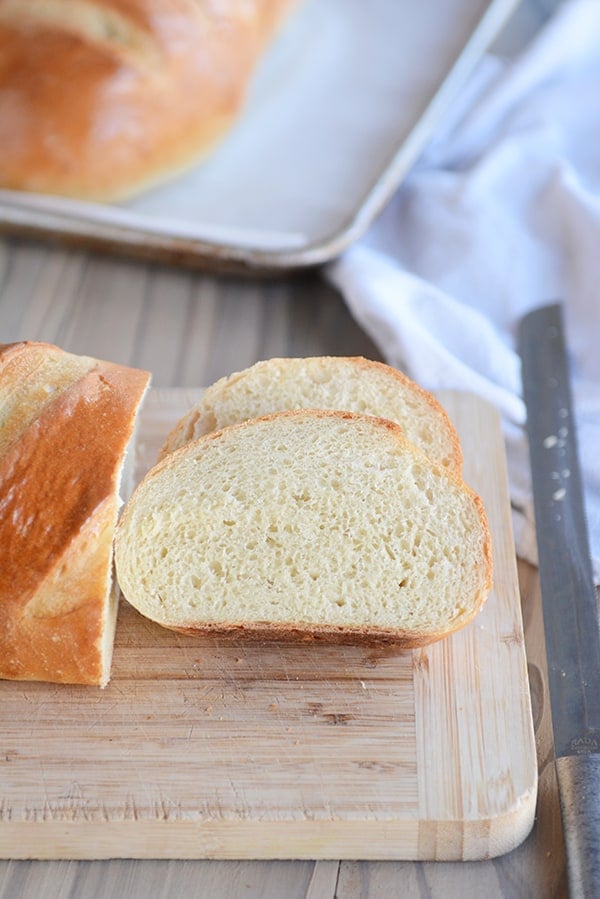
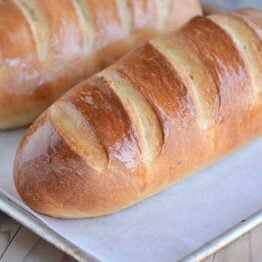
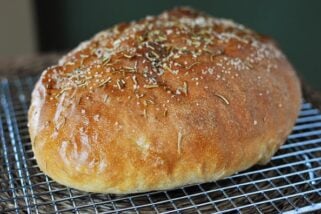
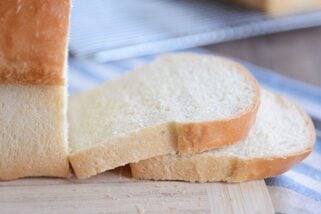
Easy Homemade French Bread
Homemade French bread has never been easier! This simple recipe produces a light and fluffy loaf of French bread that will rival any bakery!
This easy homemade French bread is so simple and perfect for a bread making beginner.
But as you can see from all the comments below, it’s just as valued by expert bread makers, too!
Making French Bread Dough
This straightforward bread dough can be made in a stand mixer or by hand.
- Warm water
- Yeast (instant or active dry yeast)
- Bit of sugar and oil
- Salt
- Flour (all-purpose or bread flour)
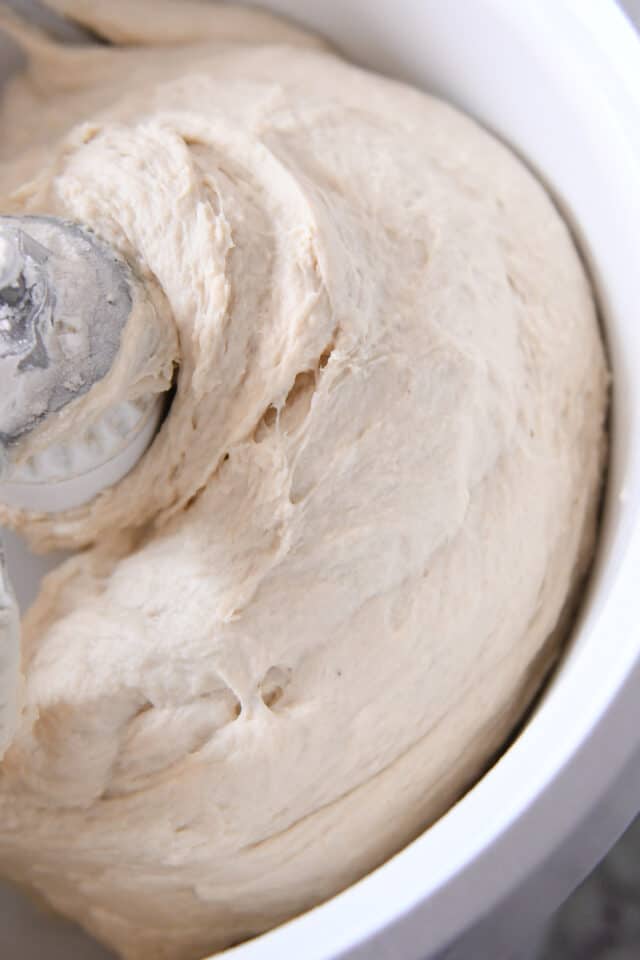
At the start, the dough will look shaggy and rough.

But as it kneads, it will become soft and smooth.
The most important part of this dough (and other yeast doughs) is to judge the amount of flour by the look and feel of the dough rather than the exact amount of flour called for in the recipe.
Factors such as humidity, elevation, room temperature, how we each measure flour, and more can affect the amount of flour added. So don’t stress about precise flour measurements and continuously feel the dough to achieve a soft dough that is slightly tacky but doesn’t leave a lot of residue on your fingers.
Too little flour and the dough will be a mess to handle. Additionally, the bread won’t hold its shape as it rises and bakes.
Too much flour and the dough won’t rise well and the bread will be tough and dense.
Two Methods for Dough Rising
In the recipe, there are two methods to letting the dough rise:
- Leave the dough in the mixer, cover with a lid or towel, and let the dough rest for 10 minutes. Stir it down by turning on the mixer for 10 seconds or so. Repeat the “rest and stir down” cycle five more times.
- Transfer the dough to a lightly greased bowl and cover with a towel or greased plastic wrap. Let the dough rise until doubled, about an hour or so, depending on the warmth of your kitchen.
I alternate between the two methods depending on my mood. The 10-minute increment rising method is unique to this original French bread recipe. The idea is that allowing the dough to rise this way produces a lighter crumb.
But the more traditional rising method also results in a delicious, fluffy loaf.
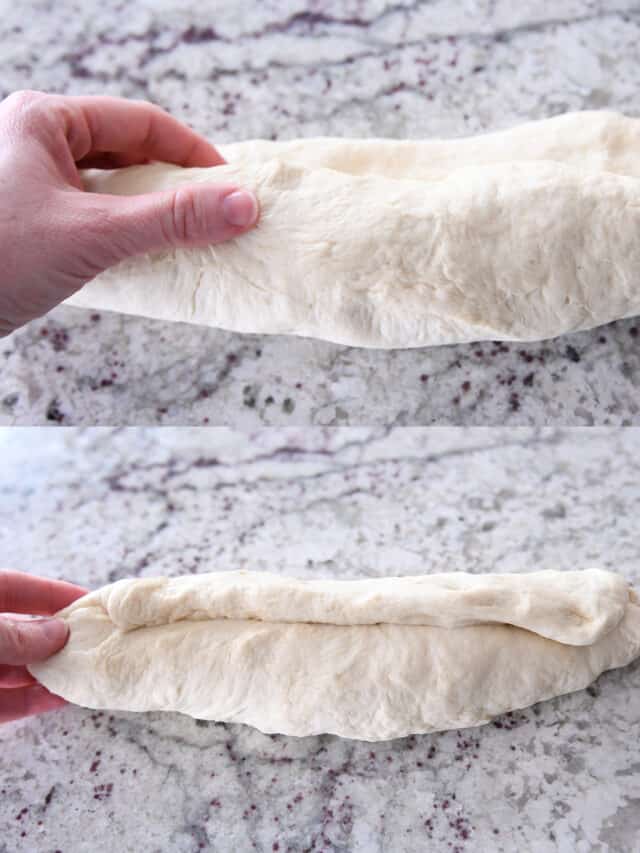
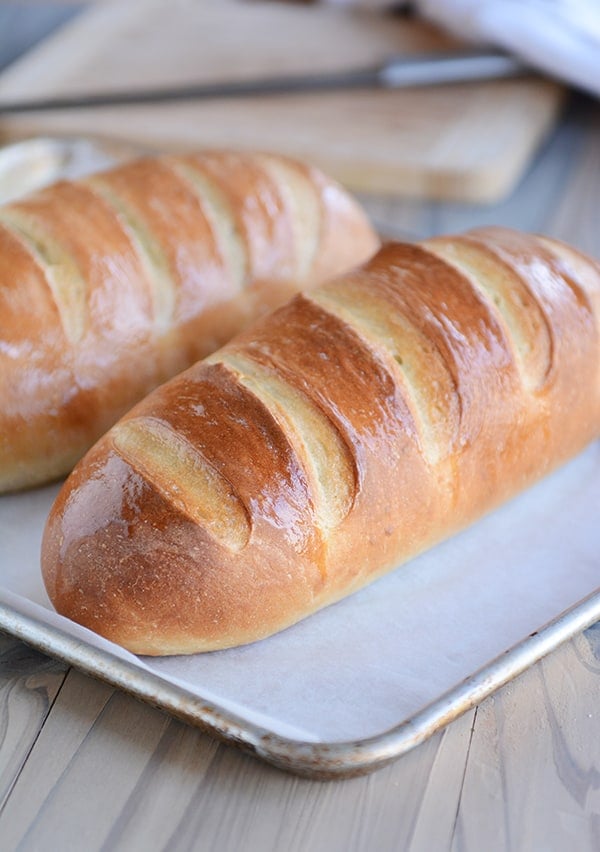
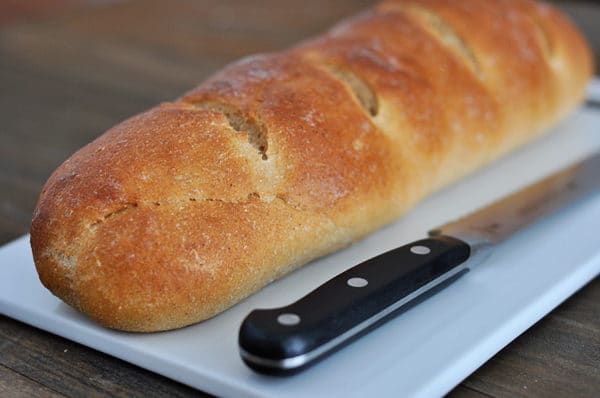
How to Shape French Bread Loaves
The question I get asked the most about this easy homemade French bread is how to shape the loaves.
The loaves can really be made any size or shape; I usually end up making 12-inch loaves, but if they end up being a bit thinner or chubbier, it’s no big deal!
Press each portion of dough into a flat rectangle and fold the bottom edge up and over the dough, pressing the seam flat with your hand.
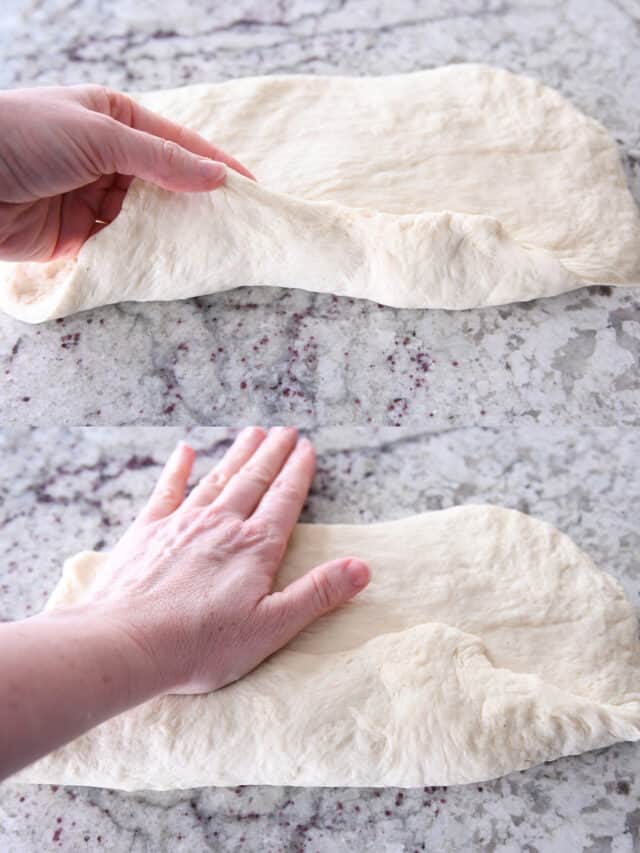
Then, roll the dough up again to meet the top edge.
Fold the top edge over and press or pinch lightly.
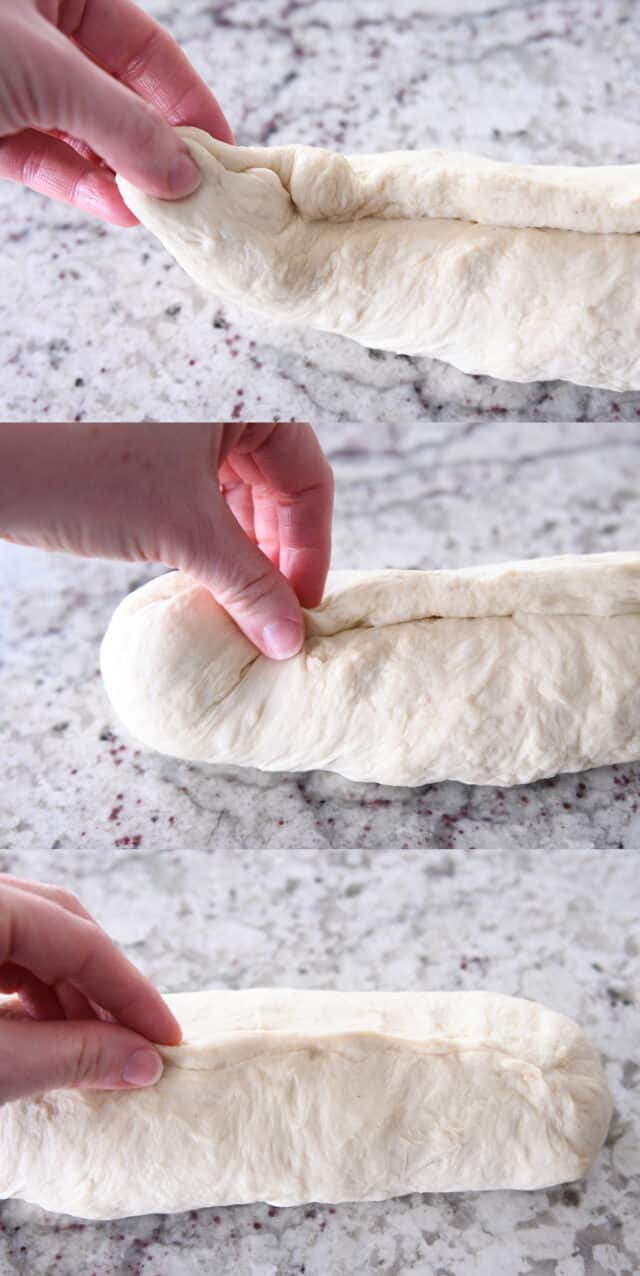
Take the end of the bread dough and fold it up and over an inch or two to give an even thickness all the way down the loaf.
Pinch to seal the end. Repeat on the other end of the dough.
Then, deliberately and thoroughly pinch and seal the entire length of the loaf.
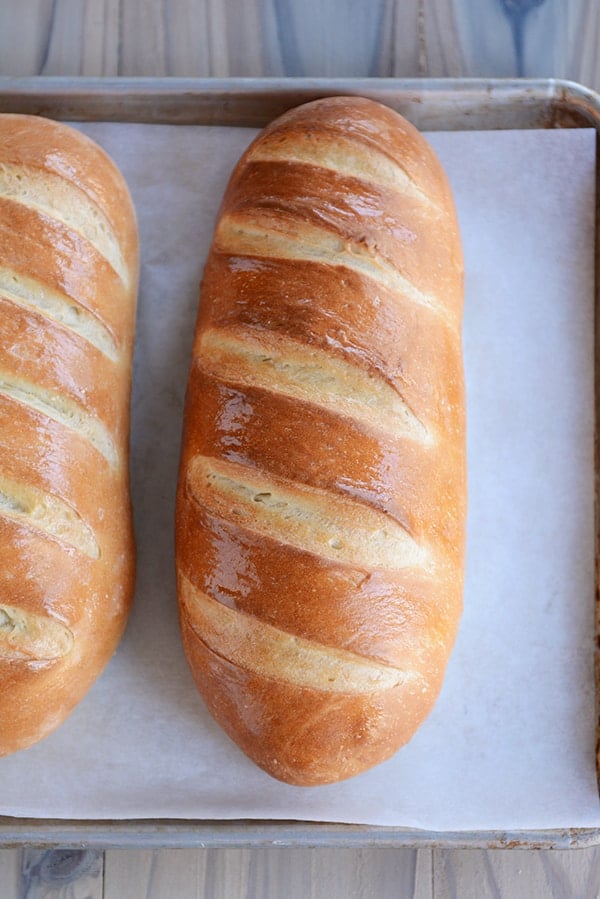
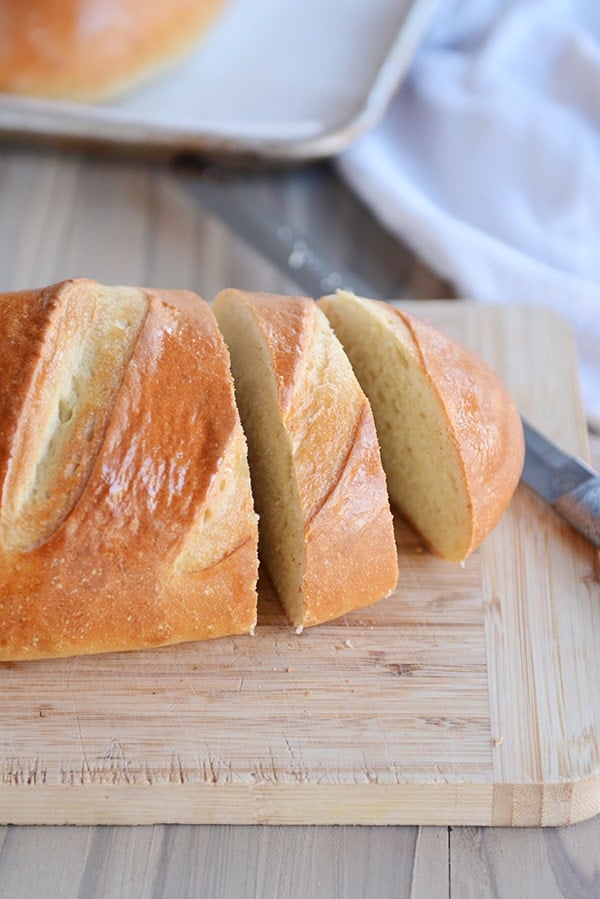
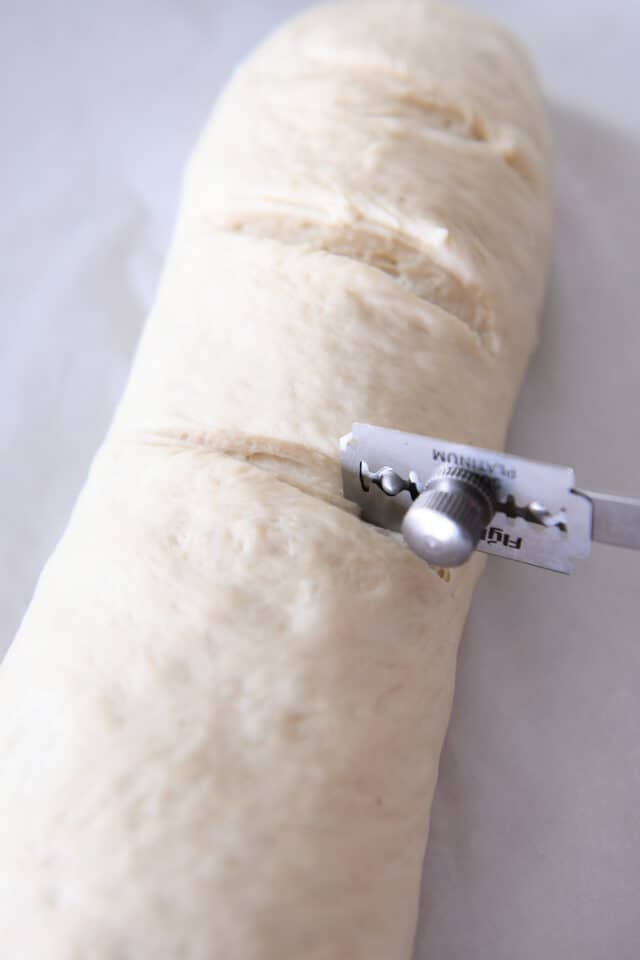
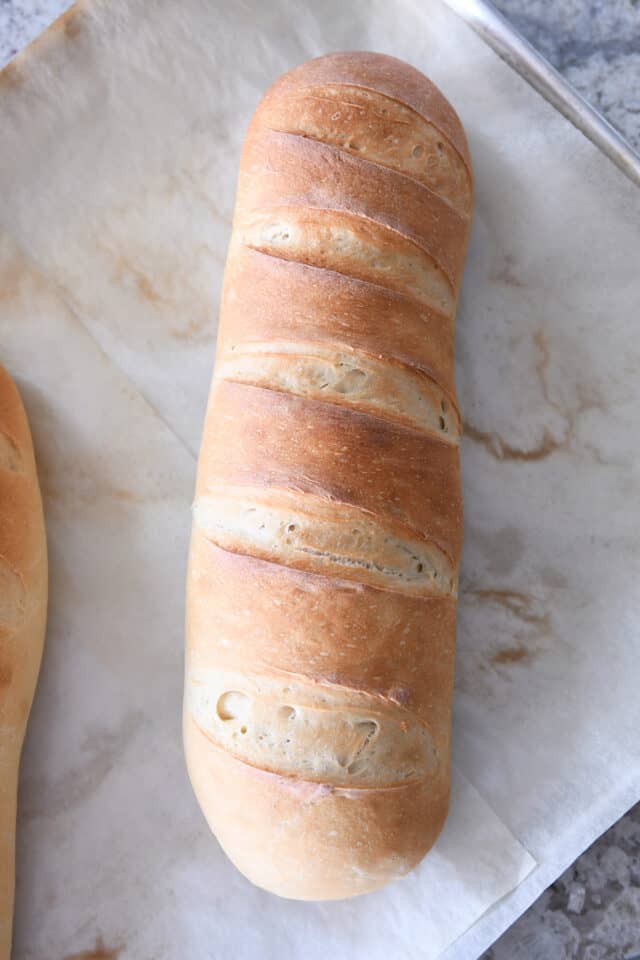
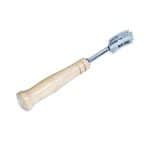
How to Score the French Bread Dough
Scoring the bread dough (in my house, also called: slashing or gashing) helps the dough rise better AND prevents it from cracking in unexpected places while baking.
Using a bread lame for this task is extremely helpful. A bread lame is a long stick or utensil with a razor blade on the end. The razor is used to make thin cuts in the dough.
If you don’t have a bread lame, using a clean, sharp razor blade or an extremely sharp kitchen knife can work. Be aware that if the knife isn’t sharp enough, it’ll likely deflate the dough.
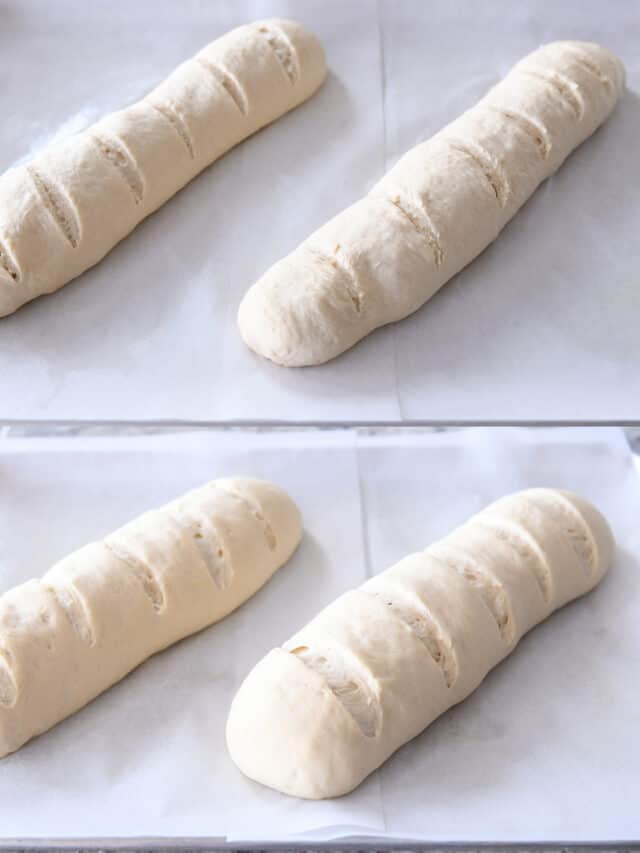
The bread loaves can be scored before or after the final rise. I prefer to do the slashing and gashing before they rise as I’ve had one too many loaves of risen bread deflate at the first touch of the razor, and there is nothing so soul crushing as when that happens.
Let the bread loaves rise until noticeably puffy before baking.
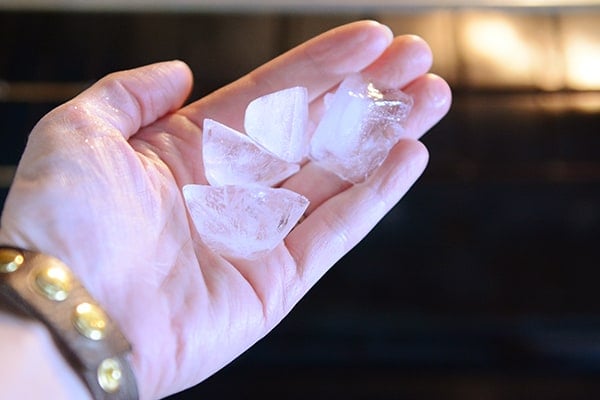
Easy Hack for Crusty French Bread
For a delicious golden crust, immediately before putting the bread in the oven, toss 3-4 ice cubes onto the bottom of the oven. Add the bread and quickly (but gently!) close the oven door.
The steam as the ice cubes hit the toasty bottom of the oven will lightly crisp up the outer crust as the bread bakes.
Important Note! Please consult your oven’s manual for details or caution on putting ice/water on the bottom of the oven floor – I’ve never had a problem, but everyone should do their own research and use their own best judgment (also take care not to toss the ice cubes on the glass oven door as it could crack).
If you are struggling to get a deeper golden crust on the French bread, try:
- Increasing the oven temperature by 25 degrees and/or
- Moving the oven rack up one position (I find my bread browns the best in the middle or upper middle area of my oven)
Whole Wheat French Bread
As noted in the recipe, French bread works quite well using whole wheat flour. I’ve found the best results are when using white whole wheat flour (red whole wheat flour makes a denser, heavier loaf).
I recommend subbing in half whole wheat flour to start and then adding more whole wheat flour as you continue to make subsequent batches of bread.
If using whole wheat flour, add a 2-3 minutes to the kneading time to help develop the gluten (also, adding a couple tablespoons of vital wheat gluten/gluten flour can also help the whole wheat bread bake up light and fluffy).
Helpful Tip: If you’ve struggled with your bread flattening out while baking instead of holding the perfect shape, you might try these French bread pans {aff. link}. I have them and LOVE them. I don’t use them every time I make this bread, but I do pull them out quite often (I also use them for this rosemary bread).
Perfect Homemade French Bread
With over 2,500 5-star reviews, this homemade French bread has become a favorite for so many of you.
Hundreds of you have let me know that you have been intimidated by homemade bread until you found this recipe! It is easy, foolproof, and will make you feel like a bread making rock star.
Helena says: Finally, after 5 failed bread attempts using other places recipes, this is THE recipe to use! Happy dance! Thank you for sharing this awesome recipe! Delicious bread!
Valerie writes: Such a fantastic, easy recipe. The “hands on” time is minimal and it comes out perfect every time. Thanks for sharing a recipe that’s become my “to do” dinner bread!
Nichole says: Followed instructions exactly! First time making any sort of bread ever. The bread turned out perfect!!!!
Pia commented: Hands down my go-to bread recipe. Today’s edition is 1/3 dark rye flour, with Italian herbs and caraway seeds mixed in and sprinkled with everything bagel topping. Yum! Best bread recipe ever, and so easily customizable!
FAQs for Homemade French Bread
Yes! Halve all the ingredients straight across – just keep an eye on the amount of flour and judge the final amount by the look and feel of the dough.
Yes, it freezes great (after baking and cooling).
Moving an oven rack up or down can help. In my oven, the bread browns best in the upper half of the oven. Also, you can try increasing the oven temp by 25 degrees.
Absolutely! You can mix the ingredients in a bowl with a spatula or spoon and knead by hand.
I always use the same amount interchangeably. Recently, I’ve heard that active dry yeast doesn’t need to be proofed in liquid first, but I always still do when using active dry yeast (no need to proof with instant yeast).
Yes, just keep an eye on baking time – smaller loaves may need less baking time.
One Year Ago: Harvest Pasta Sauce {Trader Joe’s Copycat}
Two Years Ago: Peanut Butter Cup Cheesecake with Chocolate Cookie Crust
Three Years Ago: Easy Homemade Egg Noodles {Step-by-Step Pictures Include Food Processor Method or By Hand}
Four Years Ago: Black Bean and Butternut Enchilada Skillet
Five Years Ago: Chocolate Chip Peanut Butter and Oatmeal Cookies
Easy Homemade French Bread
Ingredients
- 2 ¼ cups warm water, 110-115 degrees F
- 2 tablespoons granulated sugar
- 1 tablespoon instant or active dry yeast (see note)
- 2 ¼ teaspoons salt (see note)
- 2 tablespoons olive oil, canola oil, vegetable oil or avocado oil
- 5 ½ – 6 cups (781 – 852 g) all-purpose flour or bread flour (see note)
Instructions
- In the bowl of an electric stand mixer fitted with the dough hook, combine the water sugar and yeast. If using active dry yeast, let the mixture bubble and foam before proceeding (this can take 3-5 minutes). If using instant yeast, proceed with the recipe (no need to let the yeast activate).
- Add the salt, oil and 3 cups of flour and mix. Add in 2 1/2 to 3 more cups of flour gradually. The dough should clear the sides of the bowl and form a soft ball that doesn't leave a lot of dough residue on your fingers.
- Knead for 2-3 minutes until the dough is smooth. If the dough starts to cling to the sides of the bowl (or the center column if using a Bosch or other mixer with a center), add 1/4 cup of flour at a time until a sturdy but soft ball of dough forms.
- Rising Method 1: Leave the dough in the mixer, cover with a lid or towel, and let the dough rest for 10 minutes. Stir it down by turning on the mixer for 10 seconds or so. Repeat the "rest and stir down" cycle five more times.
- Rising Method 2: Instead of letting the dough rest for 10 minute spurts and then stirring it down, transfer the dough to a lightly greased bowl and cover with a towel or greased plastic wrap. Let the dough rise until doubled, about an hour or so, depending on the warmth of your kitchen.
- Turn the dough onto a lightly greased surface and divide in half. Pat each section into a thick rectangle, 9X13-inches or thereabouts (doesn't have to be exact). Roll the dough up starting from the long edge, pressing out any air bubbles or seams with the heel of your hand, and pinch the edge to seal. Arrange seam side down on a large baking sheet lined with parchment paper (I use separate baking sheets for each loaf).
- With a bread lame, razor blade or VERY sharp knife, cut several gashes at an angle on the top each loaf (you can wait to score the bread until after it rises, but it can easily deflate if the razor/knife isn't sharp enough).
- Cover the loaves with greased plastic wrap or a kitchen towel, and let rise until noticeably puffy and nearly doubled in size, about an hour.
- Preheat the oven to 375 degrees F and make sure an oven rack is in the center position. If you find your bread isn't browning as much as you like, preheat the oven to 400 or 425 degrees and/or move the oven rack up one position (watch carefully so the bread, especially the bottom, doesn't burn).
- Optional: for an extra golden, crisp crust, place the loaves in the preheated oven and immediately toss 3-4 ice cubes on the bottom of the oven. Close the oven door quickly but gently. (See note below!)
- Bake the loaves for 25-30 minutes until golden and baked through.
- If desired, brush melted butter over the hot loaves (this softens the crust a bit, so if you want a crispier crust, don't butter the top).
Notes


Recipe Source: adapted slightly from The Sister’s Cafe

Perfection!! I followed the directions to a T, and this was absolutely beautiful and extremely yummy!
Made this recipe tonight and, well, one loaf is completely gone even though it didn’t come out of the oven unt supper was over. Delicious!
I used 7 cups of flour and bread was still sticky and unmanageable. ??
Wet your hands a little bit to keep it from sticking but without flour. After proving dough gets less sticky and you don’t want to add too much flour.
Hi, there Mel! Well I’m your newest big fan!
I’ve made the easy creamy chicken soup with the herbs de province.
And then I saw you have an easy homemade French bread recipe. I made it today. (I’m all about the easier, the better!)
I have a stand mixer, I don’t use it often as I grew up with a hand mixer, and that is just easier for me.
Well, I guess I’ll be dragging out the big stand mixer! This bread recipe was so incredibly easy, I just couldn’t believe it. The dough rising was the longest part. I really had this whipped up in about 10 minutes!
And it’s delicious. I thought to myself, how good can it be, when it’s absolutely no trouble to make?
My husband raved about it! And that’s a good thing, I assure you! Lol
Thanks for another great recipe!
LOVE this. I do need to work on my shaping. It turned out a bit flatter and wider rather than round and narrow like the pics. Which means I’ll have to keep making it until I get it just right. And no one will be sad about this in my house!!!
Thank you so much for this amazingly easy, and yummy recipe! I feel like a chef! I used option 2, had dough rise in oven heated to 200° then turned off since it is very chilly in Denver and I was afraid that my kitchen wasn’t warm enough. Worked great!
This turned out great! I was surprised as I messed up in the beginning by not adding enough water to the yeast. I did add the rest of the water after I added some flour. Yikes!! No worries all turned out great! Next time I will do it correctly and it will be amazing! Thank you
Followed the recipe exactly; I used rising method 1. This really was the best and easiest French bread. My family LOVES it when there’s fresh bread with dinner and I can see this working mom having time at least weekly to give it to them!
Amazing but mine came out a little heavy not as light and airy as French bread in Paris. Any suggestions.
I just made this recipe with home-ground whole wheat and added the gluten. It turned out just like store-bought! I will definitely use this recipe again!
This recipe is amazing. Just baked my second batch of bread in two weeks. The bread turned out perfect. I did the “ice cube” thing in the oven and the crust was crunchy and the inside was moist and fluffy.
I have never felt confident making yeast breads but this recipe is definitely a keeper.
I only use this recipe for French bread! I love it. I make it at least twice a month!
Mine was a little dense any suggestions
I just made this bread! Such an easy recipe and the bread!!!! Oh my! It is light on the inside with a lovely crispy crust and the taste is amazing! If you love fresh, homemade bread, don’t wait! Make this bread right away!
I love all of Mel’s recipes! Without exception they never disappoint!
Can’t wait to make this. All your recipes are amazing!! Quick question. What type/brand salt do you use in your recipes and do you use different types for different recipes? Thanks!
Great recipe !!
What would I need to make this garlic bread? Will make again but for 56 loaves /14 batches
Made it today.
Worked bakery over 45 years and if our steamer was out of oven we just sprayed our breads prior to placing in oven.
Try it. It works great
Now recently retired and bake for grandkids now who absolutely love bread.
Beth you sprayed the bread with what? Water/oil? Do you put water/ice in with your oven when you bake bread at home now? Thank you!!
Made this bread and it was a hit
I love this recipe!! I’m not sure what the magic thing is, but I have never made better bread. Sometimes, after a few failed recipes trying this or that experiment in the kitchen, I come back to this one to “reset” my success-o-meter. I often will bake this and bring it to friends, with the recipe printed out just in case they want to give it a try. I have also made it “overnight” allowing the first rise to happen in the fridge while we slept, and continuing from there – but it’s truly the very best “same-day” bread I’ve ever baked or EATEN! Thank you, MEL!
We love this bread! This is my most used recipe from your site- we make this a LOT, and it’s great everytime.
Finally, after 5 failed bread attempts using other places recipes, this is THE recipe to use! I followed instructions, but sifted my bread four through a sieve and used a quart size Pyrex dish of water on a tray on the bottom rack from the moment I began preheating the oven. Happy dance! Thank you for sharing this awesome recipe! Delicious bread!
Oh man…best French bread I’ve ever made! Thank you for the tips! I will make this again and again! BTW…I made pizza out of it tonight, but plan to make a few and freeze. I’m allergic to soy and most store bought French bread has soy in it, so I never get that yummy soft goodness of French bread until now!!
Forgot to mention that I only had super cheap generic bread, so I sifted it first hoping it would make up for not having great bread. I cooked both loaves at the same time, swaped and turned them half way through…and I completely forgot to slash them before rising and was too afraid they would deflate if I tried afterwards. I’m still on a high after how great they turned out!!
How can I make this bread with a darker crust? Also, when I made the slash marks raw crust really split – advice? Novice
Hi Jackie, try slashing the bread before it rises and see if that helps. For a darker crust, increase the oven temp and/or bake in a higher position in the oven and/or brush with an egg wash prior to baking.
The crust can be browned by spritzing with water a couple of times while baking the bread.
This French bread turned out beautifully. Will keep this recipe and share it with everyone.
So many yeast recipes call for “warm water”. What is the temperature of warm water?
Also, using a stand mixer is mentioned, but no speeds. What speed do you run yours on?
Hi John – the water should be right around 105-110 degrees. Stand mixer speeds vary depending on the brand of stand mixer which is why I don’t offer a speed number in the directions. I use a Bosch mixer that runs faster than, say, a KitchenAid.
Love this bread. Turned out perfectly
I tried, I really did. Bread just doesn’t like me. I halved the recipe to make one loaf. Things seemed to be going well until the dough came out of the greased bowl after the first rise. Some stuck to the bowl anyway, with the rest almost tearing away from it. The dough was rather sticky while rolling it up and transferring it to the pan. During the second rise, it did rise up, but rather spread out. What I ended up with after baking is a wide, low, albeit tasty with a crunchy crust, loaf. Where am I going wrong?
Hi Linda, you can do this! Sounds like your dough needs a bit more flour so it isn’t quite as sticky and so it will hold its shape as it rises. Try another 1/4 to 1/2 cup flour in the half batch of dough.
It’s been 45 min in the oven and it’s not browning at all. I raised the temp to 400 and still nothing. Idk what I did wrong
This happened to me as well. Not really sure what happened. It seemed like I had plenty of flour, but if she said it wasn’t enough… maybe I’ll try more next time.
Can this recipe be made in a. Bread making machine?
I’m sorry, I don’t know! I don’t own a bread machine and haven’t tried it that way.
So I have a bread machine and prefer to use it. So first time making it I used 806 grams of flour. I have scales so that’s how I measured my flour. Added everything to the machine and turned it to the dough cycle. The dough came out really sticky. Ugh I divide the dough and worked with adding more flour. It turned out delicious and we did eat all of it. So today was my second try. I added all the ingredients and all 6 cups of flour. Let it go through the dough cycle. It turned out a lot better. I did the rising method 2 then divided the dough. It turned out great. My husband and I both love the flavor! Will be making this more in the future.
I have been making this bread with sourdough using your “lazy guide to sourdough” hack on how to add sour dough to a bread recipe. My bread looks fabulous when I pull it out of the oven, but seems to flatten out as it cools. Any tips or tricks to avoid the having my bread flatten out?!
Hi Kirstie- try baking it longer (5-10 minutes) .
This was so easy and delicious. I used the first method of rising.
Can you advise what you are using for measuring flour (AP and or bread flour).
I do weigh my flour but am from the school of measurement using 120 grams per cup of flour. Advise your cup measurement for flour and where this measurement originates from.
Just trying to figure out why yours seems to be a lot more than 120 grams per cup
I use 142 grams of flour per cup (that’s the amount I test all my recipes with).
did you use unbleached or bleached alpurposae flour, I have made this for several times but I forgot which flour I used LOL
So bummed not rising. I use to make bread a lot. Never had this happen, I’m thinking of going ahead and adding more flour AGAIN ? Not sure just bummed.
It rose good but when I cut slits it deflated. But bread is still good, and my son approved. So my recommendation is not cut the slits.
I’ve made this a couple of times before and the crust has turned out uninspiring. But then this last time I baked it with the oven cranked to 425 to accommodate another bake and the crust turned out beautifully brown and crackly with the softest inside. I will definitely be making this one again!
Made this tonight with some bruschetta!! I have yet to try it but it smells absolutely delightful
My first time making french bread (been on a bread making kick the last couple of weeks). I needed a loaf to make garlic bread for spaghetti and not only was this recipe incredibly easy, it also made the most DEVINE loaf of garlic bread. Tha k youuu!
I am going to make a practice run before Christmas Dinner. I see the comments from the French Bread Police about no sugar and oil and was wondering if you could omit those from this recipe? I do typically like a more traditional French loaf but this recipe looks simple and has good reviews.
You can definitely try experimenting – I always make the recipe as written.
I made this recipe many time. It’s always so comforting with a nice beef stew on a cold December evening, like tonight. The ice trick makes this bread crispy on the outside and so soft in the middle!
I made this today and what an easy recipe that comes out delicious. I topped it with Parmesan cheese the last five minutes of baking. Served with spaghetti and meatballs delicious will make again
Turned out perfect, thanks for sharing!
Waste of time this recipe. Spent ages on it and ended up in the bin!
I’m surprised to here this. I have made this 3 times now (6 loaves) and it always turns out beautifully. What happened to yours?
Your page is half pop ups and how do you dedicate half the page of stories of you’re bread once or q and a asking if you can gift it to a neighbor or is it ok to microwave it? Or can it be gluten free? Like holy heck just give me the weights and go from there. How many bored housewife’s can’t figure out the recipe on the back of the flour? And it’s bread. Simple bread. Use good old olive oil. Make that oven 500 and throw a pan under it with ice cubes in it. Heck do a simple egg wash that glossy nonsense. Not that hard. And 30 questions of the utility of bread are useless come on people
You may understand bread making but you don’t understand SEO. There’s a reason this website pops up in the first few Google results over a simple, no-nonsense recipe.
It may suck for the readers, but blog owners can’t just get straight to the recipe or they’ll be stuck in the bad books of Google for copyright and poor SEO techniques.
Blame Google, not the blogger.
If you don’t want to be subjected to the pop-ups, etc., all you have to do is click on “Jump to recipe” which is right under the title of the recipe at the very top of the page. As you say “It’s not that hard.”.
Such a fantastic, easy recipe. The “hands on” time is minimal and it comes out perfect every time. The French bread loaf pans you linked made a huge difference – love how they help with the shape.
Thanks for sharing a recipe that’s become my “to do” dinner bread!
Just a little tip I recently learned, to give your bread the shiny look, place an oven-safe dish with water in it, on the bottom rack while baking your bread. It’s amazing, I will definitely try the ice cubes though, my dough is on its first rise, jm so so excited to try it! Thank you!
This bread recipe is AMAZING! So easy and yields wonderful results. I will certainly be making this again. The whole family loved it! Thanks Mel!
My family absolutely loves this recipe and truthfully, I could take both loaves and eat them both, still hot, as I fiercely fight off the family, and not feel bad about it. It was also a huge hit on a party night amongst the friends.
One thing I have found, and being new to baking bread, I thought the dough was good to go after about 4c of flour. It was still sticky, but not to the mixer. Using the full 6c (for me) gives the dough an almost dry to the touch feel and makes it VERY easy to work with, without sticking to me or the surface.
Also, no matter what I did, it wasnt browning up to the golden color…I started doing an egg wash just before putting it in the oven and it comes out beautifully!
Excellent recipe! Beautiful loaves. Delicious. I have struggled with making French bread. I don’t know why because I have been making bread for 40+ years. If you are looking for the best French bread recipe, this is it!
Used stand mixer. Followed recipe. No change. Made awesome loaves and is delicious.
This recipe is perfect. Thank you ever so much. I’m at 6000 feet elevación. I’ve been trying so many recipes. My kids are so happy, me too, thanks!
Followed instructions exactly! First time making any sort of bread ever. The bread turned out perfect!!!!
This is not French bread by any stretch of the imagination… It is more like Italian bread. French bread typically combines a mixture of flour, yeast, water, and salt – and nothing else. In fact, it is against the French law to add any oils or fats to the bread. The recipe is close to one that I have made for many years, so I am sure it is quite good.
I halved the recipe because it was my first time making it. The bread turned out beautifully in spite of a rookie mistake. After I took the dough out of the bowl after the first rise, I was concerned it didn’t have enough gluten so I kneaded it. Then I realized that this meant I would need to let it rise again. So, I let it rise another hour then finished the recipe. I got to use my new lame to slice the top and brushed egg on the outside. It is wonderful! So glad I found this recipe and that it worked out well.
Great easy recipe
The house smells so good
Everyone loves it