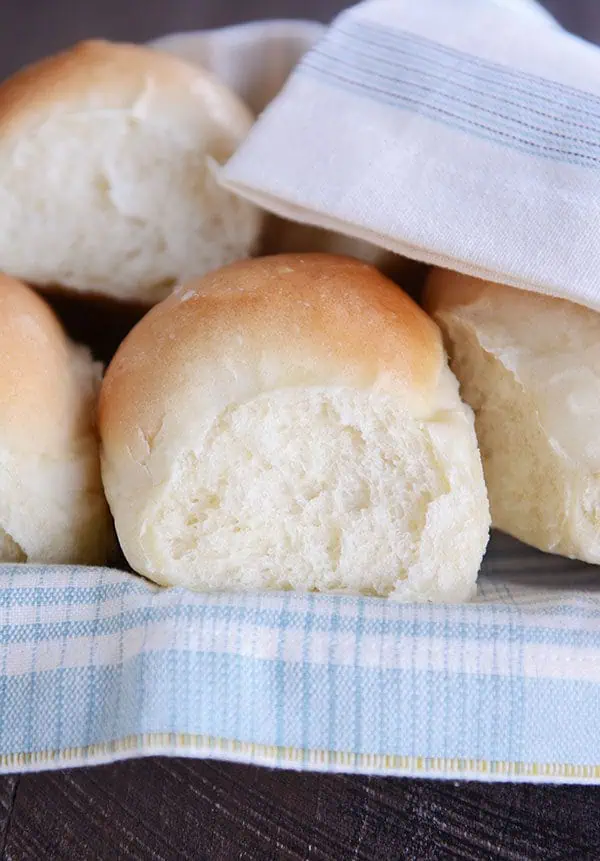
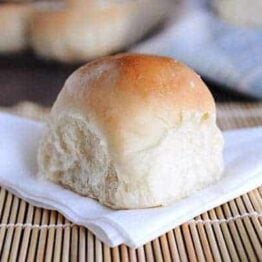
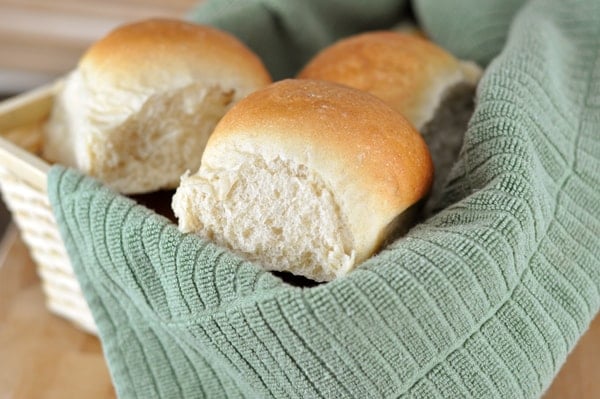
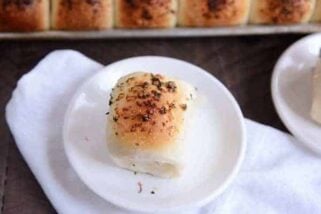
French Bread Rolls {Step-by-Step}
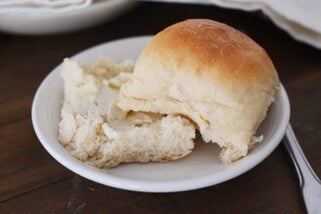
These French bread rolls make the best dinner rolls, hamburger buns, or sub buns. They are light, fluffy, and perfect for beginner (or expert) bakers. With over 1,000 5-star reviews, they are one of the most popular roll recipes on the internet.
⭐️⭐️⭐️⭐️⭐️ Thank you so much for the recipe. The rolls were wonderful. Made a double batch for Easter and froze some. They freeze excellently. Will be my go to rolls. -Jackie
Why So Many People Love This Recipe
The dough for these French bread rolls is straightforward and very forgiving. Here are many reasons why this is a foolproof, trusted recipe:
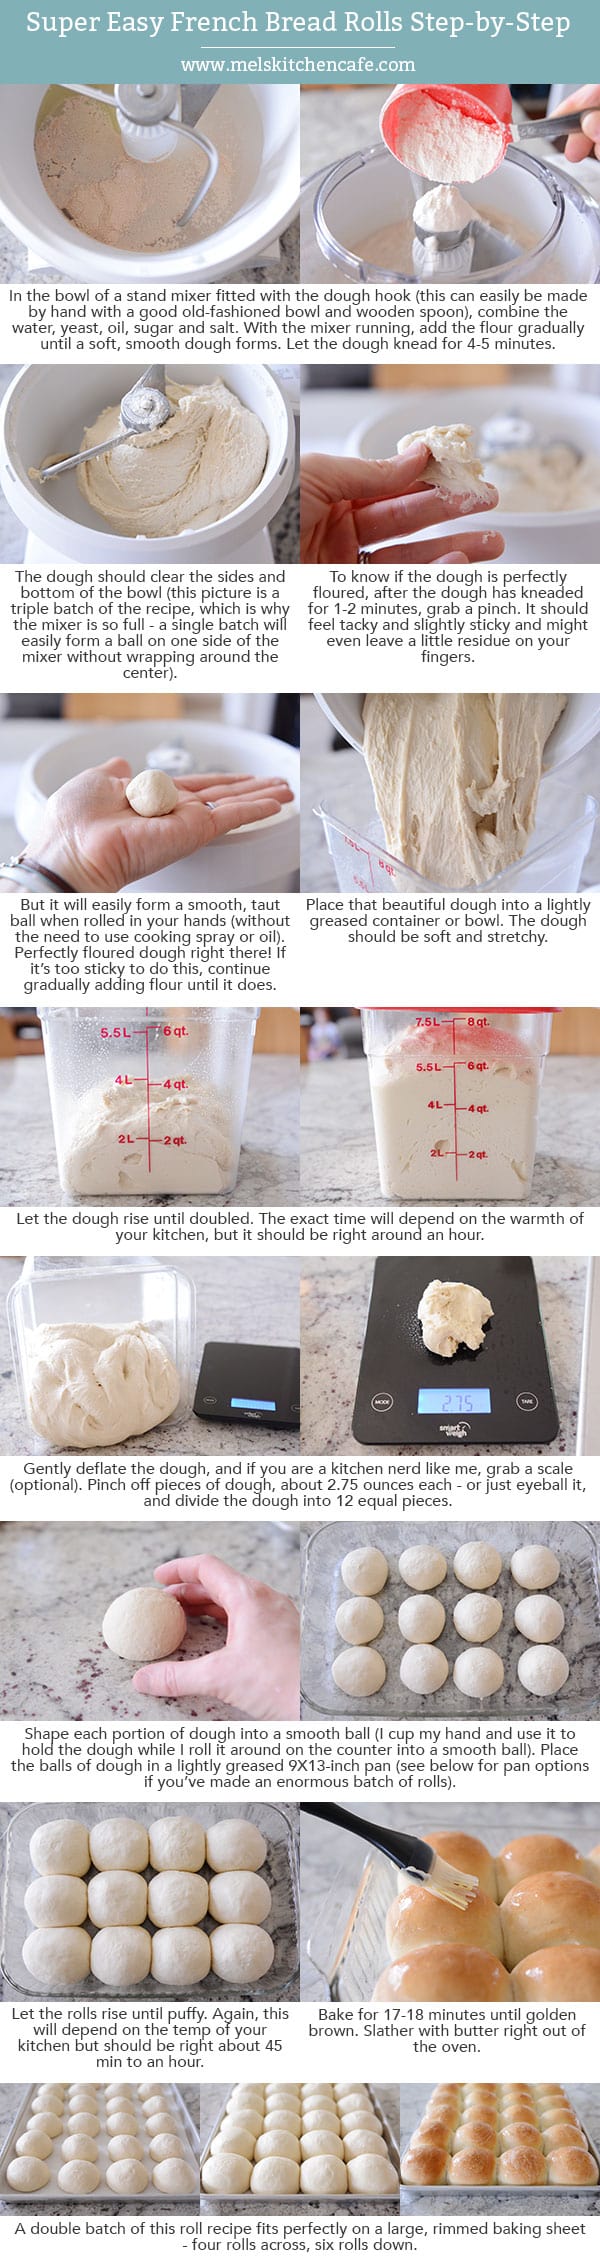
- A stand mixer fitted with the dough hook makes easy work of this recipe, however, the dough is so easy to make that it can also be mixed and kneaded by hand.
- The recipe doesn’t require scalding milk or any fussy steps. The ingredients are basic and dairy-free (other than brushing the tops of the baked rolls with butter).
- The rolls are ultra-soft and fluffy.
- You can shape the dough into dinner rolls, sub buns, hamburger buns – and some reviewers even report using the dough for pizza crust.
- These French bread rolls are easy enough for simple dinners and delicious enough to serve at any holiday dinner.

Ingredients Notes
- Warm water: The temperature of the water should be between 105 and 110 degrees F.
- Yeast: Both instant yeast and active dry yeast work in this recipe.
- Sugar: The small amount of sugar in these rolls helps activate the yeast and assists in the rolls rising quickly. It isn’t enough sugar to make the rolls taste overly sweet. You can dial the sugar up or down depending on your taste preferences.
- Oil: A few tablespoons of oil gives the dough a supple, smooth texture and helps the rolls taste fresh even the day after baking.
- Salt: I use table salt for this recipe.
- Flour: All-purpose or bread flour can be used – or a combination of both. Bread flour will create a chewier, fluffier roll texture. You can sub in 50% whole wheat flour for part of the white flour; if doing so, I recommend using a white whole wheat variety, which helps the dough stay light and fluffy.

Tips for Making Yeast Dough at Home
Here is the biggest tip I can give for successfully making yeast dough at home:
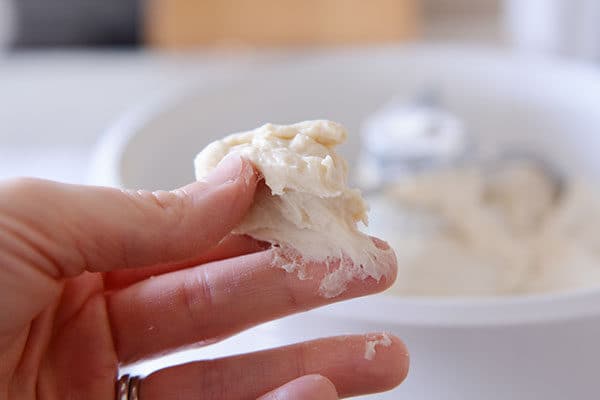
Stop stressing about adding the exact amount of flour called for in a recipe. Many, many factors determine how much flour is needed (elevation, humidity, how we each measure flour, etc.) Add the flour gradually and judge the dough by how it looks and feels. If you need to add a bit more flour, that’s ok!
How to test this French bread roll dough:
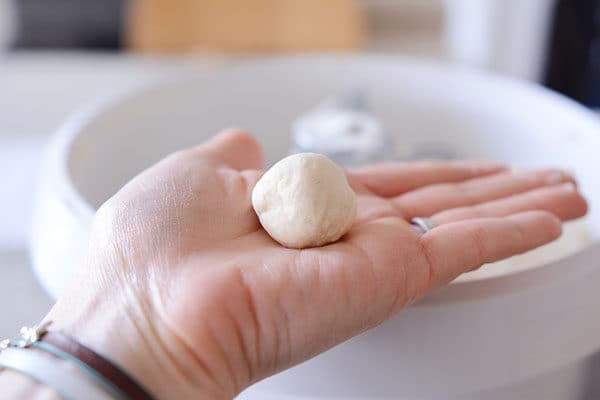
- After the flour has been added and has kneaded for a few minutes, grab a golf ball-size piece of dough.
- Initially, it might leave a little sticky residue on your fingers.
- Try rolling it into a ball without any oil or cooking spray on your hands.
- If it can form a ball shape without sticking to your hands in a shaggy, horror-movie mess, you are good to go. If not, add a bit more flour (a couple tablespoons), mix and try again.
You can see from the pictures below that initially, the dough seems pretty sticky, however, it rolls just fine into a ball without a lot of sticky dough on the palm of my hand. Adding too much flour can lead to rolls that are dense and heavy, so take time to learn what a properly floured dough looks and feels like.
How to Shape French Bread Dinner Rolls
- Cut the dough into 12 equal pieces.
- I like to weigh each piece to make sure they are uniform. Each dough piece usually weighs right around 2.6 to 2.7 ounces.
- Cup your hand around the dough and roll the dough into a smooth ball, keeping the pinky side of your hand against the counter while you roll.
- Pinch the bottom to seal, if needed.
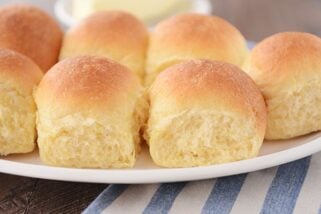
A single batch of roll dough (12 rolls) fits in a 9X13-inch pan. I almost always double this recipe and bake the rolls on a half sheet pan, which fits 24 rolls perfectly.


The Perfect Roll for Sandwiches or Subs
Over the years, these French bread rolls have become more than a dinner roll.
A quick scroll through the comments shows that many of you are using this roll dough for everything from sloppy joes to sub sandwiches.
Make-Ahead and Freezer Notes
Make-Ahead: The dough for these French bread rolls can be made and refrigerated overnight (either in bulk, or the rolls can be shaped, place on a pan, covered and refrigerated). Take the shaped rolls out of the fridge to rise fully before baking.
Freezing: The baked and cooled rolls freeze great. Place the rolls in a ziploc freezer bag, seal the bag, and place in the freezer for up to a month or so.
There is truly not an easier, more perfect roll recipe out there!
I often make these rolls for my holiday dinners – from Thanksgiving to Easter – because they are so easy, they work out every time, and they are always devoured. Plus, they make excellent leftovers!

Tools for Making French Bread Rolls at Home
*Affiliate links included below for products I’ve purchased from Amazon; feel free to shop around for the best price!*
- This is the kitchen scale I use to weigh each piece of dough.
- These containers are great for rising dough (the measurement marks make it easy to keep track of how much the dough has risen).
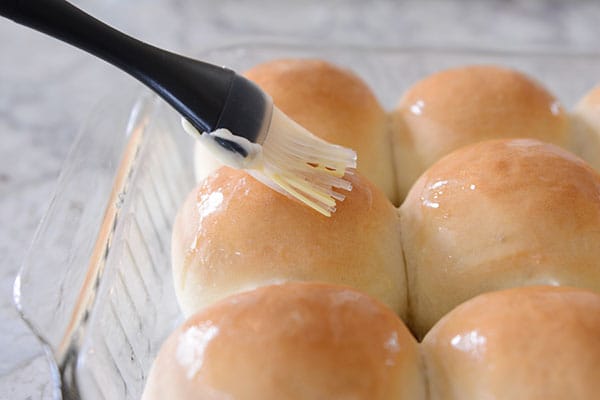
- Silicone pastry brush for brushing the rolls with butter after baking.
- My go-to OXO bench knife for portioning out the dough.
A quick note about mixers: I use a Bosch Universal stand mixer for all my bread making. Here is an older but helpful side-by-side (unsponsored) review I did between a Bosch stand mixer and a KitchenAid stand mixer.
French Bread Rolls
Ingredients
- 1 ½ cups warm water (105 to 110 degrees F)
- 1 tablespoon instant or active dry yeast (see note)
- 2 tablespoons granulated sugar or honey
- 2 tablespoons canola oil, vegetable oil, or olive oil
- 1 teaspoon table salt
- 3 ½ to 4 cups (497 to 569 g) all-purpose or bread flour, more or less (see note)
Instructions
- In the bowl of a stand mixer fitted with the dough hook or in a large bowl by hand, combine the warm water, instant yeast, sugar, oil, salt and 2 cups of the flour.
- Begin mixing, and continue to add remaining flour gradually until the dough has pulled away from the sides of the bowl.
- Knead the dough for 4 to 5 minutes in a stand mixer (7 to 9 minutes by hand). Add additionally flour a tablespoon or two at a time only if the dough starts to cling to the sides of the bowl and is really sticky to the touch (see note below for clarification).
- Place the dough in a lightly greased bowl and cover. Let the dough rise until doubled, 1 to 2 hours.
- Turn the dough out onto a lightly greased countertop.
- Divide the dough into 12 equal pieces (about 2.75 ounces each, more or less), and form the dough into round balls by cupping your hand around the dough and spinning into a round shape, pinching the bottom to seal any rough edges, if needed (video tutorial here right at minute marker 2:20).
- Place the rolls in a lightly greased 9X13-inch pan or on a lightly greased half sheet pan. Space the rolls about 1/2 to 1-inch apart.
- Cover the rolls loosely with a lightweight towel or greased plastic wrap and let the rolls rise until very puffy and nearly doubled, about 45 minutes to 1 hour.
- While the rolls rise, preheat the oven to 400 degrees F (if your oven bakes hot, preheat to 375 degrees F.) Bake for 17 to 20 minutes until golden and baked through.
- Immediately out of the oven, brush with butter, if desired. Serve warm or at room temperature.
Notes
Recommended Products

Recipe Source: Mel’s Kitchen Cafe
Recipe originally published 12/2007; updated with new pictures, step-by-step tutorial, and recipe notes.
I have never had much success with making bread until today , so thrilled with the outcome I nearly cried lol , thankyou for this recipe I have it stored in my best recipe book now
Using your recipe plus adding cheddar cheese ( per my kid’s request). They turned out great!! Thank you for the easy to follow recipe !!
Hello Mel, I look forward to trying this recipe! I live in Australia and we use the metric system; are you able to give the quantities in ml and grams? I don’t know how much 3/4 of a tablespoon of yeast is, for example. I would very much appreciate it if you were able to do this.
Warm regards Gen.
Gen I am in Australia too and I just use one sachet of dry yeast and it works 🙂
I do a lot of cooking but admit to being intimidated by bread! You have inspired me to try this recipe this weekend since you wrote that it was your 1st roll success!
Thank you!
Good luck, Ana! You’ll do great!
These rolls turned out perfectly! I have made them twice so far, and made a batch for my neighbour! Thank you for this awesome recipe!
Thank you!!! This was the first bread recipe I’ve ever made successfully. Delicious as prepared according to your directions.
This has to be the best bread roll recipe ever. I’m a complete bread making noob, and, using just ordinary plain flour, and a hand mixer with dough hooks managed to pull off perfect bread rolls.
I just had a second go, even better! I left them in the oven for the full 17 minutes and used bread flour. Just perfection, and I’m worried I’ll end up eating the lot in one sitting now
Mel, I’ve made these a bunch of times but this time decided to triple it and just make a couple loaves of bread and rolls. Let me tell you…. turned out to be best sandwich bread I’ve ever had!! I did about 1/2 white flour and 1/2 white whole wheat. It was sooo good. Can’t tell you enough how much I love your recipes!
That’s awesome!!
How long did you bake the loaves?
Best and easiest rolls!!
These were a huge hit at Easter dinner. Great instructions.
The perfect bread roll recipe…weeped with joy! Thank you so much!
I have been away from bread making for many years, but decided to give it a go again. I wanted to start out slowly, since it has been quite a while. The first time out, these came out beautifully! They are now the base for some delish roasted garlic rolls to go with spagetti, everything rolls for general consumption and slammed and awesome sesame rolls for burgers! Thanks Tons!
Way to go, Jen!
super yummy
Mel,
I found your blog searching for sandwich bread recipes. I made these rolls to have with dinner tonight, and one of my most happiest moments ever was when I heard, “Mom, these rolls are awesome!” Mel, thank you! I have never been successful at anything bread-related, but not only have I made these French bread rolls, but I have made your white wheat bread twice (by hand) and it is loved by all! I love everything I am learning from you. I am so thankful for you and what you have enabled me to do for my family!
I’m so proud of you, Jean!
Mel-I just made your French bread rolls into heart shaped rolls for dinner tonight and they turned out great! I am going to try to make heart shaped calzones for Valentine’s Day dinner. Do you think your French bread roll dough or your quick pizza dough would be better for calzones? Thanks! I tagged you on instagram, so you may see the heart rolls! Thanks for all the great inspiration!
I always use the quick pizza dough for calzones! Love the idea of heart-shaped calzones for Vday!
Thank you for the quick response! I was hoping you would say that – that makes it easier to do when I get home from work. I also love the idea of heart-shaped calzones – fingers crossed that I can get that idea to fruition! They look lovely inside my head! 🙂 Thanks again!
Any suggestions for shaping then into a longer roll, maybe 5″? I’ve only ever made rolls or hamburger buns.
Thanks for your help and recipe!
Sure, I do that all the time. I take probably a 4- or 5-ounce portion of dough, flatten it slightly, and then roll it up and shape it into a thin “loaf” for lack of a better description.
I made these Saturday, along with a soup recipe. My husband really liked the rolls, as did the rest of us, however, just 12 rolls was quite a bit of work for one meal. Since I only had 2, someone (husband, or 2 grown sons, ate more than their share!)
Hi Mel
I look forward to making these as the pizza sliders. Is there any way you could convert it to grams, or even ounces? Thanks in advance.
Would this recipe work if I subbed the all purpose flour for gluten-free version? My boys now need to remove gluten from their diets & so need an essy go-to recipe to provide additive free bread.
Unfortunately I don’t think it’s that simple. I don’t know for sure, but several people have commented on other yeast bread recipes that subbing in gluten-free flour was kind of a disaster. You’d probably be better off looking for a recipe specifically developed for gluten-free rolls. Good luck!
Clever as i am i attempted with gluten free all purpose flour. While kneeding i was wondering if anyone had left a comment abt a gluten free version. The dough is weird. Just letting it rest to rise. Ill update later on how it all went. Fingers crossed it will at least be edible haha 😀
So i was surprised the first rise actually worked…second not so much. They have rosen further in the oven. They look like a breadsize meringue. Super white and weird. However even if i wont make them again i will eat them. Not as bad as they look. But yeah… nowhere near the original recipe. These ones you cannot show to annyone lol. Just hide and eat…and dont reattempt
it was amazing the bread was fluffy and i do recommend to add a bit more sugar. i put egg wash on it before baking and it came ot crispy on top and so fluffy in the inside
Hi THANKS for the delicious French Bread Roll recipe, I made a double batch and they came out perfect like you said, and soft, I will certainly be making these on a regular basis, like this or as a long roll or hamburger roll, so simple. I also make the crepe recipe to roll up with cold meats and asparagus etc and they were a big hit!!
Wow. New recipe for Thanksgiving and it didn’t disappoint. The rolls were soft and had good flavor. My sisters think I should open a restaurant since I’ve become a exceptional cook (thanks to you). PS I’m a visual person, I sure do appreciate all your videos and pictures. Please keep them coming.
I made an extra batch of these to freeze. After first rise and shaping into rolls, I placed on parchment lined sheet pan, covered with clingfilm and froze until solid. Then wrapped them by 6.
To bake place on clean, lined sheet pan in aCOLD oven. Underneath put a large pan of boiling water and leave oven closed for 20 minutes.( do not open during this time) Remove the pot of water and turn on oven to suggested temp. You will have to watch them to get a time for next batch. As you cook from cold oven the normal cooking length is different.
They rose and baked up beautifully. In no way could I tell they had been frozen.
I made a single batch and had a friend over. We demolished them before they cooled and I had to start over. Double batch the second time. They. Are. Amazing!
Unfortunately the first time I made these I preset my oven on broil instead of bake, oops . That being said I’m going to give it another go for my Thanksgiving rolls.
What do you think about ading steam while cooking? Like traditional French bread is baked. I kind of want to try it and want to know if you have tried this method with these particular rolls.
Thanks!
I think it’s a great idea! Usually I toss a few ice cubes onto the bottom of the hot oven right as I put the rolls in to bake.
Made these tonight! Only had to use 3 cups and almost another 2/3rd cup of flour. They turned out PERFECTLY PERFECT!! I am going to add mire salt n sugar on Thanksgiving as needs a bit more ‘taste’ but my husband loved them. ❤️❤️❤️❤️❤️
I just made these today! Super easy and didn’t take long at all. Family loves them.
I made this dough and shaped into knots, fantastic!!! Super easy recipe, thanks!!
Love these rolls! I’ve made them several times over the past month. Quick question: How early could I make these ahead and have them still be fresh? I’m thinking of making them the night before my daughter’s baptism-dinner but want them to be soft and fresh and not stale. I’m not sure I’ll have time to make them the day of.
I think the night before would be totally fine as long as they are completely cooled and kept well-covered overnight (don’t put the baked rolls in the fridge!). You could also make the dough, shape it, put it on the baking sheet, cover and then bake the day of the baptism!
Hi Mel, this is a lame question but I’m out of plastic wrap and making these right now. Cover with a kitchen towel or just leave uncovered to rise do you think? I looove these rolls.
Yes, you can definitely cover with a kitchen towel (better than leaving them uncovered).
They just cooled enough to eat and they’re awesome! So easy and great step by step instructions. Thank you!
These rolls are amazing! I like to make a double batch and freeze them. My husband and kids use them to make chicken sandwiches for lunch. Thanks for sharing!
These were great! Thank you!
I made the rolls for a church dinner. I made 2 triple batches. They turned out amazing! ( used a huge commercial Hobart mixer) They rose beautifully and baked up so pretty. Everyone loved them. Thank you!
That’s a ton of rolls – awesome!
These are now so popular at church that I’m making them every Wednesday night for our fellowship dinner. I’m making the recipe x7 for 84. I make them all in one batch and bake 3 pans of 28. The whole church smells like a bakery. Thanks again!!
Amazing!
What rack do we use for these buns?
I just keep the rack in the middle position.
I’m wanting to make these buns in 8 – 12’s using a baking sheet. There should be room between them. Would the time being the same?
Yes, most likely.
Making these today for sloppy joes. This is my go to roll recipe for everything from turkey burgers to Thanksgiving dinner. I’ve been making rolls for 5 years now thanks to Mel and her tutorials. There is nothing like homemade rolls!
Hi Mel, I’ve baked these really yummy french bread rolls many times. However, they doesn’t rise as beautifully as yours. Can you please advise me what could have went wrong? I have also tried adding nuts and raisins to these bread rolls but find that they didn’t quite compliment each other. Do you have any bread rolls recipe you can share whereby I can add in nuts and dried fruits? Thanks.
Sometimes if a bread or roll dough is over floured, it won’t rise as well, so you might try adding just a bit less flour. That sometimes does the trick to allow dough to rise really well (as well as making sure the yeast isn’t expired). You know, I haven’t added fruits or nuts to any of the bread recipes on my site – sorry I’m not more help! My aunt, however, adds dried fruit to this no-knead bread and it is delicious: https://www.melskitchencafe.com/crusty-artisan-bread/
Do you back a pan of 12 for the same amount of time you bake the sheet with 24 on it? Mine were perfectly golden but still doughy on the inside.
If they are baked in a 9X13-inch pan (without very much room in between rolls) then yes, you might need to add time. A lot depends on the oven. If I use convection bake, they usually bake in the same amount of time, but if not, I have to add time.
I was looking for a simple dough. I made a double batch of the dough & used part of it to make the rolls & part of it to make into a cinnamon twist bread. Everything is delicious, nice crust, and well textured. I used organic unbleached flour & about one-third white whole wheat with Saf Instant Yeast.
This can be used for so many things & it is so easy to make in my old KitchenAid mixer. I’ll be making hamburger & hotdog rolls soon. These will be such an improvement!
Love this recipe! Don’t buy hamburger buns any more.
So excited to try this, I am an avid bread maker and bread lover (hence the size of my hips!) Anyway I am cooking for a Laurel Leadership Girls Camp next week, so I will be making these on repeat so we can use them for the barbecued pulled pork recipe of yours we so dearly love!!!
Wish me luck!
That’s the perfect combo! Good luck cooking for a crowd!
When I made these rolls, I got through all the steps and the dough rose. But I never seem to make it through the baking stage. They look good and puffy in the oven but when I take them out they are rock hard they turn into biscuits… Please help
Is there any chance they are over rising before going in the oven and then deflating while baking?
These are my go-to rolls! They are easy to make and freeze & reheat really well!
I am so grateful for the step-by-step pictures. I used to be scared of making my own bread and rolls but Mel has revolutionized my baking. <- not an understatement
I do have a few tips that might help others:
1) Add the salt after you've added the first cup of flour. Salt can retard the growth of yeast so I found mixtures rise better when I don't add the salt with the yeast & liquid but later with the flour.
2) If using a Kitchenaid/stand mixer, use the paddle attachment for all the mixing together and for the first few minutes of kneading. Switch to the dough hook once the dough clears the sides & feels tacky & forms a ball like Mel describes.
3) Make sure not to go over a "2" speed when kneading so your motor doesn't strain.
4) Using a Kitchenaid will help you not over-flour your dough. I've found when working with my hands, I have to keep adding flour so the dough doesn't keep sticking all over my hands and my counter. With a mixer, I can get the dough just like Mel describes and not end up using two more cups of flour than the recipe states (which usually happened pre-KA).
5) If using yeast that has been kept in the freezer, let it come to room temperature first before adding it. I discovered this making Mel's Baked Doughnuts when my dough took a long time to do its first rise!
Hi Mel! I love these rolls and have made them three weeks in a row. My girls love to help me weight the pieces. I can’t wait to try a whole wheat version. Have you made the dough ahead of time or do you always use it same day? Thanks for a great site!
I’ve made the rolls, shaped them and then covered and refrigerated overnight – it works great! I just take them out in time to come to room temp and rise before baking.
This is a really nice recipe! I usually make my grandmother’s recipe, but hers calls for milk and I was almost out, so I looked for one with water and landed on yours. The rolls were tasty, light and fluffy. Perfect with Chicken Pot Pie and salad for a nice “comfort food” meal. Thanks!
Mel – hope I am not being a pest but maybe you can help. You wrote that you would be doing a comparison between Bosch Universal and Kitchenaid in this weeks blog post. I just received this weeks blog and not sure where I should look for this write up
With thanks – Midge
Hey Midge – you aren’t a pest at all! That post about KitchenAid vs Bosch is going live Monday on the blog!
Thanks Mel – so looking forward to it. Have a great weekend.
Midge
Just made these for Easter and they were sooooo good! I only got one so I’m making another double batch now 😀 I served ours with strawberry honey butter and they were the bomb! Thanks for a great recipe!!! <3
Hi Mel.
I have been not only following you for almost 1.5 years, but also cooking your recipes every night. Yup, we are a “Mel Household”.
I’ve done this roll many many times, but i continue to struggle with it, because even though they taste great (as rolls and with the other recipes like the braid, etc), they just don’t look like yours at all. it looks more like air bubbles that popped…soo annoying.
Anyway, I have tried more flour, less flour, the only thing i haven’t tried is different flour.
When using the mixer I’ve tried putting all water first, then adding flour as needed (which ends up using way more flour than you call for).
When using the food processor with a bread blade, i tried, putting all dry ingredients, then the liquids, slowly, until i get the desired consistency.
– Since you are a costco fan, do you buy their huge sacks of all-purpose flour?
– Any other thing you can think of, that is making my bread not be pretty?
Thanks in advance.
So are the rolls flattening? And if so, are they flattening while rising or baking? What is the texture of the dough like when you take it out of the mixer to rise? Does it leave a lot of residue on your fingers or is it more stiff? I don’t buy the Costco bread flour. I usually use Wheat Montana unbleached all-purpose flour.
Sorry, I didn’t notice you responded. yay. So, here it goes:
– They are not flattening. At the beggining they were till i realized they needed more flour…over 1-2 cups…which is why i stopped using the kitchen aid, and started using the Ninja processor with the bread blade (a semi-poor version of the bosch? lol)
– I’ve been playing with both leaving it stickier, or stiff. Though now that I am writting back, i am wondering if i am not kneading for long enough. the ninja stops every 3 mins with the bread blade, so i do two rounds…may be i need to do 3.
– No costco flour, ok. I will try another. Question though, what if I use bread flour instead? I am not sure about the difference (vital gluten perhaps?)
anyway, thanks for responding. you’ve made my day. 🙂
CrazyColumbian, You are making me crazy also and I can’t stand it so am jumping in with my 2 cents 🙂 !
If you have no physical issues with hands/arms/wrists, skip the machine and make this by hand until you get what the dough should look and feel like and rolls with the texture you are looking for. This is a nice easy dough to work with by hand. Don’t fret on the type flour or how much. Review Mel’s picture tutorial below the recipe. Start with the liquid and add the flour 1/2 cup at a time stirring until you can’t stir and then turn it out on a floured surface and start hand kneading. Take your time and enjoy the process :). Maybe make 1/2 the recipe until you are comfortable with results.
As you are kneading flour in and you want to knead each addition until your hands are sticky, add the next half cup and knead that in. When the dough “cleans your hands” and is soft and just slightly sticky, knead for another minute and then stop. You do not need to track how much flour. You are going for the correct consistency for the amount of liquid and YOUR flour.
I happen to use WheatMontana flour also as I live in Montana. It is a hard wheat flour, high protein and it takes more liquid to flour than something like a store brand (this translates to less flour overall if you start with the liquid in the recipe). BUT, this recipe works with store white, bread flour when you go for texture and feel of the dough.
Hope you have fun and make wonderful rolls!
Liz’s comment is definitely helpful! Making the rolls by hand might be the secret to learning the perfect texture for the rolls. In answer to your question, yes, bread flour has more gluten, and yes, you can definitely use it for this recipe. I wish we had a way for you to post a picture and then I could see what the rolls are looking like as you make/bake them. Feel free to ask any other questions!
Happy Easter Mel to you and your family! I made the french bread rolls yesterday and actually forgot about them on the second rise and they became huge, they baked up fine so I will use them for hamburger buns. I made another batch this morning for dinner and they are wonderful! Easter dinner is going to be your maple glazed pork tenderloin, mashed potatoes/gravy, corn, green bean casserole, cranberries, amazing romaine salad, french bread rolls and lemon curd cheesecake; I rarely buy desserts because homemade is usually so much better but this is from Costco, they were giving out samples the other day and it is sooo good. Thanks for all that you do and all your wonderful recipes!