Easy No-Knead Peasant Bread
This easy no-knead peasant bread is a game changer! Incredibly simple to make, it is soft, fluffy, and so delicious. We can’t stop making it!
I have been so excited to get this bread recipe in front of you. I’m not even exaggerating, not one little bit, when I say it has revolutionized homemade bread around here.
I’ve made it (easily) at least ten times in the last month. I’ve served it to company. Brought it to friends. Made it just because I wanted to eat homemade bread at 1:28 p.m. It is amazing.

No-Knead Bread is Not New
The no-knead bread trend is not new by any means. Wet, loose doughs formed into shaggy loaves and baked (most often) in a Dutch oven have been around a long time.
I have several recipes like that on my website already, like this artisan no-knead bread and this fantastic rustic crusty bread.
But this peasant bread is different and amazing enough to occupy its own spot here on the blog. For starters:
- it’s easier and a bit more straightforward than other no-knead bread recipes
- you don’t need a Dutch oven or baking stone for baking
- it can be baked in a variety of every day baking pans
- it doesn’t need long rising times
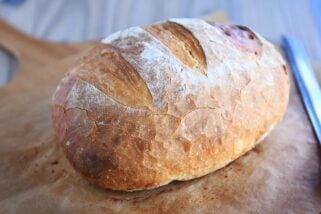
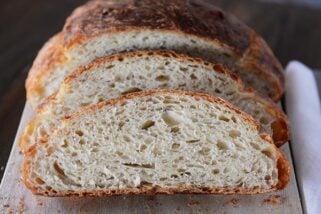
The crumb is soft and fluffy, and the crust is golden with just the perfect amount of bite and crustiness without cutting up the roof of your mouth.

How to Make Peasant Bread
In a large bowl, whisk together the flour, sugar, salt, and yeast. Add the water, and stir until no dry streaks remain.
It’s going to form a shaggy mass, and it’s going to be sticky. That’s exactly how you want it! Resist the urge to add more flour.

Grabbing a pinch of dough will leave a fair amount of sticky dough residue on your fingers.
Keeping the dough on the wet side of things is what allows us to skip any kneading and still end up with soft, fluffy bread.

Leave the dough right there in the bowl, cover the bowl, and let rise until doubled.
Once it is super puffy, grab a rubber spatula and start scraping the risen dough away from the sides of the bowl to form a messy ball in the center of the bowl.


How to Shape Soft Sticky Dough
Now for the fun part.
It can be a bit messy trying to shape soft, sticky dough like this into a loaf shape. A few tips:
- remember that it’s supposed to be kind of rustic, so ditch the idea of a perfectly shaped loaf
- grease your hands (cooking spray or oil); it makes a world of difference
- handle the dough quickly and efficiently – manhandling the dough will result in an epic dough bomb and lots of frustration
Here’s a quick video of how I shape this dough into a circle. I’m just lifting, rolling, and tucking a few times until it forms a pretty decent round shape.
Notice that my hands still end up with a bit of dough on them at the end. Feel free to use more cooking spray or oil, if needed. But don’t stress! It’s all part of the journey.
Best Pans to Use for Peasant Bread
The original peasant bread recipe calls for baking in oven-safe bowls (like Pyrex or others). Based on a traumatic experience in my past when my Pyrex bowls shattered coming out of the oven, I was determined to find a non-bowl solution for baking this bread.
I’m not saying you shouldn’t use a bowl for baking, I’m just letting you know I’ve come up with several fantastic alternatives that you probably already have in your kitchen.
After baking this bread in a Dutch oven, on a baking stone, in a round cake pan, and several other pan types, I’ve settled on the baking pan that works amazingly well and produces a loaf that is PERFECT.
A 9-inch pie plate.

The sides of the pie plate help stabilize the shape of the loaf as it rises and helps prevent the dough from spreading out and flattening.
The peasant bread bakes up beautifully in a 9-inch pie plate! It’s what I use 99% of the time when I bake this bread. And in case I haven’t made it abundantly clear: I have made this bread so.many.times. Like, you can really trust me on this one.

A metal pie plate works just fine, too. In fact, it actually gives a crustier exterior to the bread than a glass pie plate.
And, this bread bakes very well in a loaf pan, too. When shaping, go for more of a rectangle shape (but don’t over think it). Plop the loaf in a greased loaf pan, and get ready for some of the best bread of your life.

Best Bread Ever
I cannot overstate how amazing this easy, no knead peasant bread is. I want to beg, plead, bribe, force you to make it right this minute!
You’ll get all the rock star points for homemade bread with hardly any work. And you aren’t sacrificing anything in the name of it being an ultra-easy recipe. It is straight up some of the most delicious homemade bread ever.
I find myself turning to this bread recipe constantly now that I know it exists. It’s become our go-to bread for just about everything. Perfect for beginner and expert bread makers alike, please promise me you’ll make it soon!

One Year Ago: Mel’s Holiday Gift Guide: His + Hers
Two Years Ago: Perfect Homemade Caramel Apples
Three Years Ago: Perfect Small Batch Cinnamon Rolls
Four Years Ago: Easy Homemade French Bread
Five Years Ago: Harvest Pasta Sauce {Trader Joe’s Copycat}
Six Years Ago: Peanut Butter Cup Cheesecake with Chocolate Cookie Crust
Seven Years Ago: Gourmet Caramel Apples + Free Printable Handout
Eight Years Ago: Black Bean and Butternut Enchilada Skillet
Nine Years Ago: Peanut Butter Oatmeal Chocolate Chip Cookies
Ten Years Ago: Pumpkin Cookies with Caramel Frosting

Easy No-Knead Peasant Bread
Ingredients
- 4 cups (568 g) all-purpose flour (see note)
- 1 ½ teaspoons salt (see note)
- 2 teaspoons granulated sugar
- 1 tablespoon instant yeast (see note)
- 2 cups warm water
Instructions
- In a large bowl, add the flour, salt, sugar, and yeast. Whisk to combine. Add the water and mix with a rubber spatula or wooden spoon until the ingredients form a shaggy, sticky ball and no dry streaks remain.
- Cover the bowl and let the dough rise until doubled, about 1 to 1 1/2 hours.
- Place an oven rack in the center position. Preheat the oven to 425 degrees F. Generously grease a 9-inch pie plate or 8 1/2-by-4 1/2-inch loaf pan with cooking spray. (See note for other pan sizes/options.)
- Scrape the dough away from the sides of the bowl with a rubber spatula, forming a rough ball in the center of the bowl. Lightly grease your hands with cooking spray or oil and shape the dough into a circle loaf shape (or a rectangle loaf shape if using a loaf pan), tucking edges under. Place in the prepared pan. The loaf will not be completely smooth and may look a bit rough in shape, that's ok!
- Let the dough rest, uncovered, for 15-20 minutes until slightly puffy.
- Bake for 15 minutes. Reduce the heat to 375 degrees F and continue to bake for 15-20 minutes until golden.
Notes
Recommended Products


Recipe Source: adapted slightly from a recipe, Katherine B., a longtime reader sent me (thanks, Kat!) – originally from this recipe at Food52 and adding a link to Alexandra Stafford’s blog with lots of variations (I adapted it to use a pie plate or loaf pan for baking, and increased the flour and yeast amounts slightly)
I made this bread on Sunday. The next day my non baking-cooking husband wanted to make it again. I directed him but did not do any actual work. It turned out beautifully both times. We LOVE this easy to make bread. We used the pie pan both times. Next time, I think I will try it in the loaf pan. Thanks for the recipe.
I don’t know why I waited so long to try this one. So easy and so delicious!!
Made this to go along with soup and salad. My only regret is that I didn’t double it. As soon as my kids and husband started eating it, they complimented me on it. I think I will be teaching my 12 year old how to make it.
Can’t say I’ll be making this again – followed recipe to a T and the inside was still raw with the outside being a pale underbaked mess. Tasted fine, but I’ll be using a different recipe to be sure.
Was your oven working, Emma? I made this for the first time today, and the outside of the loaf was golden brown after the first 15 minutes at 425 degrees. I had one batch in a 9 inch metal pie plate, and another batch in a metal 4 x 13 inch Pullman loaf pan. I tried pulling the rectangular loaf out after 10 minutes at 375 degrees, but it still looked pale. So I left both loaves in for the full 20 minutes at 375, and they’re done. Thanks for the recipe, Mel! My teenager was asking when I was going to make more bread like I did in March of 2020, and this recipe was quick!
Hi Emma, sorry this didn’t work out for you. I think baking for longer and/or increasing your oven temperature should really help the outcome
Made this recipe the other day, added about 3-4 tablespoons of Herbs de Provence seasoning. It was absolutely amazing. Can’t wait to make it again. Super easy to make, ended up making it in a Dutch Oven, as I already had it out. Going to try cooking it in the pie pan next time.
Make this weekly, so good and so easy!
Love your recipes! I have a question. I haven’t made this yet but was wondering if I could put it in the fridge overnight to rise? Then in the morning take out and would I bake from cold or let it come to room temp first…. hoping you can help. Thanks
Hi Juliette, sorry for the delay…I haven’t tried an overnight rise for this bread, but it’s definitely worth a try. I would probably take it out of the fridge and let it rest for 20-30 minutes before baking.
The crust looked just like yours but the inside was completely raw and rose about 2”
from the pie plate. Internal temperature was 200°F which is normally what I bake my bread to, but this one leaves me wondering what happened? I think it just really needs kneading to develop gluten structure? So sad I was really looking forward to having an easy recipe in my repertoire.
Hi Jen, sorry this didn’t work out great for you. Because the dough is much wetter than typical bread dough, you may need to bake it longer and not rely on the internal temperature for doneness. Also, try adding 1/4-1/3 cup extra flour if it didn’t rise well.
After reading all the comments and not seeing anything on making this bread into rolls; I divided it up into 16 muffin cups and baked it at 425 for 5 minutes and then 375 for 10 minutes. Although it was still very good they were fairly dense and not airy like when I make into a loaf of bread. Probably won’t do it again as I prefer the lighter bread. Still love this recipe and I make a loaf or 2 every week. Thanks Mel
I made this recipe 2 days ago and it came out just as advertised. Thanks! I’m sending a loaf made this morning to my sister, who is sick, along with a hearty pot of chicken soup.
HI- I’m making this for the first time. My oven has a convection setting- which I rarely use. Do you have an opinion of baking this on regular or convection setting? and if it affects the texture, etc.? Thanks in advance!
Hi Michele, I’ve baked this on regular bake and convect bake and I don’t see a noticeable difference, so I’d suggest using the feature you’re most comfortable with!
I finally tried this tonight to go with soup. I didn’t think it would be much different from the rustic crusty bread, but you’re right, it is different enough to have its own post. I made it in a load pan, which made for easy cutting. It worked perfectly for me and the whole loaf was gone in one sitting. I told my kids it was called peasant bread and they joked it was fit for a king so the name was misleading. We loved it and will definitely be making this again.
Super Easy and what a great way to have homemade bread with Soup for dinner. Highly Recommend
Made this, followed the directions exactly and it turned out perfectly. Even watching the video several times didn’t help me– it was kind of a plop into the greased glass pie plate. But no matter! It’s delicious! And, yes, made the most wonderful toast! Thanks for this recipe–I had stopped at my local bakery for bread and they were closed for New Year’s Eve…I had just read the post showing this recipe as a reader favorite and Mel’s favorite!!
This is my new go-to bread recipe! I love that it doesn’t take all day to rise so I don’t need to think about it until the afternoon. I have used all white flour, and 1/2 white, 1/2 white whole wheat – bother delicious! I have made it in a pie pan and a loaf pan. And I just scrape it from the bowl into the pan – no mess; it shapes itself based on the shape of the pan. You can’t go wrong with this bread!
We finally tried this recipe and loved it! It was so simple and delicious! My teen daughter made it and the rest of the family was very impressed!
I have had such terrible results with most bread that I hesitated to try this. If it sounds too good to be true . . . But this was seriously the easiest and tastiest bread I have ever made. Life changing is not a stretch. Thank you
I have made this with different instructions:mix the water, yeast and sugar, set it aside for 10 to 16 minutes. Stir together the salt and flour. You can reduce salt to a low as half a tsp. if you prefer low sodium. When the yeast is foamy, stir it into the flour. cover an let it rise. From here the directions are the same. I’ve baked this in a variety of pyrex bowls with no problems. Metal loaf pans do a good job too.
P.S. I used a 2 quart bowl or 2 one quart bowls. The same for loaf pans. If the bottom isn’t brown enough, take that loaf out of the pan/bowl and place it direct on the oven rack and bake 5 more minutes.
We LOVE this bread! Have used the pie pan and a regular loaf pan. It’s a little messy, but so worth it!
Love all your recipes, Mel! I’ve tried this one twice now and each time the bread turns out dense and heavy. What could be causing this?
Hi Abby – is the bread noticeably rising (getting puffy) before you shape it?
I had the same experience. I used some whole wheat flour, less than half. Bread has good flavor, but very dense, no be holes. It did raise up puffy.
Hi, I used bread flour and came out very weak. I added 1/2 cup of flour and it improved a little. 🙁
I have made this bread for about 10 years i found it on my 1st pintrest. You can also melt some butter with minced garlic and coat the bread with it. It is delicious. Also we have used it as a bread bowl for chowders
Do you coat it with butter before or after baking. Thx.
First time making this bread, I was so amazed just how easy it was for me to make, as I have nerve damage in my hands, so kneading bread is hard for me. Both loaves came out so wonderful that I bought a 10 kg/22 lb bag of flour. Making more today and will be giving some away as winter holiday gifts. Thinking of adding some dried herbs to the dough and will see what mix works best. Thanks again.
Lois, try brushing the loaf with beaten egg, then sprinkle it with sesame seeds or Poppy seeds. I think everything but the bagel seasoning would by tasty too.( Do this after the second rise.)
This is the easiest and best tasting bread I have ever made. I find myself making a fresh loaf every week> Thanks
Hi Mel
I have been baking bread for some time now… mostly sourdough. Since trying out this recipe for the first time my sourdough started has been standing abandoned in the fridge. This is the easiest, best, most delicious bread recipe ever…. I will never look at another bread recipe again. We can’t wait for it to get out of the oven… nor can we get enough… it normally disappears within a day. Thank you so much for a true winner of a bread.
Mel, this bread is wonderful! My husband has made it twice and I love it!!! Thanks for such an easy recipe.
Merry Christmas
I’m so excited to try this bread! Does it freeze well? My apologies if I missed that info somewhere.
Yes, the baked bread freezes great.
“Is it Mel’s?!” my 8 year old asks, and to which I nod. “Ohhhh, she’s SO good!”
Thanks for another great recipe. We made this two days in a row, added garlic and Parmesan the tonight and it was delectable (even with me undercooking it )!
Haha, you two are the cutest!
I’ve made this bread twice this week and it is so good and so easy!!! Thanks for another great recipe!!
Hello! I am trying to find a bread recipe for french toast and wondered if you would recommend this one? I was trying to avoid long rise times but wasn’t sure if the bread was sweet enough. If I did try this recipe for french toast would it work to add some kind of cinnamon swirl mixture to it before baking?
Yes! This bread makes delicious french toast. The dough might be a bit too loose for a cinnamon swirl, but you could experiment!
Have made it twice once part wheat flour, once white all bread flour adding brown sugar raisins and cinnamon. I love it fresh and also toasted. I can eat nearly a whole loaf on my own and I weigh just 100 lbs.on a heavy day! Thanks for sharing! My brother shared with me!
My first truly successful yeast bread! So simple and easy to follow instructions, and even better my family loved every crumb!! Thanks Mel for another winner!
Sooooooo good and incredibly easy!!!! Thanks Mel! Another winner!! Thank you for insisting I try it! It really is delicious!
Sooooooo good and incredibly easy!!!! Thanks Mel! Another winner!!
For those of you questioning whether the amount of flour is correct…..IT IS! I’ve made this recipe with 568 grams of flour at least 20 times since Mel posted it and it comes out perfect every time! Do not question MEL! haha but seriously!
What are the weights for the other ingredients besides flour?
This bread is so easy and delicious. I like to make it during my kids quiet time. We’ve used it for toast, breakfast sandwiches, a grilled ham and cheese and for Thanksgiving for leftover turkey sandwiches which were so yummy!
I almost didn’t leave a comment…simply, it’s everything you already said. I must have made 6 loaves in the last week. It’s a winner, no fail recipe. Thank you for sharing and insisting we try it.
This bread was perfect for a pre-Thanksgiving family soup night. I doubled the recipe and sub’d half of the AP flour for whole wheat… made it perfectly hearty. Crowd loved it.
Wonderful! I oiled the outside of the bread just before baking. Gave it a nice rich color & crust.
First time made this bread and it was easy and delicious .will make it again .
So, so good and easy! I even served this to guests and they, of course, wanted the recipe. This bread also makes the best toast you’ll ever have!!
I’ve had fantastic results using the recipe as stated with 568 grams of flour. It turns out perfectly every time. A foolproof recipe.
Yikes – unless this is a tweak on the recipe, the amount of flour by weight is incorrect. The source recipe -Alexandra’s Kitchen-states 512 grams. This recipe says 568 grams, not an insignificant amount. My dough didn’t seem overly wet so that may be the reason.
Dough is currently on its first rise. I’ll complete the process and see what results I get.
I just used the original recipe as a starting point, but yes, I increase the flour a little bit because I had the best results that way.
Sorry. The flour amount is correct in cups but the amount in grams is incorrect….I should have checked.
I test all my recipes using 142 grams per cup of flour so the gram amount is correct based on how I create/test recipes. 🙂
Are you sure that the flour amount is correct? I don’t think so.
This is the easiest and best bread recipe that works every time. I made it with bread dough and it worked as well as the 50/50 white/wheat flour. I make at least 1 loaf a week. Thx
I made it with all purpose flour. It is good but not as sturdy as bread make with bread flour
I’m in trouble…my family now wants it daily!!! So great!
This bread checks all the boxes – fast, easy, very few dishes, and DELICIOUS!!